BAKING PARTNERS – RIGO JANCSI

This month challenge (since this is the month of Valentine’s Day and love) is to make a Hungarian pastry called Rigo JancsiA popular Austria-Hungary dessert is named after Rigó Jancsi (1858–1927), a famous Hungarian Gypsy violinist who seduced and married Clara Ward, Princess de Caraman-Chimay, the only daughter of American millionaire E. B. Ward and the wife of Belgian Prince de Caraman-Chimay. Their love story never ended happily ever after though. This is actually a chocolate sponge cake filled with chocolate mousse, and topped with chocolate ganache.  I added some fresh raspberries and and a raspberry coulee.

This really is a time taking effort, you need at a least a day to make it but it worth all effort. This recipe is adapted from Joe pastry and stabilized chocolate mousse inspired  from here. This recipe makes about six 2 ½ inch pieces.

For the sponge cake:
2 ½ tablespoon (24g)  all-purpose flour
1 tablespoons (6g)  cocoa powder
5 tablespoon (71g) butter
2 ounces  (57g) semisweet chocolate, chopped fine
3 eggs, room temperature and separated
3 tablespoon (45g)  sugar
1/8 teaspoon salt
For the chocolate glaze:
3 ounces (84g)bittersweet chocolate, chopped
1 tablespoon(26g)  butter
1 tablespoon (27g)  light corn syrup
1/4 teaspoon vanilla extract
For the filling:
3/4 tablespoons (5g)  cocoa powder
3 tablespoon  powdered sugar
3 ounces semisweet chocolate, chopped fine
¾ cup heavy cream + 1 tablespoon
¼ teaspoon rum extract( other wise use 3/4 tablespoon  rum)
¾ teaspoon gelatin
1 tablespoon cold water
1 tablespoon boiling water
1/2 teaspoon vanilla extract
For the assembly:
Apricot glaze
1 tablespoon apricot jam
¼ cup water
  • Preheat your oven to 350. Line a 8  inch square pan with parchment paper and brush it with melted butter.
  • For the cake: Whisk together the cocoa powder and flour. 
  • Add the chocolate pieces and butter in a bowl and stir to melt, apply ten-second bursts of heat as necessary. When the mixture is smooth, set it aside to cool. 
  • In a mixer fitted with a whip, beat the egg yolks on high until pale and thick, about five minutes, then with the machine running add half the sugar in a stream. 
  • Continue whipping until the yolks and sugar fall from the whip in a ribbon. 
  • Transfer the yolk mixture to a medium bowl and fold in chocolate mixture. Set the bowl aside while you prepare the whites. 
  • Rinse and dry the mixer bowl and whip (If you have a second bowl like I do place it in the freezer while you do the above steps). Put the whites in the bowl and whip to soft peaks, add the salt, then add the remaining sugar in a stream. 
  • Continue to whip to the stiff peak stage, the foam should be very glossy. Stir 1/3 of the whites into the yolk mixture to lighten the batter, then fold in the rest in two additions. Lastly, fold in the flour and cocoa. 
  • Scrape the batter into the prepared pan and level it with an icing spatula. Bake for 12-15 minutes.
  • Remove the cake from the oven and loosen the edges with a knife. 
  • Lay a second sheet of parchment and a wire rack over the layer, then invert the pan. Remove the pan and — carefully — the top sheet of parchment. 
  • Cover the cake with a clean kitchen towel and another wire rack and invert the cake again. Remove the parchment from the top and allow the cake to cool.
  • When the cake is cool, cut the sheet in half. 
  • Prepare the glaze by combining all the ingredients except for the vanilla in a microwave-safe bowl. Heat the bowl for 20 seconds on full power, then apply as many ten-second bursts as needed to melt the chocolate completely, stirring in between to allow the residual heat to do most of the work. 
  • Stir in the vanilla and pour the glaze over the cake, spreading it promptly with an icing spatula. Allow the glaze to set, about 45 minutes to an hour. 
  • Divide into two equal halves, cut one half into 2 ½ inch 6 pieces. .Set the pieces aside or store in the refrigerator.
  • For the filling: melt the chocolate pieces with 1 tablespoon heavy cream in the microwave, using a 20-second burst, then as many ten-second bursts as needed until it’s completely smooth. Cool it until it’s just barely warm to the touch. 
  • Add ¾ teaspoon gelatin in 1 tablespoon cold water and set aside for 5 minutes.
  • Then add 1 tablespoon of boiling water into the gelatin. 
  • Add this liquid gelatin to  3/4 cup heavy cream along with rum extract, vanilla and whip very well. 
  • Stir together the cocoa and powdered sugar. 
  • Whip the cream mixture to just shy of soft peaks. Then, with the machine on, whip in the cocoa and sugar mixture. 
  • Add the melted chocolate all at once and quickly whip or whisk it in, whichever works better for you. 
  • Set the second cake layer on sheet of parchment paper and trim up the sides. Brush apricot glaze over it, then apply the filling, being careful to apply it evenly. 
  • Square up the corners. 
  • Gently lay the glazed top pieces on the top, then refrigerate the entire cake for at least an hour. 
  • When ready to serve, cut the cake into pieces using a sharp knife heated under hot top water. 
  • Enjoy

BAKING PARTNERS – APRICOT CHERRY GALETTE

OUR Baking partner’s challenge this month is a Galette, an open pie pastry. It was suggested by Suja of Kitchen Corner try it.  Galettes make a wonderful rustic fall fruit dessert.

APRICOT CHERRY GALETTE

1 cup All purpose flour
1/2 cup Cake Flour
1/2 cup Chilled Unsalted Butter, chopped
2 tablespoons Sugar
1/4 teaspoon Salt
4 tablespoons Ice water
3 apricots, sliced
1 cup cherries, pitted
Juice of 1 Lemon
4 tablespoons sugar
1 teaspoon vanilla
1 teaspoon cornstarch
  • In a bowl mix flour, salt and sugar. 
  • Add butter pieces to the flour. Using a pastry blender cut in through the flour, rapidly till the mixture becomes coarse. The flour will look like large flakes and the butter in the size of peas. If you are using a food processor, first pulse the flour, sugar and butter. Then add the butter and pulse for 7- 8 times till the dough attains the above mentioned texture.
  • Slowly add ice cold water, 2 tablespoons at a time and mix until the dough starts coming together, making sure that the dough masses together roughly but the butter pieces remain about the same size.
  • Transfer this onto a lightly floured work surface.
  • Flatten into a rectangle rapidly with heel of your palm. 
  • Rapidly pat and smooth the top. 
  • Lift the dough off work surface using a pastry sheet. 
  • Flip the bottom of the rectangle to the middle and the top down to cover it like an envelope.
  • Tuck the two sides towards the bottom. 
  • Cover in plastic wrap and refrigerate for half an hour to relax the gluten.

  • Meanwhile make the filling. 
  • Toss together the apricots and cherries.
  • Whisk together the sugar, cornstarch, vanilla and lemon juice.
  • Toss fruit with lemon juice mixture. Set Aside.
  • Preheat oven to 350° and line a baking sheet with parchment paper. 
  • Remove dough from the fridge and place on a lightly floured surface. 
  • Roll into 1/8 inch thick circles. You can use a plate to cut into the desired size. Fold the disk into half and gently transfer into the baking sheet. Unfold it and sprinkle a mixture of flour and sugar. You will need around two tablespoons. 
  • Arrange the fruit mixture in a single layer in the center of the disc leaving 3 inches border. 
  • Fold the edge up over the filling forming loose pleats. Gently press the pleats so that it stick together. 
  • Sprinkle with coarse sugar. 
  • Bake for 20 minutes or until the filling is bubbly and the pastry is golden brown. 
  • Remove from the oven and allow it to cool down a bit in the pan and then transfer to a wire rack.

OPERA CAKE ala BAKING PARTNERS CHALLENGE

Opera Cake is a very famous French Pastry, where almond sponge cake is soaked in coffee syrup, topped with french coffee butter cream and finally glazed with ganache.  This cake is a labor of love as it is labor intensive. It can be prepared in 3 phases. First day prepare the sponge cake, second day prepare the butter cream and coffee syrup, and third day prepare ganache, chocolate glaze and assemble the final cake. The taste is awesome and worth the effort. I skipped the ganache to make it a little lighter.

NOTE:  The key for a good opera cake is evenly soaking the cake with the coffee syrup without sogging it down.

Source : Joe Pastry

For the Almond Sponge (Joconde):
6 Egg whites @ room temperature
2 1/4 tablespoons Sugar 
8 ounces Blanched almonds 
1 cup sifted Powdered sugar
6 Large eggs 
1/2 cup + 1 tablespoon All purpose flour
3 tablespoons Clarified butter, melted
1 1/2 teaspoon Vanilla 
  • Blanch almonds. Soak almonds in hot water for 30 minutes and then peel the skin off. 
  • Dry the almonds well on a paper towel and then powder in mini food processor. 
  • All ingredients need to be at room temperature for best results.
  • Pre heat the oven 425 F. 
  • Grease a half sheet pan with melted butter. 
  • Cut parchment paper exactly to the size of the pan. If it is too long , it may make the corners jagged.
  • Aadd the eggs to mixing bowl. 
  • To the eggs add sieved powdered sugar beating until pal yellow and sugar has been incorporated well with the eggs. The mixture would have increased in volume.
  • Add the powdered almonds and all purpose flour to the egg mixture blending until smooth with no lumps.
  • While this is happening, separate the other egg whites from the yolk. The bowl has to be clean. Reserve the egg yolks for making buttercream.
  • While the almond mixture is incorporating, prepare the meringue. Beat the egg whites until it reaches soft peaks. Now add the granulated sugar and beat again until it reaches stiff peak. DO NOT over beat the meringue – it may become flat. 
  • Fold the meringue into the almond mixture taking care not to flatten the mixture. 
  • Add melted butter and vanilla to the batter.
  • Grease the parchment paper with melted butter again. 
  • Pour the batter into the pan and spread it using a spatula. Take care to spread the batter on the corners. Corners are the culprits for not getting even sized sponge. 
  • Bake the sponge for 5-7 minutes or until the sponge is springy to the touch. DO NOT over bake – cake will become hard. 
  • Turn the sponge over a parchment paper and let it cool. Once one side is cooled, turn it over and peel the parchment paper and let the other side cool completely. If you are going to freeze wrap it using a cling wrap and freeze. If you are going to prepare the cake within 2 days, then it can be covered completely and stored at room temperature.
For French Coffee Buttercream:
2 tablespoons Coffee powder 
2 teaspoons Boiling water 
6 Egg yolks 
1 cup Sugar 
1/4 cup Water
1  pound Butter 
2 teaspoons Vanilla  
  • Dissolve the coffee powder in hot water and set aside. 
  • Add the reserved egg yolks to a mixing bowl. Beat until it becomes foamy,for at least 3 minutes. 
  • While the egg yolks are mixing prepare the sugar syrup. 
  • Add sugar and water in a sauce pan. Let it reach 238 degeree F. The mixture will be bubbling hot.
  • When the sugar is hot, immediately pour the syrup into the yolk little by little. DO NOT pour it in a hurry. DO NOT let it touch the walls of the mixer – the sugar will become crystal. Pour it little by little, mixing after each addition. Whisk the egg yolk mixture until it becomes cold. This is very important for the butter cream. The egg and sugar mixture MUST BE cooled down completely. 
  • Once it is cooled, remove the whisk attachment and insert the beater attachment to the mixer. 
  • Drop the butter one cube at a time to the mixer until it is incorporated well into the egg mixture.
  • Beat the butter mixture on high speed for at least 5 minutes until it becomes fluffy and pale.
  • Add the coffee and vanilla to the mixture and beat for a minute. This will make the buttercream rich in coffee flavor.


For Ganache:
10 ounces Bittersweet Chocolate
1 cup Cream
  • Add the chocolate to a bowl. 
  • Heat cream slowly until it reaches boiling point. 
  • Pour immediately over the chocolate. 
  • Let stand for 5 minutes and then mix with a spoon until it is smooth.
  • Whisk the chocolate using a wire whisk. 
  • Let stand for 5 minutes. The ganache has to be spreadable consistency.
For Coffee flavored syrup:
1/2 cup Sugar  
1 cup Water   
3 tablespoons Instant Coffee powder
  • Take sugar and water in a pan aand let it get reduced to half the volume. Now add coffee powder and let it dissolve into the hot water. Turn off  and let it cool.
For Tempered Chocolate:
6 ounces Callebaut chocolate (gourmet chocolate)
2 tablespoons Butter   
  • Prepare 2 bowls with ice water in one and cold water in the other. 
  • Add the chocolate to a microwave safe bowl, melt it in microwave one minute at a time until it is melted completely.
  • Place it on top of the cold water bowl. The temperature would have dropped to 84 degree F. Now take the bowl out and place it on top of the hot water bowl, the temperature would have hiked to 89 degree F. 
  • Immediately mix the butter and the chocolate. 
  • Pour the tempered chocolate on top of the cake.

ASSEMBLY

  • Cut the sponge into 4 equal sized rectangles.  
  • Apply the ganache a thin layer on top of the cake board. This will make sure that the cake comes out clean, when we cut it ,without sticking to the board.  
  • Place the first rectangle on the board. 
  • Center the cake. The up side of the cake has to remain the upside of the cake as it has lot of pores which will absorb the syrup.
  • Soak the sponge completely with coffee syrup. Be liberal in soaking, as the cake has to be melt in mouth. We can also pierce the sponge with fork and soak it with coffee syrup. 
  • Apply a thick layer of coffee buttercream on top of the sponge cake. 
  • Place the second rectangle of the almond sponge cake on top of the buttercream. 
  • Soak it again with coffee syrup.
  • Spread the ganache on top of the butter cream. Use an angled spatula to cover all the corners.
  • Place the 3rd sponge cake on top of the ganache and soak again with coffee syrup.
  • Apply buttercream on top of the sponge cake.
  • Place the 4th sponge cake on top o
  • At last apply a thin layer of buttercream on the sponge. 


  • Now comes the glazing part. We can either glaze the cake with melted chocolate or we can temper the chocolate and pour it on top of the cake. I tempered the chocolate and poured it on top of the cake.
  • Let the chocolate set at room temperature for about 10 minutes. 
  • Trim the sides of the cake. You should have a neat rectangle part of the cake. 
  • Mark the cake with a sharp knife with lines. These lines will help us to cut the cake after chilling, without breaking down the cake. 
  • Chill the cake for about 3 hours or overnight. 
  • Bring the cake to room temperature and cut it. 
  • Top the cake with chocolate garnishes and serve.

SALTED CARAMEL POTS DE CREME – BAKING PARTNERS

Swathi asked me to select a recipe for this month and I’d been dying to try these, so guess what we’re baking? Yep, you guessed it, SALTED CARAMEL POTS DE CREME. I cannot tell you where I first got the recipe because all I have is a photocopied page.  The salt brings out the rich buttery flavor of these simple creamy custards.

SALTED CARAMEL POTS DE CREME
1 1/2 cups sugar
1/4 cup water
1/4 teaspoon sea salt
1 1/2 cups heavy whipping cream
1/2 cup whole milk
6 egg yolks
1 teaspoon flaked sea salt*

*I used Himalayan Pink fresh ground salt

  • Preheat oven to 325 degrees.
  • Adjust racks as necessary so your baking dish will be centered evenly in your oven.
  • Place six 6 ounce ramekins in a large baking dish. As you can see I used a combination of what I had available at the time.
  • Add enough water to the baking dish to go half way up the sides of the ramekins.
  • In a medium saucepan combine the sugar, water and 1/4 teaspoon sea salt.
  • Heat and stir until sugar is completely dissolved.
  • Increase heat to medium high and bring mixture to a rolling boil.
  • Boil for 8 minutes without stirring until you reach a deep amber color.
  • Remove from heat.
  • Whisking constantly, whisk in whipping cream and milk in a steady stream. Mixture will steam and sugar will begin to harden.
  • Return to heat cooking and whisking about 2 minutes until sugar has dissolved.
  • In a large bowl whisk egg yolks until light and foamy.
  • Slowly whisk whipping cream mixture into beaten egg yolks.
  • Pour mixture through sieve into a 4 cup spouted measuring cup.
  • Carefully pour strained mixture into ramekins.
  • Bake 40 minutes or until edges are set and centers jiggle just slightly.
  • Transfer to wire racks to cool, cooling completely.
  • Cover with saran and chill 4-24 hours.
  • Before serving sprinkle with flaked sea salt.
I have made something similar in the past if you want one not quite so rich. These Salted Caramel Cheesecakes were really good too.Every recipe we tried recently was excellent, but this dessert was melt-in-your-mouth decadently good!  It was also rich so I’m very glad I made it in these small ramekins for individual servings!
SALTED CARAMEL CHEESECAKE CUPS
CHEESECAKE
1/2 pound softened cream cheese
1/2 cup sugar
2 JUMBO eggs at room temperature
1/2 cup sour cream
CARAMEL
6 tablespoons light corn syrup
1/2 cup + 2 tablespoons sugar
3 tablespoons unsalted butter, cubed
1/2 cup heavy cream
1/2 teaspoon sea salt
  • Preheat oven to 325°.
  • In a large mixing bowl beat the cream cheese and sugar at medium speed until smooth.
  • Add eggs, beating until incorporated after each egg.
  • Beat in sour cream.
  • Pour into ramekins.
  • Set ramekins in a baking dish and add water to midway up the ramekins.
  • Place in the center of the oven and bake 15-20 minutes until the edges are set, but the centers are still jiggly.
  • Turn off oven and leave cheesecakes undisturbed for 1 hour.
  •  After 1 hour transfer ramekins to cooling rack and cool completely before covering.
  • Cover and chill cheesecakes in the refrigerator at least several hours, preferably overnight.
  • Meanwhile make the caramel.
  • In a heavy saucepan heat the corn syrup.
  • Stir in the sugar until well incorporated and cook over a moderately high heat, undisturbed until a deep amber caramel forms.
  • Turn off heat and carefully stir in butter with a long spoon.  Careful, it will spit.
  • Add the heavy cream in a thin stream, stirring constantly until smooth.
  • Add salt and blend well.
  • Transfer the caramel to a heatproof container and allow to cool.

To serve:

  • Heat caramel in small increments until desired temperature.
  • Pour a spoonful over each cheesecake and serve.

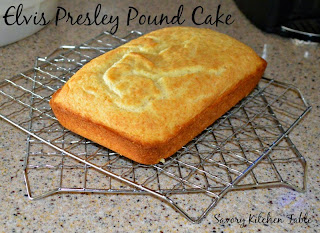
ELVIS PRESLEY POUND CAKE – BAKING PARTNERS

This month’s baking partner’s challenge is to make pound cake. I made lemon pound cake with an apricot pineapple filling and an orange glaze.

This recipe makes 1 loaf, but if you want to use a Bundt pan, double the recipe.  Make sure this cake bakes in a cold oven,  DO NOT PREHEAT OVEN.

Active Time: 20 min
Total Time: 3 1/2 hr (includes cooling)
from Gourmet | September 2005

ELVIS PRESLEY’S FAVORITE POUND CAKE
1 sticks (1/2 cup) unsalted butter, softened, plus additional for buttering pan
1 1/2 cups sifted cake flour plus additional for dusting
1/3 teaspoon salt
1 1/4 cups sugar
3 and 1/2 large eggs, at room temperature
2 teaspoons PURE vanilla
1/2 cup heavy cream

  • Generously butter pan and dust with flour, knocking out excess flour, line the bottom  of the pan with parchment paper.
  • Beat together butter and sugar in a large bowl with an electric mixer at medium-high speed until pale and fluffy, about 5 minutes in a stand mixer fitted with paddle attachment or 6 to 8 minutes with a handheld mixer. 
  • Add eggs 1 at a time, beating well after each addition, then beat in vanilla. 
  • Reduce speed to low and add half of flour, then all of cream, then remaining flour, mixing well after each addition. 
  • Scrape down side of bowl, and then beat at medium-high speed 5 minutes. Batter will become creamier and satiny.
  • Transfer the batter into pan and tap the pan against work surface once or twice to eliminate air bubbles.
  • Place pan in (cold) oven and turn oven temperature to 350°F. 
  • Bake until golden and a wooden pick or skewer inserted in middle of cake comes out with a few crumbs adhering, 1 to 1 1/4 hours. 
  • Cool cake in pan on a rack 30 minutes. 
  • Run a thin knife around inner and outer edges of cake, then invert rack over pan and invert cake onto rack to cool completely.

CHOCOLATE HEART OF DARKNESS CAKE – BAKING PARTNERS

This month baking partners had the choice between flourless chocolate cookies or chocolate truffle cake.  

LOL, There was NO choice for my family. In fact hubby INSISTED on the chocolate truffle cake and if he hadn’t I would have.  But, I have to admit these are way too rich for my blood. I made them on Easter and had a little glaze left from the hot cross buns so added a bit of cocoa and glazed the cakes.

CHOCOLATE HEART OF DARKNESS CAKE by Marcel Desaulniers 

CHOCOLATE TRUFFLE
8 ounce semisweet baking chocolate
3/4 cup heavy cream

  • Place semi sweet chocolate in a mixing bowl.
  • Heat 3/4 cup heavy cream in a small saucepan over medium heat. Bring to a boil.
  • Pour boiling cream over the chopped chocolate. Let it sit for five minutes and whisk until smooth.
  • Pour the mixture onto a nonstick baking sheet and slightly spread it with a spatula.
  • Place this in the freezer for 15 minutes.
  • Divide into two and roll into balls.
  • Place the truffles into paper lined plates and place in the freezer.

CHOCOLATE COCOA CAKE
5 ounces butter, cut into pieces + 2 tsp melted
2/3 cup all purpose flour
1/2 cup unsweetened cocoa
8 ounces (1 box) semi sweet baking chocolate
3 large eggs + 2 yolks
1/2 cup granulated sugar
1 teaspoon PURE vanilla extract

  • Preheat the oven to 325 degrees.
  • Lightly coat the inside of muffin tin (3 inch diameter cups) with melted butter. Set this aside.
  • In a sifter combine flour and cocoa powder. Sift and set aside.
  • Melt chocolate and butter in double boiler or in a microwave and stir until smooth.
  • Place egg, egg yolks and sugar in a bowl and beat on medium high heat with an electric mixer.
  • When it is frothy add the butter chocolate mixture and beat for 15 seconds.
  • Fold in the dry ingredients along with vanilla extract.
  • Fill each muffin cup 3/4’s with the batter and bake for about 5-6 minutes.
  • Remove the truffle from the freezer.
  • Quickly take the muffin tray from the oven and press one truffle each to the center of the muffin.
  • Immediately return the baking pan into the oven and continue baking until a toothpick inserted into the cake (not the center truffle portion but the edge of the cake) comes out clean. It will take 15-17 minutes.
  • Cool in room temperature for 20 minutes.
  • Run a knife around each cake to loosen it and then gently pull the baked cake out of the cup.
  • Serve while still warm with whipped cream or ice cream.

PERFECT CHEESECAKE ~ BAKING PARTNER’S CHALLENGE #9

We had many scrumptious choices this month – too many – hard to choose just one. It was a beautiful and classic cheesecake, tangy and sweet, with a velvety smooth and rich texture that I chose.  I added my homemade caramel sauce and served it for Easter.

adapted from Perfect Cheesecake by Simply recipes for Baking Partners GROUP

Crust
2 cups of Graham cracker crumbs (I used a combo of ginger snaps and vanilla wafers)
2 tablespoons sugar
Pinch sea salt
5 tablespoons unsalted butter (if using salted butter, omit the pinch of salt), melted

Filling
32 ounces cream cheese at room temperature and cut into 1/2 inch pieces
1 1/3 cup sugar
Pinch of Sea salt
2 teaspoons PURE vanilla
4 large eggs
2/3 cup regular sour cream
2/3 cup heavy whipping cream

Topping – I omitted to help cut down on the cholesterol since I was adding the caramel sauce
2 cups regular sour cream
1/3 cup powdered sugar
1 teaspoon vanilla

CRUST PREPARATION

  • Preheat oven to 350 degrees.
  • Place a 9 inch spring form pan on a large sheet of heavy duty foil.  Smooth foil up the sides rolling at the top edge.  You are basically making your pan water proof.
  • Grind the graham crackers and/or ginger snaps in a food processor until finely ground.
  • In a large bowl stir together the crackers, sugar and salt. With your hands blend in the melted butter until you have a uniform consistency.
  • Press the cracker crumb mixture evenly into the bottom of your prepared springform pan.
  • Bake for 10 minutes.
  • Remove from the oven and let cool.
  • Reduce the oven temperature to 325 degrees.

FILLING PREPARATION

  • Cream the cream cheese until smooth.
  • Add the sugar and beat for a few minutes more.
  • Add the salt and vanilla, beating until well blended after each addition.
  • Add the eggs, one at a time, beating until well blended after each addition.
  • Add the sour cream, beating until well blended.
  • Add the heavy cream, beating until well blended.
  • Scrape down the sides of the mixer bowl scraping up any thicker bits of cream cheese that has stuck to the sides or bottom.

BAKING

  • Place the foil-wrapped springform pan in a large, high-sided roasting pan.
  • Pour about 2 quarts of boiling water around the pan.
  • Pour the prepared cream cheese filling into the springform pan over the cracker crust.
  • Smooth the filling level.
  • Bake on the lower rack of your oven.
  • Carefully pour the hot water into the roasting pan creating a water bath for the cheesecake. Pour enough water to reach halfway up the side of the springform pan.
  • Bake at 325 degrees for 1 1/2 hours.
  • Turn off the oven.
  • Crack open the oven door 1-inch or so, and let the cake cool in the oven for 1 hour. Slow cooling this way helps prevent cracking in the cheesecake.
  • Remove the cake from the oven and discard the foil.
  • With a fresh piece of foil, tent the cheesecake so that the foil doesn’t actually touch the cheesecake.
  • Chill in the refrigerator for a minimum of 6 hours or overnight.

TOPPING PREPARATION

  • In a large mixing bowl cream together the sour cream, powdered sugar and vanilla, until well blended.
  • Chill topping mixture until you are ready to serve the cake.

PREPARE THE CAKE FOR SERVING

  • Run a table knife around the inside edge of the spring form pan to release anything that might have stuck during baking.
  • Remove outer pan ring.
  • Spread the sour cream topping evenly on cheesecake.
  • Drizzle with caramel sauce and serve.
  • Enjoy.

CARAMEL SAUCE
1/2 cup heavy cream
4 tablespoons butter, softened
2 tablespoons light corn syrup
3/4 cup sugar
2+ tablespoons water

  • Combine the cream and butter in a small saucepan and bring to a simmer, stirring frequently to prevent scorching.
  • Remove from the heat.
  • In a medium saucepan cook the corn syrup over a medium heat until bubbly.
  • Fold in 1/4 cup of the sugar and continue to cook until the edges begin to turn a light amber color.
  • Add in 1/4 cup sugar more and repeat until all the sugar is blended in.
  • Continue cooking until amber color darkens stirring constantly.
  • Remove from the heat and carefully fold in the cream mixture.
  • Cook over medium heat stirring frequently until caramel is bubbling.
  • Serve warm.

Makes 1 1/2 cups. Refrigerate for up to 2 weeks.

NOTE: Microwave20-30 seconds to soften refrigerated caramel before serving

Save

ORANGE BLOSSOM BRIOCHE ROLLS – BAKING PARTNERS

This month Baking Partners are making Brioche from this adapted recipe from the book by famous pastry chef Dominique Ansel: The Secret Recipes

Brioche is a pastry of French origin that is similar to a highly enriched bread with a high egg and butter content giving it a rich feel and taste.  It is light and slightly puffy.  It has a dark, golden, and flaky outer crust heightened by an egg wash. Brioche is made in the same basic way as bread, but has the richer aspect of a pastry because of the extra addition of eggs, butter, liquid (milk, water, cream, and, sometimes, brandy) and occasionally a bit of sugar.  Brioche is served as a pastry or as the basis of a dessert with local variations of added ingredients, fillings or toppings. 

ORANGE BLOSSOM BRIOCHE ROLLS  
Makes around 20-25 rolls

2 cups bread flour
½ teaspoon salt
¼ cup sugar
2 ¼ teaspoon of  instant yeast
4 large eggs
1 tablespoon whole milk
11 tablespoon unsalted cold butter small dice
¼ teaspoon Orange extract
Grated orange zest of one orange
1 teaspoon orange blossom water
Non stick spray as needed for greasing
All purpose flour for dusting
    • In a bowl, combine the bread flour, salt, sugar, yeast and eggs and mix well using hands or if using kitchen aid stand mixer use dough hook. Mix until well combined, kneading well so that it develop gluten (may take 10 -15 minutes). When it develops gluten the dough will leave the sides and  it will pass the window pane test – when you pull a piece of dough you can extend the dough without breaking it, also you  can make a see through sheet that is called window pane test. 


    • Then add the cold diced butter, and mix again until all the butter is incorporated well. 


    • Then add orange extract, orange zest, orange blossom water and mix until everything is fully incorporated. The finished dough should be smooth, shiny and sticky. 


    • Lightly grease a medium bowl and transfer the dough to the bowl. Cover with plastic wrap pressed directly on to the surface of the dough to prevent a skin from forming. Proof the dough at room temperature for doubled in size. It will take  about 1 ½ hours. 


  • Remove the plastic warp and punch down the dough by folding. Cover the dough again with plastic wrap pressed directly on the surface. Refrigerate overnight to relax the gluten.
Next day
    • When you are ready to bake, transfer the dough to lightly floured area and divide the dough into small pieces and shape it into balls/rolls or any shape you want. 


    • If you using muffin tin grease them well and transfer the shaped balls, set aside for 45 minutes or 1 hour until the rolls puff up well. As you can see I proofed mine in a really warm kitchen and the kind of grew together.


  • While the shaped rolls are proofing preheat oven to 400 F.
    • After 1 hour, brush the brioche rolls with egg wash and  bake them for 10 minutes or until they become golden brown in color. 


    • Leave the brioche for 5 minutes in the pan and carefully remove them and enjoy as much you want. 


  • Brush them with little jam or Nutella if you like.

PERFECT CHEESECAKE FOR BAKING PARTNERS

We had many scrumptious choices this month – too many – hard to choose just one. It was a beautiful and classic cheesecake, tangy and sweet, with a velvety smooth and rich texture.I added my homemade caramel sauce and served it for Easter.

Perfect Cheesecake.jpg

adapted from Perfect Cheesecake by Simply recipes for Baking Partners GROUP April 2013

Crust
2 cups of Graham cracker crumbs (I used a combo of ginger snaps and vanilla wafers)
2 tablespoons sugar
Pinch sea salt
5 tablespoons unsalted butter (if using salted butter, omit the pinch of salt), melted
Filling
32 ounces cream cheese at room temperature and cut into 1/2 inch pieces
1 1/3 cup sugar
Pinch of Sea salt
2 teaspoons PURE vanilla
4 large eggs
2/3 cup regular sour cream
2/3 cup heavy whipping cream
Topping – I omitted to help cut down on the cholesterol since I was adding the caramel sauce
2 cups regular sour cream
1/3 cup powdered sugar
1 teaspoon vanilla

CRUST PREPARATION

  • Preheat oven to 350 degrees.
  • Place a 9 inch spring form pan on a large sheet of heavy duty foil.  Smooth foil up the sides rolling at the top edge.  You are basically making your pan water proof.
  • Grind the graham crackers and/or ginger snaps in a food processor until finely ground.
  • In a large bowl stir together the crackers, sugar and salt. With your hands blend in the melted butter until you have a uniform consistency.
  • Press the cracker crumb mixture evenly into the bottom of your prepared springform pan.
  • Bake for 10 minutes.
  • Remove from the oven and let cool.
  • Reduce the oven temperature to 325 degrees.

FILLING PREPARATION

  • Cream the cream cheese until smooth.
  • Add the sugar and beat for a few minutes more.
  • Add the salt and vanilla, beating until well blended after each addition.
  • Add the eggs, one at a time, beating until well blended after each addition.
  • Add the sour cream, beating until well blended.
  • Add the heavy cream, beating until well blended.
  • Scrape down the sides of the mixer bowl scraping up any thicker bits of cream cheese that has stuck to the sides or bottom.

BAKING

  • Place the foil-wrapped springform pan in a large, high-sided roasting pan.
  • Pour about 2 quarts of boiling water around the pan.
  • Pour the prepared cream cheese filling into the springform pan over the cracker crust.
  • Smooth the filling level.
  • Bake on the lower rack of your oven.
  • Carefully pour the hot water into the roasting pan creating a water bath for the cheesecake. Pour enough water to reach halfway up the side of the springform pan.
  • Bake at 325 degrees for 1 1/2 hours.
  • Turn off the oven.
  • Crack open the oven door 1-inch or so, and let the cake cool in the oven for 1 hour. Slow cooling this way helps prevent cracking in the cheesecake.
  • Remove the cake from the oven and discard the foil.
  • With a fresh piece of foil, tent the cheesecake so that the foil doesn’t actually touch the cheesecake.
  • Chill in the refrigerator for a minimum of 6 hours or overnight.

TOPPING PREPARATION

  • In a large mixing bowl cream together the sour cream, powdered sugar and vanilla, until well blended.
  • Chill topping mixture until you are ready to serve the cake.

PREPARE THE CAKE FOR SERVING

  • Run a table knife around the inside edge of the spring form pan to release anything that might have stuck during baking.
  • Remove outer pan ring.
  • Spread the sour cream topping evenly on cheesecake.
  • Drizzle with caramel sauce and serve.
  • Enjoy.

CARAMEL SAUCE
1/2 cup heavy cream
4 tablespoons butter, softened
2 tablespoons light corn syrup
3/4 cup sugar
2+ tablespoons water

  • Combine the cream and butter in a small saucepan and bring to a simmer, stirring frequently to prevent scorching.
  • Remove from the heat.
  • In a medium saucepan cook the corn syrup over a medium heat until bubbly.
  • Fold in 1/4 cup of the sugar and continue to cook until the edges begin to turn a light amber color.
  • Add in 1/4 cup sugar more and repeat until all the sugar is blended in.
  • Continue cooking until amber color darkens stirring constantly.
  • Remove from the heat and carefully fold in the cream mixture.
  • Cook over medium heat stirring frequently until caramel is bubbling.
  • Serve warm.

Makes 1 1/2 cups. Refrigerate for up to 2 weeks.
NOTE: Microwave20-30 seconds to soften refrigerated caramel before serving.

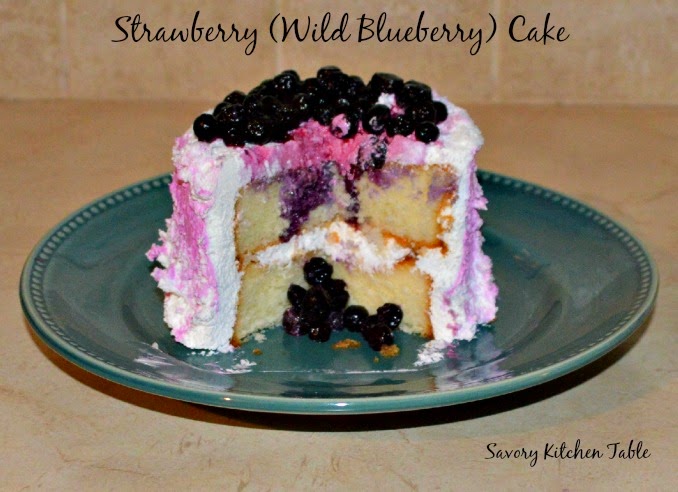
OCTOBER 2014 BAKING PARTNERS CHALLENGE – STRAWBERRY CAKE

This month’s recipe was submitted by Divya Ashok of Divya’s diner. She is a fantastic professional Bake and cake designer.

Our challenge is to make a fresh strawberry (or available fresh fruit based on location) cake with simple cake decoration you can use  for your future use. I used a small amount of strawberry flavoring in the icing and wild blueberries for the top.  The spoon I used had once been the one in the garbage disposal (what you don’t have one of those?) and it left the neat rough texture.

FRESH STRAWBERRY CAKE
Recipe adapted from America’s Test Kitchen
2-8 inch round cakes

CAKE
2 ¼ cup of cake flour, sifted
4 teaspoons of baking powder
1 teaspoon of salt
1 ¾ cups of sugar
¾ cup of unsalted butter
4 large eggs or 6 large egg whites at room temperature
¾ cup of strawberry puree
¼ cup of milk
2 teaspoons of PURE vanilla extract
1 teaspoon of strawberry extract (optional – if you can’t get good ripe strawberries)

  • Preheat oven to 350 degrees.
  • Grease and dust two 8” pans.
  • Cut butter into several pieces and allow to sit at room temperature.
  • In a small bowl, whisk together ¼ cup of cooked strawberry puree and add ¼ cup of milk.
  • Add vanilla extract and optional strawberry extract.
  • Whisk in eggs, one at a time blending well.
  • In a large mixing bowl, sift together cake flour, baking powder and salt.
  • Mix it slowly in a stand mixer with paddle attachment or with a hand held mixer.
  • Toss in softened butter pieces and continue mixing until you get a ‘bread crumb’ like texture.
  • Slowly add the wet mixture gradually and the cake batter is ready.
  • If you want the cake to look pink, add food dye.
  • Pour batter equally into two prepared pans. The mixture will not be runny and it will be difficult to spread. DO NOT use spoon to spread it, instead drop the pans on the counter multiple times to level the batter.
  • Bake it at 350 degrees for 25-30 minutes or until a toothpick inserted comes out clean.
  • Once done, remove the pans from the oven and let it sit in the counter for 10 minutes.
  • Cover it with plastic wrap and transfer it to the freezer for a night.
  • Remove the cake from the freezer 4 hours before you start decorating and bring to room temperature.

PUREE
2 pounds of very ripe fresh strawberries (frozen strawberries without sugar)
1 tablespoon of sugar

  • Wash and hull fresh ripe strawberries.
  • Cut strawberries into small pieces and transfer to a bowl.
  • Add a tablespoon of sugar and give a quick mix.
  • Cover it and allow it to sit for 2-3 hours or even overnight in the refrigerator. Strawberries will become tender and juicy.
  • Simmer the tender strawberries in a pan with ¼ cup of water for 20-25 mins over low flame, stirring frequently to prevent burning.
  • Mash berries well and allow it to cool.
  • When cool transfer the mashed berries to food processor with ¼ cup of water and puree until there are NO chunks left. Filter the puree if necessary to remove any chunky pieces. Take care not to leave any strawberry chunks! This would result in a mushy cake.
  • Return the puree to a sauce pan and slow cook it on a low flame for another 15 minutes –  reducing the puree to 1/4 cup. (If you have a little more puree that’s fine – you can use that as a filling later)

BASIC BUTTERCREAM FROSTING
1 ½ cups of unsalted butter, softened
4 ½ cups of powdered sugar, sifted
3 tablespoons of heavy cream
pinch of salt
1 teaspoon of PURE vanilla extract

  • In a large mixing bowl, add softened butter and mix it till it becomes creamy.
  • Add sifted powdered sugar, heavy cream, salt and clear vanilla extract and mixing for several minutes.

ASSEMBLY

  • Trim cake top as necessary to level.
  • Using a cake board, add a spoon of frosting in the center and spread it.
  • Top it with a cake layer, trimmed edge facing down.
  • Add a tablespoon of strawberry puree to ¼ cup of frosting, blending well.  Use to fill between the cake layers. Spread evenly with a spatula.
  • Stack another layer on top with trimmed side facing down.
  • Add ½ cup of frosting on top and spread it evenly on the sides. Just make sure the cake is totally covered with frosting. This is called crumb coat. We are just locking up the crumbs of cake with the frosting.
  • Let it sit in the refrigerator for 1 hour.
  • Remove the cake from the refrigerator and add generous amount of frosting on top and sides. Spread the frosting. You do not need to have a smooth finish as we are going to have a unfinished look.

FOR THE UNFINISHED LOOK

  • Using a spoon with the rounded sided up slowly move on the sides from down to up, creating a pattern on the cake.
  • Now do the same for cake top.

TURKISH street food – SESAME SEED RING BREAD for BAKING PARTNERS

Simit: Turkish sesame seed ring bread – I made mine round hoping they’d be fluffier inside.  They are typically made in rings like a round pretzel. LOL they should have been rings, but I wanted something more traditional looking for dinner that night so just made plain old rolls out of the dough.

SESAME SEED RING BREAD  -recipe is adapted from here

3.5 cups Bread Flour (or use unbleached all purpose flour)

1cup + 2 tablespoon of Water
A pinch of sugar
2 teaspoons instant yeast  (use active dry yeast** if you don’t have any instant yeast in hand)
1 ¼ teaspoon
2 tablespoon Molasses
½ cup Water
2 cups  white Sesame seeds

Directions:
  • **If using active dry yeast, then dissolve yeast in 3 1/2 ounces warm water and let it stand for 3-5 minutes.
  • In a bowl add flour, yeast, salt and pinch of sugar and mix well. Then gradually add water to form smooth dough, knead well about 10 minutes until the dough is no longer sticky. 
  • Cover the dough and leave it in a warm place for 1.5 hours or until doubled in bulk. 
  • Turn out the dough into a lightly floured surface and punch down. Knead for 2 minutes.
  • Divide it into 12 pieces and shape them into long rolls.
  • Take two rolls and form a twisted rope like this.
  • Then form this twisted rope into 15 cm ring by pressing and sealing the ends together.
  • Dissolve the molasses in 1/2 cup water. 
  • Dip each ring in molasses water first, then in the sesame seeds. 
  • Set aside for 20 minutes for a second rising – it needs to plumb up a little. 
  • Preheat oven to 450 degrees.
  • Bake them for 20-25 minutes or until golden. 

Homemade Puffy Pastry for Baking Partners & APRICOT RUM RAISINS

This month we’re trying our hand at homemade puff pastry.  Gotta tell you I’ve done this before and everyone should try it at least once, but I now have no problem spending the extra money for Pepperidge Farm to do it for me.

This recipe is suggested by Sangeetha Priya of Nitha Kitchen. She made homemade spinach pinwheels, but I am just not into spinach that much so I changed mine to a sweet pastry – APRICOT PINEAPPLE DANISH.
 

HOMEMADE PUFF PASTRY    Recipe Source :- BBCFood 
You can make the pastry a day before and store in refrigerator or freeze it for longer use!!!

2 cups strong plain flour (I use King Arthur)
1 cup butter at room temperature, but not soft
1 teaspoon sea salt (I used Makrut Lime Sea Salt from Savory Spice Shop
2/3 cup cold water
  • Sift the flour and salt into a large bowl. Make a well in the flour and pour in about two-thirds of the cold water, mixing until you have a firm rough dough adding extra water if needed.
  • You can use food processor/blender at this time.
  • Turn out onto a lightly floured board, knead gently and form into a smooth rectangle.
  • Cover with cling film and leave to rest for at least 20 mins in the fridge. Overnight works too.
  • Roughly break the butter in small chunks, use two parchment paper and chunk them loosely. You need to see bits of butter.
  • Using Knife or scale and bring it to shape and store in refrigerator with the same parchment paper till use.
  • Now roll the dough with thick center, place the butter at center and seal it properly.
  • Roll the dough in one direction only, until 3 times the width, about 20 x 50cm.
  • Keep edges straight and even.
    DON’T OVERWORK THE BUTTER STREAKS – YOU SHOULD HAVE A MARBLED EFFECT.
  • Fold the top third down to the center, then the bottom third up and over that.
https://images-blogger-opensocial.googleusercontent.com/gadgets/proxy?url=http%3A%2F%2F3.bp.blogspot.com%2F-pHMU44MQ7qA%2FU8nUTQZ173I%2FAAAAAAAAEJ8%2FXBRDk-CxAoo%2Fs1600%2FPuff_4.jpg&container=blogger&gadget=a&rewriteMime=image%2F*
  • Give the dough a quarter turn (to the left or right) and roll out again to three times the length.
  • Fold as before, cover with cling film and chill for at least 20 mins before rolling to use.
  • Roll and fold four more times, chilling after two.
  • You can fold 4 times the previous day and then next day you can fold two times.
  • In the whole process brush off the excess flour over the pastry dough.
  • Chill the dough for an hour or more before using.
NOTE:
  1. When you feel the dough is sticky just chill in refrigerator before the next fold.
  2. You can check out this video for making the puff pastry.


I tried a design and wasn’t totally thrilled with it, but I’ll go back to a rope design next time.

APRICOT RUM RAISINS

1 cup butter
1 cup milk
1 1/2 cups warm water
1 cup sugar
2 teaspoon salt

1/2 teaspoon cinnamon

2 tablespoons yeast
4 eggs, beaten
7 1/2 cups flour
  • In a saucepan melt butter.
  • Add milk and water whisking until smooth consistency and JUST boiling.
  • Cool 5-10 minutes so you don’t kill the yeast.
  • Add the sugar, salt and yeast to form a sponge like blob.
  • Add the eggs until uniform consistency.
  • In a mixer with a dough hook attached, combine flour and yeast mixture.
  • Knead well. Put in refrigerator for at least several hours, but overnight is better.
  • Preheat oven to 375 degrees.
  • Roll a ball of dough the size of a golf ball into a rope and coil into a circle. Make sure the center is thinner than the outer edges to hold the filling in. Sometimes I prefer squares, but you just have to work with your dough after you have it coiled.
  • Fill with a heaping tablespoon of filling per danish (recipe below).
  • Let rise an hour in a warm place.
  • Bake 15 minutes.
  • Frost with Cream Cheese Frosting (see below). If you prefer a drizzle thin out this frosting with a couple extra tablespoons of milk until desired consistency.
Cream cheese apricot raisin filling
1 bag large dried apricots, chopped

1/2 cup golden raisins, chopped
1/4 cup golden rum

  • Soak apricots and raisins in rum for an hour or overnight.
  • Drain off rum.
  • Set aside.
8oz pkg cream cheese
1 egg
1/2 cup powdered sugar
1/2 tablespoons grated orange peel
  • Blend cream cheese, egg, powdered sugar and orange peel together until smooth.
  • Fold in apricots and raisins into the cream cheese mixture. Or my favorite is to fill them as 2 separate fillings with the cream cheese first and the apricot in the center of that.

Cream Cheese Frosting
16 ounces cream cheese, softened
1/2 cup butter, softened
juice of 1 lemon
2 teaspoons pure vanilla extract
3 cups powdered sugar

  • In a medium bowl beat cream cheese and butter until smooth.
  • Add lemon juice and vanilla. Beat until blended.
  • Add powdered sugar gradually until well blended and smooth.
  • Ice first layer and then add 2nd cake top and ice again including sides of cake.
  • Refrigerate 1 hour to set icing before serving.


Save