Taco Bell’s Enchirito is a discontinued fan-favorite where an enchilada, taquito and a burrito cross together have a menage-a-trois whose beautiful baby is the enchirito.
It consisted of a soft flour tortilla filled with seasoned ground beef, refried beans, and diced onions, rolled up and smothered in red enchilada sauce and melted cheddar cheese, traditionally topped with black olives. Personally, I’m not an olive fan so those are out 🙂 I’ve also changed out the flour tortillas for a golden blend that has more flavor and crisps really well. I also made them lighter by using less refried beans
Super easy AND quick with a tasty ground beef taco seasoned filling of ground beef with enchilada sauce and cream cheese is all stuffed into corn tortillas with a hint of jalapeño and cilantro before being baked until crispy. Add a heavy splash of enchilada sauce over the top, layer them with cheese and bake them again!
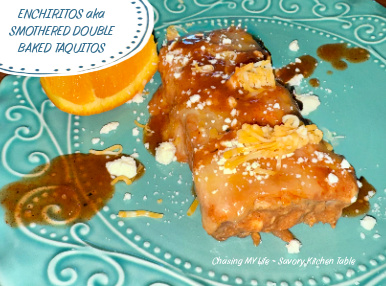
ENCHIRITOS aka SMOTHERED DOUBLE BAKED TAQUITOS serves 4
1 can refried beans
1 pound ground beef
1 yellow onion, chopped
3 tablespoons Homemade Taco Seasoning (see recipe below) or store bought seasoning
2 1/2 cups red enchilada sauce
4 ounces cream cheese, at room temperature, cut into pieces
2 ounces velveeta, diced
16 to 20 corn tortillas or 8-10 golden blend (half flour, half corn) tortillas
Avocado oil
2 cups shredded Mexican cheese blend
- Preheat the oven to 425°.
- LIGHTLY oil a shallow baking dish or deep baking sheet.
- In a large skillet set over medium high heat, place the beef and onion, cooking 8-10 minutes and breaking up the meat into small pieces until the fat has completely rendered and the beef is browned.
- Add the taco seasoning and 1/2 cup water.
- Reduce the heat to medium and simmer 5-6 minutes until the sauce thickens to coat the meat. Stir in 1/2 cup of the enchilada sauce and the cream cheese, cooking and stirring 1-2 minutes, JUST until the cream cheese melts. Remove the skillet from the heat.
- Working in batches, warm the tortillas in the microwave in 30-second intervals until pliable.

- Place the tortillas on a baking sheet and rub one side with avocado oil.
- Flip them over and spread a thin layer of refried beans.
- Spoon 2-3 tablespoons of the beef mixture down the center on to the beans.
- Roll up like a cigar and place seam-side down on the baking sheet.
- Repeat with the remaining tortillas and beef.
- Bake 10 minutes until they begin to crisp and then carefully flip them over and cook 4-5 minutes more until both sides are crispy.
- Remove from the oven.
- During the 1st baking time heat 2 cups on enchilada sauce in a small sauce pan. Add velveeta, stirring to completely melt into the enchilada sauce.
- Coat the bottom of a lightly oiled 2nd baking dish with 1 cup of enchilada sauce.
- Arrange the enchiritos over the sauce and top with the remaining enchilada sauce followed by the shredded cheese.
- Bake 8-10 minutes until the cheese is melted and bubbling.
2 avocados, chopped
1/3 cup chopped fresh cilantro
1 jalapeno, seeded and FINELY chopped
1/4 cup fresh lime juice, plus lime wedges, for serving
flaky sea salt
Crumbled Cotija cheese
sour cream
- Meanwhile, in a medium bowl, combine the avocados, cilantro, jalapeno, lime juice and a pinch of flaky salt.
- Fold ingredients gently to mix.
- Top the taquitos with the avocado mixture, sour cream and crumbled Cotija.
- Serve warm with lime wedges for squeezing.
HOMEMADE TACO SEASONING
2 tablespoons chili powder
1 tablespoon chipotle chile powder
1 tablespoon smoked paprika
1 tablespoon garlic powder
1 tablespoon onion powder
2 teaspoons ground cumin
1 teaspoon dried oregano
1 teaspoon fine pink Himalayan salt
- In a glass jar, combine everything, mixing well.
- Store at room temperature in a cool, dark place for up to 6 months.