COOKING THURSDAY ~ ORANGE GLAZED MEATBALLS ~ BLOG 365.127A

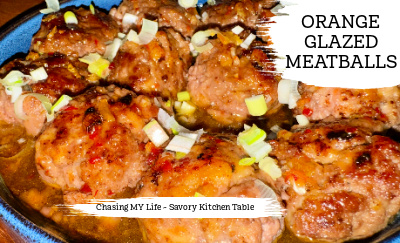
ORANGE GLAZED MEATBALLS

20 meatballs, homemade (browned) or fully cooked Angus beef meatballs
12 ounces orange marmalade (I used blood orange pepper jelly)
1/4 cup orange juice
3 green onions, FINELY chopped, reserve some for garnish
1 jalapeño, de-seeded and de-veined, FINELY diced

  • In a small saucepan whisk together the jelly and orange juice until smooth.
  • Stir in most of the green onions and jalapeño.
  • Simmer until cooked through and warm.
  • Pour glaze over meatballs, tossing to coat.
  • Garnish with remaining green onions and serve immediately.

NOTE: These keep warm in a small crock pot for buffets or tailgating.

COOKING THURSDAY ~ CHEESEBURGER WRAPS ~ BLOG 365.113C

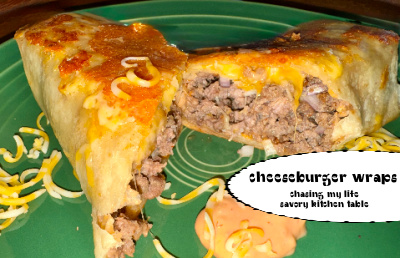
CHEESEBURGER WRAPS serves 4
1 pound ground beef
1 small onion, FINELY chopped
1 teaspoon garlic powder
1 teaspoon paprika
FRESH ground sea salt and black pepper, to taste
LARGE flour tortillas
1 cup shredded cheddar cheese
½ cup shredded mozzarella optional, for extra melt
½ cup chopped pickles
1 cup shredded lettuce
1 medium tomato diced

SAUCE optional, but HIGHLY recommended
¼ cup DUKES mayonnaise
2 tablespoons QUALITY ketchup* (SEE NOTE)
1 teaspoon mustard

  • Heat skillet over medium heat.
  • Add the ground beef and chopped onion* (SEE NOTE).
  • Sprinkle in garlic powder, paprika, salt, and black pepper.
  • Brown for 6–8 minutes, breaking up the meat into small pieces, until fully browned.
  • Stir well and remove from heat, draining off excess fat.
  • In a small bowl, whisk together mayonnaise, ketchup, and mustard until smooth.
  • Lay a tortilla flat.
  • Spread a spoonful of sauce in the center.
  • Fold in the sides and roll tightly like a burrito.
  • Place wraps seam-side down in a hot skillet and toast for 1–2 minutes per side until golden and slightly crispy.

NOTE:

  • We like FRESH chopped red onion instead of cooked onion. It’s also good to use both!
  • We also like to use jalapeno ketchup.

COOKING THURSDAY ~ PEPPER JELLY DIP ~ 2026 BLOG 365.43A

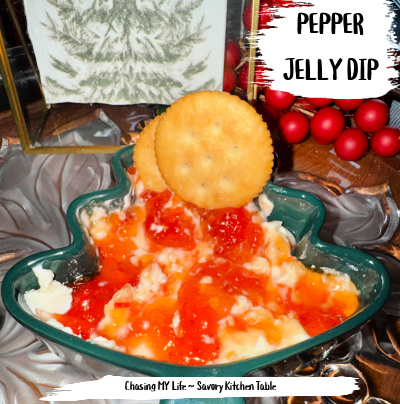
PEPPER JELLY DIP

Cream cheese and pepper jelly make the ultimate appetizer. The sweet, spicy and creamy flavors blend together to make the perfect dip. In fact, it’s a classic and very popular southern appetizer. AND it’s so very simple to make!

8 ounce block of cream cheese, softened to room temperature
½ to 1 cup of red or green pepper jelly
Assorted crackers (such as Ritz or Carr’s water crackers), pita chips, or sliced baguettes for serving, but Ritz are my ultimate favorite

  • Place the softened block of cream cheese on a serving plate or platter.
  • Spoon the pepper jelly generously over the top, letting it drip down the sides.
  • Serve immediately with crackers.
  • Provide a small cheese knife for spreading. 

VARIATIONS:

  • Baked Dip: Mix the softened cream cheese with shredded cheddar and/or pepper jack cheese, garlic powder, and onion flakes.
    Spread in a baking dish, bake at 350°F (175°C) for 15 minutes, then top with warmed pepper jelly and serve warm.
  • Additions: Add crumbled bacon, chopped green onions, toasted pecans or ?????
  • Flavor Twists: Substitute the pepper jelly with your favorite or change out the cream cheese for a Boursin flavored cheese. 

BLOODY MARY PICKLES ~ BLOG 365.315

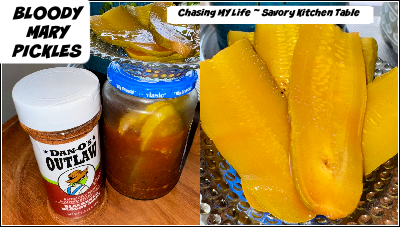
I found this recipe on FaceBook. Now I am allergic to mustard so I avoid pickles completely because of the pickling brine, but hubby LOVES pickles, mustard and Bloody Marys so this was right up his alley. So, I bought the pickles, the bloody Mary mix and special spice, the rest is history!

BLOODY MARY PICKLES
1 jar dill pickle slices
Zing Zang Bloody Mary mix
DAN’Os OUTLAW Cajun Bloody Mary seasoning

  • Pour out about half of the pickle juice.
  • Pour in enough Zing Zang Bloody Mary mix to replace pickle juice.
  • Add 2 tablespoons of seasoning.
  • Replace lid and shake to mix.
  • Allow to sit 24 hours before eating.

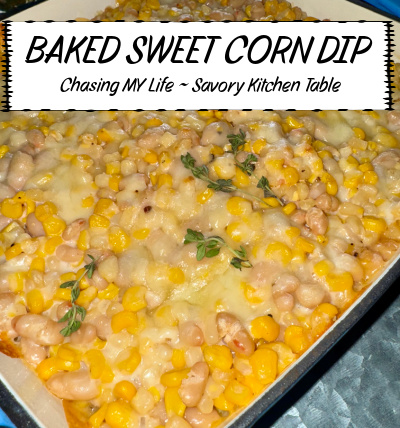
BAKED SWEET CORN DIP ~ BLOG 365.42

Dive into a delightful fusion of sweet corn and melted mozzarella with a hint of a spicy zing, rounded off with the subtle sweetness of sugar and a pinch of classic seasoning. SUPER easy and ready in just 12 minutes! A truly gourmet dish without all the fuss and preparation!

The original recipe was called Korean Cheese corn and inspired by the smells and tastes of a trip to Seoul by That Oven Feeling. This dish was evidently a staple of street cooking. I have since adapted it to my own family.

The recipe called for Kewpie mayo and the author claimed once you’ve tried it, you’ll never go back, but alas, I am just not a fan. 🙁 I do promise that even with the changes I’ve made there is still a perfect balance of sweet, creamy, cheesy and umami.

BAKED SWEET CORN DIP

15.25 ounce can QUALITY sweet corn, WELL drained
15.25 ounce can SMALL white beans, rinsed and WELL drained

3/4-1 cup shredded mozzarella cheese plus 1/4 cup more for garnishing
3-4 tablespoons DUKE’S mayonnaise
2-3 tablespoons Frank’s Original hot sauce *SEE NOTES
1/2 teaspoon sugar
FRESH ground sea salt and black pepper, to taste
Pinch of minced cilantro, for garnish
Scoopable corn chips or veggie sticks for dipping

  • Adjust the oven’s baking rack to the position second from the top.
  • Preheat the oven to a temperature of 450°.
  • Lightly grease a small (5-6 inch) cast iron skillet.
  • In a small mixing bowl whisk together the mayonnaise, hot sauce, salt and pepper.
  • In a medium mixing bowl toss together the corn and cheese.
  • Fold the mayonnaise mixture into the corn and cheese until well mixed.
  • Spread the mixture into your prepared cast iron.
  • Garnish with your additional cheese.
  • Bake for 10 minutes or until the cheese is beginning to get golden.
  • When you remove it from the oven garnish with the minced cilantro.
  • Cool for a few minutes before serving.

NOTES:

  • Recipes are just guidelines; the real flavor is in your unique creativity!
  • You can use FROZEN corn, but it MUST be thawed and thoroughly drained!!!
  • You can use Frank’s Chile Lime Hot Sauce or the Hot Honey sauce for a nice flavor change-up.
  • This recipe EASILY doubles into a 10 inch cast iron for a crowd.
  • When doubling I often add more white beans and white shoepeg corn to the sweet corn for a nice medley. These trade out ounce for ounce quite well.
  • This recipe EASILY adapts to other flavor combinations! Any meltable cheese (cheddar, Gouda, Guyere cheese is GREAT!
  • Hubby likes it when I change out the original Frank’s for BBQ sauce or even for a creamy homemade salsa for a flavor that work’s great too!
  • If you’re not a cilantro fan, try parsley, chives, thyme or even rosemary.

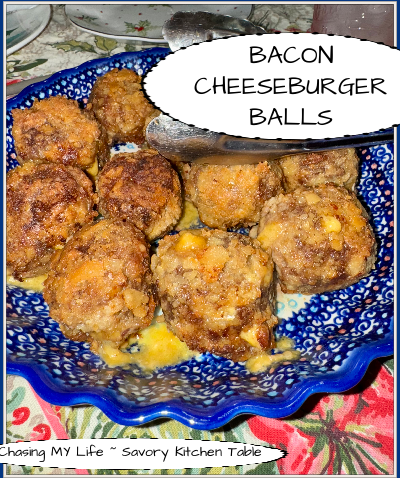
OUR FAVORITE BACON CHEESEBURGER BALLS ~ BLOG 365.17

BACON CHEESEBURGER MEATBALLS

BEEF OUTER LAYER
1 LARGE egg
1 envelope LIPTON Beefy onion soup
1 pound LEAN ground beef

  • Whisk together egg and soup mix in a mixing bowl.
  • Crumble beef over mixture and mix together lightly, but thoroughly.
  • Divide into 12 portions and set aside.

CHEESE FILLING
2 tablespoons WONDRA flour
2 tablespoons WHOLE milk
1 cup shredded cheddar cheese
4-5 bacon strips, cooked crisp and crumbled into small pieces

  • In a mixing bowl whisk together the flour and milk.
  • Add the cheese and bacon, mixing all together gently, but thoroughly.
  • Shape cheese mixture into 12 portions and roll into balls.
  • Shape 1 portion of the beef mixture around each cheese ball.

COATING
2 LARGE eggs
1 sleeve (1 cup) FINELY crushed saltines
5 tablespoons avocado (neutral) oil

  • In shallow bowl whisk the eggs until smooth.
  • Place cracker crumbs in another shallow bowl.
  • Heat oil in large skillet over medium heat.
  • Dip meatballs into egg mixture and then roll in cracker mixture.
  • Add meatballs to hot skillet, cooking 10-12 minutes until seared golden brown on all sides and cooked through.
  • Serve with ketchup, mustard and pickles.

TEXAS TRASH DIP aka CHEESY BAKED COWBOY DIP ~ BLOG 365.14

This is one of those southern recipes (in one form or another) that magically appears on potluck tables, football tailgating parties or backyard BBQs during the cooler months. Warm, cheesy and the creamy richness of cream cheese plus the smoky and savory notes of bacon added to the subtle heat of jalapeño makes this dip both delicious and addicting! Serve it with freshly made tortilla chips, crackers or even vegetable sticks for a super tasty appetizer that your guests will make disappear in no time! The chopped green onions on top add an extra burst of color and flavor. Not a “looker”, but definitely a “taster” 😀

TEXAS TRASH DIP aka CHEESY BAKED COWBOY DIP

2 cans (15.25 ounces each) whole kernel corn, drained **
1 can (15 ounces) black beans, rinsed, drained
½ cup Duke’s mayonnaise
4 ounces cream cheese, diced small and then softened
1 + ½ cups mild cheddar cheese, shredded
1 + ½ cups mozzarella cheese, shredded
½ cup FINELY grated Parmesan cheese
1 jalapeño pepper, seeded, FINELY diced
8 slices thick-cut bacon, cooked, crumbled
1 medium red onion, FINELY diced
FRESH ground sea salt and black pepper
1 bunch green onions, chopped for garnish
Chopped tomatoes, for garnish

  • Preheat oven to 350°.
    In a medium, oven-safe skillet, combine corn, black beans, mayonnaise, cream cheese, 1 cup cheddar cheese, 1 cup mozzarella cheese, Parmesan cheese, jalapeños, bacon, onion, salt, and pepper. Stir until combined.

  • Top with the remaining cheddar and mozzarella cheese.

  • Bake 25-30 minutes until the cheese is melted and the dip is heated through.

  • Garnish with green onions and FRESH chopped tomatoes.
  • Serve with tortilla chips, crackers, and fresh vegetables for dipping.


**As an alternative I use 3 cans of Green Giant Mexican Corn or white shoepeg corn.
To make the cream cheese easier to dice, place it in the freezer for 20-230 minutes and then soften.

ANTIPASTO SQUARES ~ COOKING THURSDAY ~ BLOG 365.292

Antipasto salad at its best – as a hand held snack sandwich. Perfect for tailgating, pot lucks, baby showers, game nights, family get togethers…

ANTIPASTO SQUARES

non-stick cooking spray
2 (8 ounce) tubes crescent dough (non-perforated if you can find them)
1/2 pound thin sliced tavern ham
1/4 pound sliced pepperoni
1/4 pound slice salami
1/2 pound sliced provolone
1/4 pound sliced mozzarella
1 cup WELL drained sliced pepperoncinis and/or banana peppers
1/2 cup WELL drained and chopped marinated artichokes
4 ounce can WELL drained sliced olives
2 tablespoons avocado oil
1/4 cup + 2 tablespoons FRESH grated Parmesan
1 teaspoon FRESH chopped oregano
1 tablespoon FRESH chopped basil

  • Preheat oven to 350°.
  • Grease a 9×13 baking sheet with non-stick cooking spray.
  • Roll out one can of crescents on prepared baking sheet, gently stretching into a rectangle.
  • Layer in the following order ~ pepperoni, provolone, salami, mozzarella, ham, olives, artichokes and pepperoncinis.
  • Sprinkle with half of the FRESH chopped herbs followed by the 2 tablespoons of Parmesan cheese.
  • Unroll remaining tube of crescent dough and place on top.
  • Pinch together seams to seal.
  • Whisk together the oil and remaining herbs.
  • Brush oil mixture all over top of crescent dough, then sprinkle with Parmesan.
  • Bake until dough is golden and cooked through, about 35 minutes. (If dough is browning too quickly, cover with foil.)
  • Let cool at least 15 minutes before slicing into squares.

NOTE: Keep in mind that draining everything exceptionally well and HOW you layer this recipe makes a difference in the outcome. If there is too much moisture the squares can be too soggy.

WING DINGS ~ BLOG 365.145

WING DINGS
1/4 cup FINELY chopped celery
1/4 cup FINELY chopped onion
1/4 cup FINELY chopped carrot
2 tablespoons ranch salad dressing mix
1 LARGE egg, lightly beaten
1 pound ground chicken
2 cups CRUSHED potato chips, divided
2 tablespoons avocado oil
1 tablespoon butter
1/2 cup Frank’s buffalo wing sauce

  • In a large bowl combine celery, onion, carrots, dressing mix and egg until well blended.
  • Add chicken and half the potato chips, mixing well.
  • Roll into 18 or so meatballs.
  • Heat butter and avocado in large skillet over medium heat.
  • Roll meatballs in remaining potato chips.
  • Cook in small batches, not crowding the pan, until browned and cooked through.
  • Drain well on paper toweling.

8 ounces spreadable cream cheese, room temperature
1/2 cup Gorgonzola cheese crumbles
2 tablespoons WHOLE milk
2-3 garlic cloves, MINCED
2 tablespoons Frank’s buffalo wing sauce

  • Combine ingredients until well blended.
  • Use as a base or dipping sauce.

BLOOMING QUESADILLA

BLOOMING QUESADILLA adapted from SPACE SHIPS & LASER BEAMS

A Blooming Quesadilla Ring is PERFECT for the upcoming holidays, a tailgate or Super Bowl party or even a church potluck.

20 taco sized soft flour tortillas
4 cups FINELY shredded taco blend Colby jack cheese
3 cups shredded rotisserie chicken pieces (OR PROTEIN OF CHOICE)
1 SMALL red bell pepper, seeded and FINELY diced
1/2 cup FINELY diced red onion
1/2 cup salsa your favorite brand
1 cup Taco Bell mild taco sauce
2 cups cheddar cheese finely shredded
2 tablespoons FRESH chopped cilantro

GARNISHES
FRESH chopped cilantro
Lime wedges
Sour cream
Chopped green onions
Salsa

  • Preheat oven to 375°.
  • Line a baking sheet with parchment paper.
  • Place a large, wide mouth glass jar in the center of the baking sheet.

  • Cut the tortilla’s in half.
  • Cover the halved tortilla’s with a clean dry cloth and set aside so they don’t dry out.

  • In a large mixing bowl combine the shredded cooked chicken, red pepper, 2 tablespoons of the cilantro, red onion, salsa and taco sauce.
  • Stir well until all of the ingredients are well mixed. 

  • Sprinkle each tortilla with 1 ½ to 2 tablespoons each of the shredded colby monterey jack cheese and the chicken mixture.
  • Roll each of the halved, “filled” tortillas into a cone shape. Be careful not to squish out the filling. The small pointed ends of the cones need to touch the wide mouth jar and form a ring around the jar.

  • Once you have made a complete bottom layer of about 12 to 13 “cones,” sprinkle ¾ cup of the shredded cheddar cheese on top of the ring.

  • Repeat the ring of cones for a second layer.
  • Then top with 1 cup of the colby and monterey jack cheese.

  • Repeat for the 3rd and final ring.
  • Remove the glass jar from the center of the cones.

  • Bake for 15 to 20 minutes, or until the edges of the cones are golden brown and the cheese is melted.
  • Using the edges of the parchment paper, carefully transfer the quesadilla ring to a platter.
  • Serve the quesadilla ring with your favorite salsa or dipping sauce AND garnishes.

NOTES: If trimming off the excess parchment paper, BE VERY CAREFUL not to touch the hot cheese.


CANDIED JALAPENOS aka COWBOY CANDY

CANDIED JALAPENOS aka COWBOY CANDY Adapted from Foodie with Family yields 4-6 half pints

3 pounds FRESH FIRM, jalapeno peppers, washed
2 cups apple cider vinegar
6 cups white granulated sugar
1/2 teaspoon celery seed
6 cloves garlic, minced
1 teaspoon ground cayenne pepper

  • Wearing gloves, remove the stems from all of the jalapeno peppers and discard the stems.
  • Slice the peppers into uniform 1/8-1/4 inch rounds. Set aside.
  • In a large pot, bring vinegar, sugar, celery seed and cayenne pepper to a boil.
  • Reduce heat and simmer for 5 minutes.
  • Raise the heat to boiling again, add the pepper slices and garlic, return to a hard boil, then reduce the heat again and simmer for exactly 4 minutes.
  • Use a slotted spoon to transfer the peppers into clean, sterile canning jars to within 1/4 inch of the upper rim of the jar.
  • Turn heat up under the pot with the syrup and bring to a full rolling boil. Boil hard for 6 minutes.
Use a ladle to pour the boiling syrup into the jars over the jalapeno slices.
  • Insert a cooking chopstick to the bottom of the jar two or three times to release any trapped pockets of air.
  • Adjust the level of the syrup if necessary.
    Wipe the rims of the jars with a clean, damp paper towel.
  • Add new lids and rings until finger tightness.
  • Place jars in a pan full of boiling water. Be sure jars are covered with at least 2 inches of water.
  • Boil for 10 minutes for half-pints or 15 minutes for pints.
  • When fully cooled, wipe them with a clean, damp washcloth then label.
  • Allow to mellow for at least two weeks, but preferably a month before eating.

NOTE: These make great gifts! Add any leftover syrup into half-pint jars and process the same as the jalapenos. Save it for brushing on meat for the grill or add it to potato salad or whatever your heart desires??

COON BALLS aka SAUSAGE BALLS – Raccoon NOT INCLUDED

This recipe or a similar version of it has been around since the beginning of time I believe. BUT, I can’t find any direct links to how they originated. I assume them to have began as a southern recipe based on the name, but don’t let the name fool you – there is no raccoon in them, but I suppose there once was probably around the time that the Bisquick was also homemade.

Most recipes call for just the basic ingredients of Bisquick, sausage and cheese. But, the beauty of this recipe is that you can make it any way you want with any flavors you want as long as the proportions are good 😀 Any way you make them, they are simple with few ingredients and virtually foolproof.

COON BALLS are great by themselves, but consider adding a dipping sauce – especially if serving as an appetizer or at a tailgate party. They are also great for breakfast with a sausage gravy.

COON BALLS aka SAUSAGE BALLS

1 pound ground country sausage (hubby likes the hot variety sometimes)
8-16 ounces (about 4 cups) coon cheese or sharp white cheddar cheese, FINELY shredded
2 1/2 – 3 cups Bisquick
2 tablespoons FINELY chopped sage or thyme leaves (depending on sausage flavor)
1/2 teaspoon cayenne pepper or paprika (once again depending on sausage flavor)

  • Preheat oven to 375°.
  • Using your hands blend all together until well mixed. Now if you’re a bit wimpy use the paddle attachment on your stand mixer. This will be a THICK mixture.
  • Roll into 1 inch balls. I use my medium cookie scoop to get uniform sizes.
  • Place on a parchment lined baking sheet.
  • Bake 20 minutes or until browned.

NOTES:

  • DO NOT USE PRE-SHREDDED CHEESE! Pre-shredded cheeses contain a moisture blocking cellulose that will dry out your mixture. Shred your own!!!!
  • DO NOT DIP measuring cup into the Bisquick. Spoon the Bisquick into the measuring cup. When you dip into the Bisquick it tends to pack the cup. You need a looser fill.
  • They freeze really well! To freeze uncooked sausage balls FLASH FREEZE (so they don’t stick to each other) them flat and separated on baking sheets before transferring to ziplock bags or containers to freeze for up to 3 months. Thaw completely in the refrigerator before cooking. If freezing already cooked make sure to COMPLETELY cool them before the FLASH FREEZE.