DECONSTRUCTION: HOW STUFFED CARROTS BECAME A CARROT CASSEROLE

I’m always on the look out for great ways to spice up vegetable recipes.  I found what sounded and looked like an awesome recipe in a magazine for a carrot side dish.  I was excited to make it, but then oh so disappointed.  They looked pretty, but they tasted awful.  So, we sat around the dinner table deconstructing AND reconstructing the recipe!  My family is so good at dinner conversation.  Well, maybe not, but at least they tell me what they don’t like and then help turn it into something they will like.


The original recipe:
BAKED STUFFED CARROTS
12 medium carrots
1/4 cup mayonnaise
4 teaspoons grated onion
2 teaspoons prepared horseradish
1/8 teaspoon ground nutmeg
salt and pepper to taste
1/4 cup dry bread crumbs
2 tablespoons butter, melted and divided
1/8 teaspoon paprika

  1. Place carrots in a skillet. Add 1 inch of water.  Bring to a boil. Lower heat and simmer 15-20 minutes or until crisp tender.  Drain.
  2. Cut a thin lengthwise slice out of each carrot.  Scoop out carrot, leaving a 1/4 inch shell, set shells aside. Place the removed carrot in a food processor; cover and process until finely chopped.  Transfer to a large bowl; add mayonnaise, onion, horseradish, nutmeg, salt and pepper.  Spoon into carrot shells.
  3. Place in a greased 13 inch x 9 inch baking dish.  Combine the crumbs, 1 tablespoon butter and paprika; sprinkle over carrots.  Drizzle with remaining butter.
  4. Bake, uncovered, at 375 degrees for 20-25 minutes or until tender. 
Do you remember Gilligan’s Island Season 3, episode 20?  No, I didn’t REMEMBER the number or season either, but I remember the episode well.  Gilligan discovers a crate in the lagoon and pries off the lid, which falls face side down of course, and inside are all these beautiful seeds.  Mary Ann immediately plants a garden and they all have their favorite vegetables.  Because the seeds are radioactive they produce bigger and “better” vegetables that gives each castaway a special ability.  These were 2 1/2 inches in diameter!

I present to you the Gilligan’s Island Carrots:
THE RECIPE WORTH MAKING:
BAKED CARROT CASSEROLE
12 medium carrots

1/4 cup mayonnaise1 large bunch green onions, minced3 cloves garlic, minced1/8 teaspoon ground nutmeg1 teaspoon sea salt
1 teaspoon white pepper
1/4 cup dry bread crumbs2 tablespoons butter, divided1/8 teaspoon paprika

  • Place carrots in a skillet. Add 1 inch of water. Bring to a boil. Lower heat and simmer 10 minutes or until crisp tender. Drain. Cool.
  • Slice carrots into 1 inch lengths and then into 4 pieces each.
  • In a small skillet melt 1 tablespoon of butter.  Saute’ onions and garlic until translucent and fragrant. Drain of fat.
  • Transfer to a large bowl; add mayonnaise, nutmeg, salt and pepper.
  • Toss with cooled carrots until well coated.
  • Place into a greased 9X9 baking dish. Combine the crumbs, 1 tablespoon butter and paprika; sprinkle over carrots. Drizzle with remaining butter.
  • Bake, uncovered, at 375 degrees for 10-15 minutes or until tender.

FRITOS NACHOS

FRITOS NACHOS
Chili – I use Chicken, Black Bean or Black Bean “Kitchen Sink” Steak
Fritos
diced Jalapenos
Beer Cheese Dip (optional)
Shredded Jack and Cheddar Cheeses
Crispy Bacon
Diced tomato
Diced green onion
sour cream
*optional charred finely chopped hot dogs

  • Layer:
          FRITOS
          CHILI
          CHEESE
          BACON
         TOMATOES
         GREEN ONIONS
  • Bake at 375 degrees for 15 minutes.
  • Plate and add a dollop of sour cream.
  • Enjoy.


CHILE VERDE CARNITAS FRIES

Don’t forget about our upcoming Tailgating Time Link Up for Football.  The season begins Thursday, September 4th, 2014.
 Links open at midnight September 4th!

This recipe I made up after having lunch at one of our favorite restaurants BJ’s Brewerhouse and saw something similar on their appetizer menu.  I knew immediately it would become a football favorite!

CHILE VERDE CARNITAS FRIES
crispy thin fries
Green Chile Verde Carnitas
minced jalapenos
finely shredded jack and cheddar cheese
finely chopped green onions
finely chopped cilantro
sour cream
Heinz Jalapeno ketchup

  • Assemble everything from the crispy thin fries through the cheese “Nacho” style.
  • Bake in a preheated oven for 10-15 minutes to heat through.
  • Top with green onions and cilantro.
  • Add a dollop of sour cream and Jalapeno ketchup.
  • Dig in and Enjoy!

Hubs likes his with pepper jack cheese.  That is the beauty of this recipe – you can build to suit.

    ITALIAN GARLIC SUPREME STROMBOLI aka SANDWICH PIZZA

    According to Wikipedia STROMBOLI is: a type of turnover filled with various cheeses, typically mozzarella, Italian meats such as salami, capicola and bresaola or vegetables or a Greek Island or an Ingrid Bergman movie – you choose. The dough is Italian bread dough.

    When I was much younger and elderly family friend always told me I looked just like Ingrid Bergman.  I didn’t know then what a compliment that was.

    Stromboli is reported to have originated in 1950 in Essington, Tinicum Township just outside of Philadelphia, at Romano’s Italian Restaurant & Pizzeria, by Nazzareno Romano. There, William Schofield supposedly gave it the name, after the movie Stromboli, starring Ingrid Bergman.  Other sources claim the stromboli was the brainchild of Mike Aquino, Sr., and that he created it in Spokane, Washington, in 1954.  The first claim is more credible, with most people remembering the advent of the stromboli at Romano’s Italian Restaurant & Pizzeria in the early 1950s.

    No matter what you call it, it is a family favorite around here.

    We have a favorite pizza – ITALIAN GARLIC SUPREME from Round Table Pizza.  This pizza is full of pepperoni, Italian sausage, Roma tomatoes, white mushrooms, green onions and lots of chopped garlic and is baked with a blend of 3 cheeses in a creamy garlic sauce.  Unfortunately they are not a national chain.  We have spent horribly disappointing meals  out trying to find a local replacement for this pizza.  I have since decided the best replacement is the one I make myself.  Hubby whole heartily agreed! We decided to push the envelope though and make that same recipe into a sandwich.
    ITALIAN GARLIC SUPREME STROMBOLI aka SANDWICH PIZZA
    ITALIAN GARLIC SUPREME PIZZA
    CRUST
    1 cup of warm water (105 degrees)
    3 1/2 cups of all-purpose flour
    2 tablespoons of olive oil
    2 teaspoons of honey
    1 teaspoon sugar
    1 teaspoon of salt
    1 teaspoon of yeast
    • Put warm water into a bowl. Add salt, sugar and honey and mix well. Add the yeast, mix and let it sit for about 10 minutes.
    • Gradually add the flour and olive oil until well blended.
    • When the mixture gets too heavy to mix, start kneading the dough with your hands.
    • Knead the dough until you have a smooth ball. If the dough cracks it is too dry. Add water bit by bit until if forms a nice smooth ball. If you need to add water or flour, do it by small amounts.
    • Coat the dough with olive oil, place it in a large bowl and cover it with kitchen wrap and a flour sack towel. Let the dough rise for about an hour at room temperature, then push it down again so it deflates. Let it sit for about another hour. Either bake it or refrigerate for later use.
    • Put the dough on a lightly floured surface, put a bit of flour on top and make it into the shape of a pie by stretching it out from the center outwards. Use a rolling pin until the dough is about 1/4″ thick. Punch some holes in the dough with a fork to let the air escape while the pizza is in the oven.
    • Lightly oil a cookie sheet with olive oil and sprinkle with cornmeal.
    • Pre-Bake dough at 400 degrees for 5 minutes.
    TOPPINGS 
    1 package John Morrell pepperoni
    3 Italian sausages, cooked and crumbled 
    1 can Contadina tomato paste with basil and oregano or homemade sauce
    1/2 pound mushrooms, thinly sliced
    1 large bunch green onions, thinly sliced including the majority of the tops
    6 cloves garlic, finely minced
    1 Roma tomato, diced small
    2/3 cup grated mozzarella cheese
    2/3 cup grated provolone cheese
    2/3 cup grated Romano cheese
    Extra light olive oil
    • Whisk together the tomato paste, garlic and 1 teaspoon olive oil to make the sauce.
    • Brush pre-baked dough with a small amount of olive oil and then an even layer of the sauce.
    • Evenly sprinkle the crumbled sausage over the sauce followed by half of the pepperoni.
    • Top with the mushrooms, green onions and tomatoes.
    • Evenly sprinkle the cheese over it all
    • Top with the remaining pepperoni.
    • Roll up and place on the center of the pan.
    • Bake the sandwich pizza at 400-450° F for about 20-25 minutes until the crust is golden.

    STUCK IN A TIME WARP – GRILLED CHEESE & CHILI

    Back in 1988 I was having a particularly tough time at work- no details, but let’s just say a man was trying to make my life miserable and I needed a mental health day.  I decided to go to a movie that had just been released, Working Girl.  After all, Harrison Ford was in it!  I thought it would be a fun chick flick and bring my spirits up.


    I was right.  My spirits saw the underdog, a woman no less, rise above the BS and succeed, or at least get her opportunity to succeed.  So, what is my point?  Do you remember that scene at the very end when Melanie Griffith, er Tess McGill in Working Girl combines Trask and radio to succeed?  It was almost like an Oprah AHA moment!

    Well, I had an AHA, or Trask/radio idea! Chili and Grilled Cheese.  You eat cheese on your chili don’t you?  So, why not eat chili on your cheese, grilled cheese that is.


    There’s no real recipe here – you get the picture!

    BEAN & BACON ROLLS

    BEAN & BACON ROLLS
    4 slices of your favorite bread
    8 slices bacon
    1 small can Bush Maple baked beans

    • Preheat oven to 350˚.
    • Spread Beans on each slice of bread.
    • Roll bread up and secure with 2 slices of bacon with toothpicks.
    • Bake for 30-45 minutes until bacon is crisp.

    ARE YOU READY FOR SOME FOOTBALL?

    I can’t believe pre-season is almost over and it’s almost time!  Don’t forget to come join us and link up all your favorite tailgating goodies throughout the entire 2014-2015 football season!  We’ll open the links on opening day, September 4th, 2014!

    No matter who you are rooting for we’ll have fun.  I know not everyone enjoys football, but who can resist a good football food buffet? It’s time to start thinking about tailgating treats, appetizers, chips and dips, wings, and all the other yummy party things!

    Having a game day buffet just makes it more festive!  I remember when I was a kid, My dad was a big LOS ANGELES RAMS fan. We always watched the games together and I was responsible for keeping the game food fun. I loved spending the day with my dad and it was always such a blast to play armchair quarterback..

    Martha over at Seaside Simplicity began Tailgating Time and it’s just plain fun not to mention a wonderful source for new recipes to try.  We will repost the linky on or around the first of each month as a reminder.

    HAPPY HOMEMAKER & MENU PLAN MONDAY

    GOOD MORNING! I had a great weekend and am looking forward to the last week of August.  If I had to pick a month I hated, it would be August!  Other than our anniversary being in August (which only happened because so much of the family had conflicts with the first date we picked) August has always been a stifling month to me – always too hot, too humid and downright miserable.  So, I am really glad it is on its way out and my favorite time of year is quickly approaching.   
    I LOVE FALL!
    HAPPY HOMEMAKER MONDAY IS HOSTED BY SANDRA at Diary of a Stay at Home Mom .  
    Be sure and stop by to see what it’s all about!

    • A big cup of coffee and then a homemade fruit smoothie (banana, pineapple, strawberry and cherries) before I go to the gym. 
    • Pool in time and then the gym to avoid the warmer water from the humidity of the recent storms.
    • Laundry
    • Groceries & Errands.

    Whatever strikes our fancy off the DVR.  I try not to plan this in advance and just go with the flow at least until the NEW Fall schedule starts.

    Hot as usual! It’s only supposed to be 100 today but it’s now officially monsoon season so the humidity is really unpredictable.

     Menu Plan Monday hosted by Laura at I’m an Organizing Junkie

    DATE BREAKFAST LUNCH DINNER
    MONDAY 8/25 YOGURT
    Peanutty Pork Noodle Salad
    TUESDAY 8/26 BAGEL & CREAM CHEESE
    Mandarin Chicken and Noodles
    WEDNESDAY 8/27 YOGURT
    Chicken Fried Chicken
    THURSDAY 8/28 FRUIT
    Mexican Cobb Salad with Jalapeno Ranch Dressing
    FRIDAY 8/29 CEREAL
    Snapper Wrappers
    SATURDAY 8/30 Oven Omeletes
    Sweet and Sour BBQ Pulled Pork
    SUNDAY 8/31 German Pancake
    Pot Roast – Savory style

     Do a little quilting and finish a few older projects though I have yet to have a few minutes to myself LOL like that’s going to happen.

    I have a list of tons of recipes I want to try.  Stay posted for the results.

    As I combine all my old blogs into this new one I’m also keeping a list of those recipes that I cannot in good conscience bring over until I remake them and take some decent pictures LOL.

    WONDERING who stole my mosaic memorial lights for Dicken’s grave and better yet WHY?

    On a positive note though I really want to make one of these:

     
    On the way home from our anniversary getaway we stopped by the Salton Sea.  If you don’t know about it, you can read about it here.  It’s pretty interesting.   On Friday they issued an ODOR WARNING – not at all uncommon for this time of year in Monsoon Season.

    I’m finding that more and more of my favorite blogs are posting less and less, if at all, but I found that one of my baking blogs is still around.  LICK THAT SPOON is still around.  She has some really beautiful food photography and interesting recipes.

    I’m still looking for that perfect coffee as I must start my day with coffee and then more coffee, but for now this is my signature blend.

    I open all 3 and pour all of the Dunkin’ donuts original blend and Folgers Morning Cafe in. Then I add 1/2 of the Millstone caramel truffle! YUM! Do you have a favorite coffee?

    Guidance as we start the research on our new adventure and home search.

    DELICIOUS FRIED CHICKEN & HELPFUL HINTS PLUS BONUS FRIED CHICKEN ALTERNATIVES

    In an effort to clean out my magazines and cookbooklets, I joined Magazine Mondays hosted by Cream Puffs in Venice many years ago. What I really like is that she isn’t strict about when you post so I can publish these yummy results as I find them. I have this horrible habit of cutting recipes out and throwing them into a box and then I have no idea where the original recipe came from. To be honest it didn’t help me eliminate recipes, but I enjoy it anyway.  I’ve ended up with multiple recipes and they are ALL good so just pick your favorite from this bunch! Both of these recipes make a chicken where the crust doesn’t break apart on the first bite.

    DELICIOUS FRIED CHICKEN
    Cut up chicken pieces
    1/4 cup beer or ginger ale
    1/4 teaspoon baking soda
    1/4 teaspoon salt
    Oil for frying

    • Bring oil to frying temperature in a cast iron skillet.
    • Wash chicken pieces, dry and sprinkle with salt.
    • Whisk together the beer, baking soda and salt.
    • Dip each piece of chicken in beer mixture and then fry.
    • Drain on paper towels.

    BUTTERMILK BRINED FRIED CHICKEN
    3 pounds of your favorite chicken pieces
    3 cups buttermilk
    1/3 cup kosher salt
    3 tablespoons sugar
    2 cups flour
    1/4 teaspoon sea salt
    1/4 teaspoon white pepper
    1/2 tespoon paprika
    1/2 cup buttermilk
    2 jumbo eggs

    • In a very LARGE bowl combine the 3 cups buttermilk, kosher salt and sugar, stirring to dissolve.
    • Add ALL the chicken pieces, turning to make sure each piece is coated in brine. and seal tightly.
    • Chill 3-4 hours, turning occasionally to make sure chicken pieces are well coated in brine.
    • Remove from brine and dry on paper towels. Discard brine. 
    • Heat large skillet with 1 1/2 inches of oil to 350 degrees. OIL WILL BE HOT!!! USE CARE!!
    • Whisk together the eggs and 1/2 cup buttermilk into a shallow dish.
    •  Combine flour, sea salt, white pepper and paprika in a large Ziploc bag. Divide into 2 shallow dishes.
    • Dip each chicken piece in the first flour dish, then the egg dish and then the 2nd flour dish.
    • Add chicken pieces, adjusting as necessary to maintain heat. 
    • Cook 12-15 minutes until golden brown turning only once when you see blood as grams would say.

    NOTE:  LET YOUR USED OIL COOL AND THE STRAIN IT INTO A GLASS MASON JAR.  REFRIGERATE AND IT CAN BE USED 2-3 MORE TIME IN THE THE NEXT SEVERAL MONTHS.  BE SURE TO STRAIN IT EACH AND EVERY TIME!

    HELPFUL HINTS FOR FRYING CHICKEN:

    • SIZE DOES MATTER. Try to cook pieces similar in size at the same time.
    • DO NOT CROWD YOU PAN.  Cook in batches allowing plenty of room for the oil to make your crust crisp.
    • BUTTERMILK BRINE:  Buttermilk brine on chicken as well as beef acts like an enzyme to break down muscle fibers and fat allowing more flavor to be tasted in the finished product.
    • ROOM TEMPERATURE! Bringing your pieces to room temperature before the wash and dredge does 2 helpful things – 1) your oil will not cool as much or as fast giving you an even cooking and 2) your wash and dredge will stay put better making a crispier chicken.

      HAPPY HOMEMAKER & MENU PLAN MONDAY

      www.familycorner.blogspot.com

      Good Morning! We had a lazy weekend and today is our anniversary so I am ready for an even greater new week.  

      It’s Monday morning and I’m really enjoying getting back into a regular routine here at my new and improved blog. Right now I’m still in the process of bringing posts over and organizing recipe lists, but soon – VERY soon I’ll be back to just every day life and blogging about it.

      I join in with Sandra who host Happy Homemaker Monday at Diary of a Stay at Home Mom.  Be sure and stop by to see what it’s all about!

      • Breakfast out!
        • Play day with hubby for our anniversary – a little antiquing, eating out and just having fun.

          Whatever strikes our fancy off the DVR.  I try not to plan this in advance and just go with the flow at least until the NEW Fall schedule starts.

          HOT & HUMID! YUCK!! But, we’re heading over the mountain towards the coast and 20 degree cooler weather.

           Menu Plan Monday hosted by Laura at I’m an Organizing Junkie


          DATE BREAKFAST LUNCH DINNER
          MONDAY 8/18 OUT OUT OUT
          TUESDAY 8/19 CEREAL ?? Roasted Stuffed Peppers
          WEDNESDAY 8/20 YOGURT ?? Chicken & Green Chile Flautas
          THURSDAY 8/21 FRUIT ?? CADILLACS – Parmesan Roast Beef
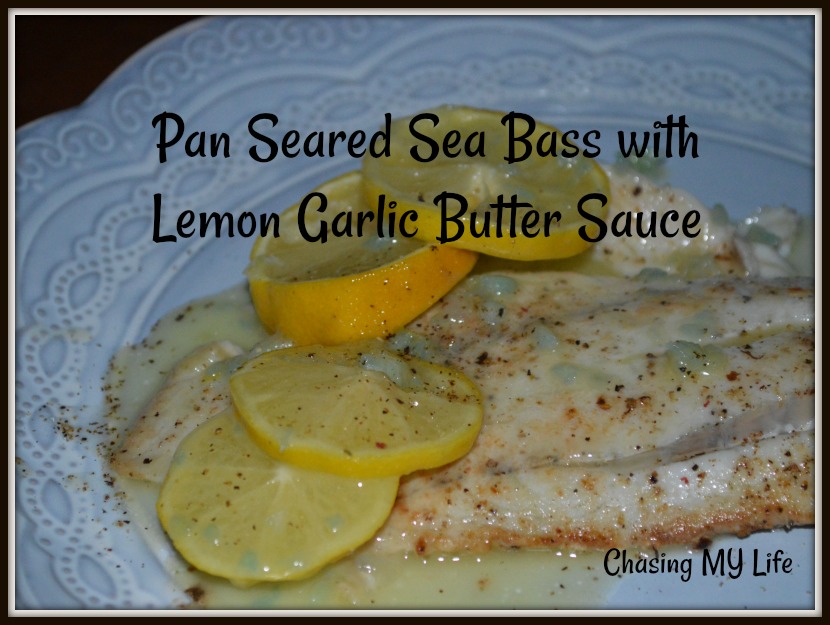
          FRIDAY 8/22 ?? ?? Pan Fried Snapper with White Wine Lemon Butter Sauce
          SATURDAY 8/23 Buttermilk Waffles  ?? Caribbean Pork Steaks 
          SUNDAY 8/24 Quiche Lorraine ?? BBQ Salami Roast Chicken

          Do a little quilting and finish a few older projects though I have yet to have a few minutes to myself LOL like that’s going to happen.

          I have a list of tons of recipes I want to try, but I’m trying to go with the most unusual first.  So this week it is PB&J Pancakes & Krabby Chicken Casserole.  Stay posted for the results. I did rework an old recipe this weekend for a fun new recipe of Apricot Pork Chops and Scalloped Potatoes.

          As I combine all my old blogs into this new one I’m also keeping a list of those recipes that I cannot in good conscience bring over until I remake them and take some decent pictures LOL.

          Nothing special as it is monsoon season and unbearable to be outside except to go to the pool.

          I got a great photo of the sunset this weekend.
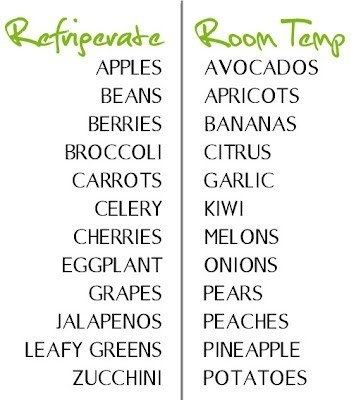
          I found this in my box of recipes – would love to tell you what publication it came from, but I just don’t know.  I did think it was a handy thing to remember.

          So what will you be making with this new knowledge?

          I’ve been trying to clean out my feedly and so many of my favorite blogs are just gone – so sad.  But I ran across Cooking Classy that used to be one of my favorites and found she’s still cooking up a storm. I just love the layout of her blog and the clean fresh look.

          Still wondering why Acronyms and Avatars have taken over the world! People no longer speak (or write) in whole sentences and are obsessed with images of themselves!

          Guidance as we move forward and start again in a home search. While we are sad that the home we had our heart set on is not not going to happen we are elated that we are realizing the signs are pointing (and have been we were just to dense to see) that we were meant to go in a different direction entirely.

          APPLE RUM RAISIN NOODLE PUDDING

          I remember the first time I had NOODLE PUDDING – my little Jewish neighbor brought it over as a welcome to the neighborhood back in 1986. She called it noodle pudding. It was so delicious. I wanted to ask her for the recipe, but I’d just met her and I was young and shy. I made her my floating fruit cake in the same pan she’d brought over and returned it to her to ask for the recipe. I remember how hard she laughed at me. She said it was a Jewish custom to always return a plate, bowl or dish full and of course I could have the recipe.   

          I’ve adapted it to suit my families tastes over the years and cut back on the amount of sugar but it is still a favorite!  I’ve also found other versions that have helped me repeatedly adapt it into what it is today.  My neighbor and I  became fast friends and shared LOTS of cherished family recipes before I moved from the neighborhood in 15 years later.

          APPLE RUM RAISIN NOODLE PUDDING

          2 cups dry wide egg noodles

          2 beaten eggs
          1/2 cup sugar
          8 ounce crushed pineapple, drained well
          1/4 cup golden raisins

          1/4 cup golden rum
          3/4 teaspoon vanilla
          2 tablespoons butter, melted

          1 teaspoon cinnamon
          1 cup milk

          1 GALA apple, peeled, cored and grated

          • Cook and drain the noodles
          • Combine all other ingredients together
          • Fold into warm noodles
          • Generously spray an 8×8 baking dish with PURE
          • Gently spread entire mixture into dish evenly
          • Bake at 325 degrees for 45 minutes

          Homemade Puffy Pastry for Baking Partners & APRICOT RUM RAISINS

          This month we’re trying our hand at homemade puff pastry.  Gotta tell you I’ve done this before and everyone should try it at least once, but I now have no problem spending the extra money for Pepperidge Farm to do it for me.

          This recipe is suggested by Sangeetha Priya of Nitha Kitchen. She made homemade spinach pinwheels, but I am just not into spinach that much so I changed mine to a sweet pastry – APRICOT PINEAPPLE DANISH.
           

          HOMEMADE PUFF PASTRY    Recipe Source :- BBCFood 
          You can make the pastry a day before and store in refrigerator or freeze it for longer use!!!

          2 cups strong plain flour (I use King Arthur)
          1 cup butter at room temperature, but not soft
          1 teaspoon sea salt (I used Makrut Lime Sea Salt from Savory Spice Shop
          2/3 cup cold water
          • Sift the flour and salt into a large bowl. Make a well in the flour and pour in about two-thirds of the cold water, mixing until you have a firm rough dough adding extra water if needed.
          • You can use food processor/blender at this time.
          • Turn out onto a lightly floured board, knead gently and form into a smooth rectangle.
          • Cover with cling film and leave to rest for at least 20 mins in the fridge. Overnight works too.
          • Roughly break the butter in small chunks, use two parchment paper and chunk them loosely. You need to see bits of butter.
          • Using Knife or scale and bring it to shape and store in refrigerator with the same parchment paper till use.
          • Now roll the dough with thick center, place the butter at center and seal it properly.
          • Roll the dough in one direction only, until 3 times the width, about 20 x 50cm.
          • Keep edges straight and even.
            DON’T OVERWORK THE BUTTER STREAKS – YOU SHOULD HAVE A MARBLED EFFECT.
          • Fold the top third down to the center, then the bottom third up and over that.
          https://images-blogger-opensocial.googleusercontent.com/gadgets/proxy?url=http%3A%2F%2F3.bp.blogspot.com%2F-pHMU44MQ7qA%2FU8nUTQZ173I%2FAAAAAAAAEJ8%2FXBRDk-CxAoo%2Fs1600%2FPuff_4.jpg&container=blogger&gadget=a&rewriteMime=image%2F*
          • Give the dough a quarter turn (to the left or right) and roll out again to three times the length.
          • Fold as before, cover with cling film and chill for at least 20 mins before rolling to use.
          • Roll and fold four more times, chilling after two.
          • You can fold 4 times the previous day and then next day you can fold two times.
          • In the whole process brush off the excess flour over the pastry dough.
          • Chill the dough for an hour or more before using.
          NOTE:
          1. When you feel the dough is sticky just chill in refrigerator before the next fold.
          2. You can check out this video for making the puff pastry.


          I tried a design and wasn’t totally thrilled with it, but I’ll go back to a rope design next time.

          APRICOT RUM RAISINS

          1 cup butter
          1 cup milk
          1 1/2 cups warm water
          1 cup sugar
          2 teaspoon salt

          1/2 teaspoon cinnamon

          2 tablespoons yeast
          4 eggs, beaten
          7 1/2 cups flour
          • In a saucepan melt butter.
          • Add milk and water whisking until smooth consistency and JUST boiling.
          • Cool 5-10 minutes so you don’t kill the yeast.
          • Add the sugar, salt and yeast to form a sponge like blob.
          • Add the eggs until uniform consistency.
          • In a mixer with a dough hook attached, combine flour and yeast mixture.
          • Knead well. Put in refrigerator for at least several hours, but overnight is better.
          • Preheat oven to 375 degrees.
          • Roll a ball of dough the size of a golf ball into a rope and coil into a circle. Make sure the center is thinner than the outer edges to hold the filling in. Sometimes I prefer squares, but you just have to work with your dough after you have it coiled.
          • Fill with a heaping tablespoon of filling per danish (recipe below).
          • Let rise an hour in a warm place.
          • Bake 15 minutes.
          • Frost with Cream Cheese Frosting (see below). If you prefer a drizzle thin out this frosting with a couple extra tablespoons of milk until desired consistency.
          Cream cheese apricot raisin filling
          1 bag large dried apricots, chopped

          1/2 cup golden raisins, chopped
          1/4 cup golden rum

          • Soak apricots and raisins in rum for an hour or overnight.
          • Drain off rum.
          • Set aside.
          8oz pkg cream cheese
          1 egg
          1/2 cup powdered sugar
          1/2 tablespoons grated orange peel
          • Blend cream cheese, egg, powdered sugar and orange peel together until smooth.
          • Fold in apricots and raisins into the cream cheese mixture. Or my favorite is to fill them as 2 separate fillings with the cream cheese first and the apricot in the center of that.

          Cream Cheese Frosting
          16 ounces cream cheese, softened
          1/2 cup butter, softened
          juice of 1 lemon
          2 teaspoons pure vanilla extract
          3 cups powdered sugar

          • In a medium bowl beat cream cheese and butter until smooth.
          • Add lemon juice and vanilla. Beat until blended.
          • Add powdered sugar gradually until well blended and smooth.
          • Ice first layer and then add 2nd cake top and ice again including sides of cake.
          • Refrigerate 1 hour to set icing before serving.


          Save