Fire Day Friday: Peanut Butter Pie with Vanilla Bean Whipped Cream

Yes, yes, I know.. this has nothing to do with grilling… but I will admit to you that I completely forgot that it was my turn to post today, so I’m giving you the same post I have up on my site.  I figured almost everyone would be able to forgive me if I could give you such a great recipe you forget it’s not done over fire 🙂 

I’ve been wanting to make this pie since I first saw it on the Taste of Home website.  The problem is, if I make a pie, it’s just Chris and I and… well… frankly… we’ll eat the whole thing.  No, not in one sitting, but still, we end up eating a whole pie.  I feel bad that in 3 or 4 days (or less depending on the size of each slice), I’ve eaten half a pie.. it just feels wrong (yet oh so right) – so, I don’t make a lot of pies, hence why it took me so long to make this 🙂 

The nice thing about the holiday season is that I don’t guilt myself about eating half a pie in a matter of days.  So, when Chris suggested making a dessert of some kind for Thanksgiving, I immediately said.. Peanut Butter Pie!!!  Mmmmmmmm!!!  He happily agreed. 

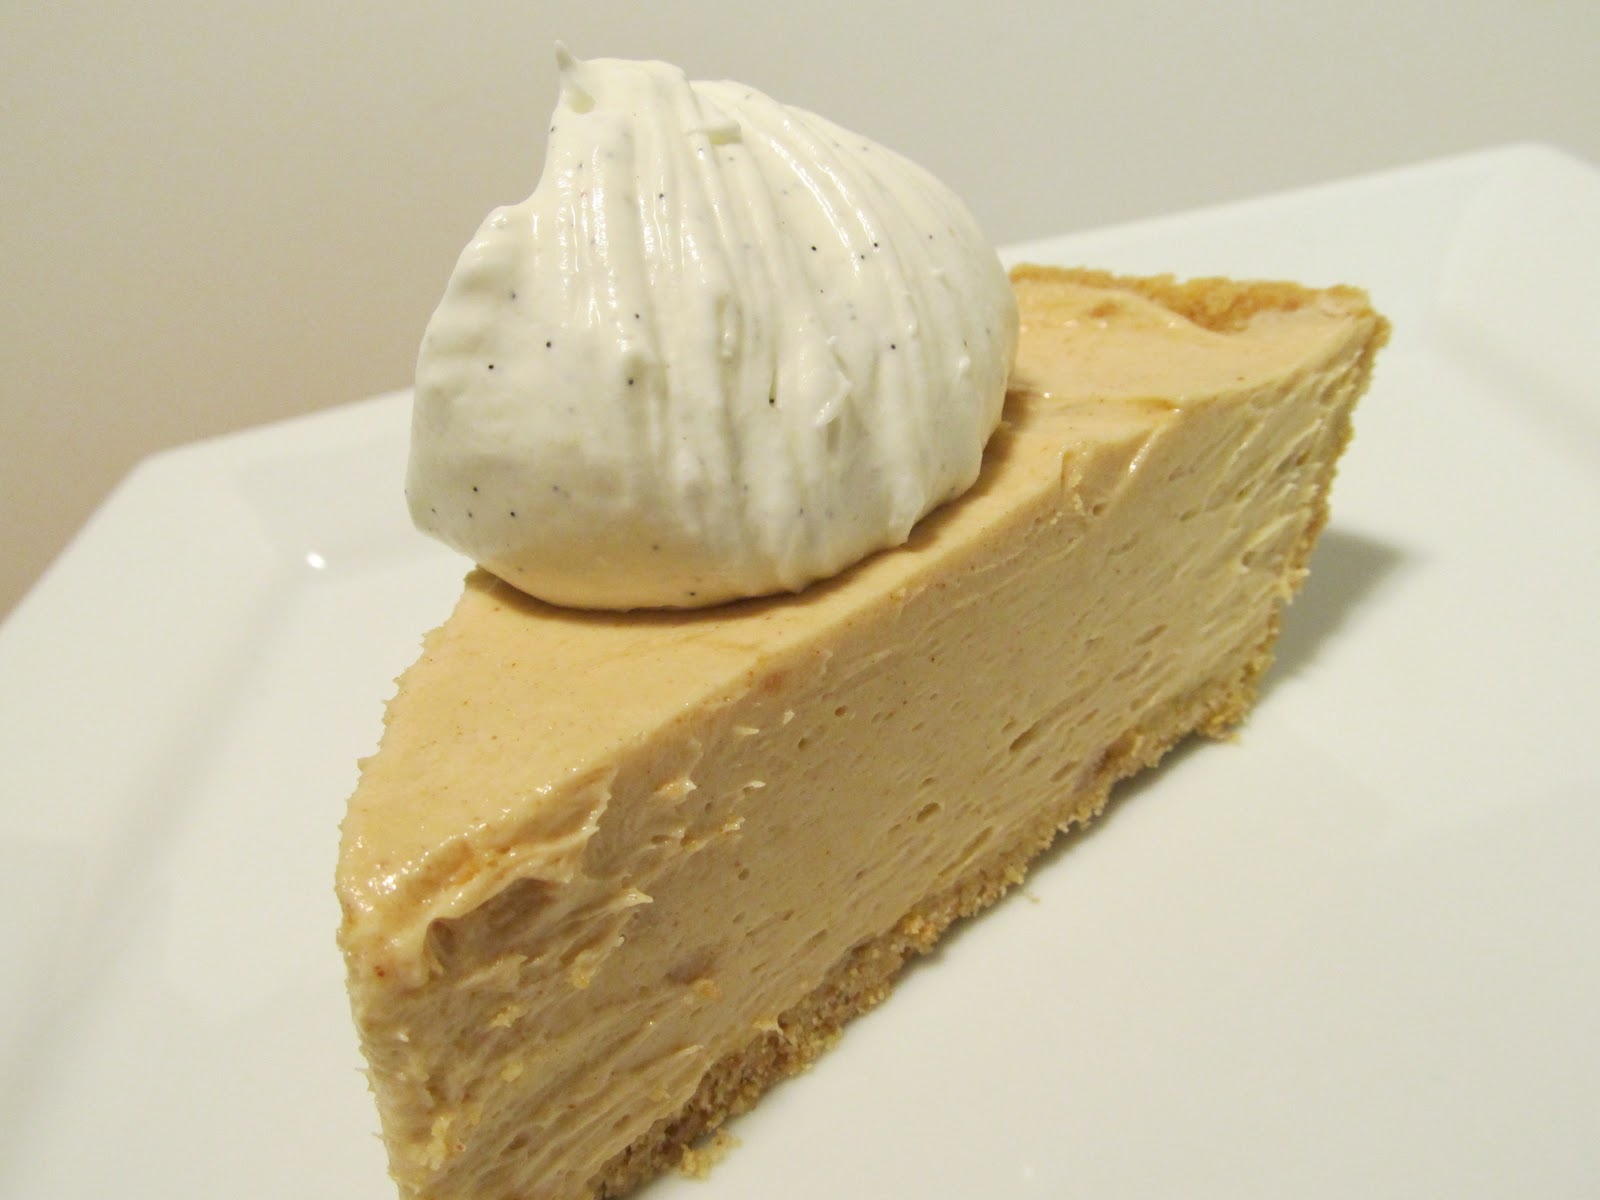
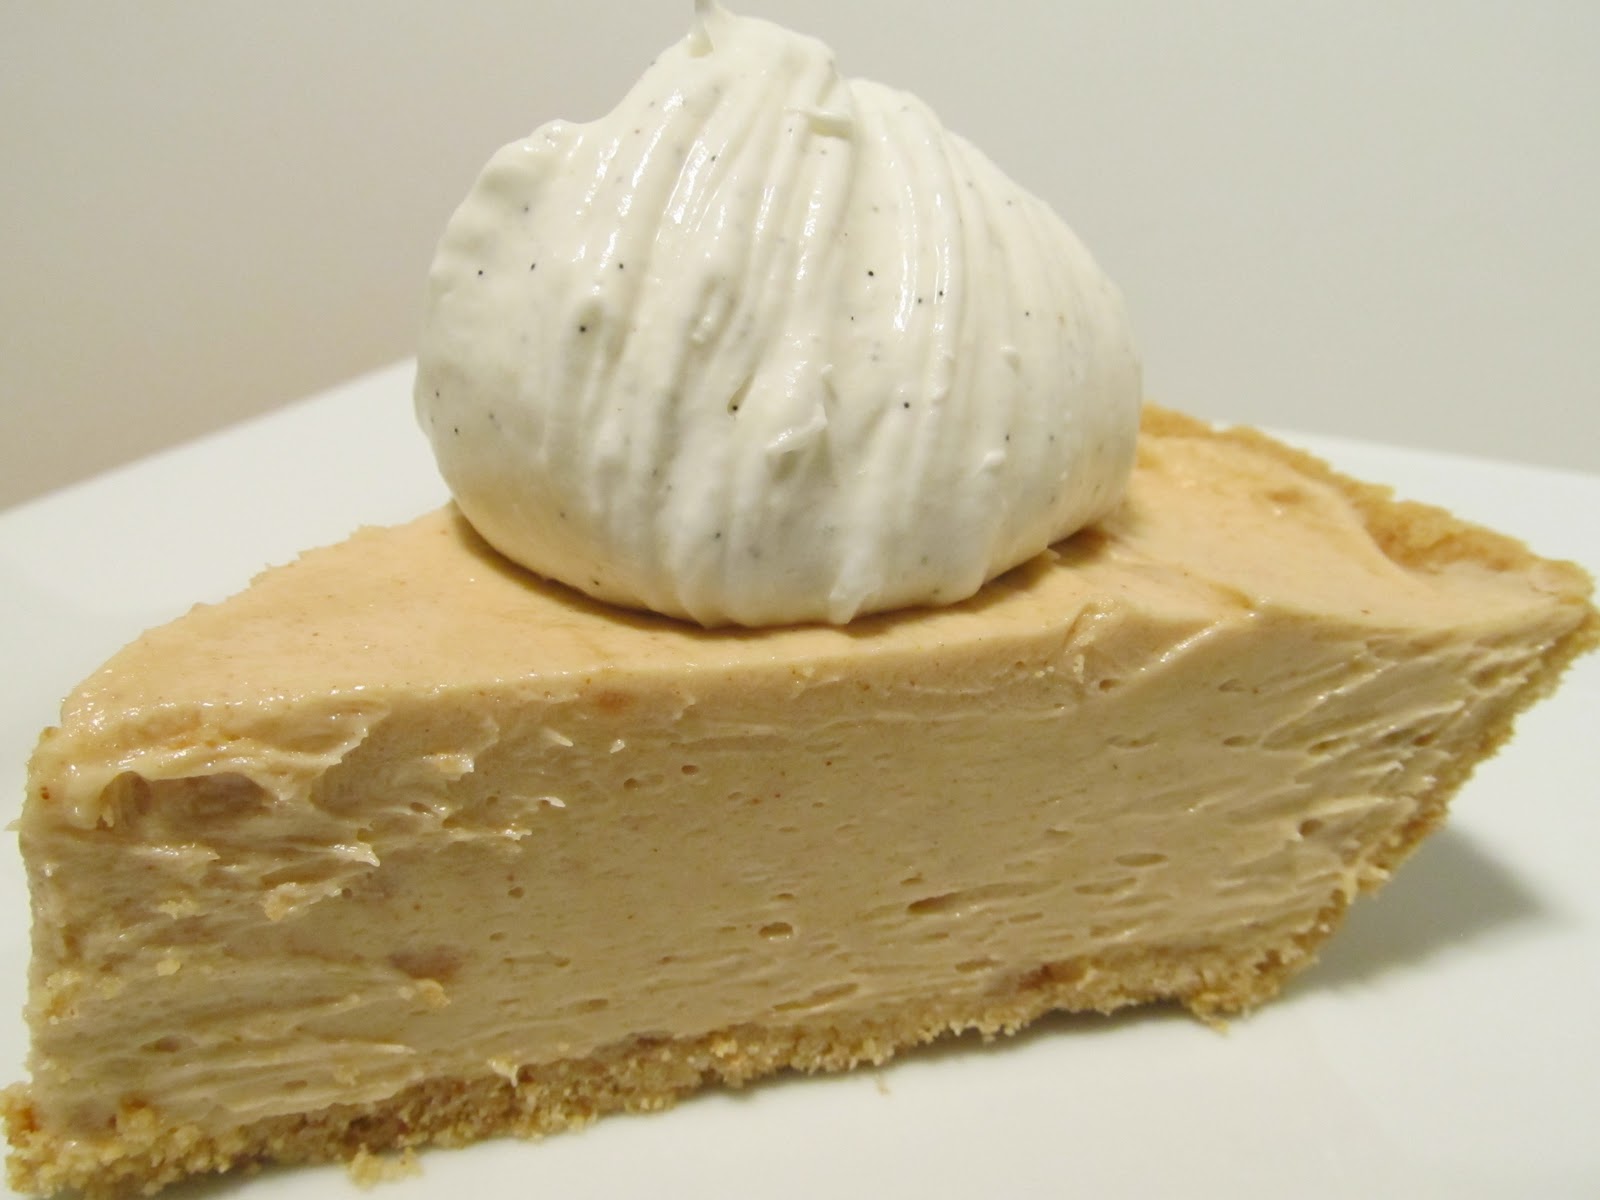
Now, had I been thinking proactively, I probably would have added some vanilla bean into the pie mixture, but for some reason I had it in my mind to make vanilla bean whipped cream and didn’t think past that.  That’s ok, the pie was incredibly fantastic and the homemade whipped cream was just the icing on the cake… or the whipped cream on the pie in this case, I guess you could say.  The pie is simple, the whipped cream is simple, there is no excuse NOT to make this.

Peanut Butter Pie with Vanilla Bean Whipped Cream
Pie recipe courtesy Taste of Home, Whipped cream recipe created by Jenn’s Food Journey
Printable Recipe 
Ingredients:
3/4 cup creamy peanut butter
4 oz cream cheese, softened
1 cup powdered sugar
1 (8oz) carton frozen whipped topping, thawed
1 9-inch graham cracker pie crust
For the Whipped Cream –
1/2 cup heavy whipping cream
1 vanilla bean, split and scraped
3-4 Tablespoons powdered sugar (you may want to use more or less depending on taste and consistency you desire)

Directions:
In a large bowl, beat the peanut butter, cream cheese, and 1 cup powdered sugar together until smooth.  Fold in whipped topping; pour into pie crust.  Chill for at least 4 hours.

To make the whipped cream – add the whipping cream and vanilla bean to a bowl.  Beat in the powdered sugar one tablespoon at a time until you get the right flavor and consistency.  Serve on top of pie.  Refrigerate any leftovers.  Enjoy!


TURKEY BACON ENCHILADAS

Need something to do with those turkey leftovers? 
I love this time of year. All the super cheap turkeys around. I’ll cook one up just to shred it for meals like this!  Enchiladas, soups, casseroles, potpies…tons of things to do with shredded turkey! 
…and of course the bacon makes it better!!

Smokey Bacon Enchiladas Recipe Adapted from Meg’s Cooking Corner

Filling:
1 large yellow onion, thinly sliced
4 cloves garlic; minced
5 cups cooked chicken breast; shredded
1 tsp chili powder
1 tsp ground cumin
3 oz. shredded cheddar cheese
salt and pepper to taste
15 – 100 calorie whole wheat flour tortillas

Sauce:
1 can condensed cream of chicken soup
1 1/4 cup sour cream
1 (4 oz) can diced green chilies
3 cloves garlic; minced
1/2 cup cooked crumbled bacon
1 1/2 tsp chili powder
1 tsp cumin
salt and pepper to taste

Topping:
5 oz. shredded cheddar cheese
1 green onion, finely chopped

Preheat oven to 350,
 
In a medium sized bowl combine all sauce ingredients and stir to mix well. Set aside.
 
 In a pan sprayed with cooking spray, add onions and cook until onions are soft. Add garlic and cook for a couple more minutes. Remove to a large mixing bowl. To the onions, add chicken, chili powder, cumin, salt and pepper, shredded cheese and 3/4 cup of the prepared sauce. Stir to mix.

Spoon 3/4 cup of the sauce into the bottom of the 9 x13 baking pan and spread evenly. Warm tortillas slightly until they are soft and flexible. Spoon 1/2 cup of the chicken filling down the center of each tortilla. Fold in the ends and roll up the tortillas. Place seam side down in the Dutch oven or baking pan. Spoon the remaining sauce over the top and top with cheddar cheese and green onions.

Bake in 350 oven for 30 minutes or until hot and cheese is bubbly.

We put 10 enchiladas in a 9 x 13 pan and then 5 of them in an 8 x 8 pan and froze the small pan. 

Total calories = 4500
15 servings = 300 calories per enchilada

2 Bacon Enchiladas = 600 calorie dinner

S’mores and Turtle Kiss Pies–Save Room for Dessert

This is my kicked up version of the kiss pie. A Hershey’s kiss and a little pie crust just wasn’t enough to satisfy my sweet tooth. If a little bit of caramel, pecans, and chocolate sound good to you then we’re on the right track. If marshmallows, graham cracker crumbs, and chocolate are more your style, I’ve got something for you too!

Let’s Get Started:

Turtle Kiss Pies
1 refrigerated pie crust (I rolled mine out to make it a little thinner)
Pecans
Caramel bits
Hershey kisses
3 Tablespoons of melted butter
1 Tablespoon sugar

I didn’t give exact measurements because it’s going to depend on how much you want to put into each kiss pie and how large you cut your squares or circles from the pie crust.

I placed a Hershey kiss, several caramel bits, and a couple of pinches of pecans on top of the pie crust and then cut a square big enough to be able to pull the sides together. Using a glass and cutting a circle out will work too.
Pull the sides together above the kiss to seal everything in.
This step is optional–Melt butter and stir in sugar to combine. Brush the top of each kiss pie with melted sugar butter.
Place on a greased cookie sheet and bake for about 15 minutes on 400 degrees F .
Optional–Sprinkle with powdered sugar
S’mores Kiss Pies
1 refrigerated pie crust (I rolled mine to make it a little thinner)
Hershey kisses
marshmallows
graham cracker crumbs
3 Tablespoons of butter
1 Tablespoon of sugar

I didn’t give exact measurements because it’s going to depend on how much want to put into each pie and how large you cut your squares or circles from the pie crust.


I placed a Hershey kiss, a few marshmallows, and a couple of pinches of graham cracker crumbs on a section of the pie crust and cut squares around it, allowing enough space to fold the edges together.

I added 4 marshmallows to each kiss pie but will add more next time. Four just didn’t seem to be enough.
Bring the edges together above the kiss and seal.
This step is optional–Melt butter and stir in sugar to combine. Brush the tops of each kiss pie.

Bake for about 15 minutes on 400 degrees F on a greased cookie sheet.
Optional–Sprinkle with powdered sugar
Come visit me at Paper Plates and China

TAILGATING TIME 2.0

IT’S OFFICIAL – FOOTBALL SEASON IS HERE!
We have decided to make a change this year in the way Tailgating Time will work. Instead of a new linky for each week we will be using the same linky to keep all the great recipes in one place. This will provide easy access to the recipes and create one big awesome recipe index collection. There is no limit to how many you add – of course we hope you will add a new recipe each and every week! Tailgating Time will generally be posted each week on Sundays at noon.

It doesn’t matter if you are a football fan or not, great party food is always a good thing. Bring over your grilled goods, chips and dips, appetizers, chili and chowders, cocktails, or any recipes that would be great for the football party buffet!

If any of you would like to host along with us you can click –> get the InLinkz code to add the linky to your blog too. You can post it once in awhile or every week during football season, that’s up to you. The only thing we ask is that you leave a comment here to let us know you are co-hosting, and that you visit and comment on as many of the participants as you can. 
 
 We can’t wait to see what you will bring to the party. Let the games begin. Whoo-hoo!

MAGIC BEANS and RICE ~ Fire Day Friday

I hope everyone had a Happy Thanksgiving and safe travels.  

I took this on a walk at our family’s cabin in North Carolina yesterday.

These purple hull beans that we picked up at the farmers’ market aren’t really magic. They just turn color while cooking and end up looking like regular green beans. But “Beans that change color and rice” just didn’t sound that catchy.
But if you have kids and can get your hands on some purple hull or purple teepee beans, you have to show them and say you have “kitchen magic”. The purple beans will turn green in less than the first 60 seconds of boiling.
I made these to go with my barbecue chicken a while back, so this kind of counts for Fire Day Friday.
It’s ironic that I’m posting about these since they were the ONLY part of the meal not cooked on the grill.
I barbecued chicken.
I fire roasted new potatoes in garlic butter.
Alexis even baked rolls on her Big Green Egg.
Not Green Beans and Rice
  • 1 cup long grain rice
  • 1 pound purple hull beans (or substitute green beans)
  • 1 teaspoon salt
  • 1 clove garlic, diced
  • 3 tablespoons butter
  • 1 tablespoon oil

Instructions

    1. Cook the rice according to directions.
    2. Boil the purple or green beans about 4-5 minutes and then shock them in an ice bath to stop the cooking and preserve their color. (Chlorophyll, the pigment in green veggies is sensitive to heat and acids.  Unfortunately, there’s no saving the purple in purple hull beans, they are going to turn green when you cook them.)
    3. “French” the green beans by slicing them 3-4 times each on a sharp diagonal. Season with the salt. Toss into the rice, fluffing with a fork.
    4. Put the butter and oil in a preheated pan over medium heat. Saute the garlic until turning golden. Pour over the rice/bean mixture.

      Bean & Sausage Cassoulet

      I’ve already made this twice.  It was that good. It’s on the higher side of calories per portion but it was super filling.  It was wonderful to have this is the refrigerator for lunches all week.

      I don’t cook with sausage too often but I happened to have 2 packages of sausages.  Which is why I ended up making this twice.  I could probably drop the calories by adding chicken instead but the sausage was SOOOO good!  I also loved the slight tang from the red wine.  You could use beef broth but I encourage the red wine as it tasted wonderful!

      Bean and Sausage Cassoulet Recipe

      1 (15 oz) can of black beans
      1 (15 oz) can of white beans
      1 (15 oz) can of red kidney beans
      1 lb. turkey sausage, diagonally sliced
      1 (15 oz) can tomato sauce
      3 medium carrots, thinly sliced
      1 large onion, sliced into rings
      1/2 cup dry red wine or beef broth
      2 tbsp. brown sugar
      1 1/2 tsp. thyme
      3 cloves garlic, minced

      Preheat oven to 375. Mix all ingredients in an ungreased 3 qt. casserole dish. Cover and bake until carrots are tender, about 1 hour or until hot and bubbly. 

      Total calories = 3320 calories
      8 servings = 415 calories per serving

      TAILGATING TIME 2.0

      IT’S OFFICIAL – FOOTBALL SEASON IS HERE!
      We have decided to make a change this year in the way Tailgating Time will work. Instead of a new linky for each week we will be using the same linky to keep all the great recipes in one place. This will provide easy access to the recipes and create one big awesome recipe index collection. There is no limit to how many you add – of course we hope you will add a new recipe each and every week! Tailgating Time will generally be posted each week on Sundays at noon.

      It doesn’t matter if you are a football fan or not, great party food is always a good thing. Bring over your grilled goods, chips and dips, appetizers, chili and chowders, cocktails, or any recipes that would be great for the football party buffet!

      If any of you would like to host along with us you can click –> get the InLinkz code to add the linky to your blog too. You can post it once in awhile or every week during football season, that’s up to you. The only thing we ask is that you leave a comment here to let us know you are co-hosting, and that you visit and comment on as many of the participants as you can. 
       
       We can’t wait to see what you will bring to the party. Let the games begin. Whoo-hoo!

      Caramelized (or at least it should have been) Chipotle Chicken – Fire Day Friday

      Sometimes, when you skip a step in a recipe, the outcome can still be really good, but the final product just isn’t quite what you had envisioned.  Take this lovely piece of chicken.  Had I not been in a hurry and allowed my glaze to cook and thicken, I truly would have had a piece of chicken that was wonderfully caramelized.  But, life gets in the way sometimes and well, like I said, the chicken was still pretty dang fantastic… it’s just that…. well.. it could have been that much better!

      So the lesson here is…. don’t skip any of these steps.  Take the extra few minutes and I promise, you will not be sorry.  Your chicken will be a bit spicy, a bit sticky, and a ton of oh so good!!

      Caramelized Chipotle Chicken
      Created by Jenn’s Food Journey

      – Serves 2 –

      Printable Recipe 
      Ingredients:
      2 boneless, skinless chicken breasts
      2 Tablespoons ketchup
      1 Tablespoon chipotle puree (to make puree, dump entire contents of chipotle peppers and adobo sauce in a can into your food processor and puree)
      1 teaspoon Dijon mustard
      1 teaspoon Worcestershire
      1 teaspoon cider vinegar
      1 teaspoon brown sugar

      Directions:
      In a small saucepan over medium heat, add all ingredients except the chicken and bring to a boil.  Reduce heat and allow to simmer for 5 minutes or until the sauce thickens up just a little bit.  Remove from heat and allow to cool.

      Preheat grill to 375 degrees F and oil grill grates.  Brush a little of the glaze on both sides of the chicken and place directly over the fire and cover.  Allow to grill for 6 minutes.  Flip the chicken and brush with more glaze.  Grill another 6 minute, flip and brush on more glaze.  Let the chicken finish cooking (internal temp of 165 degrees F.) and then remove from grill.  Brush on more glaze if you prefer and allow to rest for 3 minutes before serving.  Enjoy!

      Ice Cream Cake-Save Room for Dessert

      White Chocolate Macadamia Nut flavored ice cream with a white cake mix
      Today I’ve got an ice cream cake for you. But, not like you might think. 
      This cake uses a cake mix which usually isn’t my first choice but is worth the exception in this case.
      This cake is simple and extremely moist. 
      Not to mention there are so many flavor combinations.

      Red Velvet Ice Cream with Red Velvet Cake Mix
      Ice Cream Cake
      Recipe from Omnomicon
      1 box of cake mix (any flavor)
      1 pint of ice cream–softened (any flavor)
      3 eggs
      1 cup of water
      Preheat oven to 350 degrees F
      Grease pan 9 x 13 or bunt pan
      Beat all ingredients for 4 minutes. Pour into prepared pan and bake for 45 minutes.
      Serve with your favorite frosting or glaze. 
      I used a powdered sugar/milk glaze.
      Please come visit me at Paper Plates and China
      

      BUFFALO CHICKEN STUFFED SHELLS

      Buffalo Chicken Stuffed Shells Adapted from Sugar Crafter
      1 package 12 oz. jumbo shells
      13 oz. cooked and shredded chicken breast
      3/4 cup hot sauce, I used Franks
      3 oz. sharp cheddar cheese, shredded
      3 oz. mozzarella cheese, shredded, part skim
      3 oz. parmesan cheese, shredded
      1 1/2 cup ricotta cheese, part skim
      1 (8 oz) pkg. cream cheese, light
      1/2 cup ranch dressing, light

      Directions:  Prepare pasta shells as directed on package. Mix all the ingredients except for the shells in a large bowl. Stuff each shell with as much filling as it will hold. Preheat oven to 350 degrees.  Place in a dish sprayed with cooking spray. I put these in a 9 x 13 and an 8 x 8 casserole. Top with green onions if desired.

      Modifications:
      -I used Frank’s Buffalo Wing Sauce
      -I added extra chicken and cheese on top of the shells.

      Here’s what you’ll need:
      • Put the chicken in water to cook.  Also, cook the shells according to the package directions.
      • Preheat the oven to 350 degrees.
      • Mix together the wing sauce, cream cheese, ricotta, and cheeses.
      • Take the chicken out and shred it.  Add it to the wing sauce mixture.

      • Drain the shells and place them in a greased baking dish.
      • Spoon the mixture into the shells.
      • Into the oven for about 10-15 minutes (that’s my pizza stone underneath the dish)  
      I decided to add a bit more chicken and cheese to the top of the shells.
      Here’s what you’ll end up with:

      TAILGATING TIME 2.0

      IT’S OFFICIAL – FOOTBALL SEASON IS HERE!
      We have decided to make a change this year in the way Tailgating Time will work. Instead of a new linky for each week we will be using the same linky to keep all the great recipes in one place. This will provide easy access to the recipes and create one big awesome recipe index collection. There is no limit to how many you add – of course we hope you will add a new recipe each and every week! Tailgating Time will generally be posted each week on Sundays at noon.

      It doesn’t matter if you are a football fan or not, great party food is always a good thing. Bring over your grilled goods, chips and dips, appetizers, chili and chowders, cocktails, or any recipes that would be great for the football party buffet!

      If any of you would like to host along with us you can click –> get the InLinkz code to add the linky to your blog too. You can post it once in awhile or every week during football season, that’s up to you. The only thing we ask is that you leave a comment here to let us know you are co-hosting, and that you visit and comment on as many of the participants as you can. 
       
       We can’t wait to see what you will bring to the party. Let the games begin. Whoo-hoo!

      Fire Roasted Screwdriver Chicken – Fire Day Friday

      I have your curiosity, right?

      But not screwdriver as in Craftsman.  I’m talking about the screwdriver cocktail.

      I used the classic cocktail as a base for a “mop” for chicken roasted on the grill.  A “mop” is kind of like a BBQ sauce but it is thinner and you baste it on several times during the cook instead of just the last few minutes.  It builds on layers of flavor with each baste.
      Fire Roasted Screwdriver Chicken serves 4
      Ingredients
      • 4 bone in, skin on chicken breasts
      • 1 tsp kosher salt
      • 1 tsp paprika
      • 1/2 tsp black pepper
      • 1/2 tsp garlic powder

      For the Screwdriver mop

      • 3/4 cup orange juice
      • 1/4 cup vodka
      • 1/4 cup white wine vinegar
      • 2 Tbsp oregano, finely chopped
      • 2 Tbsp parsley, finely chopped
      • 1 Tbsp chipotle hot sauce
      • 1 Tbsp garlic, minced
      • 1 Tbsp red pepper flake
      • 1/2 tsp kosher salt

      Instructions

      1. Preheat your grill to 325f  (medium) for an indirect heat cook.  That means you push your hot coals to one side of the grill and you’ll cook over the empty space.   I added a 4″ chunk of cherry wood for a little smoke flavor.
      2. Season the chicken breasts heavily but evenly on both sides.  Place chicken skin side up on the grill over the void (not the coals), close the lid and cook for 30 minutes.
      3. Meanwhile whisk the mop ingredients together.  After the first 30 minutes, “mop” the sauce onto the chicken.  Old time pitmasters would use an actual small mop tool to do this.  You can replicate that by dabbing the sauce onto the chicken with a basting brush.  Dabbing instead of brushing gets more of the solid herbs and spices onto the chicken.  Repeat every 15 minutes.
      4. Cook for another 45 minutes to 1 hour (total cook time 1 hr 15 min to 1 hr 30 min), until the breasts have an internal temperature of 160f.
      5. Remove from grill, allow to rest for 5 minutes.  Slice the rib bones from the meat and then slice into medallions for serving.

      Notes
      Sure, you could do this in your oven at the same temp but you won’t get the smoky flavor and don’t blame me if you get the sugary mop sauce on the bottom of your oven and it burns 🙂

      Optional:  Brine the chicken for 4 hours.  It’s worth the time!


      Waiting to mop until after 30 minutes lets a crispy skin start to form first.


      The layers of mopping build texture and flavor.


      Slice the bones off lengthwise first, then slice into medallions like this.