Pan Seared rib Eye Steak

Sometimes you just want a great steak.  No fancy marinades, no fancy sauces, no fancy spices…  And much as I like my Grill… Sometimes you just want to have pan to serving plate in less than 15 minutes.  Give this a shot and you may never eat a steak another way… The technique comes a bit from Alton Brown.  Although he finishes in the oven (which I would do if using a thicker slice of meat).  Here’s the key… HOT HOT HOT pan.  Not a hot pan with oil, but a HOT pan. I use my cast iron skillet for this.  Heats evenly, retains heat and is so much fun to hear the sizzling steak when you start cooking.  Fair warning, the process will cause smoke.  No, it is not burning, but you do want to have a window open or the fan over your stove top running.
OK, here we go…
  • 2 – 1 inch thick Boneless Rib-eye Steaks (about a 8 oz each) 
  • 1 teaspoon Canola Oil 
  • 1 TBS Kosher Salt 
  • 1 TBS freshly ground Black Pepper
  1. Allow steaks to come to room temperature for 1 hour.
  2. Heat your skillet… High for 5 minutes.  No oil, no seasonings… just cast iron and heat.  You want the skillet to be about 500 degrees.
  3. Lightly coat steaks with conola oil, then liberally sprinkle with salt and pepper.  Place the steaks in the pan and do not touch them for 1 minute.  Use a kitchen timer.  (Note: expect a lot of smoke, turn the fan on your hood).
  4. Flip the steak with tongs (note: NEVER use a fork, never put holes in your meat when cooking, always use tongs) and cook for another 1 minute.  Your steaks are now temped @rare.
  5. Repeat each side for 1 minute each and your steaks are @medium rare (perfect for me)
  6. Repeat each side for 1 minute each and your steaks are @medium (perfect for Jackie)
  7. OR… Check the internal temperature of your steaks.  Medium Rare steaks are done when they reach an internal temperature of 130 to 135 degrees (mine took 4 minutes to cook).  Medium Well steaks (shudder) are done when they reach 145-150 degrees (Jackie’s took 6 minutes).
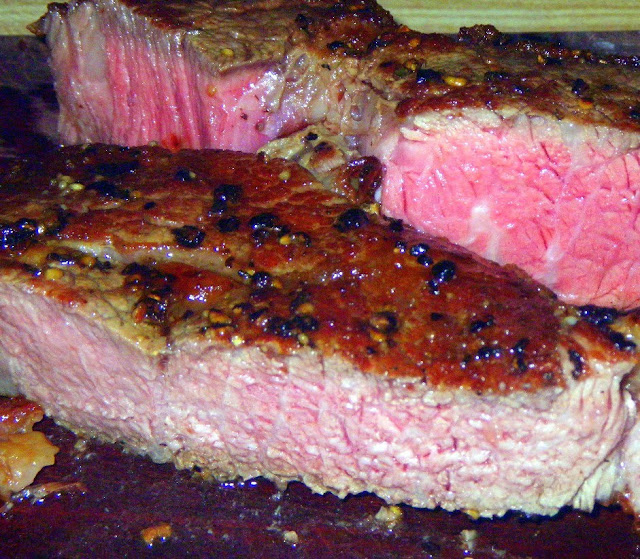
  8. Rest the meat for 5 minutes (Note: this step is VERY important.  Have you ever seen steak served in a pool of blood?  This step will fix that unsightly problem.  The juices will collect in the meat and remain if you rest the meat uncut for 5 minutes.  Actually, I rest mine in a double layer of aluminum foil.  This also keeps the meat hot the entire time, so you can serve a HOT medium rare steak at the same time you are serving a HOT medium well steak.  Just trust the temperature prob, and DO NOT EVER CUT INTO THE STEAK TO TEST DONENESS! 
Alton does explain the proper way to check for internal temperature (from the side, not the top.  You want to measure the temp at the thickest part of the meat, in the center.  When you check from the top, it is hard to find the center).

He also explains a complicated set up for resting.  I confess that aluminum foil works for me, and I did not follow his resting collection method for collecting juices.  Buy the book and take a look for yourself if you want to get complicated.

Here’s a shot of a medium rare steak and a medium steak (trust me, medium rare is better), but notice no dripping juices, they are all in the rested meat.


Dave here from MY YEAR ON THE GRILL. It really is just this easy!  

 … I CAN COOK THAT! 

And so can you!

Buffalo Chickpea Patties

I’ve been enjoying a lot of vegetarian meals lately. I LOVE beans, they are healthy and cheap!

I’ve made bean patties before but so far, these are my favorite. I got the recipe from Veggie by Season and I even attempted to copy her presentation!  It looked so nice! 

I liked how she pureed some of the oats, I think that led to them sticking together better.  They made a very nice appetizer! 

We ate these with a delicious Apple and Caramelized Onion Pizza
Buffalo Chickpea Patties
Adapted from Veggie by Season
1 – 15 oz. can garbanzo beans, drained and rinsed
1/2 cup rolled oats
1/2 c. buffalo sauce, I used Franks
1 egg white
1 small onion
1 tsp. garlic powder
Salt and pepper

For serving:
Buffalo sauce
Ranch or blue cheese
Carrot Sticks
Celery
Cucumber

Add chickpeas to a bowl, use a potato masher or fork to mash, some chunks are okay.  Add the buffalo sauce to the chickpeas. 

Add half the oats to a food processor, pulse to create a crumb, add to the chickpeas. Then add the rest of the oats. Beat the egg white into the chickpeas.  Grate onion into the chickpeas, finally add the garlic powder, salt and pepper.  Combining ingredients well. 

Heat a griddle over medium, spray with nonstick spray.  Use a 1/4 measuring cup to portion out chickpea mixture onto griddle.  Cook patties for about 5 – 7 minutes, until crispy and brown, flip gently and cook for another 5 – 7 minutes.  Serve immediately to retain crispness. 

I served these as an appetizer and got about 7 patties.  You could make larger patties and serve as a burger as well. 

Total calories = 616 calories
7 patties = 88 calories per patty

Try a New Recipe: Sourdough Starter + Bread

If you’ve ever wanted to try making sourdough, now is the perfect time to get “started!” OuR KrAzY KiTcHeN is holding the 3rd Annual Need to Knead Bread Roundup, and if you “start” now, you can have some fabulous sourdough bread to enter in the roundup!
This recipe came from one of my Taste & Create partners last year: Grace of A Southern Grace. (If you’d like to sign up and participate in November, go here by Nov. 8!)

As I was looking around Grace’s blog last year, I kept seeing all the fabulous things Grace does with her precious Ebenezer, her sourdough starter.

And I thought:

Exactly what kind of cowgirl doesn’t have a jar of sourdough starter?

Can I actually claim to be a cowgirl, having never made a loaf of bread from my own starter?

Does Grace have a recipe for sourdough starter?

Will this sourdough starter really, truly be hard to kill, as Grace alleges?
Please let it be hard to kill, and easy to maintain.

What should I name it??

And I made a list for Number One and sent him off to the store.

Sourdough Starter
1 cup warm water
1/2 cup sugar
1 package (2-1/4 teaspoons) dry yeast
3 tablespoons instant potato flakes

To make starter:
Mix water, sugar, yeast, and potato flakes. Let ferment on counter for two days. Then feed with starter feeder and continue with the instructions found in the bread recipe and/or links below.

Starter Feeder
Mix together:
½ c sugar
3 T potato flakes
1 c warm water

Add to jar of starter, (I mixed mine a little with a wooden spoon) and let sit on the counter for around 8 hours.

Grace says: Eb lives in the fridge until feeding time, which can be anywhere from 3 to 14 days after his last meal. (I’ve actually gone longer than two weeks without feeding him and he still did fine.) Upon feeding, he sits on the counter for about 8 hours, and then he’s ready to go.

After sourdough has been on the counter for 8 hours, proceed with any number of sourdough recipes. (Click this link to see all the things I’ve made with sourdough starter!)

The sourdough starter went off without a hitch. It sat and fermented and bubbled and stewed on the counter. I added the starter feeder, and it bubbled away some more. I decided to name it Virgil, which means “growing.”

When it was time, I decided to go ahead with the most basic recipe, Sourdough Bread. I followed Grace’s recipe to the letter. 12 hours later, the dough had risen, but certainly wasn’t overflowing out of my bowl like Grace’s was out of her trifle bowl. Perhaps my bowl was bigger, or something?

I decided I’d make just two loaves instead of three loaves like Grace made. I left the loaves in the oven for 8 hours, just like Grace recommends.
My bread turned out lovely! Perfectly risen, (see above!) golden brown on the outside. The very middle was just a bit doughy, so next time I will preheat the oven to 350 before I start the timer! I think that will take care of that little problem. But, this bread is delicious and easy, and I started baking more of my own bread! I also tried some other sourdough recipes, and I even got my neighbor started with some starter of her very own!
I am sold and converted. Now I’m a real, live cowgirl with real, live sourdough starter in the fridge. Howdy, Virgil. Thanks for coming into my life! I know we’ll make some beautiful things together.
Grace’s Sourdough Bread
1/2 cup oil
1 cup sourdough starter
1 teaspoon salt
1 1/2 cups warm water
1/2 cup sugar
5 cups bread flour
1 cup whole wheat flour
3 tablespoons wheat germ

Combine all ingredients in a large non-metal bowl. Stir everything together, adding more bread flour as necessary to create dough that’s no longer sticky. Transfer the dough into a second non-metal greased bowl.

Roll it around so the entire ball becomes glorious, set it in a warm place, cover it with sprayed aluminum foil…and watch it grow for about 12 hours.

After 12 hours, punch down the dough once, right in its middle. Turn it out of the bowl onto a floured surface and knead it a few times.

(Although Grace divided her dough into three, I only felt like I had enough for two loaves this time).

Divide the dough into two or three even hunks, and knead each a bit more. Place the dough into greased loaf pans.

Place the pans in the oven, cover with sprayed foil, and leave to rise again for around 8 hours.

Grace says: Just FYI, the pans are put into the oven to rise so they don’t have to be moved later and risk collapsing.

After the second rise, remove the foil and bake the dough at 350 degrees for about 25 minutes. Preheat the oven before you start the timer!
Don’t forget to visit me at The Bad Girl’s Kitchen for more fabulous recipes!

Save Room for Dessert…Donuts!

During our little cool spell a week or two ago, I decided that I would tackle donuts!  I’ve long made Sicilian sfinges, but I’d never made the roll and cut variety.  It’s actually quite an easy process. It’s not a project to do if you have little ones underfoot, however, as you do deep fry these treats and the flour tends to splatter.  I definitely recommend using a thermometer if you don’t have an electric skillet with a temp guage.  The oil temperature needs to stay around 370-375 degrees to keep the donuts from becoming greasy.
  
I was inspired to make these after reading the new culinary mystery series, A Donut Shop Mystery by Jessica Beck.  This rrecipe was in Glazed Murder.

A Good Beginning Donut from Glazed Murder
4-5 cups bread flour
1 cup sugar
1 teaspoon baking powder
1 teaspoon nutmeg (recipe calls for 1/2 teaspoon, but I love nutmeg)
1/2 teaspoon cinnamon
1/4 teaspoon salt (recipe calls for 2 dashes)
1/2 cup sour cream
1 large egg
1 cup buttermilk
Powdered sugar for rolling
Oil for frying

  • Whisk together the dry ingredients. 
  • Using a fork, beat together the sour cream, egg, and buttermilk, then add to the dry ingredients.
  • Beat together until mixture resembles bread dough.
  • Roll dough 1/4″ on a well-floured surface.
  • Using a donut cutter, cut your donuts.
  • Heat oil (3 inches deep or so) to 375 degrees.
  • Carefully lower donuts into hot oil.
  • Fry for 2 minutes on each side.
  • Remove from oil and let drain on paper towels or a rack before dusting with powdered sugar.
  • Continue frying remaining donuts and donut holes.  Dough may be rolled again to cut more donuts.

I made 1 dozen donuts and 1 dozen donut holes.

ARE YOU READY FOR SOME FOOTBALL????????????

We’re HUGE football fans!  Well, it’s that time of year again! Football season is already several weeks old (where does the time go?) and that means it’s time for tailgating again at the games, serious football food and game day buffets.  Bring over your best appetizers and your biggest appetite and oh don’t forget the Brewskis to go with it all.  I like mine really cold please with a side of lime!
Tailgating Time will be posted every Sunday at noon and open all week for you to add your football favorites. We’ll play each and every week until Superbowl Sunday. I can’t wait to see what you’ll be bringing!
It’s Tailgating Time!
HOSTED BY:
Martha at Seaside Simplicity 
Tamy at 3 sides of Crazy 
Lyndsey at Tiny Skillet

Would you like to be a host of Tailgating Time too? 
Leave me a comment here with your email or with Martha over at Seaside Simplicity so we can send you the code and add you to the host list – more exposure, more links, more football food!

It’s Tailgating Time!

GRAVESIDE CUPCAKES

Hi there! This is Emily from EZ’s Recipes posting! Since “my” Simply Delicious Sunday fell on the week before Halloween, I decided to post something fun and, well, simply delicious in honor of the occasion. I went with these Graveyard Cupcakes. I actually found this recipe months ago and bookmarked it way back then with the intent of making them in time for Halloween.
I realize that unless you are a regular follower of my blog, you do not know me very well, seeing as this is only the second time that I have posted over here at Our Krazy Kitchen. But if you are a regular visitor over there, it is no secret to you how much I love Halloween. I have been talking about it all month! And now we’re so close! Halloween for me, as a 30-something married adult with no kids yet, means getting all decked out in costume and going to a Halloween-themed party with friends. Hopefully in the near future I will become a mom, and it will take on a whole new meaning for me. My focus will shift from making Halloween awesome for myself and my adult friends to making it awesome for my kids and my friends’ kids.
But it’s not just about the costumes and the costume parties. It is about the change in the season. Here in the Midwest, that shift in the weather in mid-October makes for that perfect chilly-but-not-unbearable temperature that just tells you that Halloween is around the corner. The leaves are turning color and falling. And then there’s the best part… the food. Which leads me to the point of my blog post today… my Graveyard Cupcakes. Which I have been dying to share with you, my readers.
Just sharing this makes me all that much more excited for Halloween! They were a lot of fun to make, and they are so incredibly versatile that you can be really creative and there’s no going wrong with it.
Ingredients:

  • 1 box chocolate cake mix (if you want to go the “easy” route… feel free to make the batter from scratch as well. If you use boxed cake mix, bake according to the directions for cupcakes)
  • Chocolate or Vanilla frosting – made from scratch, or store-bought, also up to personal preference
  • Sandwich cookie crumbs OR chocolate sprinkles for graveyard “dirt”
  • Cookies such as Pepperidge Farm Milano cookies or something similarly rounded to make a “tombstone”
  • Icing to write on the tombstones with – preferably black in color but other colors could work. Or, if you want to make “grass” you could always use some green!

And from there it is pretty straightforward… make the cupcakes and decorate to your heart’s content! Have fun with it! I went with “grass” and “dirt” with mine, and experimented with both chocolate and white frostings. This is something that could be fun to make for a child’s Halloween party at school, or for an adult party… kids and adults will love them all the same!


Every have a very safe, fun, and Happy Halloween! I will see you next month, just in time for Thanksgiving! Please visit me at EZ’s Recipes!


Veggie Tales: Veggie Pasta Bake

Happy Saturday! This is Kris from Behold the Metatron. Fall is here and the air is crisp and the leaves are turning gorgeous amber hues!

On chilly days I love to bake. But not just sweets… how about a pasta bake?

This is a Giada DeLaurentiis recipe that I tweaked it. Very delish, but NOT for those that don’t like vegetables! (Shame on you!)

Ingredients

  • 2 red peppers, cored and cut into 1-inch wide strips
  • 2 zucchini, quartered lengthwise and cut into 1-inch cubes (I USED ONLY 1)
  • 2 summer squash, quartered lengthwise and cut into 1-inch cubes
  • 4 cremini mushrooms, halved (I USED 1 PINT OF BABY PORTOBELLOS)
  • 1 yellow onion, peeled and sliced into 1-inch strips (I USED 1 RED ONION)
  • 1/4 cup extra-virgin olive oil
  • 1 teaspoon salt, divided
  • 1 teaspoon freshly ground black pepper, divided
  • 1 tablespoon dried Italian herb mix or herbs de Provence (I USED HERBES DE PROVENCE)
  • 1 pound pennepasta
  • 3 cups marinara sauce (store bought or homemade)
  • 1 cup grated fontina cheese
  • 1/2 cup grated smoked mozzarella (I USED REG MOZZARELLA…I didn’t want the smokey flavor)
  • 1 1/2 cups frozen peas, thawed
  • 1/4 cup grated Parmesan, plus 1/3 cup for topping
  • 2 tablespoons butter, cut into small pieces
 
Directions
Preheat the oven to 450 degrees F.
On a baking sheet, toss the peppers, zucchini, squash, mushrooms, and onions with olive oil, 1/2 teaspoon salt, 1/2 teaspoon pepper, and dried herbs. Roast until tender, about 15 minutes.
Meanwhile, bring a large pot of salted water to a boil over high heat. Add the pasta and cook for about 6 minutes. Since you will be cooking the pasta a second time in the oven, you want to make sure the inside is still hard. Drain in a colander.
In a large bowl, toss the drained pasta with the roasted vegetables, marinara sauce, cheeses, peas, 1/2 teaspoon salt, and 1/2 teaspoon pepper. Using a wooden spoon, gently mix, until all the pasta is coated with the sauce and the ingredients are combined.
Pour the pasta into a greased 9 by 13-inch pan. Top with the remaining 1/3 cup Parmesan and butter pieces. Bake until top is golden and cheese melts, about 25 minutes.

Chicken Alfredo Pizza

It is Fire Day Friday and one of our favorite things to cook on our grills is pizza. Yes, grilled pizza. That might sound weird but it shouldn’t, coal and wood fired brick oven cooked pizzas are all the rage these days.

But first I have to thank Jenn of Jenn’s Food Journey for the excellent job she did guest posting for me last week. She has an open invite to post Fire Day Friday anytime she wants.

Back to the pizza. This is one Alexis made this week on her Big Green Egg. You could do the same thing in your oven but it is just a bit better cooked by live fire.

Alexis’ Chicken Alfredo Pizza

1 chicken breast, boneless, skinless
1 tsp black pepper
1 tsp kosher salt
2 slices bacon, cooked to crisp and crumbled
1 green onion, diced for garnish
1 recipe Pizza dough (use refrigerated, buy from your local pizza joint or make your own. Alexis used the recipe from Kitchenaid for their Crusty Pizza Dough).

Alfredo Sauce
2 Tbsp butter
2 Tbsp flour
1 cup half & half
1 cup pecorino romano cheese, grated

If you are making your own dough, like Alexis, make it first because it’s going to have to rise and do all that yeast voodoo that you amazing bakers do.

Then fire up your grill to 400f. Season the chicken with the salt and pepper. Grill 5-6 minutes per side or until 160f internal temp. After resting the chicken for 10 minutes, thinly slice.


While chicken is resting, melt butter in a medium sauce pan. Whisk in the flour, stirring until mixing together in a light blond roux. Whisk in the half & half and simmer until reduced in volume by half. Then blend in the cheese.

Raise your grill or oven temperature to 500f. Spread the dough over a pizza stone and cook for 2-3 minutes.

Remove and ladle 1/2 cup of the alfredo sauce onto the dough. Top with the chicken, bacon, and mozzarella. Drizzle about 1/4 cup of the alfredo sauce over the top.

Return to the oven/grill in an indirect heat set up for 9 minutes and top with the green onion. Cook another 2-6 minutes, until the crust reaches your desired crispiness and the toppings are melted.
Have I mentioned that I am one lucky guy because I married the perfect woman for me.

So what’s your favorite pizza?

Blue and Yellow Corn Muffins from Bobby Flay’s Mesa Grill Restaurant

Presentation and taste…
Mostly taste!  These little gems are Bobby Flay’s Blue and Yellow Corn Muffins. According to Bobby, these are the most consumed item at hisMESA GRILL restaurants.  They are the hit of his bread basket.

And look close, Fresh sweet corn, red bell peppers and jalapeños add color, texture and taste. Out of the ordinary muffins to be sure.

Finding the blue corn meal can be a bit of a challenge.  There are plenty of places on the internet to order.  I found this at my neighborhood store.  Oddly enough, it was not on the shelf sitting next to “regular” corn meal, it was sitting in the gourmet food section.  So, you may need to hunt, but it does exist, and it is available.  Just start asking.

But, the blue is just for looks.  Tastes the same as yellow corn meal.  So, feel free to use this recipe with the easy to find stuff.

One other note, I use something called “Polenta Corn meal”.  The ingredient list is exactly the same, but the color is much deeper yellow. Tastes the same, just better presentation.

Makes 12 large muffins or 3 dozen little mini muffins…

Nonstick cooking spray
6 TBS Butter
1 cup fresh Sweet Corn kernels (can use frozen)
1/2 cup finely diced Red Onions
1/2 cup finely diced Red Bell pepper
1/2 cup smashed and chopped roasted Garlic (about 6 cloves)
2 jalapeño Chili Peppers, finely diced 
2 TBS finely chopped Cilantro
1 1/2 cup all-purpose Flour
1TBS Baking Powder
1/2 tsp Baking Soda
4 tsp Kosher Salt
1 1/3 cups whole Milk
4 large Eggs
2 TBS Honey
1 cup Yellow Corn Meal
1 cup Blue Corn Meal


OK, before I get to the instructions, a bit of fair warning, if you compare the ingredient list to what is printed in the Mesa Grill Cookbook, there are a couple of little changes.  I doubled the amount of corn.  I like corn.  I like the looks of corn just busting out of these muffins when you break into one.  And the Kansas Sweet Corn right now is the best in the world.  I also roasted the garlic cloves (350 degree oven, rubbed with olive oil, wrapped in aluminum foil for 30 minutes).  The book says to mince the cloves.  I roast em, smash em with the blade of a knife and chop those. The roasting adds deeper garlic flavor.  The smashing makes more of a paste, makes for a creamier taste.

  1. Roast the garlic while you Mise en Place the veggies.  Start chopping.
  2. Rack in the middle of the oven, preheated to 400 degrees.  Grease a 12 muffin pan, or mini muffin pans.  I was going to serve these with soup, so made mini muffins that worked great as croûtons.
  3. In a small saucepan, melt the butter, add the onion and cook until soft, about 4 minutes.  Add the smashed and diced garlic.  Divide the mixture evenly between two bowls.
  4. In another large bowl, whisk together the milk, honey, eggs, red peppers, jalapeños, corn and cilantro.  Add half of the mixture in with each of the bowls containing the onion mixture.
  5. Put the blue and yellow corn meal in separate bowls.  Add half the flour, baking powder and baking soda in with the corn meal.  Sprinkle a bit of salt in each.  Mix each corn meal mixture with the separate onion mix. 
  6. Put a spoon full of each mixture side by side in a muffin mold.  Do not mix, as you want the Yin/Yang look.  Bake for 16 minutes (or for 14 minutes if you are making the mini muffins).
And, I used these as the base for a Cajun Spiced “Taco” salad Casserole, Click HERE to see that post over on my own site.
Here’s a few more photos to give you a better idea of how to make these…


This is the third recipe I made from the book.  Great to cook from, great to inspire (and even better to eat from!)


Bobby is a winner!


Dave here from MY YEAR ON THE GRILL. It really is just this easy!  

 … I CAN COOK THAT! 

And so can you!

Healthy Meals ~ Side Dish

Do you need a great lowfat side dish to pair with a juicy piece of grilled chicken or fish? This Vegetable Bake is both tasty and low in fat.

Ingredients
• vegetable cooking spray
• 2 potatoes, cubed
• 1 carrot, sliced
• 2 onions, sliced
• 1 green bell pepper, chopped
• 1/3 cup fat free Italian-style dressing
• 1/8 teaspoon garlic salt
• 1/4 teaspoon cayenne pepper
• 1/8 teaspoon onion salt

Directions
1. Preheat oven to 350 degrees F. Spray a 9 x 13 inch baking pan with cooking spray.
2. In prepared pan, combine potatoes, carrots, onions and bell pepper.
3. In a small bowl combine Italian dressing, garlic salt, cayenne pepper and onion salt. Pour over vegetables.
4. Bake, covered, for 15 minutes. Uncover, stir and bake for 10 minutes more.

Tip: Leave the skins on your potatoes to save time and get extra nutrients.

Serves 6, 98 calories per serving, only .2 grams of fat, and no cholesterol. Enjoy!

Photo Credit

READY, SET, START YOUR OVENS!

The (3rd Annual) NEED TO KNEAD has moved to OUR KRAZY KITCHEN.
We all have some favorite family bread recipes tucked away.
I know that at certain times I have the NEED TO KNEAD, primarily during the holidays or from October through April, those long cold months of winter. The rest of the time my Bread Machine Rules.
I thought we could all come together and share our daily bread recipes.
And I mean all breads! White, wheat, banana, braided, etc…  whatever you’re in the mood to share.
Ironically National bread month is November at the beginning of our holiday baking crunch.

Just post your recipes anytime until November 15, 2010, go over and link up at OUR KRAZY KITCHEN so that we can all visit you. You can even link to recipes you have previously posted. Add this button to your participating posts and link to this blog. Your blog can be in any language, but a translator on your site will help any who don’t speak the same language.

Bread History According to National Bread Month:

..”It was only after the Pilgrims came to America that baking bread in private homes became the norm. Our ancient forbearers baked bread in communal ovens. These ovens were built on the out skirts of villages, near water due to the extreme fire hazards of the early brick ovens. Later in Europe, after the Romans taught the indigenous peoples about bread making, bread was still baked in large ovens. Except these ovens were not communal ovens they were owned, as was the mill, by the local lord. This made families dependant on the lord for their daily bread. By the Middle Ages baking guilds controlled who and how bread were baked and sold. These organizations limited the number of bakers and bakeries in each village and that meant even impoverished peasants had to purchase bread.
When the first colonists came to North America they demanded the right to be in control of their daily bread. Households at last could bake bread at home. Even commoners were in control of their daily bread….”

Resource LinkCelebrate National Bread Month with crusty water rolls: recipe

Bread is one of the oldest prepared foods, dating back to the Neolithic era. The first breads produced were probably cooked versions of a grain-paste, made from ground cereal grains and water, and may have been developed by accidental cooking or deliberate experimentation with water and grain flour. Descendants of these early breads are still commonly made from various grains worldwide, including the Mexican tortilla, Indian chapatis, rotis and naans, Scottish oatcake, North American johnnycake, Middle Eastern Pita bread (Kmaj in Arabic and Pitot in Hebrew) and Ethiopian injera. The basic flat breads of this type also formed a staple in the diet of many early civilizations with the Sumerians eating a type of barley flat cake, and the 12th century BC Egyptians being able to purchase a flat bread called ta from stalls in the village streets. http://en.wikipedia.org/wiki/Bread

Have you heard about the Need to Knead Bread Roundup?  The need to knead bread round-up is almost here. I thought maybe it was time to share with you some food for thought (Pun intended) with a few great resource sites for baking.
 General Tips to remember:
  • Baking in a high place, a dry place or in a place that can have sudden changes in barometric pressure. All these factors can alter how yeast breads knead, rise and bake.
  • To determine if your yeast is still active, dissolve 1 tsp. sugar in 1/2 cup lukewarm water in a see-through measuring cup. Sprinkle 1 tbsp. yeast slowly over the water. Stir and let stand for 10 minutes. At the end of this time, the yeast should have foamed up to reach the 1 cup mark. Yeast that does not reach this mark in 10 minutes will not produce a good loaf and should be discarded.
  • Water can replace milk. The texture will change a little, but the bread will still be very tasty and good to eat.
  • White sugar, brown sugar, honey and molasses can be interchanged equally in bread dough. The sugar in bread dough supplies the tiny yeast plants with instant food and gets them off to a fast start. Artificial sweeteners are not recommended for yeast breads because they cannot be used by the yeast as natural sweeteners can.
  • Fats can be replaced with applesauce or prune puree. The texture of the bread will be more dense. A general rule of thumb is to substitute 1 1/2 tablespoons of applesauce/prune puree for every 3 tablespoons of fat.
  • Salt is added to yeast breads not only for flavor but also to keep the yeast fermentation in the bread dough under control. Too little salt will allow the yeast to push the dough so high that it may even collapse. Too much salt will keep the dough from rising enough.
In preparation for the upcoming National Bread Month in November and for our driving desires and “NEED TO KNEAD” as well as the upcoming Holidays let’s all join in together on October 31st, 2010 to November 15, 2010 and round-up all of our delicious bread recipes to look back on when we need to bake fantastic bread. I know many of mine were handed down by my grandma.
~ We are looking for all sorts of breads: quick breads, savory breads, sweet ones, yeast breads, no-knead breads, 5-minute breads, vintage or gluten-free breads, etc, etc, etc!

~ Help us promote this bread roundup by putting the above banner in your sidebars and posting about the 3rd Annual Need to Kneed Roundup on your own blogs.

~ We would love it if you would join us, and we would love it if you would help us spread the word by putting this button in your sidebars or even writing a short post about the roundup. Post your links from October 31, 2010 to November 15, 2010 for all your bread recipes.

~ Have fun blog hopping through the bread recipes, make new friends, find new family-favorite recipes, comment, enjoy the process of community-building.

Save Room for Dessert…Fudgy Chocolate Bundt Cake

Last Tuesday, we celebrated Ann’s birthday, one of my terrifically awesome staff members.  Rather than a potluck luncheon, Ann chose to order poboys from one of our local restaurants.  Her cake of choice was chocolate, and this was my contribution.  I baked the cake on Monday evening, late on Monday evening, actually, with the help of Andrew.  I should know by now, that any activity after 4 pm which involves both baking and a 5 year old needs sharp attention, something I am quite short of at 7:30 pm.  So, the cake was baked sans water & coffee.  I remembered this about 10 minutes after the cake was in the oven.  One of those, “Oh he$l!” expressions escaped my lips, and then I just shrugged.  If it turned out a disaster, I would simply bake another, in the morning.  Luckily, the cake was fine, although it’s texture was that of a brownie.  Not a bad thing, mind you, and everyone said it was “really good.”  So, there you go, if you’re feeling adventurous, leave out the liquid, or follow the cake recipe as written, which is the way I’ve made it for years, and I’ll guarantee your chocolate happiness!  Whatever you decide, don’t forego the frosting, as it is the pièce de résistance.

Don’t forget to enter my giveaway to win a copy of Steff Deschene’s award-winning book, The Ice Cream Theory. Leave a comment and tell me your favorite ice cream flavor! So, earlier today, I had a craving for an ice cream soda made with vanilla ice cream and orange soda, what’s your favorite today? Click here to enter and tell me!


Fudgy Chocolate Bundt Cake Printable recipe
2 cups flour
1 1/2 cups sugar
1/2 cup brown sugar
2 oz unsweetened chocolate squares
1/2 cup Dutch processed cocoa
2 sticks unsalted butter
8 oz Greek yogurt
1/2 cup water
1/4 cup brewed coffee, room temp
1 tablespoon vanilla extract
2 large eggs
1 teaspoon baking soda
1/2 teaspoon salt

Preheat oven to 350 degrees.
Butter a Bundt pan, then dust with cocoa as you would with flour; set aside.
Melt butter and chocolate squares together in microwave in 30 second intervals, stirring after each 30 seconds, until chocolate is smooth; stir in cocoa and set aside.
In a measuring cup, measure in 1/2 cup water and then add coffee until 3/4 mark is reached; set aside.
Pour chocolate mixture into a large mixing bowl or the bowl of a stand mixer.
To the chocolate mixture, add granulated and brown sugar, cocoa, yogurt, vanilla, eggs and water/coffee mixture.
Beat together until well-mixed.
In a small bowl, whisk flour, soda and salt; add flour mixture to the chocolate mixture, mixing until thoroughly combined.
Pour batter into prepared Bundt pan.
Bake 40-45 minutes at 350 degrees.
Allow cake to cool for 20 minutes before inverting onto a plate.
Let cake cool completely before frosting the cake.


Hershey’s “Perfectly Chocolate” Chocolate Frosting
1 stick unsalted butter
2/3 cup HERSHEY’S Cocoa
3 cups powdered sugar
1/3 cup milk
1 teaspoon vanilla extract
1/8 tsp salt (my addition)
Melt butter. Stir in cocoa and salt. Alternately add powdered sugar and milk, beating to spreading consistency. Add small amount additional milk, if needed. Stir in vanilla.