Tuesdays with Dorie ~ CARAMEL PUMPKIN PIE

Janell of Mortensen Family Memoirs picked Caramel Pumpkin Pie on pages 322 and 323. We were having a family dinner and I needed 2 pies so I made this weeks and next – talk about killing 2 birds with 1 stone.  There was nothing of either pie left!  They were both so yummy!

aprons 3

READY, SET, START YOUR OVENS!

The (3rd Annual) NEED TO KNEAD has moved to OUR KRAZY KITCHEN.
We all have some favorite family bread recipes tucked away.
I know that at certain times I have the NEED TO KNEAD, primarily during the holidays or from October through April, those long cold months of winter. The rest of the time my Bread Machine Rules.
I thought we could all come together and share our daily bread recipes.
And I mean all breads! White, wheat, banana, braided, etc…  whatever you’re in the mood to share.
Ironically National bread month is November at the beginning of our holiday baking crunch.

Just post your recipes anytime until November 15, 2010, go over and link up at OUR KRAZY KITCHEN so that we can all visit you. You can even link to recipes you have previously posted. Add this button to your participating posts and link to this blog. Your blog can be in any language, but a translator on your site will help any who don’t speak the same language.

Bread History According to National Bread Month:

..”It was only after the Pilgrims came to America that baking bread in private homes became the norm. Our ancient forbearers baked bread in communal ovens. These ovens were built on the out skirts of villages, near water due to the extreme fire hazards of the early brick ovens. Later in Europe, after the Romans taught the indigenous peoples about bread making, bread was still baked in large ovens. Except these ovens were not communal ovens they were owned, as was the mill, by the local lord. This made families dependant on the lord for their daily bread. By the Middle Ages baking guilds controlled who and how bread were baked and sold. These organizations limited the number of bakers and bakeries in each village and that meant even impoverished peasants had to purchase bread.
When the first colonists came to North America they demanded the right to be in control of their daily bread. Households at last could bake bread at home. Even commoners were in control of their daily bread….”

Resource LinkCelebrate National Bread Month with crusty water rolls: recipe

Bread is one of the oldest prepared foods, dating back to the Neolithic era. The first breads produced were probably cooked versions of a grain-paste, made from ground cereal grains and water, and may have been developed by accidental cooking or deliberate experimentation with water and grain flour. Descendants of these early breads are still commonly made from various grains worldwide, including the Mexican tortilla, Indian chapatis, rotis and naans, Scottish oatcake, North American johnnycake, Middle Eastern Pita bread (Kmaj in Arabic and Pitot in Hebrew) and Ethiopian injera. The basic flat breads of this type also formed a staple in the diet of many early civilizations with the Sumerians eating a type of barley flat cake, and the 12th century BC Egyptians being able to purchase a flat bread called ta from stalls in the village streets. http://en.wikipedia.org/wiki/Bread

Have you heard about the Need to Knead Bread Roundup?  The need to knead bread round-up is almost here. I thought maybe it was time to share with you some food for thought (Pun intended) with a few great resource sites for baking.
 General Tips to remember:
  • Baking in a high place, a dry place or in a place that can have sudden changes in barometric pressure. All these factors can alter how yeast breads knead, rise and bake.
  • To determine if your yeast is still active, dissolve 1 tsp. sugar in 1/2 cup lukewarm water in a see-through measuring cup. Sprinkle 1 tbsp. yeast slowly over the water. Stir and let stand for 10 minutes. At the end of this time, the yeast should have foamed up to reach the 1 cup mark. Yeast that does not reach this mark in 10 minutes will not produce a good loaf and should be discarded.
  • Water can replace milk. The texture will change a little, but the bread will still be very tasty and good to eat.
  • White sugar, brown sugar, honey and molasses can be interchanged equally in bread dough. The sugar in bread dough supplies the tiny yeast plants with instant food and gets them off to a fast start. Artificial sweeteners are not recommended for yeast breads because they cannot be used by the yeast as natural sweeteners can.
  • Fats can be replaced with applesauce or prune puree. The texture of the bread will be more dense. A general rule of thumb is to substitute 1 1/2 tablespoons of applesauce/prune puree for every 3 tablespoons of fat.
  • Salt is added to yeast breads not only for flavor but also to keep the yeast fermentation in the bread dough under control. Too little salt will allow the yeast to push the dough so high that it may even collapse. Too much salt will keep the dough from rising enough.
In preparation for the upcoming National Bread Month in November and for our driving desires and “NEED TO KNEAD” as well as the upcoming Holidays let’s all join in together on October 31st, 2010 to November 15, 2010 and round-up all of our delicious bread recipes to look back on when we need to bake fantastic bread. I know many of mine were handed down by my grandma.
~ We are looking for all sorts of breads: quick breads, savory breads, sweet ones, yeast breads, no-knead breads, 5-minute breads, vintage or gluten-free breads, etc, etc, etc!

~ Help us promote this bread roundup by putting the above banner in your sidebars and posting about the 3rd Annual Need to Kneed Roundup on your own blogs.

~ We would love it if you would join us, and we would love it if you would help us spread the word by putting this button in your sidebars or even writing a short post about the roundup. Post your links from October 31, 2010 to November 15, 2010 for all your bread recipes.

~ Have fun blog hopping through the bread recipes, make new friends, find new family-favorite recipes, comment, enjoy the process of community-building.

Save Room for Dessert…Fudgy Chocolate Bundt Cake

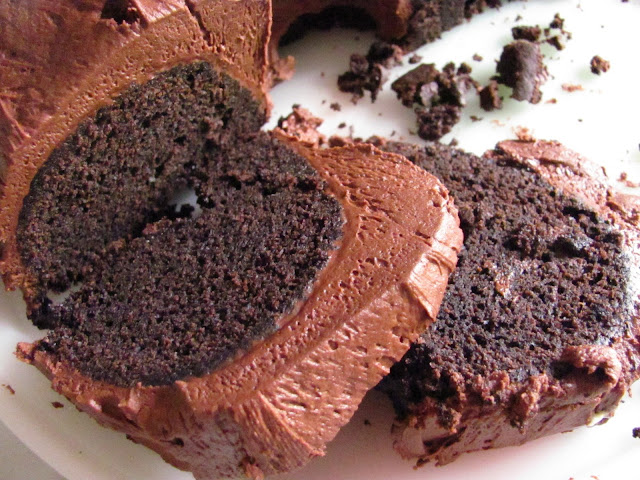
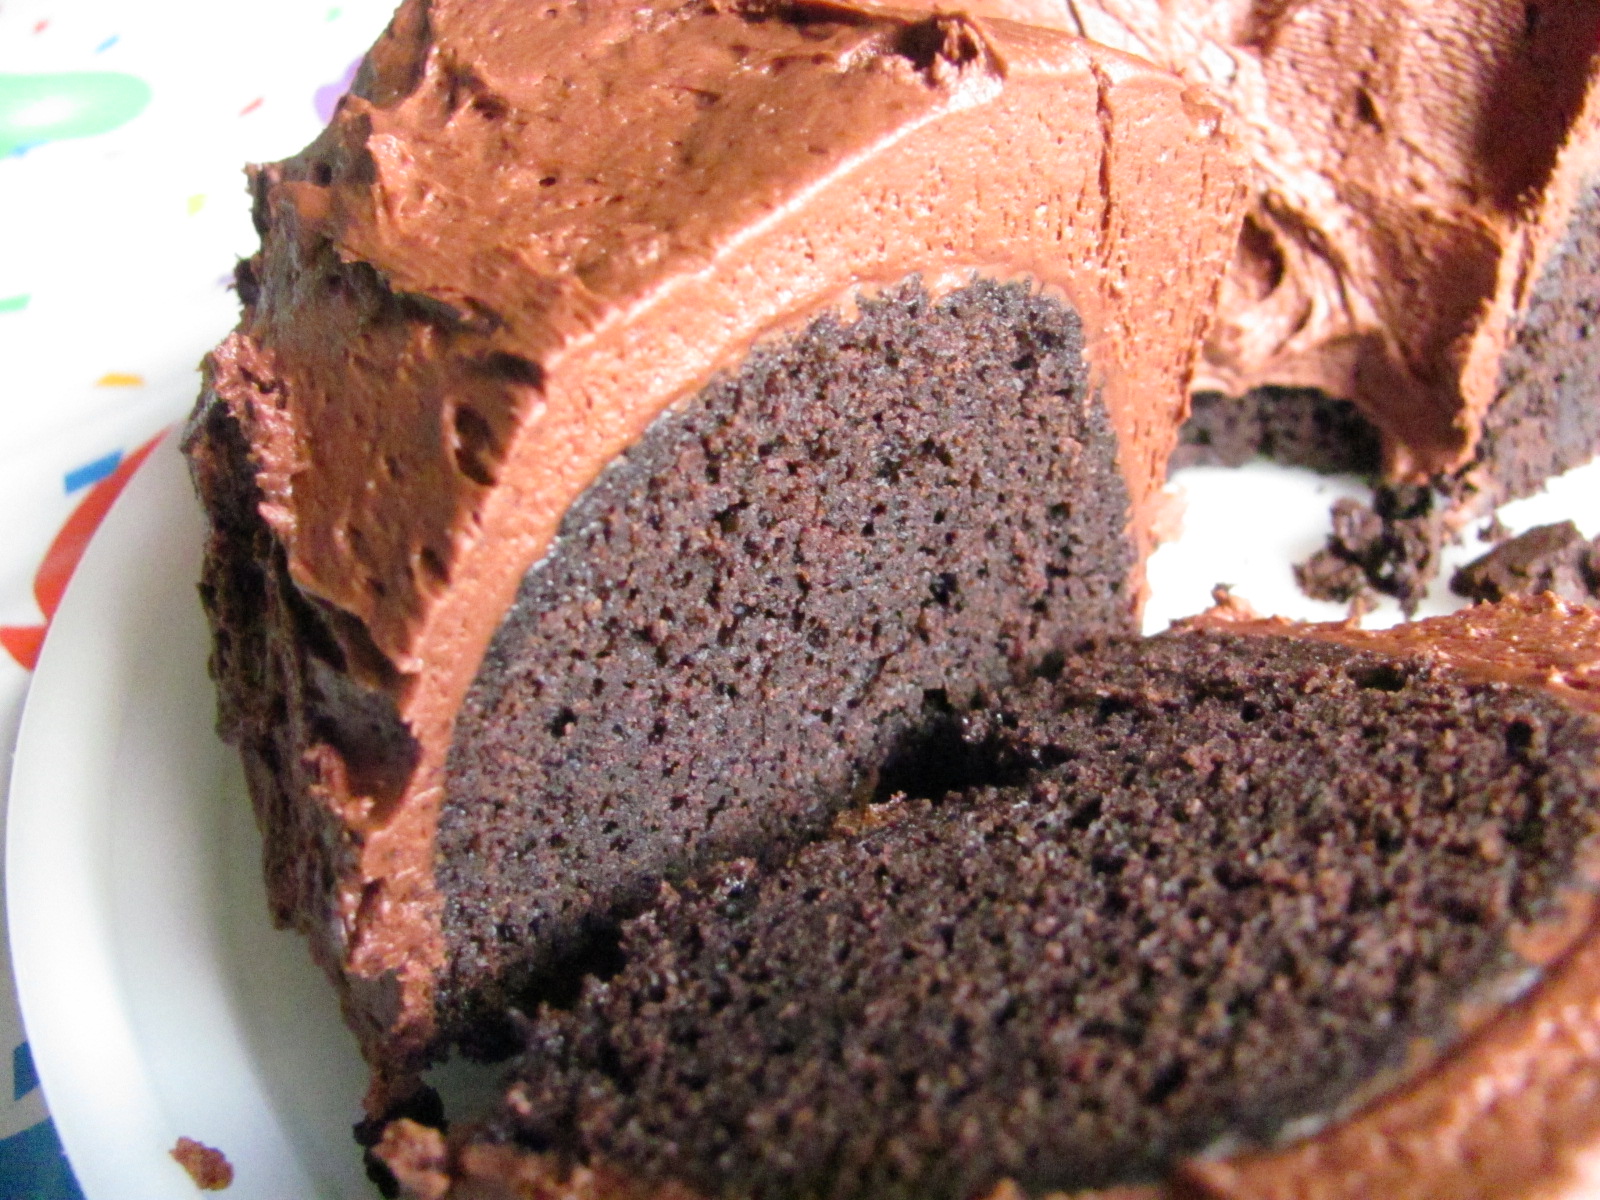
Last Tuesday, we celebrated Ann’s birthday, one of my terrifically awesome staff members.  Rather than a potluck luncheon, Ann chose to order poboys from one of our local restaurants.  Her cake of choice was chocolate, and this was my contribution.  I baked the cake on Monday evening, late on Monday evening, actually, with the help of Andrew.  I should know by now, that any activity after 4 pm which involves both baking and a 5 year old needs sharp attention, something I am quite short of at 7:30 pm.  So, the cake was baked sans water & coffee.  I remembered this about 10 minutes after the cake was in the oven.  One of those, “Oh he$l!” expressions escaped my lips, and then I just shrugged.  If it turned out a disaster, I would simply bake another, in the morning.  Luckily, the cake was fine, although it’s texture was that of a brownie.  Not a bad thing, mind you, and everyone said it was “really good.”  So, there you go, if you’re feeling adventurous, leave out the liquid, or follow the cake recipe as written, which is the way I’ve made it for years, and I’ll guarantee your chocolate happiness!  Whatever you decide, don’t forego the frosting, as it is the pièce de résistance.

Don’t forget to enter my giveaway to win a copy of Steff Deschene’s award-winning book, The Ice Cream Theory. Leave a comment and tell me your favorite ice cream flavor! So, earlier today, I had a craving for an ice cream soda made with vanilla ice cream and orange soda, what’s your favorite today? Click here to enter and tell me!


Fudgy Chocolate Bundt Cake Printable recipe
2 cups flour
1 1/2 cups sugar
1/2 cup brown sugar
2 oz unsweetened chocolate squares
1/2 cup Dutch processed cocoa
2 sticks unsalted butter
8 oz Greek yogurt
1/2 cup water
1/4 cup brewed coffee, room temp
1 tablespoon vanilla extract
2 large eggs
1 teaspoon baking soda
1/2 teaspoon salt

Preheat oven to 350 degrees.
Butter a Bundt pan, then dust with cocoa as you would with flour; set aside.
Melt butter and chocolate squares together in microwave in 30 second intervals, stirring after each 30 seconds, until chocolate is smooth; stir in cocoa and set aside.
In a measuring cup, measure in 1/2 cup water and then add coffee until 3/4 mark is reached; set aside.
Pour chocolate mixture into a large mixing bowl or the bowl of a stand mixer.
To the chocolate mixture, add granulated and brown sugar, cocoa, yogurt, vanilla, eggs and water/coffee mixture.
Beat together until well-mixed.
In a small bowl, whisk flour, soda and salt; add flour mixture to the chocolate mixture, mixing until thoroughly combined.
Pour batter into prepared Bundt pan.
Bake 40-45 minutes at 350 degrees.
Allow cake to cool for 20 minutes before inverting onto a plate.
Let cake cool completely before frosting the cake.


Hershey’s “Perfectly Chocolate” Chocolate Frosting
1 stick unsalted butter
2/3 cup HERSHEY’S Cocoa
3 cups powdered sugar
1/3 cup milk
1 teaspoon vanilla extract
1/8 tsp salt (my addition)
Melt butter. Stir in cocoa and salt. Alternately add powdered sugar and milk, beating to spreading consistency. Add small amount additional milk, if needed. Stir in vanilla.

IT’S TIME FOR SOME FOOTBALL FOOD!

We’re HUGE football fans!  Well, it’s that time of year again! Football season is already several weeks old (where does the time go?) and that means it’s time for tailgating again at the games, serious football food and game day buffets.  Bring over your best appetizers and your biggest appetite and oh don’t forget the Brewskis to go with it all.  I like mine really cold please with a side of lime!
Tailgating Time will be posted every Sunday at noon and open all week for you to add your football favorites. We’ll play each and every week until Superbowl Sunday. I can’t wait to see what you’ll be bringing!
It’s Tailgating Time!
HOSTED BY:
Martha at Seaside Simplicity 
Tamy at 3 sides of Crazy 
Lyndsey at Tiny Skillet

Would you like to be a host of Tailgating Time too? 
Leave me a comment here with your email or with Martha over at Seaside Simplicity so we can send you the code and add you to the host list – more exposure, more links, more football food!

WEEKLY MENU

Menu Plan Monday hosted by Laura at I’m an Organizing Junkie

DATE BREAKFAST LUNCH DINNER
Monday 10/18 CEREAL SANDWICHES Recipe Experiment Night

Tuesday 10/19 TOAST LEFTOVERS Chicken Enchiladas Suiza
and
Refried Beans
Wednesday 10/20 YOGURT SOUP Orange Honey Chicken
Thursday 10/21 FRUIT CHEESE & FRUIT Tuna Noodle Bake
Friday 10/22 OATMEAL C.O.R.N. Chicken Fried Chicken
with mashed potatoes and
Peppered Gravy
Saturday 10/23 Blueberry Crumb Cake leftovers Roast Chicken w/ Lemon Herb Sauce
and
Maple Glazed Carrots
Sunday 10/24 Huevos con Yummy Deviled Eggs Carnitas ~ Traditional Style
with the leftover
Refried Beans

Missing the Lazy, Crazy days of summer… already

I don’t know about you, but I already miss summer and the taste of salads.  I’m usually at home already threatened with snow, but this year I’m helping out family way south of home and have the luxury of still getting some great vegetables and making some of our favorite salads and homemade dressings.

1 large wedge romaine lettuce, torn into bite size pieces
2 Roma tomatoes, sliced
1 small avocado, sliced
2 kiwis, skinned and sliced
1 small red onion, chopped
1 orange peeled, segmented and halved again

1/3 cup peanut oil
1/3 cup olive oil
6 tablespoons champagne vinegar
Juice of 1 lemon
Juice of 1 lime
6 tablespoons sugar
salt & pepper to taste

  • Whisk together peanut oil, olive oil, champagne vinegar, lemon juice, lime juice, sugar, salt & pepper. Chill for several hours.
  • Prepare veggies and toss well.
  • Drizzle salad all over and toss again.
  • Enjoy!
  • This makes enough dressing for 3 large salads.

SLEEP TIGHT, DON’T LET THE BED BUGS BITE!

I received this in an email recently and I know that where we are right now, it is all over the news that there is a big problem.  So, this seemed liked a good thing to share and it seems like a bit of common sense too! I always wash everything, always have, but now I’ll just do it immediately to help alleviate any POTENTIAL problem from even occurring.  Now while I don’t know about the validity of the actual mode of transportation that the bugs are hitch hiking on to come in to America, I have checked and the process of killing the bugs is valid.  Bed bugs are truly the ultimate hitchhiker, so it just makes sense to be on the cautious side.
THE EMAIL:
A bit of information that you might like to know about.  We have friends here in our community and one of their sons is an entomologist (insect expert), and has been telling them that there is an epidemic of bed bugs now occurring in America.  Recently I have heard on the news that several stores in NYC have had to close due to bed bug problems, as well as a complete mall in New Jersey. 
 
He says that since much of our clothing, sheets, towels, etc. now comes from companies outside of America, (sad but true), even the most expensive stores sell foreign clothing from China, Indonesia, etc.  The bed bugs are coming in on the clothing as these countries do not consider them a problem.  He recommends that if you buy any new clothing, even underwear and socks, sheets, towels, etc. that you bring them into the house and put them in your clothes dryer for at least 20 minutes.  The heat will kill them and their eggs.  DO NOT PURCHASE CLOTHES AND HANG THEM IN THE CLOSET FIRST.  It does not matter what the price range is of the clothing, or if the outfit comes from the most expensive store known in the U.S.  They still get shipments from these countries and the bugs can come in a box of scarves or anything else for that matter.  That is the reason why so many stores, many of them clothing stores have had to shut down in NYC and other places.   All you need is to bring one item into the house that has bugs or eggs and you will go to hell and back trying to get rid of them.  He travels all over the country as an advisor to many of these stores, as prevention and after they have the problem.

aprons 3

12 WEEKS OF CHRISTMAS COOKIE CLUB – WEEK #3 ~ PEANUT BUTTER FUDGE DROPS

PEANUT BUTTER FUDGE DROPS

2/3 cup Hot water
10 ounces Land of Lakes cocoa mix
2 cups JIF creamy peanut butter
1/2 cup light corn syrup
3 cups C&H powdered sugar, divided 2cups + 1 cup
2 cups crushed vanilla wafers
2 cups crushed ginger snaps
72 Hershey Kisses (I like the cherry cordials)

  • Whisk together the hot water and cocoa mix until smooth.
  • Add peanut butter and corn syrup. Blend until smooth.
  • Add 2 cups powdered sugar and stir until well blended.
  • Stir in cookie crumbs until well blended.
  • Spray wax paper with PURE (these will be sticky so don’t forget this step).
  • Drop heaping teaspoonfuls of dough onto the wax paper.
  • Place the remaining 1 cup of powdered sugar in a shallow bowl.
  • Roll each piece of dough into a ball and dredge in powdered sugar.
  • Press your thumb into the center and fill with a Hershey’s kiss.

aprons 3

London Broil with Spicy Chimichurri

First, I must say thank you to Chris for asking me to guest post for him.  I was so excited when I received his email!  I love to grill…actually, love doesn’t even describe it correctly, it’s more than that…grilling is in my blood.  For me, being asked to guest post on Fire Day Friday is like a home cook being asked to star in their own show on the Food Network!!
But enough with this embarrassing gushing, let me introduce myself.  I’m Jenn from Jenn’s Food Journey.  I have a love affair with cooking and, of course, grilling.  I had no desire to cook when I was younger.  Yes, I loved to help my mom or my grandma with certain little tasks in the kitchen, but that was it, I didn’t want to do the whole shebang.  It was much later in life when I found the passion and love I have for it now. Grilling is my true love, though.  When my boyfriend and I moved into our house together, my parents gave us the best house warming gift ever: A GRILL!!  As soon we got it set up, I immediately wanted to start cooking on it.  From that point on, I grilled 6 nights a week for 3 months straight. (Seriously!)  Despite all the hours standing at the grill, I still do not claim to be a master griller (is that an actually word? who cares, I like it)…but every now and then I truly shock myself with my creations……like this one I’ll be sharing with you today…yes, I’m finally getting to why I’m really here!!
I made my first Chimichurri -an Argentinean sauce similar to pesto- back in August.  I had recently come in possession of Steven Raichlen’s Planet Barbecue and knew his recipe for chimichurri would be one of the first ones I would try.  When Chris asked me to guest post my mind immediately started turning…what was I going to make?  I sorted through files with all kinds of grilling recipes and could not come up with a good idea.  Then it hit me.  I had a London Broil in my freezer that I had been wanting to use, why not do something with that?  (And by the way, I found out after purchasing this particular cut of meat, that London Broil is actually the way you prepare the cut of meat, not the cut itself.  London broil is broiling or grilling flank steak.  So even though the cut I bought said London Broil on the package, it’s really a cut of flank steak….I learned something new I guess!  So don’t worry if you can’t find “London Broil”, it’s really just flank steak!!)  Once I knew what kind of meat I was going to use, I started thinking about what to do with it.  Marinating?  Yes, that would be a good start.  A sauce maybe?  Well, yes, of course, I am a self proclaimed sauce lover.  But what kind???  hhhhmmmm… I have jalapenos…what about a fire roasted salsa of some kind??  DING! (that’s the light bulb going off in my head by the way)  The spicy chimichurri was born!  I am one that loves heat, you may not be, so to tone down this recipe, you can just use jalapenos, or better yet, use an Anaheim or poblano pepper instead.  Either way, this chimichurri will work fantastic on any cut of beef, chicken, or pork.  I hope you enjoy it as much as we did!

London Broil with Spicy Chimichurri
Created by Jenn’s Food Journey
Printable Recipe 
Ingredients:
For Marinade:
1 cup lager beer
3 Tablespoons Worcestershire sauce
1 Tablespoon honey
1 Tablespoon olive oil
1/2 teaspoon red pepper flakes
1/2 teaspoon black pepper
2 cloves of garlic, smashed and roughly chopped
1/4 teaspoon Hungarian sweet paprika
1 1/4 lbs. London broil
For Spicy Chimichurri-
2 large garlic cloves, unpeeled
2 jalapeno peppers
1 Serrano pepper
1/2 teaspoon dried oregano
1 Tablespoon lime juice
1/4 cup packed fresh parsley, minced
3 Tablespoons olive oil
1/2 Roma tomato, finely diced (about 1 Tbls) 

Directions:

In a resealable bag or baking dish, mix together all the marinade ingredients.  Place the London Broil in the bag, seal, and marinate for at least 4 hours, but 8-24 is recommended.
Fire roast your garlic and peppers.  For the garlic: place unpeeled cloves in a square of foil, drizzle with olive oil, season with salt and pepper, and seal foil around it.  Place on preheated grill for about 5 minutes, or until the garlic becomes soft.  Squeeze garlic from the skins, mash with side of knife and mince.  For the peppers: rub with a little olive oil and place directly over the fire on the grill grates.  Allow to cook until the skins are black and blistered, about 8-10 minutes.  Place peppers in a bowl and cover with plastic wrap for 5 minutes.  When peppers have cooled a bit, peel skin, remove seeds, and then finely dice.
Heat grill to 350-400 degrees.  In a bowl, combine the garlic, peppers, and oregano.  Stir in the lime juice.  Add the parsley and the olive oil and mix to combine.  Fold in the tomatoes; set aside.
Remove the steak from the bag and discard the marinade.  Place the meat on the grill grate directly over the fire and close the lid.  Allow to cook for 4-10 minutes on each side, depending on your desired doneness. (Rare: 120-125 degrees; MedRare: 130-135 degrees; Medium: 140-145 degrees; MedWell: 150-155 degrees; WellDone: 160 degrees).  Remember to take the steak off about 5 degrees sooner then your desired doneness, they need to rest for at least 5 minutes and they will continue to cook.  Serve with chimichurri and enjoy!

Sloppy Joe Sliders on Green Onion Cilantro “Knot” Rolls

Good Morning my friends!

What a glorious last couple of weeks!  The air has a crispness, Fall is here and along with that is all the excitement of the coming seasons… 6 weeks to Thanksgiving and 10 weeks to Christmas!  I am already plotting Thanksgiving dinner, and these rolls, flavored with a Bobby Flay sauce were a successful experiment.


I posted the secret to that success over on my “real” site today (click HERE).


But the guts to these sliders are my regular sloppy Joe mix.  Don’t bother with the over salted, over processed, over chemical laced cans of goo.  This recipe is much tastier and better for you. 


1 pound lean ground beef
1/4 cup chopped onion
1/4 cup chopped green bell pepper
1/2 teaspoon garlic powder
1 teaspoon prepared yellow mustard
3/4 cup ketchup
3 teaspoons brown sugar
salt to taste
ground black pepper to taste

  • In a medium skillet over medium heat, brown the ground beef, onion, and green pepper; drain off liquids.
  • Stir in the garlic powder, mustard, ketchup, and brown sugar; mix thoroughly. Reduce heat, and simmer for 30 minutes. Season with salt and pepper.

And that’s it…. Quick, simple and tasty… what more could you want?


Dave here from MY YEAR ON THE GRILL. It really is just this easy!  

 … I CAN COOK THAT! 

And so can you!

Green Chili Chicken and Lime Soup

I love chicken soup. Actually, I love homemade chicken soup.   
I’ve made this soup a number of times and each time it seems to get better and better.
I often cook a bunch of chicken and have bags of portioned cooked, shredded chicken in the freezer.  I cooked the rice early in the day so when it came time for dinner, this was able to be thrown together very quickly.  

We ate this with a pepper jack peach quesadilla with honey lime sour cream.  It was a wonderful meal!!  Very healthy and incredibly tasty!! 

Green Chili Chicken and Lime Soup Recipe
Adapted from Picky Palate
1 onion, chopped
4 cloves garlic, minced
2 cartons of chicken broth or 64 oz.
1 can Rotel with green chilies
2 – 4 oz. cans of green chilies
2 cups chicken, cooked and shredded
2 cups basmati rice, cooked
1/4 cup lime juice
1 1/2 tsp. cumin
Salt & pepper to taste
Handful of cilantro, chopped
Place onion in pan with cooking spray and cook for about 5 minutes.  Add garlic, cook for one minute.  Stir in chicken broth, tomatoes, green chilies, cooked chicken, cooked rice, lime juice and seasonings.  Cook for 5 minutes, taste and season with salt and pepper as desired.  Right before serving, add chopped cilantro. 
Total calories = 1162
6 servings = 194 calories per serving
Pepperjack Peach Quesadilla & Green Chili Chicken and Lime Soup = 485 calorie dinner
Check out Debbi Does Dinner Healthy for more recipes!