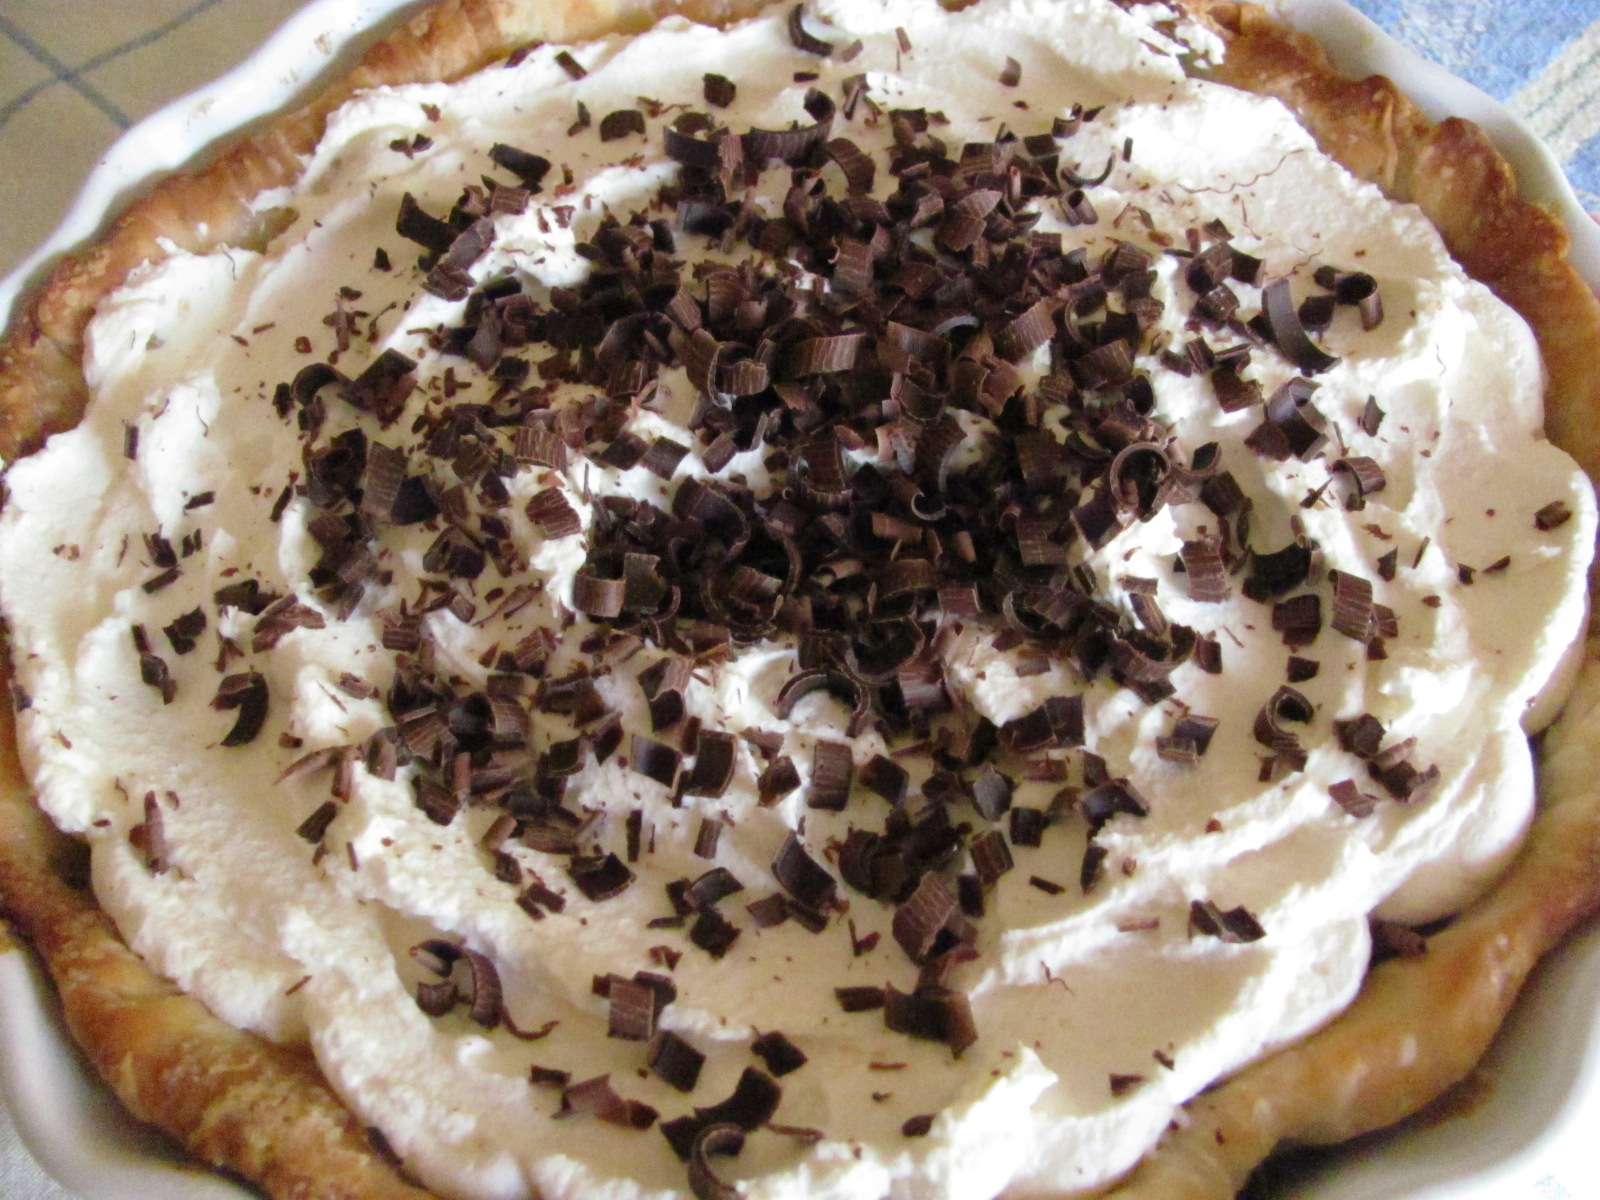
Save Room for Dessert…Black Bottom Pie

Here’s a little weird tidbit about me, while I’ve never liked pudding, I ‘ve always loved any type of custard pie. Chocolate, vanilla, lemon, coconut, banana, caramel…love the pie! It’s my texture issue; a bowl of pudding is just that, a bowl of pudding. No contrasts, no crunch. But in pie, there’s the creaminess of the custard, the crunchiness of the crust, and the lusciousness of the whipped cream. Truly, a beautiful thing. So, in homage to that sensory delight, today’s post is a black bottom custard pie. From the bottom up there’s the crisp, flaky, and buttery crust, a sinfully rich and chocolate custard, cloaked with a rich vanilla custard, and finally, topped off with a vanilla whipped cream and chocolate shavings. A delight for the connossieur of custard pies everywhere! Hope you enjoy it…

Black Bottom Pie

Custard
1 cup milk
1 cup half and half
4 egg yolks
2/3 cup sugar
1 tablespoon cornstarch
1 teaspoon vanilla
1 envelope gelatin
4 tablespoons water
6 oz bittersweet chocolate, chopped
All-butter pastry (recipe below)
4 tablespoons semisweet chocolate chips
Vanilla whipped cream (recipe below)
Chocolate shavings, optional

All-butter pastry
1 1/4 cups flour
1 tablespoon superfine sugar
1/2 teaspoon salt
1/2 cup unsalted butter, cut into small cubes
Ice cold water

Pastry method
Cut the stick of butter into small cubes by quartering the stick of butter lengthwise and then cutting into 32 cubes.
Place cubes on a plate and place plate into freezer for 15 minutes.
Fill a measuring cup with ice cubes and water; chill in freezer alongside the butter.
In a large ziplock bag (1 gallon size), measure in flour, sugar, and salt.
Once butter has chilled for 15 minutes, drop cubes into ziplock bag (a few at a time) and shake to coat with flour.
Press out all air and seal bag.
Place bag on a flat surface, jiggling the bag to distribute the flour and butter mixture evenly.
Using a rolling pin, roll over the bag incorporating the butter into the flour mixture.
After rolling over the bag 2 times, shake and turn the bag to redristribute the mixture, and repeat the process another 2-3 times.
Pour mixture onto a clean surface, and sprinkle on 2 tablespoons of ice cold water. I use a pastry scraper and my hands to incorporate the water. Continue to add water, one tablespoon at a time until you have a shaggy looking mass that holds together when you pinch it between your fingers. I added about 5 tablespoons of water.
Form the pastry into a disk and wrap in plastic wrap. Chill in the refrigerator for at least an hour.
Roll out the pastry to fit a 9″ pie plate.
Preheat the oven to 400 degrees.
Line the pastry with a piece of parchment and fill with pie weights, dry beans, or rice and bake for 20 minutes.  Remove from oven, remove parchment and with a fork, prick the bottom crust all over.  Return to the oven and bake another 10 minutes.  Allow to cool.  Melt the 4 tablespoons of chocolate chips in 30 second intervals in the microwave, stirring until melted. Using a pastry brush, paint the bottom of the pie crust with the melted chocolate. Place piecrust in the refrigerator until chocolate has hardened.

The custard
Mix together the gelatin and 4 tablespoons of water; set aside.
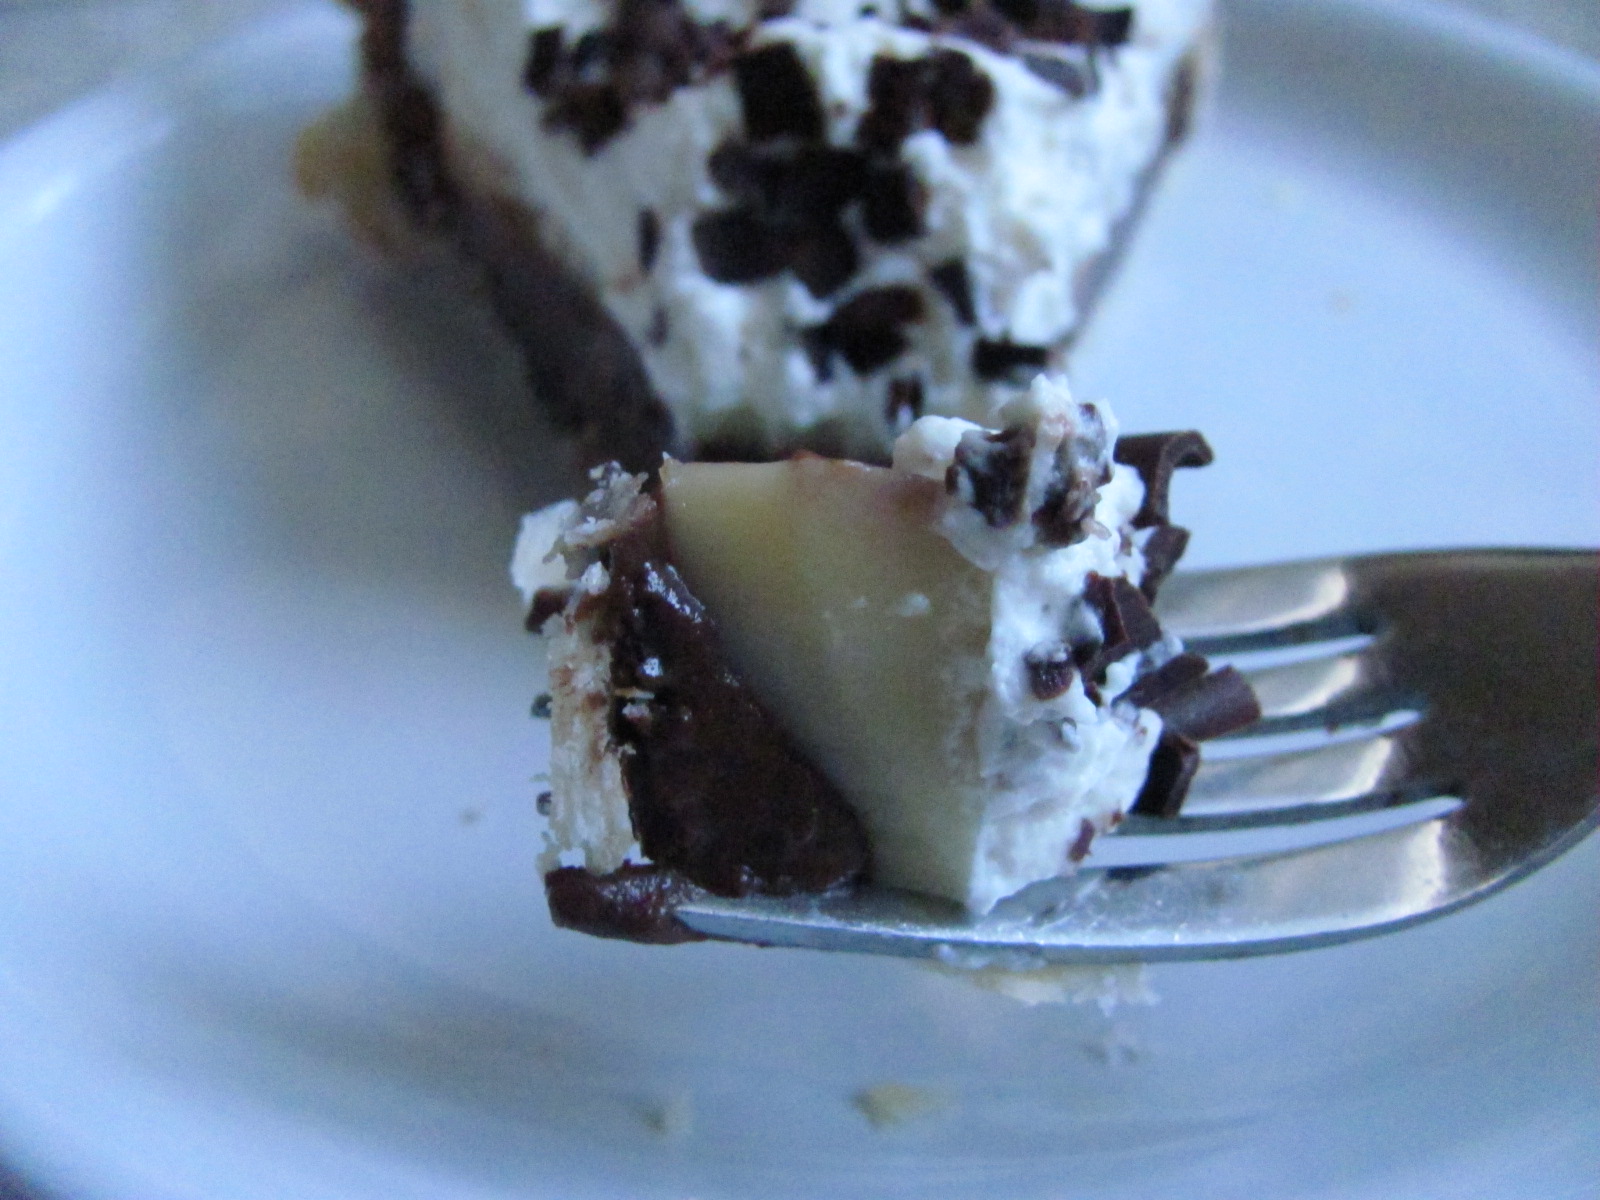
In a large saucepan, combine the milk, half and half, egg yolks, sugar, and cornstarch. Cook over medium-high heat, stirring constantly until the mixture comes to a boil and thickens. Remove from the heat and add the gelatin mixture, as well as the vanilla. Once mixed, remove 1 1/2 cups of the custard and set aside. To the remaining custard, add the 6 oz of bittersweet chocolate, stirring until the chocolate has melted. Allow both custard mixtures to cool.

The assembly
Remove the prepared piecrust from the refrigerator and pour the cooled chocolate custard into the piecrust. Return to the refrigerator and allow to chill for 30 minutes. Spread vanilla custard on top of chocolate custard and refrigerate overnight.

To serve
Prepare the vanilla whipped cream and spread on chilled pie; sprinkle on chocolate shavings and serve.

Vanilla Whipped Cream
2 cups heavy cream
1/4 cup powdered sugar
1 teaspoon vanilla
Combine all ingredients in a large bowl. Using a mixer, beat all ingredients until stiff peaks form. Use immediately.

TIPS FROM AN EX-CATERER

While out blog surfing today, I happened on a fun new cooking blog, The Church Cook, who had a wonderful post about food preparation.  The post had 10 tips and but they are really good tips.  I’ll list the tips for you, then you can go check out the whys behind them.
  • Use your hands
  • Use a thermometer
  • Keep ingredients close to you
  • Store food in ziploc bags
  • Use the timer
  • Weigh Your baking ingredients
  • Clean as you go
  • Freeze
  • Prep ahead
  • Have Fun Sharing

aprons 3

Cooking The Italian Way – Focaccia

008

Here’s something that’s going to blow your mind.

050

I used to be a picky eater.  Very picky. 

In fact, I would say that for most of my childhood I was only marauding as an Italian. 

Any true Italian family would have disowned me, what with my distaste for tomato sauce, fish, and sausage, among many other things.  But my parents dealt pretty well, much to their credit. 

(And now I’m getting it back tenfold, as my palate has expanded so much that I can’t attempt to cook something for them without realizing that it has some spice or vegetable that my father doesn’t like.  I.e. it HAS a vegetable in it and therefore he doesn’t like it.)

041

When I was eight, my father was sent on a business trip to Italy for three weeks (he works for an Italian bank). 

To which my mother responded, “Oh no you didn’t.”

And so all four of us – my mom, my dad, my brother, and I (my sister hadn’t been born yet) – ended up on a transatlantic flight headed straight for the old country.  

013

We stayed for six weeks, meandering through the city of Torino and then the small beachside town of Chiavari.  And while I actually do remember a fair portion of the trip, especially considering how young I was, the thing that stands out most in my mind was the focaccia. 

Now, this may be because this was all I would eat for the entire trip.  I hated the pizza.  I hated the pasta.  I was obviously young and stupid,  And delusional. 

But the focaccia?  Oh my lord that was good.  Sometimes when I close my eyes and think really hard, I can still taste it.  Salty.  Olive oil-y.  The kind of good that, when you bite into it, you know everything must be right in the world.  At least for that second in space and time.
Though I’ve searched high and low, I’m pretty sure focaccia that good doesn’t exist here in the US.  That stuff they serve you in restaurants doesn’t even come close.

This recipe that I’m sharing with you, however, is one of the best renditions I’ve found so far.  It’s not the exact flavor and texture, but, to be fair, I’m pretty sure that’s because there’s some secret ingredient that the Italians are putting in the bread (crack, cocaine, heroin…who knows.  Who cares?  It’s totally worth it.) to make it taste so good. 

I’ve sent a few private investigators over to Italy to figure it out.  But so far all of them have come back twenty pounds heavier, extremely content, but with little to no insight into “the focaccia problem”, as I call it.  When you want something done, you should do it yourself, I guess. 

So until I have a chance to get myself over to Italy, this is going to have to suffice.  Make it.  And dream with me.
033
Before I get to the recipe, I just want to share with all of you a fun, new FREE e-cookbook that has come out (featuring a few recipes by yours truly).  The e-cookbook features smart schooltime recipes for snacks and lunch food that are fast, easy, and healthy.  Guaranteed kid-tested, mother-approved kind of stuff.  You can download it here.

Focaccia
Makes 1 loaf, adapted from Tracey’s Culinary Adventures

1 1/2 cups warm water
3 tablespoons extra virgin olive oil (plus extra for drizzling)
1 1/4 teaspoons salt
3 1/2 cups (14 3/4 oz) all-purpose flour
1 tablespoon instant yeast
4 teaspoons Italian seasoning mix

Spray a 13 x 9 pan with cooking spray then drizzle 1 to 2 tablespoons of extra virgin olive oil over the bottom of the pan.

Place the water, olive oil, salt, flour and yeast in the bowl of a stand mixer fitted with the paddle attachment.  Beat on high speed for about 1 minute.  The dough will be smooth, elastic and sticky.

Transfer the dough to the prepared baking pan.  With oil or water on the tip of your fingers (don’t use more flour, you want the dough to remain sticky), press the dough into the bottom of the pan, nudging to get it all the way into the corners.  Cover the pan and let the dough rise for about 60 minutes, or until it is puffy.

While the dough rises, preheat oven to 375 F. 

Once risen, uncover the pan and use your fingers to make dimples all over the dough (you may need a bit of oil on your fingers if the dough is too sticky).  Drizzle the dough lightly with olive oil and sprinkle it with the Italian seasoning.

Bake for 35-40 minutes, or until the bread is golden brown.  Remove the pan to a wire rack to cool for 5 minutes, then turn the focaccia out of the pan (otherwise the bottom crust will get soggy).  Serve warm or at room temperature. 

I made the focaccia into a grilled eggplant, tomato, and fresh mozzarella sandwich.  Amazing!

066

Southwestern Roast Beef Sandwich

I won’t fork over big bucks for the latest kitchen gadget but sometimes you get lucky at a garage sale.

I bought a dehydrator for $6 at a garage sale a couple of weeks ago on a whim. I would never have spent $50 to buy one new in a store but for $6, what did I have to lose?

I have been having fun drying out an assortment of chilies and then grinding them up in a coffee grinder. So I had this wonderful sweet paprika and a spicy chili powder to use and thought I’d make a southwestern roast beef.


Southwestern Roast Beef Sandwich

2 lb beef eye of round
4 ea hoagie rolls
5 tsp Southwestern Rub
2 Tbsp vegetable oil
Cumin mayo
8 slices swiss cheese
lettuce, tomato, red onion

Rub
2 tsp paprika
1 tsp dried oregano
1/2 – 1 tsp chili powder
1/2 tsp cumin
1/2 tsp kosher salt
1/2 tsp turbinado sugar
1/2 tsp garlic powder

Cumin Mayonnaise
4 teaspoons ground cumin
1 cup mayonnaise
2 teaspoons fresh lime juice
3 teaspoons Chopped fresh cilantro

Instructions
Make the cumin mayo. In a small skillet over medium heat (using no oil), add cumin and stir constantly until darkened (2 minutes). Remove from heat. Mix mayo, cumin, lime juice and cilantro in a bowl. Cover and let chill for an hour before serving.

Mix rub ingredients together. Rub three teaspoons onto all sides of the beef roast. Mix the other two teaspoons with the oil.

Since this is Fire Day Friday, I spit roasted my beef on a rotisserie on the grill.

I used about 3/4 chimney full of lit coal and it took about an hour or an internal temp of 140f. I brushed it with the oil/seasoning mixture about 30 minutes into the cooking time.

You could also do this in an oven. Put the roast in an oven preheated to 450f for 10 minutes. Baste with the oil mixture. Cut the heat to 250f and then cook it for another 30 to 40 minutes or until the roast hits an internal temp of 140f.

Let rest for 15 minutes and then slice thinly. TIP: When I want really thin sliced roast beef, I will put the roast in the fridge for a day and then slice it while it’s cold. Whether doing it by hand or on an electric slicer, it’s easier to get thin slices when fully chilled.

Serve on a hoagie roll with the cheese, toppings and cumin mayo.


The roast beast…errr beef was tender and packed with flavor. The cumin mayo sealed the deal. It sure beats roast beef from a deli!

It’s my birthday soon and CSN wants to give you a present to help me celebrate! so it’s GIVEAWAY TIME at 3 Sides of Crazy!

I love shopping online with CSN and you can too.  It so easy and they have so many wonderful name brand products to choose from.  Whether you are looking for a  Corelle, TV stands, dining room furniture or cookware they have it all.
Seriously, you really need to go check out these sites
www.racksandstands.com
www.allmodern.com
www.diningroomsdirect.com
www.cookware.com
www.moremailboxes.com

How can you win? By joining this giveaway of course!

Just to remind you, CSN Stores has over 1 million products and that number is constantly rising. Not only is their product catalog growing but they’re adding new stores like www.luxebycsn.com. You can literally spend all day looking for the perfect product at CSN.stores.  Thank you CSN.stores for being so generous to the blogworld and allowing help spread the word.

The winner receives a $55 gift certificate to use
as they wish on any of the 
CSN.stores websites.


THE RULES ~ leave a comment for each entry with the link.
  • Answer one questionWhat is your favorite holiday recipe?
  • Go over to their new site, www.luxebycsn.com and tell me your favorite item.
  • You can earn an entry by linking that recipe here.
  • You can earn an extra entry by blogging about this contest.
  • You can earn another entry by becoming a follower of OUR KRAZY KITCHEN.
  • You can earn another entry by becoming a follower here at 3 Sides of Crazy.
  • You can earn another entry by becoming a follower here at Always Eat On The Good China.
  • No entries after 11:30 pm Pacific Time Sunday, September 20th.
  • Winner will be selected at random and announced Monday, September 21st.
  • Good luck!

Disclosure: I did not receive any type of compensation for this post. CSN stores is sponsoring this giveaway and will handle prize fulfillment. All opinions are my own and I was not influenced to post them.

aprons 3

Simply Delicious Sunday will be making some little cakes soon…

I love shopping online with CSN and you can too.  It so easy and they have so many wonderful name brand products to choose from.  Whether you are looking for lights, TV stands, dining room furniture or cookware they have it all.

Look for my review of this beautiful Pumpkin Patch Pan in the very near future. I truly wonder how I ever got along without it! 
 
Just to remind you, CSN Stores has over 1 million products and that number is constantly rising. Not only is their product catalog growing but they’re adding new stores like www.luxebycsn.com. You can literally spend all day looking for the perfect product at CSN.stores.  Thank you CSN.stores for being so generous to the blogworld and allowing help spread the word.


I’m envisioning an awesome
little cakes in my family’s future.  The uses are going to be endless.


If you stop by 3 sides of crazy, I’m having a CSN giveaway there.

aprons 3

CAMPFIRE POTATOES

Amounts are proportionate and per taste.
Slice some yukon gold potatoes and Vidalia onions.
Generously sprinkle with salt and pepper.
Toss with melted butter until well coated.
Using heavy duty foil cut out generous sized squares per person.
Squirt a generous amount of yellow mustard all around.
Sprinkle with grated cheddar cheese and crumbled crisp bacon.
Seal well.
Seal well and toss on grill for 25-30 minutes.
aprons 3

CHICKEN ala BAD DAY and home made SOY SAUCE substitute

I was having one of those days with trying to get my aunt to a specific appointment at a specific time.  You know the type that she wasn’t (or wasn’t able to) cooperating, the weather was storming, it was hot and muggy and I was just plain getting worn out dealing with her.  We were supposed to have leftovers tonight, I had planned it that way knowing I would be gone dealing with her, but someone, who will remain nameless decided that it looked better for lunch.  So when I got home I rooted around the crisper and the pantry trying to throw together enough dinner for tonight and was pleasantly surprised at the outcome.  My uncle asked what I called this and I said Chicken ala Bad Day.  He asked if I would post it to my blog and I said yes, because guess what?  They want me to make it again and it turned out REALLY good.

CHICKEN ala BAD DAY 
3 tablespoons butter
2 pound boneless skinless chicken breasts
1 large bunch green onions, sliced thin
3 cloves garlic, minced
1/4 cup champagne vinegar 
1 tablespoon balsamic vinegar
2 tablespoons molasses
salt and pepper to taste 
1/2 pound green beans, trimmed 
1/4 pound mushrooms, sliced

  • Heat the butter in a large skillet over medium-high heat. 
  • Generously salt and pepper the chicken pieces.
  • Saute’ the onions and garlic until they soften and brown, about 5 minutes.
  • Add chicken pieces until golden brown on both sides. 
  • Pour in vinegars and molasses.
  • Reduce heat to medium-low, and simmer until chicken is well glazed.  I removed the chicken and then added mushrooms and green beans and sauteed them in the remaining sauce creating a great accompanying vegetable.
I was going to use soy sauce when I discovered I was completely out and so I looked up substitutes.  I found this and it sounds like a great mix that I plan to try soon.
Soy Sauce Alternatives
If you are looking for a substitute for soy sauce which can be stored for sometime, here is a concoction which can be used for a month, if stored in the refrigerator.

Prepare garlic vinegar
5 garlic cloves
½ a quart of boiling white wine vinegar
1½ tablespoons of peppercorns 

1 tablespoon onion powder
1/4 teaspoon ground ginger
+/-5 tablespoons blackstrap molasses (a spiritous mixture of rum and molasses)

  • Add garlic and peppercorns to vinegar and  let it stand for 3 weeks.
  • After 3 weeks,  add onion powder and ground ginger to 1¾ cups of the strained garlic vinegar. 
  • Next add +/-5 tablespoons. Take care to add the blackstrap based on how sour or sweet you want it to be. 

This soy sauce alternative is actually the best choice for those who are on a low sodium diet owing to blood pressure or cardiovascular issues and also makes way for the health benefits of blackstrap molasses which includes regularization of bowel movement, arthritic pain relief and restoration of color to graying hair.

aprons 3

MEXICAN SWISS STEAK

Hi Tamy here filling in for Min today which works well with her theme, Try a New Recipe.  This recipe is the perfect Try A New Recipe.

I recently had a thrift store find beyond belief.  An old recipe box full of old hand written recipes.  I estimate they are from the 50-60’s era when women passed around recipes at morning coffee, tupperware parties and PTA meetings.

This recipe called for either a can of diced tomatoes OR a can of cream of chicken soup for a creamy version.  I decided to amp it up a bit and added a can of Rotel diced tomatoes with green chiles and changed the soup from chicken to celery.  What resulted was an extremely tender and spicy round steak in its own gravy.
MEXICAN SWISS STEAK
2 pounds round or swiss steak, 3/4 inches thick
1 large Vidalia onion, thinly sliced
1 pound can tomatoes OR 1 can cream of chicken soup
1 can ROTEL tomatoes with green chiles
1 can cream of celery soup
salt & pepper to taste
  • Salt and pepper each piece of meat.
  • Cut meat into serving size pieces
  • Whisk together the soup and tomatoes until well blended.
  • Layer meat, onion rings and soup several times in crock pot.
  • Cook on low 8-10 hours.

I served it with Potato casserole and the guys wolfed it ALL down!

DON’T FORGET!
It’s PARTY time here at OUR KrAzY kitchen.
LUAU badge
Be sure to link up on the sidebar to join the party.