HAPPY MOTHER’S DAY ~ STRAWBERRY PIZZA & STRAWBERRY CREAM CHEESE PIE ~ SAME BASIC RECIPE 2 WAYS

STRAWBERRY PIZZA
1 package Pillsbury pie dough (or homemade if you have time)

2 eggs
8 ounces cream cheese, softened

3/4 cup sugar + 3-4 tablespoons

1 teaspoon vanilla

1 pound strawberries, cleaned and sliced
whipped cream

  • In a medium mixing bowl sprinkle 3-4 tablespoons of sugar over sliced strawberries and toss. Set aside.
  • Cut out 4 – 5 inch rounds.
  • Bake 10 minutes at 400 degrees.
  • Cool.
  • In a mixing bowl combine cream cheese, eggs, 3/4 cup sugar and vanilla. Beat until well blended.
  • Bake cream cheese mixture 10 minutes until slightly thickened.
  • Spread over “pizza” rounds.
  • Top with spoonfuls of strawberries.
  • Add whipped cream and top with CARAMEL SAUCE and MOCHA HOT FUDGE SAUCE.

RUSTIC STRAWBERRY CREAM CHEESE PIE
1 package Pillsbury pie dough (or homemade if you have time)

2 eggs
8 ounces cream cheese, softened

3/4 cup sugar + 3-4 tablespoons

1 teaspoon vanilla

1 pound strawberries, cleaned and sliced
whipped cream

  • In a medium mixing bowl sprinkle 3-4 tablespoons of sugar over sliced strawberries and toss. Set aside.
  • Fit crust into pie plate, prick bottom in a couple places with fork tines and bake 5 minutes at 400 degrees.
  • In a mixing bowl combine cream cheese, eggs, 3/4 cup sugar and vanilla. Beat until well blended.
  • Pour into pie plate and bake cream cheese mixture 15 minutes until slightly thickened. You will need to lay a piece of foil over top for part of the time to prevent crust from burning.
  • Spread over “pizza” rounds.
  • Top with spoonfuls of strawberries.
  • Add whipped cream and top with CARAMEL SAUCE and MOCHA HOT FUDGE SAUCE.

Kitchen Dreams & Wishes

It’s been awhile since I’ve done a Kitchen Wishes post, but as I progress through this temporary situation I find I am missing more and more of my “own” things.  So today with the help of King Arthur Flour I’m doing a little dreaming again.
Like for these Wisconsin Mixing Bowls – they are so versatile, durable and just plain useful.
And for this dual bladed pizza cutter – I use a pizza cutter to cut way more things than just pizza.  They work wonders on quesadillas and even better on scones.
And I really miss the specialty tools like a chef’s torch or the simple things like a flour wand.

aprons 3

BALSAMIC BERRY SAUCE

1 tablespoon butter
1 cup fresh blackberries, pureed large
8 ounce can crushed pineapple, drained slightly
1/3 cup sugar
1 tablespoon balsamic vinegar

  • Melt butter in a large skillet over medium heat. Add the berries, pineapple, sugar, and balsamic vinegar.
  • Cook until the strawberries are heated through and darkened to a deep purple.
  • Spoon berries over shortcake or ice cream and serve.

aprons 3

Taste & Create, Anyone?

Min here, just doing a plug for my friend Nicole, the creator of the Taste & Create food blog event and fellow food blogger at For the Love of Food. Nicole’s been bogged down in housing construction, subsisting in a 400 square foot apartment with barely a kitchen, so in the meantime I’ve been hosting T&C.
Taste & Create is a fantastic event in which food bloggers are randomly paired off, tasked with choosing and preparing any of their partner’s recipes–and then blogging about it, of course. To read more about it, go to How It Works.
Do YOU want to play?
If you’d like to participate this month, please email me at cowgirlmin07 [at] gmail [dot] com by May 9th. I’ll send out partner assignments by the 11th, and submissions will be due on the Taste & Create website by May 24th.
That’s all there is to it. Usually we have a variety of participants from all around the world, and it’s a ton of fun to meet new friends and discover new ingredients!
Hope you’ll join us!

STACKED GREEN CHILE & GRILLED CHICKEN ENCHILADAS

I made this for daring cooks and then made it again and altered it for my family.  It turned out really good when paired with my homemade REFRIED BEANS.

STACKED GREEN CHILE & GRILLED CHICKEN ENCHILADAS

1½ pounds Fresh Anaheim chiles roasted, peeled, seeds removed & chopped coarsely.
7-8 ounces Tomatillos (about 4-5 medium) peeled and stems removed
4 cups homemade Chicken broth
3 cloves Garlic, minced
1 bunch green onions, minced
½ teaspoon sea salt to taste
¼ tsp Black Pepper to taste
2 tablespoons Cornstarch (dissolve in 2 tablespoons water, for thickening)
Hot sauce, your favorite, optional
3 Boneless chicken breasts

3 tablespoons canola oil

3 10-12 inch flour tortillas

8 ounces grated Cheddar/Monterey Jack
Cilantro for garnish, chopped and sprinkled optional
Roasting the Fresh Chiles
  • Coat each chile with a little vegetable oil. If you are doing only a couple chiles, using the gas stove works. For larger batches (as in this recipe), grilling or broiling is faster.
  • Lay the oiled chiles on the grill or baking sheet (line pan with foil for simpler clean-up). Place the grill or broil close to the element, turning the chiles so they char evenly. They should be black and blistered.
  • As they are completely charred (they will probably not all be done at once), remove them to a bowl and cover with plastic, or close up in a paper bag. Let them rest until they are cool.
  • Pull on the stem and the seed core MAY pop out (it rarely does for me). Open the chile and remove the seeds. Turn the chile skin side up and with a paring knife, scrape away the skin. Sometimes it just pulls right off, sometimes you really have to scrape it.
  • DO NOT RINSE!
Green Chile Sauce 
  • Put a medium saucepan of water on to boil and remove the papery outer skin from the tomatillos. Boil the tomatillos until soft, 5 to 10 minutes. You can also grill the tomatillos until soft. 
  • Drain and puree in a blender or food processor.
  • Return the tomatillos to the saucepan along with the chicken broth, chopped green chiles, minced onion, oregano, garlic, salt and pepper.
  • Bring to a boil over medium-high heat and then reduce the heat and simmer for 10 minutes.
  • Add the cornstarch/water mixture and stir well. Simmer, stirring occasionally, until the sauce is thickened and reduced to 4-5 cups, another 10-15 minutes.
  • Adjust seasonings and add hot sauce if you want a little more heat.
Assembling the stacked Green Chile and Grilled Chicken Enchiladas
  • Heat a gas grill to medium high or build a medium-hot charcoal Coat the chicken with olive oil and season well with salt and pepper. Preheat oven to 450 degrees.
  • Grill the chicken until just cooked through, 4-5 minutes a side for boneless chicken breasts. I did them on the stove in a cast iron pan and they were awesome.
  • Cool and then slice into thin strips or shred.
  • In a small skillet, heat 3 tablespoons oil over medium-high heat until very hot. Dip the edge of a tortilla into the oil to check – it should sizzle immediately.
  • Using tongs, put a tortilla into the pan and cook until soft and lightly brown on each side, about 15-20 seconds per side (at the most).
  • Drain on paper towels.
  • Add oil as needed and continue until all 12 tortillas are done.
  • In a baking dish large enough to hold four separate stacks of tortillas, ladle a thin layer of sauce.
  • Lay four tortillas in the dish and ladle another ½ cup (4 ounces/112 grams) of sauce over the tortillas.
  • Divide half the chicken among the first layer of tortillas, top with another ½ cup of sauce and 1/3 of the grated cheese.
  • Stack another four tortillas, top with the rest of the chicken, more sauce and another third of the cheese.
  • Finish with the third tortilla, topped with the remaining sauce and cheese.
  • Bake until the sauce has thickened and the cheese melted, about 20 minutes. Let rest for 5-10 minutes.
  • To serve, transfer each stack to a plate. Spoon any leftover sauce over the stacks and sprinkle with cilantro, if you wish. The stacks may also be cooked in individual gratin dishes.

aprons 3

Cheating Grilled Corn On The Cob

Fire Day Fridays are about cooking something with live fire that anyone else can make on any other type of grill. No Big Green Egg required. No special equipment. Fire Day Fridays are about inspiring and getting people to use their own grills.
It is hard to beat the taste of grilled corn on the cob. The fire roasting brings out the best in the sugary starches hidden in those kernels.

But my favorite way of cooking corn on the cob on the grill is a lot of prep work, requires a long soak and takes at least 30 minutes more of actual cooking time. That makes it impractical if you are trying to serve it with most other grilled main courses unless you have two grills going at once.

So here is a way I tried tonight that makes it easy, you can do all but 5 minutes of it ahead of time, and you can make it early in the season when the only corn you can get at the stupidmarket is partially shucked corn like this.
Cheating Grilled Corn On The Cob

Source: Nibble Me This

4-5 ears corn on the cob, shucked and silks removed
3 TB butter
2 TB spice rub of your choice (I used a southwestern rub tonight, but you could go as simple as chili powder)

Fill a large pot half way with water (I used an 8 qt pot) with water, add 3 TB of kosher salt and bring to a boil. Add corn and boil for 5 minutes. Remove corn to an ice bath.

You can hold the process here for a few hours. Cook whatever main dish you are making on the grill, then once it is resting, finish the corn on the already hot grill as follows.

Melt the butter and whisk in the spice rub. Get your grill to a 350-400f temperature (medium high-high if using a gas grill, depending on your grill). Place the cobs over direct heat.

Brush with the butter/spice mixture.

Check occasionally until the kernels on the bottom start to brown/blacken. This will take about 3 minutes or so. Be patient.

Once it starts to turn, rotate about 1/3rd turn and cook until the next side starts to char. This time, it will probably only be a minute or so.

Turn 1/3rd way again and cook until the final side is slightly charred.

Remove and give one more quick brush of a butter mixture. Serve as the perfect side dish to any grilled meats.

Or in my case, slice off those rich smoky kernels and then use them in a dish like Sweet Tamale Corn Cakes. Or in a great black bean and corn salsa. Or in corn bread. Or in……oh, you get the point.

SUN DREID TOMATO PESTO SPAGHETTI CARBONARA

1/2 pound bacon /Pancetta, cut into 1 inch pieces

4 egg yolks
2 tablespoons Classico sun dried tomato pesto
3/4 cup Parmesan Cheese
4 cloves garlic, minced
1 small-medium onion, chopped fine
1 1/2 cup heavy cream
1/2 teaspoon sea salt, if necessary depending on bacon
1 teaspoon white pepper
3 tablespoons butter, melted
fresh parsley
1/2 pound spaghetti, linguine or pasta of your choice
  • Saute’ the bacon and brown until crisp.
  • At the same time bring the pasta water to a boil. Timing is crucial on this dish, the pasta must be ready when the rest of the ingredients are.
  • Chop the onion into small bits.
  • Using a slotted spoon remove the bacon from the grease and drain on paper towels.
  • Add the onions to the bacon grease and saute. Add the garlic.
  • Using a slotted spoon remove the onions and garlic and add to the bacon.
  • Pour off excess bacon grease.
  • Seriously scrape bottom of pan to loosen the stuck on bits – we NEED those for flavor. Make sure the pan cools slightly so as not to curdle the cream.
  • Add the sun dried tomato pesto and let heat to thin slightly.
  • Add the heavy cream, cooking until heated through and bubbling.
  • Add back in the bacon, onion and garlic. Lower heat. Simmer a few minutes to heat through and reduce liquid.
  • In a large serving bowl whisk the egg yolks together. Add the majority of the Parmesan cheese and Parsley, saving just enough for garnish. Mix it together well.
  • Add the drained HOT** pasta and mix well.
  • Add the butter, pepper and the bacon mixture. TOSS, TOSS and TOSS again until well mixed.
  • Garnish and Serve immediately.
**Pasta MUST be hot in order for this to coagulate well.

aprons 3

Cheese and Potato Cakes

A funny thing happened on my way to the Caribbean… I am captivated by leftovers.  Largely due to the cost of ingredients here, I am now doing my best to make leftovers into something new.  This recipe is a great example of what I am talking about.  Rather than fresh made mashed potatoes one night and microwaved cold mashed potatoes the next, I made a whole new dish from the cold mashed potatoes from the night before.

Unless your family watches you cook, they will never know you are serving leftovers.  It is the perfect sidedish, glory from deception… Who could ask for more???

But first, I need to share the credit (well, since I stole the entire recipe, sharing is a generous word from my side, but I digress…)

One of my favorite sites is THE MYSTERY LOVERS’ KITCHEN.  MLK is a fun site, with 6 very talented cooks alternating a weekly recipe posting.  BUT, they also have another thing in common.  Each contributor has a book (most a series of books), featuring recipes and or food as an important part of their murder mysteries.  It takes a bit of reading before you get the hang of which lady and which personality is cooking on any particular day.  But then, I am married, so I am used to one site (person) with borderline criminal schizophrenic personalities.  So I enjoy the blog a lot.

A Cheese Shop Mystery 

One of the stars of THE MYSTERY LOVERS’ KITCHEN is Avery Aames.  Avery has a new book, new series being released soon.  The sassy owner of an artisan cheese shop who also loves a tasty mystery, fights crime and feeds cheese lovers.  “The Long Quiche Goodbye” (don’t you love that title) is due to be released soon, and you can pre-order now!  Recently Avery did a post of a cheese recipe for your leftover mashed potatoes.  It sounded odd, it sounded like it would mess up my pan and not come out as she described… But it sounded really good if it worked as she claimed.


Here’s what she said to do…

Avery’s Cheese and Potato Cake


Ingredients:


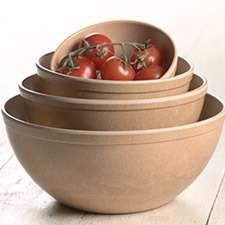
1/2 cup leftover mashed potatoes [recipe for potatoes below]

4 thin slices of your favorite Cheese [I used white cheddar]
dash of paprika
1/2 teaspoon dried parsley
1 tablespoon of oil

Directions:

In a skillet, heat the oil on medium. Mold the potatoes into a flat “ball.” Lay two slices of the cheese in the skillet. Place the potatoes on top. Lay two more slices on top of the potatoes. As the cheese melts, use a spatula and lift the cheese up the sides of the potatoes. Continue to do this for 2 minutes. Flip the “cake” and do the same with the cheese, scraping it up the sides to form a crust around the potatoes. By the time the cheese is cooked to your liking, the potatoes will have heated through.


Serve warm. If you like, add a dollop of sourcream.


Be honest now… When you read this don’t you think that the cheese is going to hit that hot oil, melt all over the pan and get really messy in your pan.  I just could not imagine it working as Avery said it would.  But I was intrigued enough to give it a try.


Actually, I tried it for my lunch before I made it for my wife.  From bitter experience, I have learned to experiment with my lunch before inflicting oddities on my wife.  But I digress…


I had some spicy Chipotle infused Cheddar Cheese that I needed to use up.  Sure enough, as you can see, when I added the cheese to the hot oil, it did melt FAST.  But, as Avery instructed, I continued to push the melted (and rapidly crusting) cheese onto the sides of the tater patties.
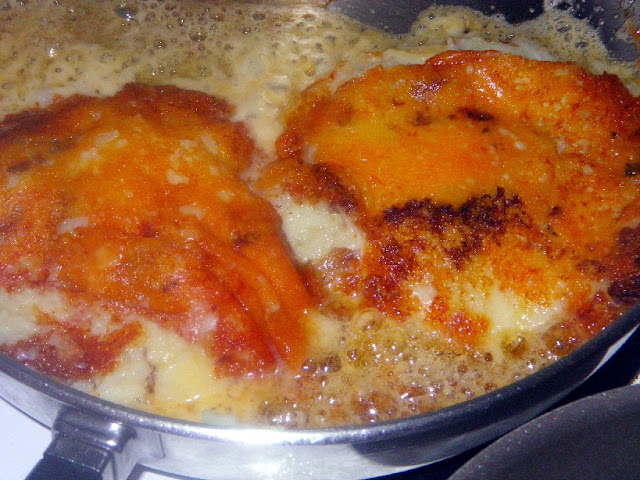


And look at that!!!


The cheese did not stick to the pan (as I expected)
The cheese did not burn (as I expected)
The cheese did not ooze out into the oil and never stick to the taters (as I expected)


It worked exactly as Avery said it would (um… is it too late to add “as expected”???)


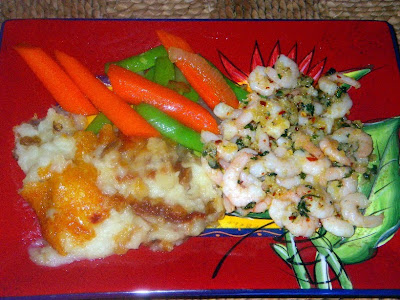
Avery’s did end up a bit nicer presentation, with a patty look instead of my final look.  I made my patties too big, and I did not have a spatula big enough transfer to a plate before they broke apart.  Next time.


But, what I wanted did indeed happen.  there was no hint that this new dish was made from old left overs.  Thanks Avery, you made me look like a genius!


Dave here from MY YEAR ON THE GRILLI was THRILLED with the results.  Crusty, cheesy and filled with new flavors!


 … I CAN COOK THAT! Anyone can!!! And anyone can make this winner…


And BTW…


Avery has a trailer for her book.  Lots of images of cheese, and will whet your appetite for not just a “gouda” mystery, a Great Mystery… Click HERE to see the trailer!