BACON CHEESEBURGER HAMBURGER HELPER NOT!!


BACON CHEESEBURGER HAMBURGER HELPER NOT!!
6 bacon strips cooked crisp and crumbled
1 1/2 pounds hamburger
1 small Vidalia onion, chopped
2 cups green giant frozen corn, thawed
2 large Yukon potatoes, sliced
Land o’ Lakes American Cheese Slices

  • Preheat oven to 375 degrees.
  • Toss bacon and corn together.
  • Layer potatoes over top.
  • Generously salt and pepper the potatoes.
  • Place a thin layer of cheese slices over potatoes.
  • Brown hamburger and onions together. Salt and pepper well while meat is browning. Drain off fat.
  • Layer over the potatoes and top with another layer of potatoes.
  • Salt and pepper again and layer with another layer of cheese.
  • Cover and bake for 45 minutes.
  • Uncover and bake another 15 minutes.

**I like to make this and the ITALIAN SAUSAGE BAKE back to back (that way I also have 2 meals ready to go with half the mess) so the left over bits of browned sausage and caramelized onion add flavor to the hamburger.
aprons 3

CHICKEN PAPRIKA IN BALSAMIC CREAM SAUCE

When I was a little girl we went a restaurant on the west coast called the Sea Lion for special occasions. The restaurant sat right on the beach and my favorite time to go was during a storm. My family always reserved a window table in advance. The waves would crash up on the windows while you were eating and it created such an ambiance that ALL food tasted better in my opinion. I wasn’t much on fish back then (silly me) so I would always order their Paprika Fried Chicken which I have not yet been able to completely duplicate, but have settled for this recipe until I can. The flavor is similar, but creamy. Their recipe was more like a broasted chicken, but the flavor combination was just so unique!!
CHICKEN PAPRIKA IN BALSAMIC CREAM SAUCE
2 pounds chicken tenders
1/2 teaspoon each sea salt & white pepper
1/2 cup flour for dredging
1 tablespoon + 2 tablespoons Hungarian sweet paprika
2 teaspoons minced garlic, jar
2 large bunches green onions, thinly sliced
olive oil
4 tablespoons balsamic vinegar
1 tablespoon lemon juice
1 1/2 cups boiling water
1 teaspoon Better than Bouillon chicken base
1/2 cup heavy cream
  • Mix together the sea salt, white pepper and 1 tablespoon of paprika with the flour in a plastic bag.
  • Coat each chicken tender well with flour seasoning mix. Reserve any remaining flour mixture.
  • In a large skillet heat olive oil.
  • Brown chicken pieces until golden on each side, until almost cooked through, set aside.
  • Add onions to oil and saute until translucent. Add garlic and cook until fragrant.
  • Add balsamic vinegar and lemon juice to deglaze the pan scraping up any bits stuck to the pan for added flavor.
  • Whisk the boiling water, chicken base 2 tablespoons paprika together until smooth.
  • Bring to a boil.
  • Add any remaining flour seasoning mix and whisk until smooth.
  • Reduce heat, return chicken to pan and simmer 5-10 minutes.
  • Add cream and simmer 5-10 minutes more until chicken is cooked through.
  • Serve over egg noodles or mashed potatoes.

aprons 3

Regional Middle East Recipes ~ Choereg (Armenian Easter Bread)

Joanne from Eats Well With Others is now hosting Regional Recipes! Go to This Post for details if you’d like to play along and then watch for the Joanne’s Regional Recipes Round Up post on February 28th. This month the theme Is Middle Eastern Foods.


The only recipe I could find in my repertoire was from a college roommate who was Armenian. She called it something I couldn’t pronounce then and can’t remember now, but it translated basically to “Easter bread” and I had never made it before today – just watched her all those years ago. I did a little research and found it is also called, Choereg and there are a ton or recipes out there in blogland for breads, rolls and even bread sticks with the same dough.

CHOEREG aka ARMENIAN aka EASTER BREAD
1 cup whole milk
1 cup unsalted butter
1 cup salted butter
1 cup + 2 teaspoons sugar
1/2 cup lukewarm water
2 (1/4 ounce) envelopes active dry yeast
5 eggs + 1 egg, beaten for brushing on top
6 cups all-purpose flour, or as needed
1 1/2 teaspoons baking powder
1 1/2 tablespoons ground mahleb (1/2 teaspoon almond extract + 1/4 teaspoon black cherry extract + 1/4 teaspoon vinegar substitutes well)
1 teaspoon salt
1 tablespoon sesame seeds (optional & personally I don’t care for them at all)

  • In a medium saucepan over a low heat, melt the butter.
  • Add the milk and heat together until well blended, but not boiling.
  • Stir in 1 cup of sugar until dissolved, then set aside to cool until lukewarm*.
  • Meanwhile, in a small bowl, dissolve 2 teaspoons of sugar in warm water. Sprinkle the yeast over the surface, and let stand until frothy, about 10 minutes or so.
  • In a large bowl whisk the eggs just enough to break up the yolks.
  • Slowly pour in the lukewarm milk mixture, constantly stirring.
  • In a small bowl whisk together the almond extract, black cherry extract and vinegar.
  • Add to the milk mixture just until incorporated.
  • Add the yeast mixture, and stir just until blended.
  • In a large bowl, combine the flour, baking powder and salt.
  • Make a well in the center, and pour in the wet mixture.
  • Stir until it forms a sticky dough.
  • Pour onto a floured surface, and knead in additional flour as needed to make a more substantial dough.
  • Knead about 10 minutes.
  • Place in an oiled bowl, and set in a warm place to rise for about 2 hours, or until doubled in size.
  • When the dough has doubled, punch down again, and let rise until doubled again. About another hour.
  • Separate the dough into 5 even portions, then separate each of those into thirds. Roll each of those into ropes about 12 inches long. Braid sets of three ropes together, pinching the ends to seal, and tucking them under for a better presentation. Place the loaves onto baking sheets lined with parchment paper. Loaves should be spaced 4 inches apart. Set in a warm place to rise until your finger leaves an impression behind when you poke the loaf gently.
  • Preheat the oven to 350 degrees.
  • Brush the loaves with beaten egg, and sprinkle with sesame seeds if desired.
  • Bake for 25 minutes in the preheated oven, or until nicely golden brown all over.

*Make sure this is lukewarm, not hot. You do NOT want the eggs to cook as you blend this in.

CHICKEN & DUMPLINGS ~ CLASSIC & COMFORTING

SIMPLE CHICKEN & FEATHER DUMPLINGS
1 rotisserie chicken picked clean
chicken carcass with enough water to cover
1 medium Vidalia onion, chopped small
2 stalks celery, sliced
1 cup baby carrots, chopped
3 tablespoons Wondra flour
1 cup milk, room temperature
2 tablespoons butter

  • Cover chicken carcass with water. Bring to a boil and reduce broth to 7 cups.
  • Save 4 cups aside for making the dumplings.
  • Pour 3 cups through sieve into a large saucepan. Set aside.
  • Melt butter and saute’ vegetables.
  • Whisk together milk and flour until smooth.
  • Gradually whisk milk mixture into broth mixture until well blended.
  • Add in sauteed vegetables and chicken pieces.
  • Simmer until desired consistency.

DUMPLINGS
2 cups sifted cake flour
1 teaspoon salt
4 teaspoons baking powder
1/4 teaspoon white pepper
1 egg, well beaten
3 tablespoons butter, melted
2/3 cup milk

  • Sift together flour, salt, pepper and baking powder.
  • Add egg, butter and enough milk to make a moist, stiff batter.
  • Drop by teaspoonfuls into the boiling liquid.
  • Cover and cook 15-20 minutes ~ Watch closely!


  • aprons 3

Faux Grilling – Salmon Skewers with Maple-Mustard Glaze ala Year on the Grill


Before I get to the post, I have a question for you ladies… Actually two…

Remember me, Dave here from MY YEAR ON THE GRILL. I am the guy who gave you ladies advice on pleasing your man with two ROMANCE POSTS…

So…

Did any of you get diamonds for Valentines Day???

and

Did any of you make Moink Balls for your man???

If you answered “no” to both those questions, you have no one to blame but yourselves. I did my best for you.

But that is old business. Time for today’s post with an explanation of what I call “Faux Grilling”.

It has just been too cold, windy and nasty around here to do any grilling. Unusual for Kansas, but I really can’t remember a day since Christmas when it was above 40 degrees. I did my mandatory, “I can still grill in the cold and snow” session just to prove I could. But it is just no fun.

So, I started “Faux Grilling”. It is pretty easy. I have made Moink Balls, shrimp, pineapple wrapped in bacon (that’s a post for another day) and now Salmon skewers. So, I guess it is time I explained the process.

You need skewers. The flat kind work best so the do not roll. If you don’t have flat skewers, you can use 2 of the long “toothpick” style and create a flat type. In the photo on the right, I am showing the look that you want. I skewered the meat, and suspended the skewers between the sides of a small casserole dish. These were single round toothpick style, and my first efforts at “Faux” grilling. They worked… OK, but when I moved to flat skewers, I was able to turn them and grill top and bottom…


Like this photo to the left. the blades of this skewer are flat, combined with the heads in the shape of bulls and shrimp, I am able to turn the bacon wrapped pineapple (that’s a post for another day), and get both sides “grilled”.

Once I have the meat positioned correctly, I just put them in the oven, set on broil and instead of direct heat grilling over coals, I am direct heat grilling under a heating element.

But it works the same. Notice the char marks, similar to grill marks. You lose those beautiful grill marks, but the taste is as close as I can get and not get my fingers frostbit.

Til I move to a tropical Island (next week), as long as I live in Kansas in February, this is as close to grilling as I am going to get.

But before I leave you for the week, I want to share this quick, easy and great tasting recipe. This post is part of a cultural exchange program called TASTE AND CREATE! Once a month, Taste and Create pairs you with another blogger. You are asked to look over their blog and cook something from it. This month I was paired with Marthe from the Netherlands. Her blog, CULINARY DELIGHTS was great fun to look over. While she is native born Dutch, she does write in English, and very well. You would never guess this was her second language. Marthe makes lots of cupcakes and cookies; plays along with Tuesdays with Dorrie and Craving Ellie in My Belly. She started blogging about the same time I did. It was fun to get to know her.


Plus, I was reminded of my youth. 35 years ago, when I was in high school, I dated the foreign exchange student from the Netherlands. You can file this under too much information, but that Dutch girl was the first I ever… Well, you know the rest, better keep the details to myself. Suffice it to say, anything Dutch always makes me smile just a bit.


But, I digress. here’s Marthe’s recipe for

Salmon Skewers
with
Maple-Mustard Glaze


4 salmon skewers (ready bought President’s Choice, 320 gram)
1/8 cup maple syrup
1 tbsp grainy Dijon mustard (we used regular non-grainy Dijon mustard)
1/4 tsp salt
1/8 tsp pepper
In a small bowl whisk together maple syrup, mustard, salt and pepper; brush half over salmon skewers. Place skewers on grill over medium-high heat; close lid and cook, brushing once with remaining maple mixture until salmon is done, about 10 minutes.
.They came out PERFECT. Nice and flavorful, cooked to just the flaky stage (I did 7 minutes on each side, flipping the skewers once… same as I would on a grill). I loved the mustard sauce. Very easy and wonderful taste. I plated these with some Chinese Garlic noodles with snow peas. This is also one of the recipes I read on CULINARY DELIGHTS. Marthe’s blog is worth a look. I posted the details of the noodles on my “real” site today, so head over to MY YEAR ON THE GRILL to see how to make them!

Come back next week to see what I come up with during the next few days. It might be my first post after moving to the US Virgin islands… should be interesting.

MEXICAN MEATLOAF

I’ve been trying to use up some ingredients here and this recipe was born out of that need. We really enjoyed it especially since it started as a serious guinea pig recipe.

MEXICAN MEATLOAF
1 1/2 pounds ground beef
1/2 pound ground pork
2 small ripe avocados, mashed
1 small onion, chopped
1 can ROTEL tomatoes, drained well
1/2 can enchilada sauce
1 teaspoon chili pepper
1 egg
1 sleeve saltines, crushed
salt & pepper to taste
1/4 cup grated cheese

  • Combine all the ingredients except the cheese and enchilada sauce.
  • Form the meatloaf in a loaf pan.
  • Pour the enchilada sauce over top.
  • Bake for 1 hour.
  • Top with cheese and leave in oven only until cheese melts.
  • Let settle 5 minutes before serving.
  • Top with a dollop of sour cream.
hubby approved

CARIBBEAN PORK STEAKS & TOASTED CREAM CHEESE CROUTONS with MIXED GREEN SALAD and GRAM’S VINAIGRETTE & MAGIC MARSHMALLOW CRESCENT PUFFS with a TWIST

I want to make sure you know that this weekend Chris from Nibble Me This is hosting a Valentine’s Romance weekend over at OUR KrAzY kitchen and Dave from My Year on the Grill who hosts I CAN COOK THAT! at OUR KrAzY kitchen has been running a Romance series on his regular day where he tells us what men really want for Valentine’s Day. Now my hubby would tell you that Dave is so right as far as the dilemma between moink balls and flowers and chocolates. The recipes below are what hubby would prefer I serve for Valentines. Of course LOL he would also prefer it be served in bed by me already naked.

CARIBBEAN PORK STEAKS

Now I had to do these inside with the broiler this time, but they are sooooooooooooo much more impressive with the grill marks from the BBQ, yet it doesn’t change the flavor much.


2-3 pounds of pork, 4 chops or 2 steaks
2-3 cloves garlic, finely minced
1/4 teaspoon salt
1/4 teaspoon white pepper
1/2 teaspoon red pepper flakes
1/2 cup pineapple sundae topping*
1 teaspoon Caribbean jerk seasoning
pineapple slices

  • In a small bowl whisk together the pineapple topping, red pepper, Caribbean jerk seasoning and garlic. Set aside.
  • Salt and pepper the chops on both sides.
  • Grill or broil chops until they are no longer pink near the bone.
  • Brush with glaze on both sides of pork chops and pineapple slices and return to the grill or broiler until the glaze bubbles and the pineapple is heated through.
  • Garnish with grilled pineapple slices.

*apricot pineapple preserves substitutes really well.

TOASTED CREAM CHEESE CROUTONS with MIXED GREEN SALAD

I found the recipe for the croutons in some magazine. It was from Kraft, but fell in love with it and immediately adapted to our favorite salad. You can also make lots of the cream cheese croutons in advance and just pull out as many as you need each meal.

Romaine hearts, chopped

grape tomatoes, halved
1 bunch green onions, sliced thin
English cucumber, sliced & chopped
kiwi, chopped
pomegranate seeds
Philadelphia cream cheese
walnuts, finely chopped (I used my mini food processor)
cream cheese croutons

  • Cut the cream cheese into 1/2 inch cubes.
  • Coat cream cheese cubes with the walnut pieces.
  • Freeze overnight or up to 2 months.
  • Preheat oven to 350 degrees.
  • Prepare salad.
  • Spray cookie sheet with PURE.
  • Remove as many cream cheese cubes as you need 5 minutes before baking them.
  • Spread out the cream cheese cubes.
  • Bake for 5 minutes until golden brown.
  • Toss salad with vinaigrette and top with croutons.

2 cloves garlic, minced
1 large green onion, minced
1 tablespoon brown sugar
1 tablespoon white sugar
1/2 teaspoon sea salt
1/3 teaspoon fresh ground pepper
1/2 teaspoon Worcestershire sauce
3 tablespoons champagne vinegar
juice of 1 lemon
juice of 1 lime
3/4 cup olive or peanut oil

  • In a dressing bottle combine the garlic and onion. sugars, salt and pepper.
  • In a small bowl whisk together the vinegar, lemon juice, lime juice, Worcestershire sauce, oil, sugars, salt and pepper.
  • Pour over the garlic and onion.
  • Shake well to combine until well blended.
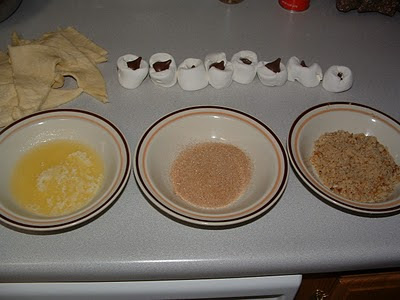
MAGIC MARSHMALLOW CRESCENT PUFFS with a TWIST
The original recipe that won the Pillsbury Grand Prize Winner of $25,000 in 1969 seems to be surfacing everywhere lately. I have finally decided to give it a try by adding my own signature twist.
This recipe was the Pillsbury Grand Prize Winner of $25,000 in 1969 for a very good reason, it really is magical. The cinnamon-sugar marshmallows melt away during the baking, leaving an ooey-gooey caramel center behind. And while they are delicious warm from the oven I defy anyone seeing a baked one for the first time to identify the inigredients that made the whole or to resist even a cold one especially now that they leave an ooey gooey caramel chocolate center behind. The BIG trick is making sure that the marshmallow is wrapped really well inside and sealed tight.


1/4 cup sugar
1 teaspoon cinnamon
2-8 ounce cans Pillsbury Refrigerated Quick Crescent Dinner Rolls
16 large marshmallows
1/4 cup butter, melted
1/4 cup chopped nuts
16 cherry HERSHEY’S KISSES*
crushed walnuts, optional
  • Combine sugar with cinnamon.
  • Separate crescent dough into 16 triangles.
  • Push a cherry Kiss into the center of each marshmallow
  • Dip marshmallow in melted butter and then roll in cinnamon-sugar mixture.
  • Wrap a dough triangle around each marshmallow, completely covering marshmallow and squeezing edges of dough tightly to seal.
  • Dip in melted butter and place in regular sized muffin cups.
  • Roll in crushed walnuts.
  • Repeat with remaining marshmallows.
  • Place pan on foil or on a cookie sheet during baking to guard against spill-overs in the oven.
  • Bake puffs at 375 degrees for 10 – 14 minutes until golden brown.
  • Wait a minute or two, then remove from pans and drizzle with glaze and sprinkle with chopped nuts if desired.

GLAZE PREP

1/2 cup powdered sugar
1/2 teaspoon vanilla
2-3 teaspoons milk
  • combine powdered sugar, vanilla and milk, and mix well.
  • drizzle
*Also good with other flavor HERSHEY kisses.

CHILI HOMINY BAKE

Back when I was a latch key kid I was supposed to go home after school, lock the door, do my chores and homework and then start dinner. Dinners were mainly casseroles and a pre-planned set of recipes at that. One of those recipes was my great aunt Louise’s Chili Hominy Bake. I recently ran across that recipe and it drudged up memories – some good, some not so good. You see I can’t stand kidney beans or black olives and I hated hominy – or so I thought. I did love the overall flavor, but since I didn’t like the parts I decided to rework them to make a better whole!

AUNT LOUISE’S JIFFY CHILI HOMINY BAKE
1 pound ground beef
1/2 cup chopped onion
1 pound can chili with beans (2 cups)
1 tablespoon chili powder
1 can cream of chicken soup
1 can yellow hominy, drained (2 1/2 cups)
2 tablespoons sliced ripe olives
1/2 cup shredded American cheese

  • Cook ground beef and onion until browned.
  • Stir in other ingredients except cheese.
  • Put in casserole.
  • Cover and bake in medium oven for 25 minutes.
  • Sprinkle cheese over top, continue baking uncovered 5 minutes more.
  • Good re-heated.

MY CHILI HOMINY BAKE
1 1/2 pounds ground beef
1 Vidalia onion, chopped
2 cloves garlic, minced
1 packet Williams Chili seasoning
1 can Rotel tomatoes with green chiles, drained, but save the juice
1 can cream of celery soup
1 large can hominy, drained & chopped small
1/2 cup shredded cheddar cheese
salt & pepper to taste

  • Cook ground beef, garlic and onion until browned.
  • Add in the chili seasoning mix and tomato juice.
  • Cook until well blended and juice is absorbed.
  • Chop hominy smaller.
  • Stir together the soup, tomatoes and chiles, hominy until well blended.
  • Stir together the soup mixture and beef mixture until well blended.
  • Put in greased casserole.
  • Sprinkle cheese over top, continue baking uncovered 25-30 minutes more.
  • Good re-heated.


The key was taking out the kidney beans, black olives and chopping the hominy into better sized pieces. Now that might not be the key for you so add them back in! This is a very versatile recipe. I guarantee these changes will make this a great kid friendly casserole.

MANDARIN CHICKEN & NOODLES


2 pounds chicken tenders
1 1/3 cup sugar
1/2 cup soy sauce
Juice of 2 lemons
4 cloves garlic, minced
1 bunch green onions, sliced thin
2 teaspoons sesame oil
1/2 cup water
3 tablespoons cornstarch
1/2 pound linguini

  • Cook linguini al dente.
  • In a small saucepan combine the soy sauce, lemon juice, sesame oil, sugar and garlic.
  • Whisk the cornstarch into the water until smooth.
  • Add the cornstarch mixture to the soy sauce mixture and blend well.
  • Bring mixture to a boil, reduce heat and simmer until thick.
  • While the sauce is cooking, salt and pepper the chicken tenders and broil 2-3 minutes each side.
  • Shred chicken, slice green onions and add to the linguini.
  • Pour sauce over top and toss well.

ORANGE HONEY CHICKEN

ORANGE HONEY CHICKEN

2 pounds skinless, boneless chicken breasts, cut into large chunks
1 egg, beaten
1 teaspoon sesame oil
1/2 cup cornstarch
1/4 cup flour
1/2 teaspoon salt
1/4 teaspoon white pepper
heavy coat of olive oil
1 clove minced garlic, jar
1 bunch green onions, minced
1 1/2 tablespoon soy sauce
Juice of 1 orange
1/4 cup honey
1/2 teaspoon red chile pepper flakes
1 1/2 tablespoon cream sherry
5 tablespoons sugar
zest of one orange
1 teaspoon fresh grated ginger or 1/2 teaspoon ground ginger

  • Mix cornstarch, flour, salt & pepper in ziploc bag.
  • Toss chicken pieces in beaten eggs and sesame oil and then dredge in the flour bag.
  • In a large skillet, heat olive oil. When hot, add the chicken pieces and cook turning as needed until all sides are golden brown. 4-8 minutes.
  • Drain chicken on paper towel lined plate.
  • Pour off excess oil and clean pan with paper towel.
  • Add 1 tablespoon more olive oil and saute’ garlic and green onion.
  • Add the soy sauce, sugar, honey, orange juice, sherry, red chile pepper flakes and ginger.
  • Cook until thick, do not boil.
  • Dip in honey mixture and place on sprayed cookie sheet. If you would like sprinkle some sesame seeds over the chicken at this point.
  • Bake at 350 degrees for 20 minutes.
  • Brush with original glaze after the first 10 minutes.
  • Save any additional glaze to use over the rice.
  • Serve over rice.

Taco Ring

1 1/2 pounds ground beef
taco seasoning
1 large onion, chopped small
4 oz. can chopped green chiles, not drained
1 package refrigerator crescent rolls 1
large tomato, chopped
1 bunch green onions, sliced

3 cups shredded lettuce
1 package Sargento Mexican blend fine shredded cheese

sour cream

  • Preheat oven to 350 degrees.
  • In a skillet brown the ground beef and onion. Drain.
  • Add taco seasoning and green chiles.
  • Simmer 5-10 minutes. Drain again so there is no excess moisture.
  • I use my stoneware pizza stone. Lightly spray it with PURE.
  • Unroll the crescent rolls and separate them.
  • Arrange the rolls (wide edges inward with the thin corner edge slightly hanging off the pizza stone) in a circular pattern around the pizza stone with the corners slightly touching.
  • Arrange the meat mixture in a circular pattern covering the large end portion of the crescent rolls. Sprinkle 1/3 -1/2 of the cheese over the meat.
  • Pull the small pointed end up over the meat mixture and pinch into large portion creating a ring that resembles a wreath. You will have an open area with meat showing through.
  • Bake according to the biscuit directions and golden.
  • I also serve it on the stoneware. Arrange the shredded lettuce, green onions and tomatoes in the center and edges. For just us, I just put it directly on the plate.
  • Garnish with sour cream and remaining cheese.
  • Serve immediately.

BEEF POT PIES

  • 6 cups shredded pot roast
  • 2 medium onions, chopped
  • 2 cloves garlic, minced
  • 2 tablespoons vegetable oil
  • 3 celery stalks
  • 1 small bag baby carrots
  • 1 small bag frozen green beans or 1/2 pound fresh, cleaned and cut
  • 2 cups beef broth
  • 12 oz. evaporated milk
  • 1/3 cup butter
  • 1/2 cup + 1 tablespoon Wondra flour
  • 3/4 teaspoon thyme
  • 1/4 cup cooking sherry
  • 1/8 cup parsley
  • salt and pepper to taste
Separate beef from fat and bones and set aside. Heat oil in dutch oven. Saute’ onions, garlic and celery until just tender. Transfer to a large mixing bowl and toss with shredded beef. Mix together beef broth and milk and microwave until steamy, 2-3 minutes. In a large sauce pan melt butter. When foamy stir in flour, parsley and thyme until golden. Gradually whisk in the hot milk mixture. Bring to a simmer and cook until thick. Turn off heat and stir in sherry, salt and pepper to taste. Stir in beef mixture and vegetables. Divide into 6-8 small French white Pyrex round baking dishes. Cover with lids and freeze.

When ready to bake, thaw and bring to room temperature. Cover with pie crust** and bake at 400 degrees for 30-35 minutes or until golden brown. With this recipe you don’t end up with a bottom crust, but just think of how many calories you’re saving.

**Pillsbury pie crust from the dairy section will make 2 pot pies with left over pieces for decorative leaves. Unfold a sheet of puff pastry onto a lightly floured surface. Using a floured rolling pin, roll the dough out gently. Measure the diameter of the pot pie bowls, and cut out dough rounds that are slightly larger in diameter. Repeat until you have made all the necessary tops. Whisk an egg in a small bowl. Lay the dough rounds on top of the pot pies. Brush the dough lightly with the beaten egg. Bake the pies for 20 to 25 minutes, until golden brown. Serve immediately.