Dark Chocolate Brownies

These brownies are a joy.  Dark, rich and gooey they are a delicious chocolatey treat.  Enjoy on it’s own or with a generous dollop of vanilla ice cream on top!

2 1/2 cups dark chocolate chips
2 sticks unsalted butter
6 large eggs
1 1/2 cups brown sugar
1 tablespoonful vanilla extract
1 1/4 cups all purpose flour
1/4 teaspoonful baking soda
Pinch of salt

Heat oven to 350F

Grease a 13×9 pan.

Heat the butter and chocolate very gently in a pan over low heat until melted. 

Set aside to cool a little.

Whisk the eggs and sugar together for approx 3 minutes.

Add the vanilla extract to the chocolate mixture and combine.

Add the chocolate mixture to the egg mixture and gently but thoroughly combine.

Sift the flour, salt and baking soda into the chocolate egg mixture and fold in gently.

Pour the mixture into the pan and place in the oven for approx 20 minutes.  The mixture should wiggle in the middle when you remove it from the oven.

Leave to cool thoroughly in the pan before cutting into squares.

Enjoy!

CHEESECAKE APPLE CRISP

GOOD MORNING EVERYONE!  Tamy here filling in.  I hope you enjoy this Apple crisp.  It’s simple and simply delicious!!!

CHEESECAKE APPLE CRISP

CRISP
2-3 large Granny Smith apples (4 Cups)
1/2 cup brown sugar
1 tablespoon flour
1/2 cup milk
1/4 cup apple juice

TOPPING
2/3 cup flour
1/2 cup old fashioned oatmeal
1/4 cup sugar
1/2 teaspoon salt
2 teaspoons cinnamon
1/2 cup butter, melted
1 small box cheesecake flavored instant pudding

  • Preheat oven to 350°.
  • In a large mixing bowl combine all CRISP ingredients and mix well. Pour into an un-greased stoneware pan.
  • In a mixing bowl combine the topping ingredients and mix until crumbly.
  • Sprinkle topping over apple mixture.
  • Bake 45-60 minutes or until apples are tender and topping is crisp and golden.
  • Serve warm with a scoop of French vanilla ice cream.

GARDEN TOMATO SALSA ~ CLASSIC GOOD EATS

Just in time for Superbowl tailgating!!

GARDEN TOMATO SALSA
6 cups chopped tomatoes
i bunch cilantro, chopped fine
1 medium Vidalia onion, chopped fine
Juice of 1 lime*
4 cloves minced garlic
1 tablespoon kosher salt
2 tablespoons red wine vinegar
2 teaspoons olive oil
jalapeno, minced to taste

Toss all together and chill 24-48 hours before serving. You end up with about 7 1/2 cups of salsa.


Stuffed Pepper Soup

Stuffed Pepper Soup adapted by SkinnyTaste
3 cups cooked brown rice
1 lb 95% lean ground beef
1/2 cup chopped green bell pepper
1/2 cup chopped red bell pepper
1 cup finely diced onion
3 cloves garlic, chopped
2 cans (14.5 oz each) cans petite diced tomatoes
1 3/4 cups tomato sauce
2 cups reduced sodium, fat-free chicken broth
1/2 tsp dried marjoram
salt and fresh pepper to taste

Directions:  In a large pot or dutch oven, brown ground meat on high heat and season with salt. Drain fat if any, reduce heat to medium-low, then add peppers, onions and garlic. Cook about 5 minutes on low heat.

Add tomatoes, tomato sauce, chicken broth, marjoram and season with salt and pepper to taste. Cover and simmer on low heat for 30 minutes. Serve about 1 1/3 cups of soup in each bowl and top with 1/2 cup cooked brown rice.

Here’s what you will need:

Chop the garlic, peppers, and onion.

Brown the beef in a Dutch oven. 

Once browned, add the peppers, onions, and garlic.

Add the diced tomatoes, tomato sauce, and herbs.
Cover and simmer on low for 30 minutes. 
Prepare rice according to package directions.

Top soup with rice.
Here’s what you’ll end up with:

This soup was a big hit in my house tonight.  We love stuffed green peppers (recipe) so I thought that this would be a hit and I was right.  All 3 of the kids ate it! (score!!)

The mixture of the 2 different peppers gave it a little variety in both color and taste. 

I used the Uncle Ben’s 90 second microwaveable brown rice (a favorite of mine) and 1 package ended up being enough for all of us.  You could also use either bulgur or even quinoa.

Hope you enjoy!

2 1/2 BEAN SALAD

I love 3 bean salad, but I hate kidney beans. So, I developed this recipe to cater to my own likes. If you like kidney beans, just add them back in.
2 1/2 BEAN SALAD
2 cans green beans
1 can wax beans
1-2 oz. jar pimentos
1 cup white vinegar
1 1/4 cups sugar
2 teaspoons salt
  • Drain beans and pimentos and place into a jar with enough room for the liquid.
  • In a sauce pan dissolve the sugar and salt into the vinegar and bring it to a boil.
  • Let it cool.
  • Pour it over the beans.
  • Marinate at least 24-48 hours for the best flavor.

Italian Style Green Bean Casserole

You know the classic green bean casserole that everyone feels the need to make on Thanksgiving and/or Christmas?  Really, the only thing awesome about that casserole is the french fried onions on the top.  I could just eat those out of the can.
Well, maybe it’s time to start a new tradition and make THIS green bean casserole. 

You so don’t have to wait until the holidays to make this. I’ll be making it again no matter what the season.  These were amazingly delicious!  Creamy, cheesy and fresh! 
The only thing I would change is to cut the green beans in half.  I try to control portions and it was hard to cut a portion evenly with the large green beans.

Italian style Green Bean Casserole
Adapted by Cinnamon Spice & Everything Nice

2 lbs. fresh green beans, ends trimmed
4 tbsp. butter, divided
1/2 cup onion, minced
1 red pepper, cut up finely
5 cloves garlic, minced
1/4 cup flour
2 cups milk
Salt and pepper
Pinch of nutmeg
8 oz. mozzarella cheese
25 Ritz crackers, crushed in baggie
1/4 cup parmesan, grated

Gently steam the green beans until tender but still firm.  Place in 9 x 13 pan that has been sprayed with cooking spray. 

Melt 2 tbsp. of the butter in a pan, add the onions and red pepper and saute for about 5 – 6 minutes.  Add garlic and saute for another couple of minutes. Whisk in the flour and cook for 2 – 3 minutes. Whisk in milk, bring to a simmer but not boil.  Stir in cheese and turn off heat and stir until cheese is melted.  Season with salt and pepper to taste.  Add just a bit of nutmeg and stir.

Pour the sauce over the top of the green beans.  Melt the remaining 2 tbsp. of butter and combine with the crackers and parmesan cheese.  Sprinkle over casserole.  Bake for 25 minutes at 400 until bubbly and golden on top. 

Total calories = 2565 calories
8 servings = 321 calories per serving

Blueberry Almond Lemon Muffins

These little mouthfuls are wonderful as breakfast or a snack.  The addition of ground almonds give them a little more interest than a regular blueberry muffin and make them a little more moist.  These were a hit with my family, I hope they will be with yours also!

Blueberry, Almond, Lemon Muffins.

2 1/2 cups all purpose flour
1/2 cup of ground almonds
1 teaspoon baking powder
1/2  teaspoon baking soda
1 cup sugar
Pinch of salt
Zest of a lemon
1 cup sour cream
2 eggs
1 teaspoon vanilla extract
1 1/2 sticks butter (melted and cooled)
1 tablespoon all purpose flour
1 1/2 cups blueberries
sliced almonds – for sprinkling

Heat the oven 350 F

Line a muffin pan with paper liners.

Melt the butter in the microwave and let cool.

Combine the flour, almonds, sugar, salt, baking powder and soda in a bowl.

Mix together the sour cream, eggs, lemon zest and vanilla extract.

Pour the wet ingredients into the dry and mix until just combined.

Toss the blueberries in a tablespoon of flour and gently fold into the ingredients. 

Spoon into the muffin pan and bake for approx 20 – 30 minutes.

Remove from the oven, cool in the pan for 5 minutes and then remove to a rack to cool thoroughly.

West Texas Chipotle Chicken Wrap


We are getting geared up for playoff football around my house.  This is a perfect recipe for your football party.

West Texas Chipotle Chicken Wrap adapted from Kids Eat Right
½ cup reduced-fat mayonnaise
¼ cup light sour cream
2 tablespoons fresh lime juice
1 jalapeno pepper, seeded and minced
½ teaspoon diced chipotle pepper
¼ teaspoon salt, optional
3 cups cooked chicken, cut into ¾-inch cubes
1 cup chopped tomato
1 avocado, peeled and chopped
3 tablespoons chopped fresh cilantro
6 flour tortillas

Directions:  Combine the mayonnaise, sour cream, lime juice, jalapeno, chipotle peppers, and salt in large mixing bowl. Place the chicken, tomato, avocado, and cilantro in a bowl with the mayonnaise mixture and toss lightly to coat. Top each of the 6 tortillas evenly with the chicken mixture. Roll.

Cooking Tip

This filling can serve as a cold entree, a wrap sandwich filling, or a tasty pasta salad (add 2 cups cooked orzo and increase the seasonings to taste).
Serving Size is 1 wrap.  480 calories, Protein 28g, Dietary Fiber 4g, Total Fat 20g (Sat Fat 4g), Sodium 820mg

Here’s what you’ll need:

I used this all-natural, pre-cooked chicken from Trader Joe’s but you could always just use frozen, fresh or even rotisserie chicken.

Chop up the pepper and tomato.
Mix the mayo and sour cream.
Cook the chicken.
Mince up some cilantro.

Cut up the chicken.

  • Add the chicken, tomato, and pepper to the mayo/sour cream.
  • Warm your tortillas.  You can do this by putting two in two paper towels and microwave for 20-25 seconds. 
  • Put the mixture onto the tortilla and roll.
Here’s what you’ll end up with:

These little roll-ups were so easy to make and were totally finished in under 15 minutes.  You can serve them hot or cold.
To make them even healthier, substitute 1/2 of the mayo and sour cream with Greek yogurt.
You also could roll them all up and put them in a microwave-safe dish, sprinkle with cheese and then microwave for 30 seconds or so.  Serve with sour cream and salsa on the side.
These wraps had great flavor and with the creaminess of the mayo/sour cream, I didn’t even need to dip them in salsa.  For a hotter version, add jalapenos or even a can of diced chilies.
Hope you enjoy!
April

Banket – Dutch Pastry with Almond Filling

This month I am bringing you a family recipe and digging into my heritage, a family recipe from my Dutch Grandmother.
This wonderful flaky almond filled pastry is something that I grew up eating every Christmas. As with most food and family recipes…it always brings back such good memories of family and holidays. In Grand Rapids and really most of west Michigan it seems every one who is Dutch (which is many) has their own version or recipe for banket (pronounced bahnKET) with a flaky buttery crust and almond paste (not marzipan) rolled throughout, not too sweet and perfect with a cup of tea or coffee.


I have been wanting a chance to make it with my mother and document it for the blog, but she lives in Michigan and with me in Florida for the last 21 years it just never happened. When my parents visit in February she will bring me some almond paste and one year she did show me how to assemble it, but the filling and dough was already made.

I had my sister mail me grandma’s banket recipe (my mom could never find hers). I’ve had it for awhile but was always a bit timid to try making it on my own, besides it makes a lot and we don’t usually have many people around for Christmas any more down here in Florida. Not this year I decided to put on my big girl panties and try making it all by myself.

It is such a family tradition, my sister makes it with her daughters-in-law, and makes it her way. I never was interested in making it when my grandmother was alive…I just enjoyed eating all her wonderful baking. She was the best. My mom learned from my dad’s mom, both his parents are Dutch. My mom’s dad was Dutch, but her mom was Welsh, so she learned how to make it from my grandma Bouwman, my dad’s mom.
This was her actual recipe such as it was, like most of her recipes: my input is in blue after calling my mom several times while trying to make it.

Grandma Bouwman’s Banket
Crust:
1 pound butter/oleo, soften at room temp (I used cold butter, like you would making pie crust)
4 cups flour
1/4 cup sugar (optional) I skipped the sugar
3/4 cup milk – make sure it’s cold
Mix well until crumbly, add milk. Form into dough using fork, divide into eight balls.
Roll out each ball to form rectangle, put almond filling on crust.

My take on this: I used a pastry cutter like you would when making pie crust, cutting in the butter until you get a crumbly oatmeal-like texture. Use cold butter and cold milk or water so it will be nice and flaky…form into dough try not to over-work the dough. After talking to my mother she said another old recipe she had has you refrigerate the dough and filling overnight. My personal tip would be to form it into the eight balls, and then flatten them first before refrigerating them.

Filling:
1 pound almond paste (2 cups)
2 cups sugar (you could probably use a little less, but I use a scant 2 cups)
3 eggs (I think next time I will us 2 eggs)
Mix well, put in fridge to harden. Add flour to make it less sticky when putting it on crust.
My take on this: I had a block of almond paste that mom brought down from Michigan. They can get it every where up there…if you can’t find almond paste, you can make your own almond paste try this one here
My mom told me to beat the eggs and sugar first then add the almond paste after breaking it into crumbles.

Bake 10 minutes at 425° then 15 minutes at 350°
I found I had to bake this longer. If you want to bake it like a pie you can bake it high heat for 15 minutes then turn it down and bake another 15 – 20 minutes until golden brown. Make sure your dough is nice and cold. I would brush an egg wash on before baking next time, I didn’t on these and they came out fine, but sometimes my grand mother would.

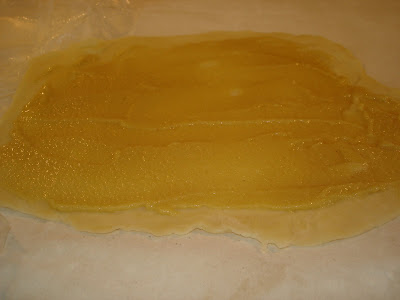
This was the almond paste mixture after it was in the refrigerator overnight.

When I was trying to mix the almond paste my mom suggested to beat the eggs first with a hand mixer, so I did, I think I did it too much and it became a little frothy, then I added the crumbled almond paste and sugar. I think I should of added the sugar with the eggs, then added the almond paste. Mine turned out fine, but it was different from my mother’s. I think 2 eggs would work fine in it. I didn’t add any extra flour because it was very spreadable this way…maybe because of the three eggs. Maybe I should stick to it this way, my mom would spread it with her hands and flour her fingers, and place little pieces around all over the dough. It was sticky to work with!

I just used a rubber spatula to spread it on. My mom cautioned me not to have too much filling do it won’t ooze out on the baking pan. She said she added too much last year and she didn’t like the way it turned out.

You are supposed to roll the dough out into rectangles, but I got it as close as I could, and they still turned out even without smooth edges. You can cut and paste it, the dough seems to handle it well.

To keep it a family tradition I got my daughter involved…of course she asked to roll some of her own…so I had to stand back and let her do it!!
And she did great! Of course I have such a small area it’s so difficult to have two people in the kitchen at the same time. It was also 80° out and seemed very hot with to oven on, I know my grandma and mom didn’t have to deal with weather like that in Michigan at Christmas time! 🙂

The dough is rolled out thin sorta like a pie dough would be…dusting the work surface and rolling pin with flour as you go. After you roll up the filling inside the logs, seal it with water. Since I used a little more filling than my mother did I made sure it was sealed well and gave it a little pinch too.

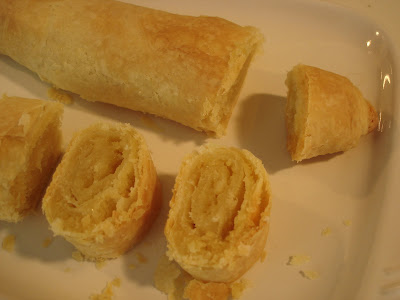
I have baked the “logs” that my mom gave me (they freeze really well) at 350° or 375° for 30 – 35 minutes. I didn’t know the directions at that time, so I think you can do it that way without having to start out baking it at high heat and turning it down. Just keep any eye on it until its a nice golden brown.

If you don’t have a stoneware baking pan or pizza stone, line your cookie sheet with parchment paper so it browns up nicely. I didn’t use an egg-wash in this batch.

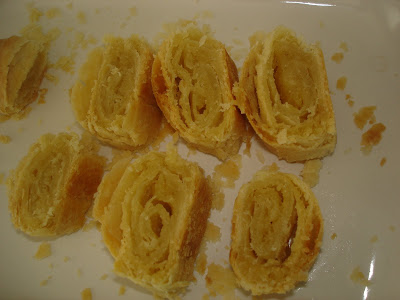
…so good and reminds me of my mom’s…

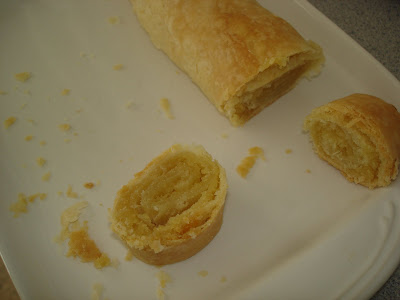
…they were nice and flaky, the almond filling didn’t ooze out (of course I like it oozing out a little when it caramelizes up a little) .

It is so good for breakfast the next morning, not too sweet, delicate flavor.


…I hope they enjoy it as much as we do…


…enjoy Cultural Connection!

Fire Roasted Chicken Wings – Fire Day Friday

The NFL playoffs are firing up and so are grills at game day parties everywhere.   There will be “chicken wings” on menus but these are a little different.  Instead of the traditional hot wing pieces of “drumettes” and “wingettes”, these use whole chicken wings.
It’s cold and possibly snowy wherever you are and you probably don’t want to drag your grill out.  Good news, you don’t have to.  You can do this one in your oven, if you have to.  But they are even better roasted on your grill.
Fire Roasted Chicken Wings
Adapted from Adam Perry Lang’s BBQ25
Serves 6
Ingredients
  • 24 chicken wings (whole wings, not wing parts)

For the marinade

  • 1 Tbsp kosher salt
  • 1.5 tsp black pepper, coarsely ground
  • 1 tsp garlic powder
  • 1 Tbsp peanut oil
  • 1 Tbsp Worcestershire sauce
  • 1 Tbsp red wine vinegar
  • 1 Tbsp hot sauce

For the BBQ glaze

  • 1 cup BBQ sauce (use your favorite)
  • 2 Tbsp brown sugar
  • 1/4 tsp cayenne pepper

Instructions

  1. Combine the marinade ingredients and marinate the wings for 1-3 hours. 
  2. Preheat your grill to 300f for indirect heat* (or your oven). 
  3. Drain the wings and pat them dry.  Take the wing tip and tuck it behind the other end of the wing (the “drumette”.
  4. Place the wings on your grill (or in your oven) for 1 hour.
  5. Remove the wings and toss a large bowl with the BBQ glaze ingredients.
  6. Raise the grill (or oven…you really aren’t using your oven are you? ha ha) temp to 400f.  
  7. Cook the wings for another 30 minutes.
  8. Eat and enjoy!

Notes

  • Indirect heat is where you put the hot coals on one side of the grill and cook your food on the other side while the grill lid is closed so the meat “fire roasts” instead of grilling. 

OVEN POACHED EGGS ~ CLASSIC GOOD EATS

I LOVE breakfast for any meal! It’s always comforting and these are so easy and soooooooooooo good too.

2 Jumbo eggs per person
1 tablespoon butter per person
2 slices bacon per person
grated cheddar cheese
salt and pepper to taste

  • Preheat oven to 350 degrees. 
  • Cook bacon until crisp. 
  • Melt butter and coat entire inside of ramekin or muffin tin. 
  • Break 1 egg (try not to break the yolk) in each ramekin or muffin slot. 
  • Salt and pepper to taste. 
  • Bake 8-10 minutes or until just set. 
  • Top each egg with a slice of crumbled bacon and then grated cheddar cheese. 
  • Bake another 3 minutes. 
  • Serve with chilled juice and toast.