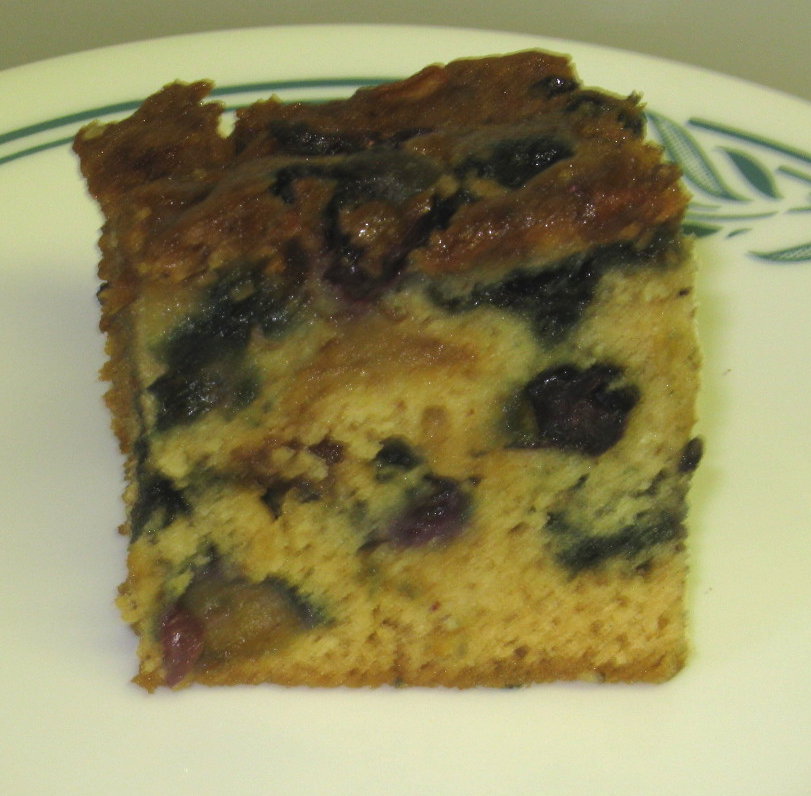
CANTALOUPE CAKE

Cantaloupe Cake   
By Bizzy from Bizzy Bakes

What do you do when you have leftover blueberries and  cantaloupe?  My answer would be, make a fruit salad.  That sounded like a wonderful idea so I did a search for cantaloupe recipes.  Why, I did not search for a cantaloupe fruit salad is beyond me. Cantaloupe recipes brought all kinds of interesting combinations for a variety of different presentations.

The minute, I saw cantaloupe cake, I knew what I was doing.  I am sure, this leaves you, scratching your head.  Is it just me, or have you heard or eaten a cantaloupe baked good?  If not, it is time to try something new. 

Cantaloupe Cake  (adapted from CD  Kitchen)
Serves/Makes: 10     
Ingredients:
1/2 cup oil
11/4 cup sugar
3 eggs
2 cups self-rising flour
1 teaspoon cinnamon
1/2 teaspoon salt
1 teaspoon baking soda
1/2 teaspoon baking powder
1 cup fresh cantaloupe, cut into large chunks 
1 cup blueberries
  • In food processor, blend cantaloupe until partially smooth with small chunks.
  • Combine oil, sugar, cantaloupe and eggs, beat until smooth. Add flour, cinnamon and baking soda, mix until smooth. Fold in blueberries.
  • Spread mixture into a greased 9×13 inch pan. Bake at 375 for 30 minutes.Lower heat to 325 F and bake 10 more minutes. Cool completely.

Fire Day Friday: Slow Smoked Spare Ribs

Normally I try to keep my Fire Day Friday posts to short grilling recipes but since it is Labor Day Weekend, I want to post how I like to smoke pork spare ribs. The process is written for 1 rack of ribs, multiply as needed. 
Slow Smoked Spare Ribs
1 rack pork spare ribs trimmed St. Louis style and membrane removed from back
1 Tablespoon peanut oil
2 teaspoon black pepper, coarse ground
¼ cup BBQ dry rub
1/2 cup brown sugar
2 “long squirt” Squeeze Parkay (See instructions)
1/2 cup BBQ sauce
2 Tablespoons honey
1.5 teaspoons BBQ dry rub
Rub rib on both sides with the oil. Sprinkle both sides with black pepper. Sprinkle both sides evenly with BBQ rub. [Rub note: There are a lot of good BBQ dry rubs available on the market now. If you can’t find one or want to make your own, try the dry rub from this recipe from Chris Lilly on Grilling.com.]
The St Louis style trim gives you even portions and quicker cooking.
Build an indirect fire in your grill at 250f. If you are using a charcoal smoker or grill, mix several fist sized chunks of wood in with the coal. If you are using a gas grill here are some options for you from Grill Master, John Dawson of Patio Daddio.
I like hickory wood for flavor and cherry wood for coloring the meat.
Smoke the ribs bone side down in a covered grill for 3 hours, replenishing coals and wood as needed to maintain the temperature. 
Remove the ribs from the smoker/grill. Fold a 3 foot piece of foil in half. Place half the brown sugar and Tiger Sauce on the foil. Squirt one “rib length” squirt of the Parkay on top. Place the rib meat side down on top. 
 
Place the rest of the brown sugar, Tiger Sauce, and another squirt of the Parkay on top. Parkay sounds weird I know. But a LOT of the pros on the competition BBQ circuit use this trick.
Wrap the foil tightly around the rib rack and seal tightly. Place back on the grill/smoker for another hour.
Remove the ribs from the grill. CAREFULLY open the foil with tongs and oven mitts. Take the ribs out of the foil but keep the juice.
Whisk together the BBQ sauce, honey, and BBQ rub. Add 2 Tablespoons of the juice from the foil pack and whisk into the glaze.
Glaze both sides of the rack of ribs and return to the grill for another hour. The ribs are done when they bend easily like this but don’t fall apart.
If you want “fall off the bone” ribs (which are technically overdone), leave them in the foil for an extra 30 minutes during the foiled portion.
Slice and serve with the leftover BBQ glaze. 
I hope you all fire up your grills and enjoy this holiday weekend!

CHICKEN PUFFS

I’m not quite sure where I originally found this recipe, but we fell in love with it and it makes a wonderful presentation for company.  The pictures are from when I originally made it with whole chicken breasts, but I have since changed it to using bite sized pieces.  Using chicken tenders works best.  It bakes better and is much easier to eat!
CHICKEN PUFFS
2 pounds boneless, skinless chicken breasts or tenders
4 Pepperidge farm puff pastry sheets, defrosted
4 ounces cream cheese
1/2 pound bacon, cut into quarters
1 bunch green onions, chopped
1 handful flat leaf parsley
sea salt and white pepper to taste
1 large egg, beaten
PURE
  • Preheat oven to 400 degrees.
  • Add cream cheese, green onions, parsley, salt and pepper to a small food processor and process until well blended.  Set aside.
  • Cook bacon until crisp.  Drain on paper towels.
  • Cut chicken into bite size pieces.
  • In a large bowl, toss chicken pieces with cream cheese mixture until well coated.
  • On a large jelly roll pan that has been sprayed with PURE, lay out your puff pastry pieces and seal any stray seams.
  • Divide chicken evenly among the 4 sheets.
  • Top evenly with the bacon.
  • Pull up all four corners and give them a little twist in the center.
  • Brush with beaten egg.
  • Bake 30 minutes until golden brown.
  • Serve immediately.

BUFFALO CHICKEN SLOPPY JOES ~ BLOG 366.

BUFFALO CHICKEN SLOPPY JOES adapted from Rachel Ray
1-1 1/2 pounds ground chicken
3/4-1 cup Frank’s original Buffalo Wing Sauce
3/4-1 cup homemade ranch dressing
1 carrot, FINELY diced
2 celery stalks, FINELY diced
1 SMALL Vidalia onion FINELY diced
1/4 cup of brown sugar
Hawaiian or Egg Buns
Bleu cheese crumbles, optional

  • In a large skillet melt 1 tablespoon avocado oil.
  • Add carrots, celery and onion, sauteing 3-5 minutes.
  • Add chicken, cooking until browned and veggies are softened.
  • Add in wing sauce and ranch dressing stirring to blend flavors.
  • Add in brown sugar. If sauce is too spicy, add another 1/4 cup 😀
  • Serve on a bun with crumbles if desired.
  • Add extra ranch as needed.

NOTE: Bleu cheese dressing substitutes well for the ranch if you prefer.

ORIGINALLY POSTED JULY 31, 2011, updated for content and photo


CHEESY CHIMICHANGAS

Cheese!  Cheese! Cheese! 
I don’t often indulge in cheese. Even though I do so love it.  I usually feel that you need a LOT of cheese in order for it to really taste good.  I don’t usually indulge in that many calories, I usually choose to flavor my food in other ways.
However, one does have to have cheese sometimes, right?? 
I tasted this before adding the cheese and after and it was delicious with the cheese.  It still has a lot of flavor and the cheese brings it out even more! 
These were plenty flavorful on their own but I used some of my tomatillo green salsa to put on it.  This made it even better!  Seriously, this was a fantastic meal!  Loved the leftovers the next day too!
Cheesy Chimichangas
Adapted from Food Snob

1 pound ground turkey
1 onion, diced
3 cloves garlic, minced
11/2 tablespoon cumin
1 can green chiles, 4 oz.
2 teaspoons oregano
1 can Rotel tomatoes with green chiles
1 can tomato sauce, 15 oz. (I only used about 3/4 of it)
1 1/2 cups of cheddar cheese, 6 oz.
10 – 100 calorie whole wheat tortillas

  • Cook the ground turkey and the onions together.  
  • When the ground turkey is done, add spices, chiles and tomatoes.  Let simmer for 10 minutes or until thickened.  
  • Turn off heat and add cheese and stir until melted. 
  • Put 1/2 cup of turkey mixture onto tortilla and roll and place seam side down in a pan. 
  • Spray tops with cooking spray and bake in oven for about 25 minutes at 400 degrees. 

Total calories = 2569 calories
10 servings = 257 calories per chimichanga

2 Cheesy Chimichangas = 514 calorie dinner

PERFECT BROWNIES

Taste and Create was started as a food event by Nicole from For the Love of Food.  The whole purpose of Taste and Create was, and has been, and continues to be to create a community of bloggers who test each others’ recipes and share links. The participants of the event are paired together and try a new recipe from one another’s blog.  My partner this month is Laura from Tasteful Diversions. I spent a lazy afternoon perusing her recipes and was intrigued by her recent brownie recipe.  Laura had adapted the recipe from Cook’s Illustrated and I opted to follow her version.  These brownies were awesome.  Hubby gave them 2 thumbs up!  I added a Mocha cream cheese frosting and they really were perfect!
 PERFECT BROWNIES 

1/3 cup Ghiradelli unsweetened cocoa
1/2 cup plus 2 tablespoons boiling water
2 ounces Baker’s unsweetened chocolate, finely chopped
4 tablespoons unsalted butter, melted
1/2 cup plus 2 tablespoons safflower oil
2 eggs
2 egg yolks
2 teaspoons vanilla extract
2 1/2 cup sugar
1 3/4 cup all purpose flour
3/4 teaspoon salt
6 ounces dark chocolate chips (those melty ones you get in bulk to make fondue with at the grocery store) I used Whole Foods brand

  • Preheat oven to 350°. 
  • Line 13×9 pan with foil; spray lightly with cooking spray. 
  • In a large bowl, whisk cocoa and boiling water together until smooth. 
  • Add in unsweetened chocolate and continue to whisk until chocolate is melted. 
  • Whisk in melted butter and oil. (CI notes at this point that the mixture may look curdled; I have not had this issue.) 
  • Whisk in sugar. 
  • Stir in eggs, yolks, and vanilla until all ingredients are fully incorporated. 
  • Fold in chips.
  • Pour batter into prepared pan and bake at 350° 30-35 minutes, until a toothpick inserted halfway between edge and center comes out clean. 
  • Remove from oven and allow to cool in pan on a rack for 1 1/2hrs. 
  • Using foil, remove brownies from pan and place on rack to cool another hour before serving.*

*Laura said, “Okay look, this is 2 1/2 hours of cooling time. I don’t know about you, but there is no chance in hell that fresh brownies are going to get that much alone time at my house. I usually make it about 45 minutes before I start cutting” and I wholeheartedly concur!

BUNLESS BURGER SERIES #3~BURGERS w/ CARAMELIZED PEACHES & RED ONIONS, GORGONZOLA CREAM CHEESE MAYONNAISE & MUENSTER

Good Morning everyone.  Tamy here filling in for Martha K who was filling in for Kris on Simple Saturday, who had originally traded with Martha MM.  So sense it was already so complicated, I’m bringing you a not simple, but not complicated recipe for the upcoming holiday weekend.  It’s perfect for outside eating and celebrates the fruit of the month also, peaches!  I hope you enjoy it.  We make it quite often and really have been enjoying going bunless.
BUNLESS BURGERS w/ CARAMELIZED PEACHES & RED ONIONS, GORGONZOLA CREAM CHEESE MAYONNAISE & MUENSTER

2 – 1/3 pound burger patties
2 teaspoons liquid smoke
sea salt & white pepper
grated Muenster cheese

Caramelized peaches & red onions
2 tablespoons butter
1 extra large red onion, thinly sliced into rings
2 small peaches, chopped
2 teaspoons balsamic vinegar

Gorgonzola Cream Cheese Mayonnaise
2 ounces cream cheese, softened
2 ounces gorgonzola cheese crumbles, room temperature
1/4 cup mayonnaise

  • In a small food processor blend together the cream cheese, mayonnaise and Gorgonzola cheese crumbles.
  • Combine ground beef, liquid smoke, salt and pepper to the meat and hand form the patties.
  • Grill burgers inside or out.
  • In a large sauce pan melt butter.  
  • When sizzling add onions and saute’ until translucent. 
  • Add peaches and saute’ until juicy.
  • Add balsamic vinegar and continue sauteing until moisture has sizzled away.
  • Plate burger.
  • Spread on Gorgonzola mayo.
  • Top with peaches, onions and then sprinkle with muenster cheese.  
  • I use the pan lid over the plate for a minute to melt the cheese.

Fire Day Friday; Grilled Shrimp Po’ Boy

Ok, ok… so I didn’t fill the bun up with enough shrimp before I took the picture… BUT.. just because it might not be the best picture does not mean that it wasn’t the best grilled shrimp po’ boy I’ve ever had.  Oh, no!  These sandwiches were downright DEE-licious.  And, let’s not forget simple.  You don’t have do to too much to make this really stand out.  I kept this very simple, but feel free to jazz it up if you want.  I know that traditional po’ boys are usually made by frying shrimp or oysters or whatever you have on there, but honestly, I like to try to keep things as healthy as I can, so I went for the grilling method.  Who needs all the bread any, right?  I mean you’ve got all the bread you need in the bun 🙂  Plus…you get to use your grill if you make them this way!!

Grilled Shrimp Po’ Boy
Created by Jenn’s Food Journey
Printable Recipe 
Ingredients:
36-48 large frozen shrimp, thawed and tails removed
1-2 Tablespoon basil olive oil (you can use extra virgin olive oil)
salt and pepper
shredded lettuce or cabbage (I used coleslaw mix)
cherry tomatoes, quartered (I used about 1/2 cup)
hoagie buns or French sandwich rolls or even hot dog buns
fiery remoulade – recipe to follow
metal or wooden skewers (please soak wooden skewers in water for at least 30 minutes)

Directions:
In a large bowl, add the shrimp and toss with olive oil and salt and pepper.  Allow to marinate for 1 hour.  Thread shrimp onto skewers.

Preheat grill to 375 degrees.  Place the skewered shrimp directly over the fire and grill for 3-5 minutes per side or until shrimp is cooked through.  Carefully remove from grill and allow to rest for 5 minutes.  Carefully remove shrimp from skewers.

To build your po’ boy – add a butt load of shrimp and top with cabbage/lettuce and tomatoes.  Drizzle on fiery remoulade.  Enjoy!

Fiery Remoulade
Created by Jenn’s Food Journey
Ingredients:
1/4 cup mayonnaise
1 Tablespoon chili paste
1 teaspoon Sriracha
1 teaspoon lemon juice 

Directions:
Mix all ingredients together in a small bowl until well combined.  Cover and refrigerate until ready to use.  Enjoy!


CHCIKEN SCALOPPINI IN BRANDY SAUCE

CHICKEN SCALLOPINI IN BRANDY SAUCE
For 4 People
4 boneless, skinless chicken breasts, sliced in 1/2 horizontally**
3+ tablespoons butter
½ cup brandy
Juice of 1 lemon
flour
salt and pepper

  • Wash and dry the slices after slicing them in half and removing any excess fat. 
  • Melt 2-3 tablespoons of butter in  large skillet.
  • Dredge the chicken slices and place in the pan.
  • Brown them, salt and peppering them generously.
  • Set aside, keeping warm. 
  • Add the remaining butter, brandy and juice of a lemon to the pan, scraping the bottom for any chicken pieces. Blend well. Let sauce start to thicken.
  • When sauce has just about reached desired thickness, return the chicken slices to the pan, covering well with the sauce.
  • Serve immediately.

** I used breast tenders this time and it was great! 
 
Recipe Rundown
Taste: Both savory and sweet, tangy and rich.
Texture: Tender caramelized onions on top and fork tender. 
Ease: Super easy and quick.
Appearance: Appetizing and visually appealing.
Pros: Addicting and wonderful for entertaining.
Cons: None!
Would I make this again? Yes.

Rotini with Eggplant Tomato Sauce

I don’t eat a lot of pasta.  But I LOVE roasting vegetables!
I also don’t cook with a lot of eggplant but I picked some up at the farmers market and this sounded excellent!
The vegetables smelled SO GOOD roasting in the oven.  I swear, I should just roast vegetables every day to make my house smell good.  Luckily I chose a cooler day so the house didn’t heat up to much.
This turned out so good!  I have a fairly small food processor so I was a bit afraid it wouldn’t all fit but it did.  It didn’t really take up too much room. 
I also chose to puree the pine nuts in the sauce rather than just sprinkle them on top. Either way works. 
The only thing I would do different would be to add a bit of onion. I just love onion and it just seemed like it needed to be there.
Rotini with Eggplant Tomato Sauce

1 medium eggplant, mine was just under 1 pound, cut into 1 inch cubes
1 pint cherry tomatoes
4 cloves of garlic
1 tablespoon olive oil
1 teaspoon salt
1 teaspoon pepper
1 teaspoon red pepper flakes
1/4 cup toasted pine nuts
Pasta, I used Barilla Plus Rotini, 14.5 oz.
1/4 cup torn fresh mint leaves, I used less
1/2 cup grated Parmesan cheese

  • In a large bowl, combine the eggplant, cherry tomatoes, garlic, olive oil, salt, pepper and red pepper flakes. 
  • Spread the vegetables out in an even layer on a baking sheet sprayed with cooking spray. Roast in the oven at 400 until veggies are tender and eggplant is golden, about 35 minutes. 
  • While the veggies are roasting, place the pine nuts in a small baking dish.  Place in the oven on the rack below the vegetables.  Roast until golden, about 8 minutes.
  • Remove from the oven and reserve. 
  • Meanwhile, cook pasta according to directions.  Pour pasta into a large bowl. Reserve about 1 1/2 cup of the pasta cooking liquid.
  • Transfer the roasted veggies to a food processor. Add the torn mint leaves.  Puree the vegetables, mint leaves and pine nuts. Transfer the pureed vegetables to the bowl of pasta and add the parmesan.  Stir to combine, adding the pasta cooking liquid 1/2 cup at a time until the pasta and sauce is saucy. 

Total calories = 2218 calories
6 servings = 370 calories per serving

Pasta Rotini with Eggplant Tomato Puree = 370 calorie dinner**

CHICKEN SCALLOPINI IN BRANDY SAUCE

CHICKEN SCALLOPINI IN BRANDY SAUCE
For 4 People
4 boneless, skinless chicken breasts, sliced in 1/2 horizontally**
3+ tablespoons butter
½ cup brandy
Juice of 1 lemon
flour
salt and pepper

  • Wash and dry the slices after slicing them in half and removing any excess fat. 
  • Melt 2-3 tablespoons of butter in  large skillet.
  • Dredge the chicken slices and place in the pan.
  • Brown them, salt and peppering them generously.
  • Set aside, keeping warm. 
  • Add the remaining butter, brandy and juice of a lemon to the pan, scraping the bottom for any chicken pieces. Blend well. Let sauce start to thicken.
  • When sauce has just about reached desired thickness, return the chicken slices to the pan, covering well with the sauce.
  • Serve immediately.

** I used breast tenders this time and it was great!
Recipe Rundown
Taste: Both savory and sweet, tangy and rich.
Texture: Tender caramelized onions on top and fork tender. 
Ease: Super easy and quick.
Appearance: Appetizing and visually appealing.
Pros: Addicting and wonderful for entertaining.
Cons: None!
Would I make this again? Yes.

COD POCKETS

COD POCKETS adapted from The Magic Pumpkin
For 4 People
1 Pepperidge Farm Puff Pastry box = 3 POCKETS people
3 cod fillets
breadcrumbs
ground ginger
Juice of 1 lemon 
salt
white pepper 
sesame seeds
  • Unroll the pastry and divide into 3 wedges.*
  • Rinse and dry cod fillets gently. 
  • In a bowl put the bread crumbs, ginger, salt and pepper, blending well.  Pour into a shallow dish
  • Dredge the cod fillets in the seasoned bread crumbs making sure to coat them evenly.
  • Sprinkle each filet with a VERY small amount of lemon juice. 
  • Wrap the fillet and seal all edges.
  • Lay the packetson a baking sheet lined with parchment paper, sprinkle with sesame seeds. 
  • Use a beaten egg wash.
  • Bake at 200 degrees for 20 minutes.  Serve Warm
*What I actually ended up with was 2 big and 2 small portions.