

Another favorite! Remember the chicken and sauce for the chicken enchiladas? We’ll do the same thing but the stuffing will be a little different and we’re stuffing peppers, not tortillas!
Sometimes I change this recipe up a little by taking the stuffed poblano peppers and dredging them in egg and flour and bread crumbs and then frying them before baking and covering with the red sauce. It’s your choice but the way they are prepared below is a little healthier because it doesn’t include the frying step.
SPECIAL EQUIPMENT: The chicken stays very moist if you cook it in a pressure cooker. Don’t have a pressure cooker? Then a large dutch oven is fine – but I highly recommend mastering the art of cooking with an old fashioned pressure cooker!
Ingredients:
• 2 pound(s) of chicken breasts (you can use boneless, skinless – or use bone in/skin on and just remove both when cooked and cooled)
• 1 box or large can chicken broth (28 to 32 ounces)
• 2 medium or 1 large yellow onion(s), diced
• 1 small red onion diced
• 4 slices bacon
• 4 cloves garlic, diced
• 2 tbsp. of chili powder
• 2 cans Rotel tomatoes (mild or original)
• 2 tbsp. of cumin
• 6 tbsp. of flour
• 6 tbsp. of butter
• 1 can tomato soup
• 1 small can enchilada sauce (mild or medium, you decide)
• 1 can black beans
• 8 ounce(s) of Philadelphia cream cheese
• 4 cups(s) of Mexican blend shredded cheese
• 8 large poblano peppers
• 4 tbsp. of olive oil
• 1 salt and pepper to taste
Steps
1. Roast the poblano peppers in order to get the skins off. To do this, put the peppers in a large bowl and drizzle with olive oil. Toss the peppers to coat them. On a cookie sheet, put the peppers under your oven broiler on high until the peppers start to brown. Turn and roast other side. If you have a grill, you can do the same thing on a grill.
2. When the peppers have browned, place them in a large bowl and seal the bowl with plastic wrap. Let them stand while you do the rest of the recipe. This will cause then to “sweat” and the skin will easily peel off.
3. Cook the chicken. In a pressure cooker, heat a little olive oil in the bottom. Add the bacon and cook for a few minutes to render the fat. Pat chicken breasts dry, salt and pepper and and put them in the bottom of the pressure cooker to brown for a couple of minutes on both sides.
4. If you don’t have a pressure cooker, just brown the chicken (as above) in a large dutch oven and just cover and cook in that.
5. Add ½ of diced onion (reserve red onion for later) and ½ of the garlic. Mix.
6. Pour chicken broth over breasts. Add cumin and chili powder.
7. Add Rotel tomatoes.
8. Place lid securely on pressure cooker or dutch oven. In the pressure cooker, bring to a high boil and the weight on the lid will “rock.” Keep on higher heat and cook for 10 to 12 minutes. Remove from heat and let steam dissipate. Remove lid. Remove chicken breasts to cool. Reserve liquid.
9. In a dutch oven, bring everything to a boil and then reduce heat, cover, and cook until chicken is done. Don’t overcook the chicken! Use a thermometer inserted in one of the breasts if you need to.
10. Separate chicken and red sauce. When chicken is cooled, tear/shred with your hands. Place in a large mixing bowl. You’ll finish the red sauce later. (step 15)
11. To make the chicken stuffing, in a large skillet, melt 2 tbl. butter.
12. Add other 1/2 of the onion, red onion and garlic. Saute.
13. Add the black beans and 1 drained can of Rotel tomatoes.
14. Add cream cheese
15. Add this mixture to the shredded chicken. Add 2 cups of the shredded cheese. Mix well.
16. For the red sauce, in another large skillet, make a roux out of 4 tbl each of butter and flour. Cook until the color of peanut butter.
17. Add liquid from cooked chicken a ladle at a time mixing well between each.
18. Add the can of tomato soup
19. Heat oven to 450°.
20. Take the “sweated” poblanos and peel off the skins. I keep the stems on but slit each pepper down one side. Take out the membrane and seeds.
21. Stuff each pepper with the chicken mixture.
22. Spray a large casserole pan with cooking spray.
23. Place stuffed peppers in casserole dish.
24. Repeat until bottom is covered.
25. Ladle the red sauce over the peppers. Cover the peppers about halfway. You may have red sauce leftover. You can either reheat it when serving the peppers so your guests can add more or freeze the excess to use in a later recipe!
26. Sprinkle the rest of the shredded cheese on top.
27. Bake 15 or 20 minutes until bubbly.
Author: QuiltLady
APRICOT ALMOND CHICKEN
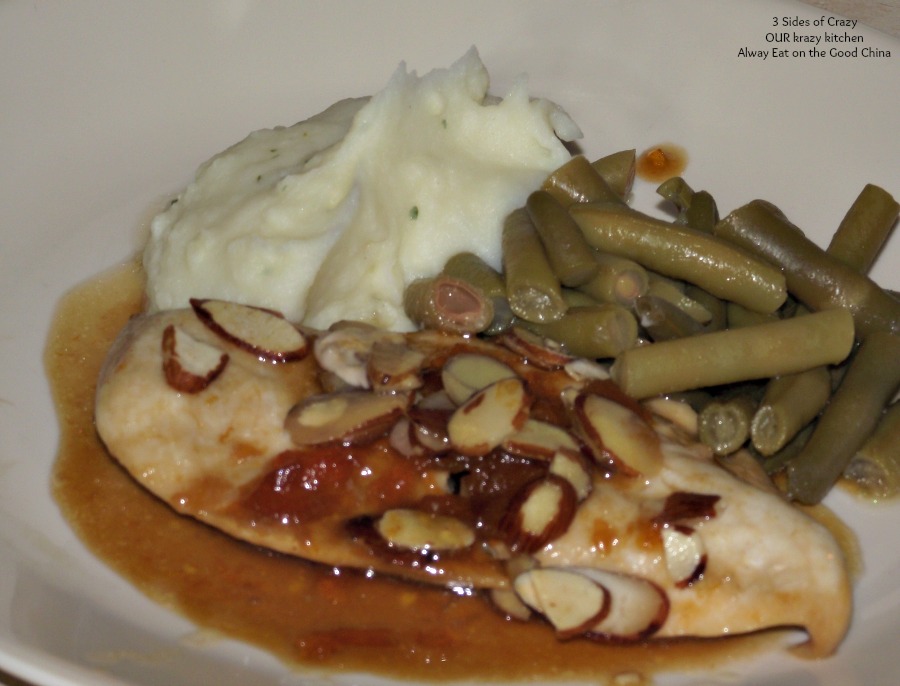
APRICOT ALMOND CHICKEN
4-6 boneless, skinless chicken
1 cup Smucker’s apricot jam
3 tablespoons soy sauce
3 green onions, chopped
4 teaspoons apple cider vinegar
1/2 cup sliced almonds**
2 tablespoons butter, melted
- Preheat oven to 350˚.
- Whisk together the jam, soy sauce, green onion and vinegar.
- Put half of the sauce in a shallow bowl and coat each piece of chicken.
- Set the other half aside.
- Place chicken pieces in a greased baking dish.
- Sprinkle almonds over chicken pieces.
- Drizzle with butter.
- Bake uncovered 30-35 minutes until cooked through.
- Serve with reserved sauce.
**I used honey roasted from the salad toppings section of the produce section.
APRICOT ALMOND CHICKEN
APRICOT ALMOND CHICKEN
4-6 boneless, skinless chicken
1 cup Smucker’s apricot jam
3 tablespoons soy sauce
3 green onions, chopped
4 teaspoons apple cider vinegar
1/2 cup sliced almonds**
2 tablespoons butter, melted
- Preheat oven to 350˚.
- Whisk together the jam, soy sauce, green onion and vinegar.
- Put half of the sauce in a shallow bowl and coat each piece of chicken.
- Set the other half aside.
- Place chicken pieces in a greased baking dish.
- Sprinkle almonds over chicken pieces.
- Drizzle with butter.
- Bake uncovered 30-35 minutes until cooked through.
- Serve with reserved sauce.
**I used honey roasted from the salad toppings section of the produce section.
BBQ HOT WINGS & CREAMY RANCH SAUCE

CREAMY RANCH SAUCE
1/2 cup mayonnaise
1/2 cup Hidden Valley bacon ranch salad dressing
1 tablespoon rice wine vinegar
1 clove garlic, minced
- In a small food processor blend all ingredients together until smooth.
- Refrigerate 24 hours before using.
BBQ SAUCE
1/2 cup Suckle Busters original BBQ sauce
1/2 cup Sweet Baby Ray’s BBQ sauce
- Whisk together and heat in microwave 30-60 seconds to blend.
HOT WINGS
- 2-3 dozen+ chicken wings ~ We prefer drumettes (with a little meat on them) to actual wings, but it’s your choice.
- 1-2 cups Flour
- 1 teaspoon salt
- 1 teaspoon pepper
- PURE
I also prefer to use an old cast iron frying pan (our is at least 3rd generation, dating back to hubby’s grandfather that we know for sure). I still believe this gives you the most even browning.
- Preheat oven to 350 degrees
- Wash and dry the chicken pieces.
- Add flour and seasonings in a plastic ziploc bag. Using a ziploc bag makes it easy to throw away the whole mess after dredging all the chicken pieces and it helps you coat every possible spot of the chicken pieces.
- Add chicken a few pieces at a time and coat them well. Set chicken pieces aside.
- While you’re doing this, have the butter melting in the pan. Start with 1 stick and add as necessary, but make sure you don’t run out.
- Once all the chicken has been dredged, start frying. After you have the pan full, pepper the pieces again. Don’t turn the chicken until you can see blood. You only need to turn the chicken one time. Brown evenly and then set aside on paper towels until all pieces have been fried.
- Spray a cookie sheet with PURE.
- Dip each piece of chicken into the BBQ sauce mixture and put on cookie sheet.
- Bake for 20 minutes.
- Serve hot with my homemade sauce and celery sticks if you’d like.
BLTE BAKE

BLTE BAKE
mayonnaise
4-6 slices extra sour sourdough bread, toasted
4 slices white American cheese
12 strips bacon, cooked and crumbled
4-6 eggs, fried over medium
1 medium tomato, chopped**
2 tablespoon butter
2 tablespoon flour
salt and pepper
1 cup milk
1/2 cup grated cheddar cheese
4 green onions, thinly sliced
**I used sliced here, but it is much better with chopped.
- Spread each piece of toast with mayonnaise.
- Cut each piece into small chunks.
- Arrange toast, mayonnaise side up in a buttered 9×9 baking dish.
- Top with American cheese slices.
- Top with crumbled bacon pieces.
- Fry eggs in bacon grease and place on top of bacon pieces.
- Top with tomato chunks.
- Preheat oven to 325˚.
- In a small saucepan, melt butter.
- Add flour, salt and pepper whisk until smooth.
- Gradually add milk. Bring to a boil, cook, stirring constantly until smooth and thick.
- Pour over tomato chunks.
- Sprinkle with cheddar cheese and onions.
- Bake uncovered for 10 minutes.
PAN SEARED CHICKEN w/ HERB ROASTED TOMATO & SPINACH PAN SAUCE
I am obviously drawn to similar type recipes. While going through my magazine recipe boxes I found 3 separate recipes for a similar style chicken. One recipe was for Bon Appetit and two from unknown sources. I picked through all the ingredients of all three recipes and chose the ingredients we like best to create my own recipe.
I also like to make the butter the day before so it becomes more flavorful.

PAN SEARED CHICKEN w/ HERB ROASTED TOMATO & SPINACH PAN SAUCE
4 boneless, skinless chicken breasts
4 tablespoons butter, softened
2 tablespoons red wine vinegar
1 teaspoon Worcestershire sauce
1/2 tablespoon sweet paprika
1/2 tablespoon dried tarragon
1/2 tablespoon dried marjoram
2 cloves garlic, minced
2 cups cherry tomatoes
2 cups fresh baby spinach
1 tablespoon flat leaf parsley, chopped
sea salt and pepper
1 tablespoon heavy cream
- In a small bowl whisk together the butter, Worcestershire sauce, garlic, marjoram, paprika and tarragon. Chill for at least an hour.
- Melt 1/2 of the herb butter in a large skillet.
- Season each chicken breast with salt and pepper.
- Add chicken to skillet and sear on each side until no longer pink inside (5-6 minutes per side).
- Transfer chicken to a platter and keep warm.
- Add vinegar to de-glaze pan.
- Add tomatoes to skillet and increase heat until tomatoes char and burst (5-6 minutes). Crush tomatoes slightly to release juices.
- Add remaining butter to skillet.
- When melted, add the spinach and saute until just done.
- Add heavy cream and stir until well blended.
- Serve over chicken pieces and noodles.
WEEKLY MENU

Menu Plan Monday hosted by Laura at I’m an Organizing Junkie
| DATE | BREAKFAST | LUNCH | DINNER | |
| Monday | 8/27 | CEREAL | YOGURT | CHICKEN CAPRI |
| Tuesday | 8/28 | TOAST | LEFTOVERS | PAN SEARED CHICKEN w/ TOMATO SPINACH HERB PAN SAUCE |
| Wednesday | 8/29 | YOGURT | SOUP | TROPICAL LIME CHICKEN |
| Thursday | 8/30 | FRUIT | CHEESE & FRUIT | TARRAGON CREAM CHICKEN |
| Friday | 8/31 | OATMEAL | CHEESE & FRUIT | BISTRO CHICKEN CAKES w/ TOMATO CONCASSE’ |
| Saturday | 9/1 | FRENCH TOAST CASSEROLE | YOGURT | HOT CHICKEN SALAD |
| Sunday | 9/2 | EGGS ala ROOSEVELT aka DEPRESSION EGGS | C.O.R.N. | ALMOND CHICKEN WITH APRICOT SAUCE |
FRENCH TOAST CASSEROLE
We love French toast, but I hate having to make recipes that require one of us to eat while it’s hot and the next batch is on the griddle. This recipe makes us both happy at the same time and is a time saver because I throw it together the night before AND it uses what might otherwise be wasted. We love sourdough bread, but the heels are sometimes a little tough. I save the heels from each loaf in the freezer and when I have enough I make this casserole. It’s absolutely perfect for Thanksgiving or Christmas morning. The smell of the cinnamon baking is one of the best smiles you can give your family.

FRENCH TOAST CASSEROLE
CASSEROLE
8-10 sourdough heels (or regular slices work too)
8 eggs
3 cups milk
4 teaspoons sugar
1 teaspoon cinnamon
1 teaspoon vanilla
3/4 teaspoon sea salt
TOPPING
3 tablespoons butter, cubed or sliced thin
3 tablespoons sugar
3 teaspoons cinnamon
maple syrup – OPTIONAL – it really is great without it
- In a large mixing bowl whisk together the eggs, milk, 4 teaspoons sugar, vanilla extract and sea salt.
- Cube bread.
- Add bread to the egg mixture and toss to coat well.
- Grease a 13×9 baking dish.
- Pour bread mixture into baking dish, cover and refrigerate overnight.
- Remove casserole from refrigerator 30 minutes before baking.
- Preheat oven to 350˚.
- Dot casserole with butter pieces.
- Combine topping sugar and cinnamon – sprinkle over top.
- Cover** and bake 45-50 minutes, or until toothpick comes out of center clean.
- Let stand 5 minutes before serving.
**If you want a crispy top, uncover 10 minutes before it’s through.
FRENCH TOAST CASSEROLE
We love French toast, but I hate having to make recipes that require one of us to eat while it’s hot and the next batch is on the griddle. This recipe makes us both happy at the same time and is a time saver because I throw it together the night before AND it uses what might otherwise be wasted. We love sourdough bread, but the heels are sometimes a little tough. I save the heels from each loaf in the freezer and when I have enough I make this casserole. It’s absolutely perfect for Thanksgiving or Christmas morning. The smell of the cinnamon baking is one of the best smiles you can give your family.
FRENCH TOAST CASSEROLE
CASSEROLE
8-10 sourdough heels (or regular slices work too)
8 eggs
3 cups milk
4 teaspoons sugar
1 teaspoon cinnamon
1 teaspoon vanilla
3/4 teaspoon sea salt
TOPPING
3 tablespoons butter, cubed or sliced thin
3 tablespoons sugar
3 teaspoons cinnamon
maple syrup – OPTIONAL – it really is great without it
- In a large mixing bowl whisk together the eggs, milk, 4 teaspoons sugar, vanilla extract and sea salt.
- Cube bread.
- Add bread to the egg mixture and toss to coat well.
- Grease a 13×9 baking dish.
- Pour bread mixture into baking dish, cover and refrigerate overnight.
- Remove casserole from refrigerator 30 minutes before baking.
- Preheat oven to 350˚.
- Dot casserole with butter pieces.
- Combine topping sugar and cinnamon – sprinkle over top.
- Cover** and bake 45-50 minutes, or until toothpick comes out of center clean.
- Let stand 5 minutes before serving.
**If you want a crispy top, uncover 10 minutes before it’s through.
HULI HULI CHICKEN

There is nothing better than chicken on the grill in the summertime. Whether it’s smoked, BBQed or marinaded – you really can’t go wrong. It’s an easy dinner and it doesn’t heat up the house.
This chicken is soaked in a soy sauce brine, then grilled and brushed with an amazing pineapple juice glaze for the last bit of grilling.
I changed a few aspects of the recipe by using chicken breasts which is what I had on hand and it cuts down on cooking time.
I served it with a bowl of Hawaiian macaroni salad & fresh pineapple wedges which disappeared immediately thanks to hubby.
Huli-Huli Chicken
For the chicken
1 quart water
1 cup soy sauce
1 tablespoon vegetable oil
3 garlic cloves, minced
1/2 tablespoon grated fresh ginger
4 pounds bone-in, skin-on chicken piece **
**I used boneless, skinless breasts this time and adjusted the grilling time accordingly. The breasts were so much better than bone in pieces!
For the glaze
3 (6-ounce) cans pineapple juice
1/4 cup packed golden brown sugar
1 tablespoon liquid smoke (can omit if using a charcoal grill)
1/4 cup soy sauce
1/4 cup ketchup
4 garlic cloves, minced
2 tablespoons grated fresh ginger
2 teaspoons Asian chili-garlic sauce
Brine Chicken
- Combine water and soy in a large bowl.
- Heat oil in large sauce pan over medium-high heat until shimmering.
- Add garlic and ginger and cook until fragrant, about 30 seconds.
- Stir into soy sauce mixture.
- Add chicken and refrigerate, covered, for at least 1 hour or up to 8.
Make Glaze
- Combine pineapple juice, sugar, soy sauce, ketchup, vinegar, garlic, ginger and chili-garlic sauce in a saucepan and bring to a boil.
- Reduce heat to simmer until thick and syrupy (you should have about 1 cup), 20-25 minutes.
Prep Grill
- CHARCOAL GRILL Seal wood chips in foil packet and cut vent holes in top. Open bottom vents on grill. Light about 75 coals. When coals are covered with a fine gray ash, spread evenly over the bottom of the grill. Arrange foil packet directly on coals. Set cooking grate in place and heat, covered with lid vent open halfway, until wood chips begin to smoke heavily, about 5 minutes. (For gas grill, place foil packet directly on primary burner.
- GAS GRILL **Heat all burners on high, covered, until wood chips begin to smoke heavily, about 15 minutes.
- Turn all burners to medium-low.)
- Scrape and oil the grate.
**IF YOU USE LIQUID SMOKE IN GLAZE YOU CAN SKIP THE CHIPS.
Grill Chicken
Remove chicken from the brine and pat dry with paper towels. Arrange skin side up on grill (do not place chicken directly above foil packet). Grill, covered, until chicken is well browned on bottom and meat registers 120 degrees, 25-30 minutes. Flip chicken skin side down and continue to grill, covered, until skin is well browned and crisp and thigh meat reaches 170 to 175 degrees, 20-25 minutes longer. Transfer chicken to platter, brush with half of the glaze, and let rest 5 minutes. Serve, passing remaining glaze at table.
Source: Adapted from Cook’s Country, June 2009 & Tide & Thyme
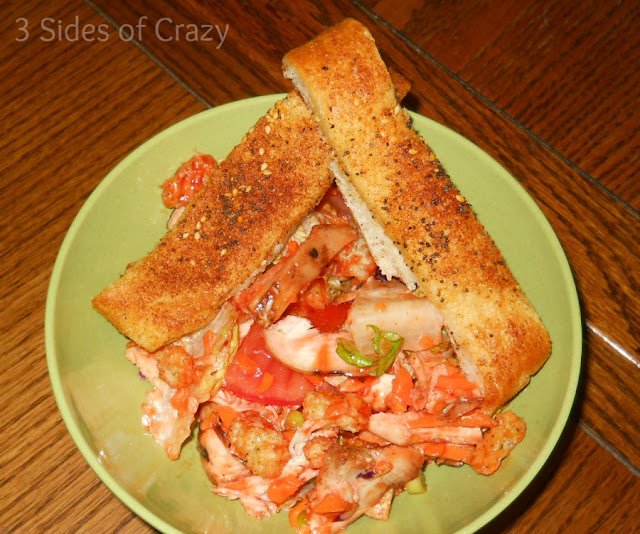
CHEESY GARLIC BREADSTICKS – TASTE & CREATE
Hubby was asking for pizza and I needed to do a recipe for Taste and Create. So this recipe from NIVEDHANAM, my partner this month solved my problem. We compromised on her bread sticks and my BBQ chicken salad.
The breadsticks were great and really easy!
Taste and Create was started as a food event by Nicole from For the Love of Food. The whole purpose of Taste and Create was, and has been, and continues to be to create a community of bloggers who test each others’ recipes and share links. The participants of the event are paired together and try a new recipe from one another’s blog.

CHEESY GARLIC BREADSTICKS
All Purpose Flour – 2 cups
Warm Water – 1/2 cup (About 110 degrees F)
Warm Milk – 1/2 cup (About 110 degrees F)
Salt – 3/4 teaspoon
Sugar – 1 tablespoon
Italian Seasoning – 1 tablespoon + 1 tablespoon
Olive Oil – 2 tablespoons + 2 tablespoons + 1 table spoon
Cheese – 3 tablespoons + 2 tablespoons (grated)
Rapid Rise / Instant Yeast – 2 1/4 tea spoons
Garlic – 3 tablespoons (minced fine / use garlic paste)
- In a mixer bowl, add warm water, warm milk, yeast and sugar and mix well and leave it to froth.
- Once the mixture is frothy, add 2 table spoons olive oil, salt, flour and run the mixer on low until most of the flour is absorbed.
- Add 3 table spoons cheese, garlic, 1 table spoon Italian seasoning and run the mixer until it forms a ball – around 5 minutes. Add a table spoon more flour if the dough is very sticky. If doing by hand, it will take around 7 minutes of kneading.
- Transfer to a greased bowl and allow it to rise for about 30 minutes
- Take a 10X13 sheet pan and grease it well with 2 table spoons of olive oil
- Spread the dough on the sheet pan and cover it with a greased plastic sheet. DO NOT USE KITCHEN TOWEL as it can stick to the dough and will be difficult to remove.
- Preheat the oven to 210 degrees C
- After 1 hour or after risen to double the volume, cut the dough into 1 1/2 inch thick strips and spread a table spoon of oil on the dough, sprinkle 2 table spoons cheese and Italian seasoning
- Bake in the oven for 14 – 20 minutes until it becomes golden and corners become crisp. It is a good idea to remove the breadsticks around 10 minutes and run the pizza cutter through the cut area to make it easier. Also rotate the pan half way through
- Remove from the oven and cool it in the pan for 2 minutes and transfer to a cutting board. Cut with the pizza cutter or a knife and serve hot with marinara sauce.
Points to note Yeast– (from https://www.kingarthurflour.com/tips/yeast-bread-primer.html) Somewhere between 95°F and 115°F is fine. With such a wide temperature range, you know that yeast is really quite accommodating. Try a few drops of water on your wrist. If it feels warm and comfortable to you, it will feel the same way to the yeast. The temperature has to be 120°F, which feels hot, before it begins to kill the yeast. It has to get all the way to 140°F before all the yeast is completely done in. 140°F feels really hot. If you don’t want to trust yourself the first time around, use a candy thermometer to see if you and the thermometer agree on what is “hot” and what’s just right.
