SLOW COOKER BLACK BEAN CHILI

SLOW COOKER BLACK BEAN CHILI

1 pound chuck steak, cut into 3/4 inch chunks**

15 ounce can tomato puree

15 ounce can black beans, drained and rinsed

2 cloves garlic, minced

3 tablespoons chili powder

1 KNORR beef tub

2 cups hot water

medium red onion, chopped (reserve some for garnish)

1 bunch green onions, sliced (reserve some for garnish)

sour cream

grated cheese

  • Combine hot water and KNORR beef tub until well blended.  Pour into slow cooker.
  • Add tomato puree, chili powder, garlic, salt and pepper to taste, blending well.
  • Add beef pieces, red onion and green onion.
  • Cover and cook on low 6-8 hours.
  • Top with sour cream, grated cheese and onions for garnish.
  • I served them over grilled hot dogs for hubby and Monday night football.

**We had grilled rib eyes the night before and I got a great price on buying the family pack so we grilled them all and then I cut the remains into 3/4 inch chunks for the chili.  I have to say the charring added some great flavor.

CARNITAS

The recipe I was given years ago lacked in flavor so I modified it and we’re extremely happy with the outcome. I’ve been making them this way for years. Originally the roasting was done on a rack with water underneath and just a simple salt and pepper.
Now I use a large onion diced as my natural rack to protect the pork. The onions bake together and become an essential flavor to the dish. I place the pork roast on top of the onion pieces and surround it with a can of diced green chiles and 4-5 cloves of minced garlic. Then I pour a can of salsa verde enchilada sauce on top of the green chiles and onions.  Cover it with foil and bake for 2 hours at 350°.
Then uncover it and bake another hour or until fork tender.  Remove the roast to a cutting board and shred it into bite sized pieces.
Add the pork pieces back into the onion mixture and coat well.
Serve with your favorite salsa, grated cheese and sour cream. Enjoy!

SMOTHERED CHICKEN

 SMOTHERED CHICKEN

1 boneless, skinless chicken breast PER person

2 slices bacon PER person

2 ounces fresh mushrooms PER person

1 green onion PER person

1/4 cup shredded cheese PER person

1-2 tablespoon honey PER person

1-2 tablespoon BOB’s Country Sauce PER person

seasoning salt

white pepper

  • Sprinkle each breast with seasoning salt and white pepper on both sides. Cover and refrigerate for 30 minutes.
  • Preheat oven to 350°.
  • Cook bacon until crisp in frying pan.  Drain on paper towels.
  • Add chicken breasts to hot bacon fat and brown well on both sides ~ 3 to 5 minutes per side.
  • Whisk together the honey and Country Bob’s sauce.
  • As you remove chicken from frying pan dip it in the honey mixture and then place  in a prepared baking dish.
  • Pour remaining honey sauce over top of chicken pieces.
  • Add onions and mushrooms to the bacon grease and saute until tender. Drain well.
  • Crumble bacon over the chicken pieces.
  • Spoon onions and mushrooms over chicken breasts.
  • Sprinkle cheese on top.
  • Bake 30 minutes or until chicken is cooked through.**
  • Serve over mashed potatoes and use any remaining sauce in the pan to top the potatoes.

**I like to use chicken steaks instead of breasts because they are thinner and we’re eating less these days.  If you do this, decrease your cooking time accordingly.

BAKED SNAPPER

We’ve being been trying to eat more fish. The problem is that so many recipes are rather bland so I have made it my personal mission to spice things up.

BAKED SNAPPER

1 fillet per person

salt

white pepper

sweet paprika

1 bunch green onions, chopped

3 tablespoons white wine

3 tablespoons champagne dressing

lemon slices

  • Preheat oven to 400°.
  • Rinse fish and pat dry.
  • Whisk together the white wine and champagne dressing.
  • Sprinkle green onions on bottom of a prepared baking dish.
  • Sprinkle the first side of the filets with salt, pepper and paprika.  Arrange seasoned side on top of green onions.
  • Season second side with salt and pepper.
  • Pour white wine over fish and then sprinkle with paprika.
  • Slice lemon and cut off rinds.
  • Arrange lemon pieces on fish.
  • Bake 25-30 minutes or until fish is cooked through.

GINGER PUMPKIN BREAD & MAPLE BROWN BUTTER GLAZE

Oh my, this is the best bread I have ever tasted! It is a must make again and again recipe!

adapted from  SIMPLY SCRATCH BLOG

GINGER PUMPKIN BREAD & MAPLE BROWN BUTTER GLAZE

Delicious pumpkin bread smothered in a maple brown butter icing. Ginger Pumpkin Bread adapted from Martha Stewart.

Yield: 8-10                                       Prep Time: 20 minutes

Cook Time: 60-70 minutes             Total Time: 1 hour 30 minutes12 tablespoons {1 1/2 sticks} unsalted butter, melted

2 1/2 cups all-purpose flour, plus more for pan

2 teaspoons baking powder

2 teaspoons ground ginger

1 teaspoon salt

1 cup granulated sugar

1 cup packed light-brown sugar

1 can (15 ounces) pumpkin puree (1 3/4 cups)

3 large eggs

**2/3 cup golden raisins

**1/2 cup chopped walnuts

**these were my additions and we loved them!!!

  • Preheat oven to 375 degrees.
  • In a 8×5 loaf pan; lightly butter or spray with baking spray and then dust wit flour (tap out any excess flour and discard), set aside.
  • In a medium bowl, whisk together flour, baking powder, ginger, and salt.
  • In a large bowl, whisk together sugars, pumpkin, melted butter, and eggs. Next add in the flour mixture, and stir until just combined.
  • Pour batter into the prepared pan. Bake until a cake tester is inserted into the center and comes out with only a smidgen coating it, which is about 60 to 70 minutes.
  • Let cool 10 minutes; invert pan and transfer the loaf to a wire rack to cool completely.

FOR THE GLAZE:

1/4 cup Real Maple Syrup

1/4 teaspoon Real Vanilla Extract

2 tablespoons Unsalted Butter

1/3 cup Powdered Sugar, plus more if needed

1 tablespoon Heavy Cream

A pinch of Kosher Salt

  • Heat a small skillet over medium/medium-high heat.
  • Once the pan is hot, add in the two tablespoons of unsalted butter. The butter should instantly start to melt and turn golden.
  • Once melted and a deep golden, turn off the heat and add in the maple syrup and vanilla, whisking constantly {it should bubble up}.
  • Once the bubbles have subsided a bit, whisk in the powdered sugar.
  • Keep whisking while adding the tablespoon of heavy creamy and a pinch of kosher salt.
  • Drizzle warm icing over cooled cake. Slice and serve!

BROWN SUGAR CRUMB CAKE & MAKING YOUR OWN BROWN SUGAR

BROWN SUGAR CRUMB CAKE

CAKE

1/2 cups flour, sifted

1/2 cup sugar

1 tablespoon baking powder

1/2 teaspoon sea salt

1 JUMBO egg

1/2 cup milk

1 teaspoon vanilla

  • Preheat oven to 350°.
  • Prepare baking dish with cooking spray and a light flour dusting.
  • Sift together dry ingredients in a mixing bowl.
  • In a large mixing bowl whisk together the milk, egg and vanilla until well blended.
  • Gradually fold the dry ingredients into the wet ingredients JUST until combined. DO NOT OVER MIX!
  • Spread batter into pan.

TOPPING

1 1/4 cup flour, sifted

1 cup packed dark brown sugar**

2 teaspoons cinnamon, sifted

1/2 cup unsalted butter, melted

  • In a medium bowl sift together the dry ingredients.
  • Pour melted butter over dry ingredients and stir gently until crumbs form.
  • Sprinkle the crumbs over the batter.
  • Use a knife to swirl some of the crumb mixture down into the cake.
  • Bake 25-30 minutes or until toothpick comes out clean.
**With the move coming up I’m not replacing food and I was OUT of brown sugar!  Then I remembered I had cut out an article on making your own brown sugar.  I have to say that in the future I may always make my own brown sugar – the flavor was so deep and rich.
HOMEMADE BROWN SUGAR
1 cup granulated sugar
1 tablespoon Grandma’s molasses for light brown sugar
2 tablespoons Grandma’s molasses for dark brown sugar

Combine together in a large mixing bowl starting with a low speed and gradually increasing until well blended.  This can take as long as 10 minutes.

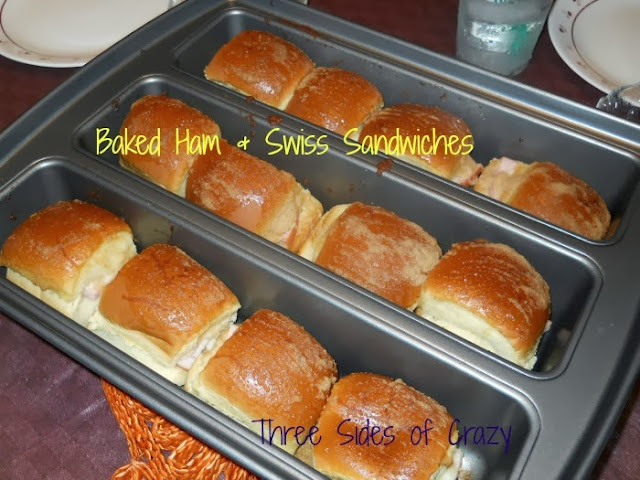
BAKED HAM & SWISS SLIDERS

I wish I could tell you where I saw this recipe, but I can’t.  I did adapt it slightly, but it really makes the perfect football food – quick, easy and tasty.

BAKED HAM & SWISS SLIDERS

12 pack of KING’S Hawaiian rolls

4 slices thick ham, quartered (to fit on rolls)

4 large slices Swiss cheese, quartered (to fit on rolls)

1/3 cup butter

2 teaspoons Worcestershire sauce

1 teaspoon garlic powder

1 teaspoon onion powder

  • Slice rolls in half and layer pan with bottom halves.*
  • Place a slice of ham and Swiss cheese on each roll.
  • Put the tops on.
  • In a small saucepan melt the butter.
  • Add the Worcestershire sauce and seasonings and blend well.
  • Brush the tops of each roll.
  • Cover with foil and refrigerate over night.
  • Preheat oven to 375°.
  • Bake 15-20 minutes.
  • Serve immediately!  They are best hot.

As an added bonus they are really good as a “club” adding turkey as well to the ham.

*Original recipe called for using a 9×13 pan.  I used my lasagna pan and it worked out very well.

MEATBALL STEW & PARMESAN ONION WEDGES

MEATBALL STEW

1/2 cup white wine

2 tablespoons balsamic vinegar

1 tub KNORR beef gel

3 1/2 cups hot water

1/4 cup WONDRA flour

1 pound small red tomatoes cut into bite size pieces

3 ribs celery, sliced thin

2 cups baby carrots sliced in half lengthwise

1 package frozen pearl onions (thawed)**

1 tablespoon Avocado oil

12 oz. package frozen meatballs

1 package McCormick Au Jus

Himalayan pink salt and Garlic pepper to taste

  • Whisk together the hot water, gel tub, vinegar, Au Jus seasoning and white wine until well blended.
  • Add flour and whisk until lump free and set aside.
  • Heat oil in dutch oven over medium-high heat.
  • Add celery, potatoes, carrots and onions, sauteing until slightly softened (about 8-10 minutes).
  • Add broth mixture and bring to a boil. Reduce heat and simmer 10 minutes.
  • Add meatballs and simmer 15 minutes or until meatballs are heated through.  Broth will thicken as it simmers.

**While the pearl onions look good, I prefer to make this recipe with sweet Maui onions.

PARMESAN ONION WEDGES

2 cups biscuit/baking mix

2/3 cup WHOLE milk

1/2 cup Parmesan cheese

1 small onion, minced

1/2 mayonnaise**

1 teaspoon salad seasoning

  • Preheat oven to 400°.
  • In a small bowl stir biscuit mix and milk together just until moistened.
  • Turn onto a floured surface and knead a few times.
  • Roll out to a 11-12 inch circle and transfer to a pizza pan.
  • Combine the cheese, mayonnaise, onion and salad seasoning. Spread on top of dough.
  • Bake 15-20 minutes or until golden.
  • Serve war.
  • Refrigerate leftovers.

SMOKEY NAVY BEAN SOUP – CROCK POT STYLE


The weather has taken a serious turn towards fall.  But, I’m ready!  One of my favorite things about fall is fun food for tailgating or just watching football at home.  This soup recipe is no exception.

Whether you serve it in a bread bowl (which is my favorite way) or just in a bowl, the flavor is smokey, deep and intense – perfect for warming you from the inside out. AND it is super easy in the crock pot!

SMOKEY NAVY BEAN SOUP – CROCK POT STYLE

1 pound navy beans, soaked overnight

1 large onion, chopped

6 cups water

1 KNORR vegetable gel tub

1 large onion, chopped

2-3 cloves garlic, minced

3 ribs celery, sliced

3 carrots, sliced

1 can petite diced tomatoes (I use Chipotle & jalapeno flavored)

1/2 teaspoon dried thyme

salt and pepper to taste (I use 1 t. Himalayan pink salt and 1/4 t. white pepper)

1 ham steak, chopped (about 2 cups)

1/2 pound bacon, crisp and bacon

grated cheese

  • Spray slow cooker with PAM.
  • Drains beans of soaking water and add to slow cooker along with onions, garlic, celery, tomatoes and carrots.
  • Whisk together the water, KNORR gel tub, thyme, salt and pepper until well blended. Add to the slow cooker.
  • Cook on low 4-6 hours.
  • Add ham pieces.
  • Cook another 2-3 hours.
  • Garnish with cheese and bacon before serving.
  • Enjoy!

LEMON CREAM CHICKEN

When I first started blogging it was about home renovations that were forced on us when we bought some investment property. Soon after though I realized that my favorite blogs to read and the women I met were those of the foodie genre. Since then I have made more recipes from the scraps of paper I collected over the years. Some were real duds, but some shone brightly.

Tonight the Lemon Cream Chicken shined the brightest of all recent recipes I’ve tried. So, I’m going to share it with you and hope you enjoy it as much as we did!

Lemon Cream Chicken

LEMON CREAM CHICKEN

1/3 cup WONDRA flour

salt and pepper to taste

4 skinless, boneless chicken breast halves**

3 tablespoons butter

1 KNORR chicken homestyle stock tub

3/4 cup hot water

1 cup whipping cream

Juice of 1 large lemon

1/4 pound fresh mushrooms, sliced

  • Wash and dry chicken pieces.
  • Generously salt and pepper each side.
  • Dredge in the flour, pressing to coat well.
  • In a large skillet, melt butter.
  • Add chicken pieces and brown on each side. Remove chicken and keep warm.
  • Add KNORR stock and hot water, whisking into drippings until well blended.
  • Bring to a boil over medium high heat and simmer about 10 minutes until reduced by half.
  • Whisk in the lemon juice and whipping cream until well blended.
  • Reduce heat and add mushrooms cooking about 5 minutes until mushrooms are tender.
  • Simmer to desired consistency.
  • Pour over chicken and mashed potatoes.

**I use thinly sliced chicken steaks which are basically chicken breasts that are sliced at least once and many times 3 times. This helps for portion control and works wonders! Since my last surgery and for medical reasons I’m supposed to eat less each meal and eat more meals. This it happens allows me to try even more recipes as long as I adjust them to feed 2.

CANNING & PRESERVING – A WAY OF LIFE

One thing that many of you don’t know about me is that I love to cook (LOL) AND to preserve. To me there is nothing that says I love you more than preparing those special meals and treats for my family. Canning is easy, but it is time consuming and you do have to follow sterile rules to make it safe. You can be as plain or as inventive as you want.

Hubby pointed out this would be a good time to share my award pictures that I began to scrapbook about before the move and have yet to finish. I always thought it a little ironic that I was ‘preserving’ my preserving ribbons. Here are a few pictures.

How I got started on entering the county fair is actually a cute story. I was still working for a major phone company and I make a Spiced Pear jam that really is awesome. We had a cafeteria in the building I worked in and the engineers would stop by my desk to buy a jar of jam before their coffee break so they could put it on their pancakes and waffles. I loved making it and only charged them enough to actually cover my expenses so I could make more.My boss kept trying to get me to enter it into competition, but I was reluctant as I really didn’t think I had what it took to compete against women who had been doing it all their lives (1 woman had an entire 4×8 foot wall with just her entries and had been winning 1st and 2nd place awards for over 20 years) because I was a self-taught newbie and ‘shy’. Unbeknownst to me, one of the guys entered me in the upcoming county fair. He knew I went every year to drool over the jams and jellies and crafty items in the home building. You have to picture my jaw actually dropping to the floor on this particular year when I see my name, my jam and an actual 3rd place ribbon attached to it! I was literally speechless especially since I hadn’t entered the fair. Long story short I will always be eternally grateful to him for giving me the courage and confidence to enter each and every year after that for 10 years until I moved away. I have also been published in several of their cookbooks for the years I won first place. I hope to start again soon.This year I want to try my hand at some of the local indigenous fruits (cranberries, blackberries, blueberries and apples to start).

Loaded Baked Potato Salad

Min here, from The Bad Girl’s Kitchen.  Long time no see!  I was lured over here yesterday by Melynda’s Apricot Pie, if you must know.  Then I just had to come back over and share my new creation with you!!

This recipe came about when I received an email listing “summer salads.”  There was a link to a recipe someone had called “Loaded Baked Potato Salad,” which I thought sounded great…but when I read through the recipe, it was really a casserole…?! 

What do I mean by “casserole?”  It was a potato dish that was assembled and then BAKED in a 9×13 pan.  Sort of reminiscent of my Twice Baked Potato Casserole, actually.  Totally not a “salad” at all, (salad in my mind means “cold”), and certainly not a dish I would think about serving in the heat of summer.

I set out to create a true potato salad.

First, I used my grill to bake the potatoes.  I just clean them, rub them with olive oil, then grill on the top rack over medium-ish heat for about one hour, turning over halfway through.  You want them baked but not too soft, keep in mind your grill may cook differently than mine.  Remove potatoes from grill and let cool before chopping, of course. I found that using a serrated knife helps the potatoes hold together better, while keeping the skin pieces intact.

Once salad ingredients are prepped, it’s important not to mix it until you’ve added everything, because the potatoes are a bit fragile.  You want to gently fold the ingredients together.  I used a mixture of sour cream and real mayonnaise because that’s what I prefer.  The real mayo adds a bit of flavor you wouldn’t get with sour cream alone.  You need to put this salad together ahead of time, and I’d recommend chilling it in the refrigerator for at least an hour or so if you have time.

I have to tell you, this is an amazing potato salad!  Make it for your next barbecue, and everyone will be impressed!  I think the baked potatoes add so much to the flavor compared to a traditional potato salad made with boiled potatoes, that I may actually try to bake all my potatoes for salads from now on.

My family and I loved this potato salad; in fact my oldest son H-Bomb even asked for seconds although he’s not a huge potato fan.  It’s my new favorite, and I’m going to make more today!

Loaded Baked Potato Salad 
Serves 6 to 8 

6 baked potatoes, skin on
1/2 pound bacon, chopped and cooked until crisp, then drained and cooled on paper towels
3 – 4 scallions, chopped
1 cup shredded sharp cheddar cheese
1/2 cup sour cream
1/2 cup mayonnaise
Salt and pepper to taste

Reserve a few pieces bacon, some green onions and cheese to use as garnish. 

Use a serrated knife to gently chop potatoes, leaving skin on.  I cut each potato in quarters lengthwise, before chopping in pieces.  Add to large mixing bowl.

Add bacon, onions and cheese; do not mix. Season with salt and pepper. Set aside.

In a small bowl, mix sour cream and mayo.  Add to potato mixture and mix gently with a rubber spatula.  Taste and adjust salt and pepper, if needed.  Refrigerate until ready to serve.

Before serving, garnish with reserved cheese, bacon and green onions.

Don’t forget to visit me at The Bad Girl’s Kitchen for more fabulous recipes!

I also host the fun monthly food blog event, Taste & Create!  Please join us!