Honey Wheat Sunflower Dinner Rolls

Hi everyone!

This is Alexis from NibbleMeThis. I’m posting for Fire Day Friday this week because Chris is tied up moving one of his out of town offices this week.

Ya’ll probably know I got my own Big Green Egg a while back and this is one of my favorite rolls I have made on it. I used this recipe for Honey Wheat Sunflower Bread but only made one loaf and it is a wonderful bread recipe.


But I used the other half of the dough to make dinner rolls. I knew I was going to love it but was surprised how much Chris and the boys liked it because they are “white bread” kind of dudes. The rolls had a bit of sweet to them and the sunflower seed kernels added a nice texture.

Oh yeah, this was funny. One of our older son’s friends was eating one when I mentioned they had sunflower seeds and he about choked, asking, “Am I supposed to be spitting the shells out?” because he thought the sunflower seeds were in the shells.


Honey Wheat Sunflower Dinner Rolls
adapted from Lillian Wittler’s Honey-Wheat Sunflower Bread

2 cups warm water (120-130f)
2 3/4 cups bread flour
2 packages active dry yeast (quarter oz each)
1 Tbsp white sugar
2 cups whole wheat flour
1 cup quick oats
1/3 cup instant dry buttermilk powder
1/4 cup butter, melted and cooled
1/4 cup creamed honey (you can use regular but I like creamed better)
2 tsp salt
1 cup sunflower kernels (unsalted)
2 Tbsp agave nectar
2 Tbsp unsalted butter, melted

I use a Thermapen instant read thermometer to make sure my water is the right temp.

Mix the warm water, 2 cups of the bread flour (not the whole 2 3/4 cups), yeast and sugar in your mixer bowl. Beat for 3 minutes on low (Speed 2 on my Kitchenaide).

Cover with a tea towel and let it rise until it has doubled. The recipe said 30 minutes but mine took more like an hour.

Fold in the wheat flour, oats, dry milk, butter, creamed honey, and salt.

Stir in the sunflower kernels and as much of the remaining bread flour to get a good consistency. I ended up only using maybe 1/2 cup.

Put on the dough hook and kneaded it until it all held together and pulled cleanly from the sides of the bowl, about 6-8 minutes.

Take out of the mixing bowl and put it into another greased bowl then turn once. Cover and let rise until doubled, about another 30-45 minutes.

Punch down and divide into two.

I shaped one half for the bread loaf plan. The other half I made into equal golf ball sized balls. I put them in a greased, stone ware pie pan and let it rise until doubled again (about 30 minutes).

When that is happening, I started my Big Green Egg and set it up for baking at 375f but you could do it in your oven.

Place in your oven or Egg and cook for 20 minutes uncovered. Then cover it with foil and go another 15 minutes until a cake tester comes out clean.

Brush with a 50/50 mix of Agave nectar and melted butter.

Remove from the grill/oven and cool on a rack.

This one is tasty and would be a great way to serve something different than the same old dinner roll this Thanksgiving.

Pomegranate Deviled Eggs

Don’t you love the colors…

Mardi Gras Purple and Gold came to mind when I saw these… Or Minnesota Vikings (Brett Favre…. really, does anyone think that was a good idea???), LA Lakers or Washington Huskies.  For a select area of the country, these colors could be the big hit of a sports themed party.

And very easy.

First, I guess the why question comes up.

I am toying with ideas.  I was selected to host a POM WONDERFUL Pomegranate themed party.  If all goes well, fame, glory and valuable prizes will be winging my way.  If things don’t…. well, I still got a big bunch of Pomegranates, lots of bottles of POM Wonderful Juice and I got to spend a week pondering what if…

Like what happens if you soak a hard boiled egg in Pomegranate juice for a day.

OK, only a few more days till the party and I get to be normal again.

But wait…  Have you sampled POM juice?  It has a very distinctive taste.  Tart, tangy a little sweet filled with taste.  Did the marinade affect the taste of the eggs.
You BET!  That Pom Tang makes these unusual (in a good way), unexpected (always a good thing) and they make a fun presentation!

No big secret… Only slightly hard part os to get Pomegranate Juice.  Sure, you could buy a bottle, but where’s the fun???
Pomegranates are in season now, stores are full of them.  Don’t be scared…  be experimental!

To get at the good stuff, there are 6 easy steps…
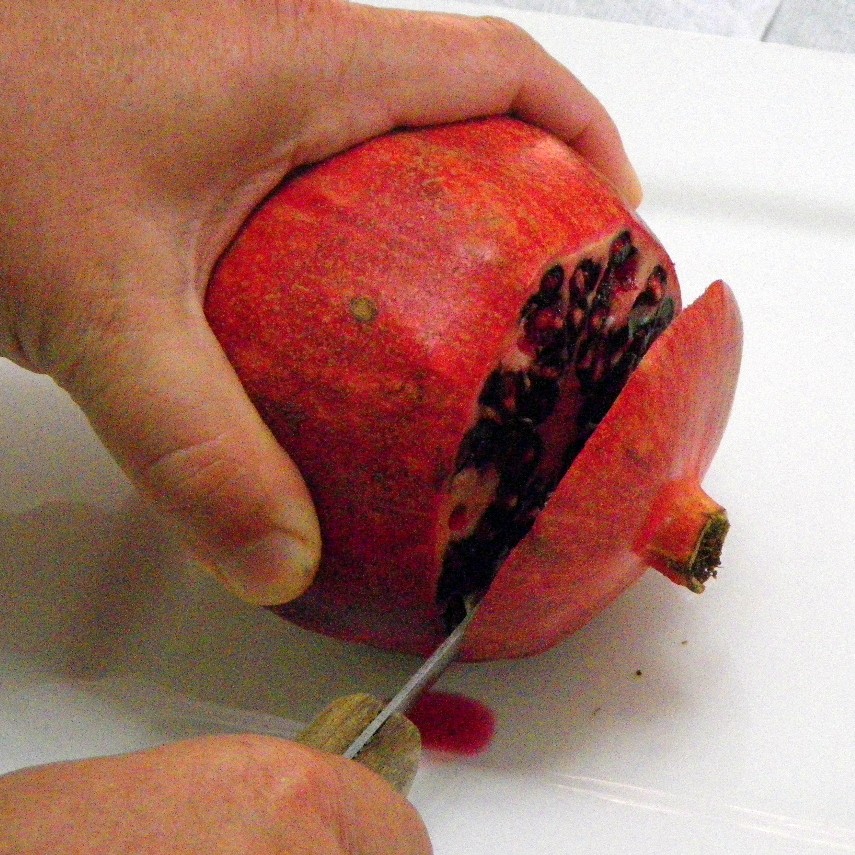

Step 1 is to cut.  

Just a bit off the top....

Look at the photo, cut just about an inch from the top, and slice all the way through.


Step 2 is to SCORE

OK, if you look close inside the Pomegranate, you will see white membranes. these membranes hold the seeds, and are what attaches the seeds to the fruit, which is attached to the branch, the trunk, the roots and the nutrients that feed it. It’s the cycle of life without a Lion. Scoring means to cut down through those membranes. Keeps the arils intact and less mess. Leave the last 1/2 inch uncut so you can…

Step 3 is to Open

Now we’re at the good part.

Feel free to taste test the little seed sacks. FILLED with juice, sweet, a little tangy and ready to eat! But to actually cook with them, we need to open it up, just peel down the sides. Now, you can see all the seeds, all the arils.


Step 4 is to Loosen

If you are afraid of the mess, you can use a spoon for this step. But let’s get Zen with it. Be the Pomegranate… Feel the Pomegranate.. Live the Pomegranate lifestyle. get in there and pop the arils off with your thumb.

Just a small word of caution with this step. Wear an apron, or be very careful. The juice is wonderful, but it does stain. Work with the sides of the pomegranate towards you and the seeds away, when you separate them, it is less likely that the juice will pop towards you.

When you separate the arils from the membrane, always empty them into a bowl of water. the seeds sink (they are full of juice), while the white membrane will rise to the top, making it easy to…


Step 5 is to Scoop

With the membrane floating, it is easy to scoop the white parts out. The membrane is about the only inedible part of a pomegranate. It is very bitter. So scoop out all you can. Again, run your fingers through the seeds and make sure as much as possible has been removed.

Step 6 is to Strain

Pour through a colander, or scoop out with a slotted spoon,  but stack em up! 

You get about a cup and a half of arils out of each Pomegranate.

……………………………………………….
And there you go, How to open a Pomegranate in 6 easy steps!

Pour the Arils into a blender or food processor to get the juice.  Run through a collander to get the seeds out and you are set!!!

Now, let’s make the deviled eggs.

I have a trick to make perfect hard boiled eggs… Not too soft, not too hard.  Put eggs in a pot, cover with water about an inch above the eggs.  Now, put on high heat until the water reaches a rapid boil (only about 3 minutes).  Remove from the heat, cover and wait 10 minutes…

DONE!

Remove the shells and soak in the Pom Juice for 24 hours.  Stir every few hours to evenly coat.

And from there, just make deviled eggs.  Easiest recipe…

cut the eggs in half, remove the yolks.

add juice of 1/2 a lemon, mayonnaise and yellow mustard to taste (I do a 2 to 1 mayo over mustard mix) until you reach a thick paste stage.

Fill the eggs and you are done…


POMEGRANATE DEVILED EGGS

and they do have that snappy taste!

Dave here from MY YEAR ON THE GRILL. It really is just this easy!  

 … I CAN COOK THAT! 

And so can you!


Save Room for Dessert…Easy Cranberry & Apple Cake

My friend Melinda knows my love of all things cranberry, so when she saw this recipe in Ina Garten’s How Easy is That? cookbook, she called my attention to it immediately.  I was smitten and couldn’t wait to make it.  Since my mother & sister were coming over to bake cuccidati on Sunday, I decided to bake it for them.  Both live an hour away, so they rarely get to sample all of the goodies I bake.

The recipe says to bake it in a pie pan, but I just used a 13×9, and it worked great.  I loved this cake!  Tart cranberries with the delicious essence of range and cinnamon along with buttery cake, it’s just a perfectly deliciously cake!  Now’s the time to make this, as cranberries are in abundance and so good for you, too!

Easy Cranberry & Apple Cake
1 12 ounce bag cranberries, picked over and rinsed
1 Granny Smith apple, peeled and diced
1/2 cup brown sugar
1 tablespoon orange zest
1/4 cup orange juice
1 1/8 teaspoon cinnamon, divided
3 large eggs (The recipe called for 2 extra-large, but I only had large, so I used 3)
1 cup +1 tablespoon sugar
1 stick unsalted butter, melted and cooled
1 teaspoon vanilla

1/4 cup sour cream (I used Greek yogurt)
1 cup flour

1/4 teaspoon kosher salt

  • Preheat the oven to 325 degrees.
  • Place cranberries, apple, brown sugar, orange zest, orange juice, and cinnamon in a 13×9 casserole dish or a 10″ pie plate.  Mix together and set aside.
  • Using a mixer, beat eggs for 2 minutes.
  • Add 1 cup sugar, mleted butter, vanilla, and sour cream.  Beat until combined
  • Add flour and salt.
  • Pour batter over fruit, covering fruit entirely.
  • Mix the remaining 1 tablespoon sugar and 1/8 teaspoon cinnamon together; sprinkle cinnamon sugar over batter.
  • Bake at 325 degrees for 50 minutes or until a toothpick inserted comes out clean.
  • Serve warm or at room temperature.

ARE YOU READY FOR SOME FOOTBALL????????????

We’re HUGE football fans!  Well, it’s that time of year again! Football season is already several weeks old (where does the time go?) and that means it’s time for tailgating again at the games, serious football food and game day buffets.  Bring over your best appetizers and your biggest appetite and oh don’t forget the Brewskis to go with it all.  I like mine really cold please with a side of lime!
Tailgating Time will be posted every Sunday at noon and open all week for you to add your football favorites. We’ll play each and every week until Superbowl Sunday. I can’t wait to see what you’ll be bringing!
It’s Tailgating Time!
HOSTED BY:
Martha at Seaside Simplicity 
Tamy at 3 sides of Crazy 
Lyndsey at Tiny Skillet

Would you like to be a host of Tailgating Time too? 
Leave me a comment here with your email or with Martha over at Seaside Simplicity so we can send you the code and add you to the host list – more exposure, more links, more football food!

Italian Sausage and Roasted Red Pepper Lentil Stew

Last week, I was naive.

When temperatures hit 70 here in New York City, I made the mistake of declaring to the world (via Twitter) that it smelled like spring.  In my defense, it did.  It smelled like grass and flowers. Hope and limitless potential.  Short sleeves and miniskirts.

I reveled in it.

Then.  Came this week.

The wind had changed and all of a sudden it smelled barren.  Heartless.  Frigid

It started to unnerve me after a while.  The scent seeping into my pores.

And so I did the only thing I could. I stewed.  I stewed until my entire house smelled of warmth.  Roasted red pepper lentil sausage warmth.

Now that is something worth reveling in.

Italian Sausage and Roasted Red Pepper Lentil Stew
Serves 4, adapted from Closet Cooking

1/2 lb Italian sausage, casings removed
1 tbsp oil
1 onion, diced
2 carrots, diced
2 cloves garlic, chopped
red pepper flakes, to taste
1 cup red wine
1 cup red lentils
2 cups chicken broth
1 (14 oz) can diced tomatoes
2 roasted red bell peppers, diced
1 bay leaf
1/2 tsp oregano
1 tbsp balsamic vinegar
salt and pepper, to taste
parsley and feta cheese for garnish

  1. Cook the sausage in a large pot, breaking into crumbles with a spatula as you go.  Set aside.
  2. Heat the oil in the same pot.  Add the onion and carrots, and saute until tender, about 10 minutes.
  3. Add the garlic and chili pepper flakes and cook until fragrant, about 30 seconds.
  4. Add the red wine and deglaze the pan.  Add the sausage, lentils, chicken broth, tomatoes, roasted red bell peppers, bay leaf, oregano, and balsamic vinegar.  Bring to a boil.
  5. Reduce the heat, cover and simmer until the lentils are cooked, about 20-30 minutes, stirring occasionally.
  6. Season to taste with salt and pepper. Ladle into bowls and top with chopped parsley and feta crumbles.

Fried Artichoke Hearts

One of my favorite appetizers is fried artichoke hearts. You bite through the crispy crust and into the tender, tangy inside of artichoke that leaves happiness on your lips.


Huh, what? Oh, yeah, it is Fire Day Friday.


But technically, this was cooked outside on a grill.


I refuse to use our deep fryer inside the house because I hate the lingering greasy smell. My fire pit was the closest stable surface to hold my deep fryer.

Deep Fried Artichoke Hearts with Gorgonzola Dipping Sauce
Source: NibbleMeThis
Servings: 4-6

24 each artichoke hearts (preferably not the marinated kind)
6 ounces beer
1/2 teaspoon salt
1 egg
1/2 cup self rising flour
1/4 cup panko bread crumbs
2 teaspoon paprika
1/2 teaspoon salt

Dipping sauce
1/2 cup mayonnaise
1/2 cup sour cream
1/3 cup gorgonzola cheese
1 tablespoon white balsamic fig vinegar (sub any light flavored vinegar)
1 tablespoon lemon juice
1/4 teaspoon black pepper ground
1/2 teaspoon Fire Ant Juice (or your favorite hot sauce)

Mix together the dipping sauce and rest in the fridge for at least one hour.

Whisk the beer, salt, and egg together in a bowl. Mix the flour, panko bread crumbs, paprika, and salt together on a plate.

One by one, dip the artichoke hearts in the egg wash and then roll in the flour mix.

Deep fry them in small batches (8 or less) at 375f for 4 minutes.

Remove from the fryer and rest on a cooling rack, seasoning with a pinch of salt immediately.

Dust with finely grated pecorino romano cheese and serve with the dipping sauce.


Did I mention these are deep fried artichoke hearts?

So what are YOUR favorite appetizers?

SEAFOOD CASSEROLE EXTRAODINAIRE

Hi everyone, Tamy here filling in for Dave.  You can normally find me at my home blogs 3 Sides of Crazy, Always Eat On The Good China, on Sundays here at OUR KrAzY kitchen and on Saturdays over at THE Motivation Station, but covering today for Dave.  I made this a while back for Magazines Mondays.  The guys loved it and it’s perfect for Dave’s theme, I CAN COOK THAT!
I really intended to stick with this recipe as it was written, really I did! But, as I read it more closely I felt some changes coming on. You know that feeling you get when you realize hubby won’t like ingredient 5 or your son would hate ingredient x, etc… The more I messed with the recipe the further it got from what the intended.

So here is their recipe as written:


BLEND IN THE BAYOU
8 ounces cream cheese
4 tablespoons butter, divided
1 large onion, chopped
2 celery ribs, chopped
1 large green pepper, chopped
1 pound cooked medium shrimp, peeled and deveined
2 – 6 ounce cans crabmeat, drained and flaked
1 can cream of mushroom soup
3/4 cup cooked rice, prepared
4 1/2 ounce jar sliced mushrooms, drained
1 teaspoon garlic salt
3/4 teaspoon hot pepper sauce
1/2 teaspoon cayenne pepper
3/4 cup shredded cheddar cheese
1/2 cup crushed butter-flavored crackers
  • In a small saucepan, cook and stir the cream cheese and 2 tablespoons butter over low heat until melted and smooth. Set aside.
  • In a large skillet, saute the onion, celery and green pepper in remaining butter until tender.
  • Stir in the shrimp, crab, soup, rice, mushrooms, garlic salt, pepper sauce, cayenne and cream cheese mixture.
  • Transfer to a greased 2 quart baking dish.
  • Combine crackers crumbs and cheese. Sprinkle over top.
  • Bake, uncovered 25 minutes or until bubbly.
and here is the new recipe as made and enjoyed and savored as the plates were licked clean!


SEAFOOD CASSEROLE EXTRAODINAIRE
inspired by Taste of Home’s Blend in the Bayou

8 ounces cream cheese
3 tablespoons butter, divided
1 large bunch green onions, chopped

4 large mushrooms, chopped 2 cloves garlic, minced

1 – 8 ounce package crabmeat, chopped & flaked
2 – 6 ounce cans white albacore tuna, drained and flaked
1 can cream of celery soup
3/4 cup cooked rice, prepared
1 teaspoon sea salt
1 teaspoon hot pepper sauce
1/2 teaspoon chili pepper
3/4 cup shredded cheddar/jack cheese
1/2 sleeve crushed butter-flavored crackers ( I used Keebler herb and butter)
  • Preheat oven to 350 degrees.
  • In a small saucepan, cook and stir the cream cheese, soup and 2 tablespoons butter over low heat until melted and smooth. Set aside.
  • In a large skillet, saute the onion, mushrooms and garlic in remaining 1 tablespoon butter until tender.
  • Stir in the tuna, crab, soup, rice, mushrooms, salt, pepper sauce, chili powder and cream cheese mixture.
  • Transfer to a greased 2 quart baking dish.
  • Sprinkle crackers over top.
  • Bake, uncovered 25 minutes or until bubbly.
  • Sprinkle with cheese and bake 5 minutes more.

aprons 3

QUICK & EASY CHICKEN CHILI

Hi everyone, Tamy here filling in for Min.  You can normally find me at my home blogs 3 Sides of Crazy, Always Eat On The Good China, on Sundays here at OUR KrAzY kitchen and on Saturdays over at THE Motivation Station, but today Min asked to fill in for her while she goes through the excruciating withdrawal of no computer and she waits for her new one to be delivered.  I made up this recipe a couple of weeks ago when I was home without a car and the pantry was all but bare.  Good thing I did, the guys loved it and it’s perfect for Min’s theme, Try  A New Recipe Day!

QUICK & EASY CHICKEN CHILI
3 skinless, boneless chicken breasts, frozen
2 cups homemade chicken broth, frozen
1 can cream of potato soup
1 jar dried beef, chopped
1 Williams chili mix package
1 can chopped green chilies
  • Place frozen chicken breasts on the bottom.
  • Pour green chilies over chicken pieces.
  • Top with cream of potato soup.
  • Top with frozen broth.
  • Sprinkle chili seasoning mix on top of chicken broth.
  • Top with beef pieces.
  • Slow cook on high for 2 hours. Reduce to low for 6 hours. Or cook on low 10 hours.
Don’t forget to visit Min at The Bad Girl’s Kitchen for more fabulous recipes!

    Save Room for Dessert…Nutty Pumpkin Bundt Cake with Cranberries

    This is my first pumpkin cake of the season, and it’s one of my favorites.  Anytime I can combine three of my favorite things into one moist & spicy cake, I’m a happy camper.  In this pumpkin cake, there are cranberries, which add a lovely tartness, not to mention gorgeous ruby color, and the toasted pecans add a wonderful texture.  I’ve used various glazes for this cake, one favorite being cream cheese, but today I decided upon a simple vanilla glaze.  Enjoy!

    Nutty Pumpkin Bundt Cake with Cranberries
    2 cups flour
    2 teaspoons baking soda
    2 teaspoons cinnamon
    1/2 teaspoon salt
    4 eggs
    1 1/4 cup sugar
    3/4 cup brown sugar
    1 cup oil
    1-15 ounce can pumpkin puree
    1 1/2 cups toasted and coarsely chopped pecans
    1 1/2 cups cranberries, coarsely chopped

    Preheat oven to 350 degrees.
    Butter and flour a Bundt pan; set aside.
    In a small bowl, whisk together flour, baking soda, cinnamon, and salt; set aside.
    Beat eggs and sugar together for 3 minutes; mix in oil, then pumpkin puree.
    Stir in pecans and cranberries.
    Add flour mixture.
    Pour batter into prepared Bundt pan.
    Bake for 55 minutes at 350 degrees.
    Allow to cool in pan for 10 minutes, then invert, allowing to cool completely before glazing.

    Vanilla Glaze
    1 tablespoon unsalted butter
    4 tablespoons whole milk
    1 1/2 cups powdered sugar
    1 teaspoon vanilla extract
    1/8 teaspoon salt
    Microwave butter and 4 tablespoons milk until butter melts.  Stir in vanilla and salt.  Add powdered sugar and stir until smooth.  If glaze is too thick, add additional milk until desired consistency is reached.

    HAPPY HALLOWEEN & ARE YOU READY FOR SOME FOOTBALL????????????

    We’re HUGE football fans!  Well, it’s that time of year again! Football season is already several weeks old (where does the time go?) and that means it’s time for tailgating again at the games, serious football food and game day buffets.  Bring over your best appetizers and your biggest appetite and oh don’t forget the Brewskis to go with it all.  I like mine really cold please with a side of lime!
    Tailgating Time will be posted every Sunday at noon and open all week for you to add your football favorites. We’ll play each and every week until Superbowl Sunday. I can’t wait to see what you’ll be bringing!
    It’s Tailgating Time!
    HOSTED BY:
    Martha at Seaside Simplicity 
    Tamy at 3 sides of Crazy 
    Lyndsey at Tiny Skillet

    Would you like to be a host of Tailgating Time too? 
    Leave me a comment here with your email or with Martha over at Seaside Simplicity so we can send you the code and add you to the host list – more exposure, more links, more football food!

    Pumkpin Parmesan Pasta: The Perfect “Pre-Trick or Treat” Dinner

    Hi, everyone!  My name is Angie from Cocina Diary and today I am guest posting at this wonderful Krazy Kitchen.  Well, it is the day before Halloween and everywhere I look, all I see is Halloween decorations and candy.  This festivity immediately conjures thoughts of candy, so I immediately thought about a dessert, when deciding on a recipe for today.  But the more I thought about it, the more I moved away from that idea.  Do not get me wrong.  I love candy but too much sweetness deserves a little savory, especially around Halloween.  And so, I want to share with you my Pumpkin Parmesan Pasta.
    Here is why this pasta is such a great adult alternative for a Halloween celebration, or any other gathering.  First it is delicious and easy.  Second, it has pumpkin in it, and you can feed a crowd because the ingredients are affordable.  So, in other words: my type of recipe.  Now for the actual recipe. 
     
    You will need the following ingredients:
    • 3-4 crushed garlic cloves
    • 2 tbsp olive oil
    • 1 lb. sweet sausage.  I buy the package that already comes with the meat out of the casing, which saves time.
    • 1 cup canned pumpkin (not pumpkin pie mix)
    • 1 can, plus 2 tbsp chicken broth (If you do not want to open another can of broth, you can substitute the broth for water; here is a quick tip I use.  I freeze leftover broth in ice trays– which comes to about two tbsp.  That way I alway have it handy for recipes like this)
    • 1/4 cup half and half
    • 1/2 cup sour cream
    • a pinch of ground cloves
    • 1 1/2 tsp kosher salt
    • 1/2 tsp white pepper
    • a pinch of black pepper
    • 1 tbsp sage
    • 1 box of penne pasta (cooked al dente)
    • some parsley for garnish
    • 1/4 cup, plus 2 tbsp Parmigiano Reggiano
     Instructions:
    1. In a large skillet, over medium, heat the garlic in the olive oil. 
    2.  Add the sausage and cook until done.
    3. Once cooked, put the meat and garlic in a separate bowl.
    4.  Add the broth to the skillet to deglaze it and get those delicious bits from the bottom of the pan.
    5. Add the sour cream, half and half, pumpkin, 2 tbsp cheese, and the spices.  Let it simmer for about 10 minutes.
    6. Drain the pasta and add it to the sauce in the skillet. Also add the meat you set aside before.
    7. Simmer until the sauce starts thickening.
    8. Serve and garnish with parsley and cheese.
    This pasta has a delicate flavor, and although the sausage also adds a little bite to the flavors, it does not overpower the pumpkin flavor.  You will also find that the sauce is very creamy and delicious.  This whole dish is like a warm cozy blanket around your shoulders; it will make you smile.  And it will provide the right sustenance and energy before you go trick or treating.  🙂 I hope you enjoy it.
     
    I also want to thank the talented posse at Our Krazy Kitchen for giving me the opportunity to post one of my recipes here today.  Thanks a lot and I hope you guys like it!  Have a great weekend.