HOT WING SALAD aka VOODOO CHICKEN SALAD

Do you facebook?  I have to admit I did until this.  But, I digress, I played a few of the games while sitting on hold or watching TV late at night.  One of the things that came to mind on CAFEWORLD was, “are these real recipes?”  I did find a recipe for VOODOO CHICKEN SALAD, but it was nothing like I expected so I am making my own!


HOT WING SALAD aka VOODOO CHICKEN SALAD
Romaine Lettuce, torn and washed
1 large Heirloom tomato, diced
1 small red onion, sliced thin
4 boneless, skinless chicken breasts, cut into bite sized pieces 

2 cups Flour
1 teaspoon salt
1 teaspoon pepper
hidden valley ranch dressing mix (DRY) OR Good Seasons Italian dressing mix (DRY)

1 teaspoon lime juice
2 teaspoons lemon juice
1/2 cup crumbled Bleu Cheese
  • I prepare the chicken breasts the same as you would HOT WINGS
  • Preheat oven to 350 degrees
  • Wash and dry the chicken pieces.
  • Mix together the flour and seasonings in a plastic ziploc bag. Using a ziploc bag makes it easy to throw away the whole mess after dredging all the chicken pieces and it helps you coat every possible spot of the chicken pieces.
  • Add chicken a few pieces at a time and coat them well. Set chicken pieces aside.
  • While you’re doing this, have the butter melting in the pan. Start with 4 tablespoons and add as necessary, but make sure you don’t run out dry.
  • Once all the chicken has been dredged start frying. After you have the pan full pepper the pieces again. Don’t turn the chicken until you can see blood. You only need to turn the chicken one time. Brown evenly and then set aside on paper towels until all pieces have been fried.
  • As the last batch is frying melt 4 tablespoons of butter in a flat bowl. To that add 1/2 cup of Frank’s hot sauce.  Whisk them together well.
  • Spray a cookie sheet with PURE.
  • Dip each piece of chicken into the hot sauce mixture and put on cookie sheet.
  • After you’re all done and if you have hot sauce & butter mixture left, pour a little over the top of each wing.
  • Bake for 30 minutes.
  • Toss the torn lettuce, onion and tomatoes with the lemon and lime juice.
  • Add cooled chicken pieces and bleu cheese crumbles.
  • Pour on the desired amount of dressing and toss well.
  • Enjoy!

PORK CHOPS with RED PEPPER SAUCE

Hi Tamy here just filling for Simple Saturday.

Roasted Red Pepper Sauce
1 tablespoon olive oil
1/2 medium Vidalia onion, finely diced
3-4 cloves garlic, minced
1 1/2 cups roasted red peppers
1/2 cup fresh basil
1/4 cup white wine
1 tablespoon butter
1 tablespoon  flour
 3/4 cup whole milk
1 cup Gruyere cheese
grated Parmesan cheese and basil for topping
salt and pepper to taste
  • In a medium sauce pan, heat olive oil over medium heat.  Add onions and garlic and cook until onions are translucent and garlic is fragrant, 5-7 minutes.  Add in red peppers and basil, continuing to cook until peppers are heated through.  Stir in white wine and continue to cook for one more minute.  Remove from heat and let cool for a few minutes.  Carefully pour into a food processor.  Turn on food processor and let run until pepper mix is creamy and only has small lumps.  Set aside.
  • Rinse out the medium sauce pan and add in the butter over medium heat.  Once butter has melted, whisk in flour and continue to cook for 1-2 minutes.  Whisk in milk, stir constantly, and continue to cook until the sauce begins to thicken.  Remove from heat and stir in cheese, continually stirring until cheese has melted.  Stir in pepper mixture and return to stove stop.  Over medium low heat, return sauce to a warm temperature to serve.
  • To serve, pour over your choice of pasta and top with the Parmesan cheese and more fresh basil.
Tonight I sliced a few potatoes into a pan.  Salt and peppered them well, Tossed a few pieces of white American cheese over the potatoes.  Topped them with browned some pork chops.  Poured the sauce over top and baked at 350 degrees for an hour.  The guys all but licked their plates!

    Fire Day Friday: Southwest Twice Baked Potatoes

    These guys may be a re-post from when I first started my food blog but they are one of my favorite side dishes for grilled steaks. Plus they can be made up ahead of time and then finished on the grill indirect while the steaks rest.

    Southwest Twice-Baked New Potatoes
    Adapted from Southern Living March 2006

    2 pounds medium-size new potatoes
    1 tablespoon canola oil
    1 tablespoon kosher salt
    1/2 cup shredded Cheddar cheese
    2 tablespoon sour cream
    1 tablespoon melted butter
    2 tablespoon heavy cream
    1/2 teaspoon pepper
    1/2 teaspoon Salt
    1/2 teaspoon paprika
    1/2 poblano, anaheim, or jalapeno peppers

    Cut a thin slice from the bottom of each potato to make it flat so the potatoes will be stable. Rub them with oil and then rub with the 1 Tbsp of salt.

    Bake them at 350f just until soft to touch, about 45 minutes. Remove and let cool for about 10 minutes.

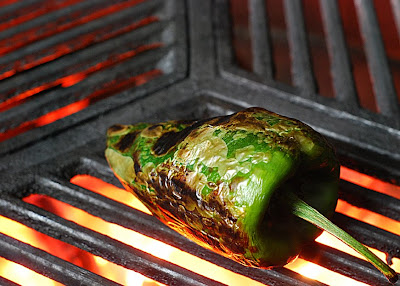
    While the potatoes are cooking, char the pepper over a hot flame until blistered. Place in a ziptop bag for 5 minutes, then peel, seed, and dice it. Use half or more of it for these recipe.

    Cut a thin slice from the top of each cooked potato. Use a melon baller or a very small spoon to carefully scoop out most of the insides of each potato to make a little bowl. Keep all of the pulp in a mixing bowl.

    Add shredded Cheddar cheese and next 6 ingredients to potato pulp in bowl and mash with a potato masher or just a fork. Mix in the diced pepper.

    Stuff some of this mixture into each potato shell.

    Bake potatoes at 350° for another 10 – 20 minutes until the tops start to turn golden.

    Garnish with your choice of more sour cream, paprika, cheese, cilantro or just about anything.

    Marinara Sauce – This Time it IS Your Italian Grandmother’s Red Gravy


    This is one of those “application” posts.  So many things you can do once you master this simple sauce…

    I like to use phrases like, “Not your Grandmothers’s…” (Like my“Not your Grandmother’s Herbes de Provence”).  Often, with availability of ingredients, new fangled cooking appliances or even building on years of other cooks experimenting, updated recipes really are better.  But also often, all you are really doing is dressing up a classic that doesn’t really need to be dressed up.

    And marinara sauce is one of those things that really doesn’t need much of a dressing up.  Tomatoes are still available fresh, but only for a little while longer.  Cheap; $2.50 a pound is the going rate for sorted, top quality, and as little as a dollar for a bag if you are willing to take fluctuating sizes, a few bruises and variations in color.  For this recipe, grab the dollar a bag ones.  In fact, grab 5 or 6 bags.  Make a big batch, freeze in bags of 1 cup size each bag and you will be very glad you did.  February is just around the corner.  I don’t think my wife will take me to the tropics this year.  But with a few bags of these in the freezer, next winter, I can take my wife to the Mediterranean.  Well, at least her taste buds.

    Need I add that this bounty all came from my Farmer’s Market.  If you missed it, I did a photo review of the Kansas City River Market.  Click HERE to see one of the best in the country.  Again… Farmer’s markets are terrific.. even this late in the season.


    And you don’t need much to make this thick rich sauce.  All “real food”, nothing zingy.  But deep rich flavors will add all the zing you need.


    1 TBS Extra Virgin Olive Oil
    4 clove Garlic, smashed and minced
    3 pounds ripe Tomatoes (a $1 bag), skins removed
    1 tsp sugar
    and a few leaves of Basil
    2 TBS “Not your Grandmother’s Herbes de Provence”   
    or, use the herbs you like, thyme, rosemary, lavender, whatever you please.  My  “Not your Grandmother’s Herbes de Provence” herb mixture works great, and since I always have a little bag of it handy, easy and fast, and is a ready made batch of the herbs I like.


    Removing the skins is an easy thing to do.  Get a pot of water boiling, and have a bowl with ice water handy.  Cut an X into the top (not the vine end, the other end)just enough to break the skin.  Plunge them into the boiling water for only 15 seconds.  You want the outside to cook just a shade, but not so hot that the inside starts to cook.  Remove and plunge into the ice bath.  The skin peals easily now.


    Smashing and mincing garlic is just as easy.  Take a wide chef’s knife, put a garlic clove between the flat of the knife and a cutting board and smash away with the flat of your hand.  Then just mince away.  Easy and fast!


    And now, once all the prep work is done, it is finally time to cook.  In a big cast iron skillet, heat the olive oil.  Add the minced garlic and sauté for just a few minutes. 


    While that is working, rough cut the tomatoes into quarters.  Be careful and don’t cut your hand, but best to quarter the tomatoes over the skillet. Every bit of juice you lose on the cutting board is just a bit less flavor.  Also, while you are cutting, remove any hard parts.  the stem end, and if the center is not ripe and red, pull it out.


    Add a little sugar, add the “Not your Grandmother’s Herbes de Provence” spices (or your own favorites) and stew away at a gentle simmer.  At a simmer, it takes about 45 minutes for the tomatoes to break down properly.  BUT, the longer you allow them to simmer, the sweeter the sauce will be.  I was doing other things around the house, and let mine cook for an hour and a half.  If you have less time, you can cook at a higher heat.  But keep an eye on them and stir often so they do not scorch.


    And here it is after the hour and a half… All bubbly, sweet and filled with flavors.  I moved this in a couple of batches into a food processor and pulsed for just a few times to break it up.  At the last minute, add some fresh minced Basil leaf.  If you want a thin sauce, pulse a lot.  If you want a thicker sauce, no real need to pulse at all.  Me, i like the smooth even look, texture and taste of a thick but not chunky sauce.


    Like This…


    Can you stand a little history???  As originally printed in theWISEGEEK.COM site…

    Marinara sauce originated with sailors in Naples in the 16th century, after the Spaniards introduced the tomato to their neighboring countries. The word marinara is derived from marinaro, which is Italian for “of the sea.” Because of this, many people mistakenly believe marinara sauce includes some type of fish or seafood. However, marinara sauce loosely translates as “the sauce of the sailors,” because it was a meatless sauce extensively used on sailing ships before modern refrigeration techniques were invented. The lack of meat and the sheer simplicity of making tasty marinara sauce were particularly appealing to the cooks on board sailing ships, because the high acid content of the tomatoes and the absence of any type of meat fat resulted in a sauce which would not easily spoil.

    Even though marinara sauce has a reputation for being easy to make at home, there are currently several hundred different types of marinara offered on the market. Perhaps the increased popularity of marinara sauce is due to recent research which revealed that cooked tomatoes are rich with lycopene, an antioxidant which may help reduce the risk of certain types of cancer.

    Written by A. B. Kelsey

     So, simple, fast, easy to make and much richer than the jars you get in the stores.  And CHEAPER!  Save a dollar here and 50 cents there, and you have the budget to buy those little extras (like Kalamata Olives that add so much extra flavor to a simple tuna casserole (well, not so simple actually)).  But, that’s a post for another day.


    And the go great with some pasta and meatballs… And that’s today’s subject of my post on my own site… Take a look


    Dave here from MY YEAR ON THE GRILL. It really is just this easy!  

     … I CAN COOK THAT! 

    And so can you!

    Shredded Chicken Sandwiches with Dr. Pepper BBQ Sauce

    I love to make my own BBQ sauce.  You can make it sweet, tangy, spicy, whatever. Most importantly, you KNOW what’s in there.
    I’ve made several different kinds of barbecue sauces.  All sorts of ways.

    This one is a bit different.

    It’s made with Dr. Pepper.
    Pop isn’t healthy. I know this.  This is why I stopped drinking it. Yup. Cold turkey. Stopped.  I don’t let my kids drink it either, unless they are at a party or something. 
    Dr. Pepper USED to be one of my favorites.

    But when I saw this recipe, it looked so intriguing, I just HAD to try it.  So forgive me, but I used Dr. Pepper in this. Get over it and try it, it’s really good.  It was quite sweet but that’s okay.  Go easier on the honey if you want.    
    You don’ taste Dr. Pepper.  If I didn’t tell you that there was Dr. Pepper in this, you wouldn’t know. Seriously.  That’s what I thought was so intriguing about it!

    I’ve seen a recipe with barbecue sauce made with rootbeer too!  Shhh. Don’t tell the Dr. Pepper.
    We ate this meal on Arnold Select Sandwich Thins for dinner.  We also had some delicious roasted cauliflower. The next couple of days, I ate it on tortillas like a wrap. Very tasty!
    Dr. Pepper Barbecue Sauce Recipe
    Adapted from Simply Recipes
    1 cups minced onion
    1 tbsp. oil
    3 cups Dr. Pepper (I used diet)
    2 cans diced tomatoes
    1 cup orange juice
    1 cup honey
    1/2 cup apple cider vinegar
    1 tsp. cayenne pepper
    Salt to taste

    Heat the oil in pan. Add onions and saute for 5 – 6 minutes.  Add the remaining ingredients and stir well.  Simmer for 30 minutes.

    Pour the sauce carefully into a blender and puree until smooth.  It’s best to work in batches and don’t fill the blender more than 1/3 full. 

    Put the sauce into pan and simmer, uncovered for 1 – 2 hours.  Stirring occasionally. Yield 4 1/2 cups.

    Pulled Chicken Sandwiches
    Boneless chicken breasts (I had 2 – 20 oz. packages)

    Cook chicken until done and shred.  Add BBQ sauce and mix together. I used 2 1/2 cups of this BBQ sauce and I froze the other 2 cups of sauce.
     
    2 Chicken Sandwiches + Roasted Cauliflower  = Very Tasty Meal!


    Check out Debbi Does Dinner Healthy for more (mostly) healthy recipes!

    Try a New Recipe: Min’s Pork Chile Verde

    For a while, we had a Schwan’s delivery guy who said he used to be chef. He said he was “Irish-Mexican” and that his dream job would be cooking on a ranch like ours. He was large, round, friendly and nice, and we talked quite a bit about food. He shared the ingredients for his “secret” Green Chile, and I wrote them down. I didn’t write down the technique, amounts, or anything else, so the first time I made this, I winged it. For a last-minute dinner for 14 hungry cowboys. Everyone loved it!

    This is a nice, filling stew, perfect for a fall day.
    Just so you know, here are all the notes I started with:
    Green Chile
    chicken stock
    roasted green chiles
    chicken bouillon
    cumin
    mexican oregano
    pork sirloins or chicken
    cornstarch to thicken (don’t if freezing)
    pureed tomatoes
    And that’s all I got. He said that green chile is “peasant food” or something to that effect, and that he used to make and serve it in a restaurant where he cooked. He also said something about feeling okay to share the “recipe” with me because I live in the middle of nowhere, basically “who are you going to tell?” Ahem.
    But, you know, I made this up as I went along, and I also added more ingredients, and completely improvised the method. So it’s not really like I divulged any big secrets here. I don’t think, anyway, given the end result.
    I pulled a 5-pound package of pork loin ribs out of the freezer, but didn’t realize that they were not boneless, but that’s all I had. That’s okay, since I was cutting the meat up anyway, I just had an extra step of removing all the bones. Incidentally, the slab of meat wouldn’t fit into our microwave for defrosting, so I did it a different way: I stuck it into the biggest frying pan I have (it didn’t all fit, some was sticking over the edge), put a cup of water in the pan and perched the lid on top of the meat. I turned it on medium to sort of “steam-thaw” it until I could get the ribs apart and cut them into bite-size pieces. It worked pretty well, I just tried not to cook the meat very much in the process. It would be much easier with advance notice (instead of, “Do you think you could make dinner for us tonight? There are 14 of us”) and having meat that was thawed.
    Yesterday, I used boneless country pork ribs that I had already thawed, so I didn’t have any pork “broth.” I just used all chicken broth instead.
    And although this started out to be a somewhat “authentic” Chile Verde, it ended up being something quite different. I embraced the “peasant food” label and ran with it, boiling and straining the pork rib bones for broth, adding ingredients that we had in the pantry to extend the recipe when I didn’t think it looked like enough to feed 14.
    It was a bit too spicy for the kids…If you’re concerned about it being too spicy, just leave out the can of jalapeños and reduce the cumin.

    Don’t forget, this recipe serves 14 with some leftover. You can half the amounts of everything if you wish, although it’s sooooo good, I don’t know why you would. Also, I always always forget to add the tomatoes at the end. I’m going to go ahead and call them “optional.” =)
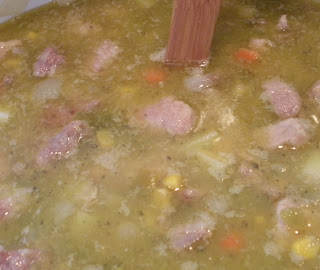
    Min’s Pork Chile Verde Stew
    serves about 14
    Butter
    Olive oil
    5 pounds boneless pork ribs
    1 cup flour
    1 1/2 yellow onions, diced (about 2 cups)
    2 carrots, peeled and cut in 1/4-inch dice
    4 cans chicken broth (2 cans if using pork “broth”)
    7 cubes chicken bouillon
    4 4-ounce cans fire-roasted diced green chiles
    1 4-ounce can fire-roasted diced jalapeños
    6 to 8 red potatoes, washed and cut in 1/4-inch dice
    1 can garbanzo beans
    1 can whole kernel corn
    1 tablespoon cumin (or to taste)
    2 teaspoons Mexican oregano, crushed
    1 can diced tomatoes (optional)
    Kosher salt and freshly ground pepper to taste
    Pour flour into a large ziploc bag. Cut pork into 1/2-inch pieces, add to ziploc bag, seal and shake to coat. Starting with two tablespoon each, add butter and olive oil to a large soup pot over medium heat. Remove pork from flour with a slotted spoon, and fry in butter and oil until golden brown and cooked through, stirring occasionally. Remove cooked pork to a plate, and repeat until all pork is cooked and on a plate, using more butter and oil as necessary in equal amounts.
    Add diced onions to the pan, along with an additional tablespoon each of butter and olive oil, if necessary. Saute over medium-low heat until onions are translucent. Add carrots, stirring in and cooking for a few minutes. Add chicken and pork broth, and chicken bouillon cubes. Return pork to the pot.
    Add everything else except tomatoes, salt and pepper, and stir well. Reduce heat to low, and simmer until potatoes are tender. Stir in tomatoes and warm through. Taste and adjust for spices, add salt and pepper if needed.
    Serve with tortillas or crusty bread on the side and plenty of Corona.
    Don’t forget to visit me at The Bad Girl’s Kitchen for more fabulous recipes!

    Save Room for Dessert..Symphony Bar Milk Chocolate Cookies

    Today’s dessert comes from Martha Stewart’s Cookies.  I’ve had it for awhile, and I have yet to try any of the recipes.  The cookie on the cover, Chewy Chocolate Gingerbread Cookies, looked delicious to me – chocolate, cinnamon, ginger, cloves, & nutmeg – a perfect combination of flavors as far as I am concerned, but I knew neither the child nor the husband would eat them, and I really wanted to bake a cookie for them to enjoy.  So, I kept looking, and I came across Milk Chocolate Cookies – perfect, except I didn’t have the requisite good-quality milk chocolate; however, I did have 2 large Symphony bars.  Good enough for me, I decided.  This is both a chewy and crunchy cookie, a perfect combination in my book.  Hope you enjoy them!
    Symphony Bar Milk Chocolate Cookies
    1 cup flour
    1/2 cup cocoa powder
    1/2 teaspoon baking soda
    1/2 teaspoon salt
    2-4.25 oz Symphony Bar with Almond & Toffee Chips
    1 stick unsalted butter
    1 1/2 cups sugar
    2 eggs
    1 teaspoon vanilla
    • Preheat oven to 325 degrees.
    • Line a cookie sheet with parchment or spray with non-stick spray.
    • In a small bowl, combine flour, cocoa, baking soda, and salt; set aside.
    • Melt together one of the Symphony bars with the stick of butter – I did this in the microwave, stirring after intervals of 30 seconds.  The cookbook says to use a double-boiler technique – your choice.  Once melted, allow the mixture to cool.
    • In a large bowl, beat together the cooled melted chocolate, sugar, eggs, and vanilla.
    • With the mixer on low, add the flour/cocoa mixture.
    • Chop the remaining Symphony bar, and add to the cookie dough. 
    • Chill for 15 minutes.
    • Using a small cookie scoop, drop cookie dough onto prepared pan.  The cookies spread, so allow at least 2″ between them.
    • Bake for 12-13 minutes at 325 degrees.
    • Allow to cool before removing from pan.
    Recipe adapted from Martha Stewart’s Cookies.

    ARE YOU READY FOR SOME FOOTBALL????????????

    We are – we’re HUGE fans!  We do a count down in August to pre-season every year and never miss a game when at all humanly possible!  Well, it’s that time of year again! Football season is already 1 week old and that means it’s time for tailgating at the games, serious football food and game day buffets.  Bring over your best appetizers and your biggest appetite and oh don’t forget the Brewskis to go with it all.  I like mine really cold please with a side of lime!
    Tailgating Time will be posted every Sunday at noon and open all week for you to add your football favorites. We’ll play each and every week until Superbowl Sunday. I can’t wait to see what you’ll be bringing!
    It’s Tailgating Time!
    HOSTED BY:
    Martha at Seaside Simplicity 
    Tamy at 3 sides of Crazy 
    Lyndsey at Tiny Skillet
    Martha at Menagerie
    Would you like to be a host of Tailgating Time too? 
    Leave me a comment here with your email or with Martha over at Seaside Simplicity so we can send you the code and add you to the host list – more exposure, more links, more football food!

    Also don’t forget that the CSN winner will be announced at Seaside Simplicity  today!

    aprons 3

    PUMPKIN WALNUT BREAD

    Hi there! I am Emily Z. from EZ’s Recipes, where I blog about my adventures in the kitchen, as well as the occasional restaurant review. I have been blogging for almost a year now and have enjoyed every minute of it. I am flattered and thrilled to be able to be a contributor to OuR KrAzy kItChEn. I will be posting here the 4th Sunday of every month.
    Fall is my favorite season. If you read my blog, you will see that clearly as I talk about it often. I feel that Fall offers so much… the pretty weather, the change in colors, the activities (football! Halloween!), and the foods. One of my favorite fall foods is pumpkin.
    This time of year also brings out my desire to use my bread maker and my crock pot. I got this recipe out of the little cookbook that came with my bread maker. I love using my bread maker! It fills the house with such lovely smells and so far I have not been disappointed with a single loaf of bread that I have made! This one included; the addition of the walnuts and the cranberries in the pumpkin bread is fantastic.
    Please also join me over at EZ’s Recipes for lots of fun and delicious recipes in between my posts here! I have some fun stuff up my sleeve for Halloween coming up, so please stay tuned!
    Ingredients:

    • 1/4 cup oil
    • 1 cup canned pumpkin
    • 2 large eggs, at room temperature
    • 1 cup brown sugar, packed
    • 2 1/4 cups unbleached all-purpose flour
    • 1 teaspoon cinnamon
    • 1/2 teaspoon allspice
    • 1/4 teaspoon nutmeg
    • 1 teaspoon salt
    • 1 teaspoon baking powder
    • 1/2 cup walnuts
    • 1/2 cup dried cranberries
    1. Place ingredients, in order listed, in bread pan fitted with kneading paddle. Place in bread maker and select Quick Bread/Cake. Press Crust and select Medium (or to taste). Press Loaf and select dough size (I generally go with 2 pound loafs myself).
    2. After batter has mixed for about 4 minutes, stir sides and bottom of bread pan with rubber spatula to ensure complete mixing. Allow to continue mixing.
    3. When cycle is completed, remove bread from machine and transfer to wire rack to cool. Bread slices best when allowed to cool. If not serving after cooling, wrap in foil to maintain freshness when completely cooled.

    The Perfect Bean Dip!

    I love bean dip and this recipe happens to be a staple for any party that I may be throwing or attending. It’s a great alternative to hummus… even though hummus is equally awesome.

    Italian White Bean Dip

    What you’ll need:
    1x 15 oz can of Cannellini beans
    1/4 cup olive oil, 1 tsp for topping
    1/2 cup basil leaves
    1/4 cup italian parsley
    1 lemon juiced
    1 garlic clove, chopped before puree
    1 tsp red pepper flakes for a kick!
    salt and freshly cracked red pepper to taste

    What you’ll do:
    Chop the garlic and herbs before putting in blender. Rinse the beans. Add all ingredients to a food processor or blender. Blend until smooth. Serve in a cute bowl and garnish with a little olive oil and some leftover herbs. Serve with pita chips. This is a crowd pleaser!

    Visit me any time at Behold the Metatron , and on Tuesday at The Motivation Station!

    Grilled Garlic Chicken with Sherry Butter Sauce

    Noooooooooooooooooooo!

    Did you just hear that?

    Fall just fell.

    Don’t get me wrong, one of the benefits of moving to East Tennessee from Florida was finally getting to enjoy a real Fall. You don’t get them in Florida. I love watching the leaves turn colors across the Great Smoky Mountains and feeling a crisp Autumn breeze. But since I like to do my cooking outdoors, I already miss having sun light until 8 or 9 in the evening.

    That just means I have to start taking steps to make cooking quicker. For example, using chicken tenderloins in this recipe for a quick grill. They are also inexpensive.


    Grilled Garlic Chicken with Sherry Butter Sauce
    Inspired by The Fresh Market & Friends Cookbook

    6 ea chicken tenderloins

    Dry rub
    1 teaspoon black pepper
    1 teaspoon granulated garlic
    1/2 teaspoon kosher salt
    1/2 teaspoon turbinado sugar

    Sherry Butter Sauce
    1/4 cup butter
    2 cloves garlic, minced
    1/4 cup sherry
    3 Tbsp water
    1 teaspoon Worcestershire sauce
    1 teaspoon coarse ground Dijon mustard

    Set up your grill for direct heat at 350f (or you could do this on the stove top over medium heat).

    Season the chicken tenderloins on both sides with the dry rub. Set aside.

    Put a sauce pan on the grill and after it is warm, melt the butter. Add the garlic and simmer for about 5 minutes. Whisk in the remaining ingredients and reduce to half. Remove and set aside.

    Turn your grill up to 450 degrees. Place the chicken on the grill and cook for 3 minutes.

    Flip and cook another 3 minutes.

    Flip, brush with some of the sauce and cook 1 minute.

    Flip, brush with some of the sauce and cook 1 last minute or until 165f internal temp.

    Plate and drizzle some of the sauce on the chicken. We served ours with a side of angel hair and sun-dried tomatoes and some of Alexis’ home made bread that I toasted.

    So tell me….
    1) What is the one summer dish that you are sorry to see sneaking out of the door and/or
    2) What Fall dish are glad to welcome?

    Mushroom/Tomato Goat Cheese Pizza and a dough recipe

    I love pizza! 
    Here’s a funny little stat… I make @8 pizzas every two weeks.  I always use a fresh baked from scratch dough.  That sounds like a lot, and it sounds like a lot of work, but nope.
    Easy as pie (pizza pie) to make your own dough.  I actually use a modified flatbread recipe (it has a small amount of yeast, but no rising time) for my dough.  I make it in a large batch, divide the batch into 4ths.  That is the perfect size to make 2 personal size pizzas.  One with my wife’s favorite toppings and one with the better toppings for me.
    Once I have the dough, I store the divides in separate ziplock bags in the fridge.  If I don’t plan to make the za’s within the two weeks, these freeze just fine.  With the aid of my kitchenaid, it takes 15 minutes to make the dough; just a little longer back when I kneaded everything by hand.  That’s a small investment in time for 8 pizzas.
    This was my lunch yesterday…
    Leftover Mushrooms sliced, 
    Leftover Tomatoes, 
    Leftover Goat Cheese 
    A sprinkling of Balsamic Vinegar
    and a sprinkling of my “Not your grandmother’s Herbes de Provence” spicemix!
    ___________________________
    If you are a novice bread maker, this pizza dough recipe is about as easy as it gets.  Just enough yeast to make the insides of the crust sweet and soft.  But crisps up nicely on the outside.  The dough goes right from the kneading process to the fridge.  So, there is no rise time to complicate the process.

    The flour and water used in the mix should be as cold as possible.  That’s what allows the yeast to flavor the bread, but keeps the flatbread… flat. 

    But I digress away from the recipe…

    4 1/2 cups chilled Flour
    1 3/4 teaspoon Salt
    1 tsp instant Yeast
    1/4 cup Olive Oil
    1 3/4 cups COLD Water (40 degrees)

    OK, did you read the 2 cold ingredients. Takes an extra hour or two of planning, I measure the water and the flour and pop them in the fridge for a couple hours to get cold. The small amount of yeast, relative to the amount of flour and the cold will make for a flat bread, almost no fermentation (rise). Just enough to soften the taste, but not make a big rise. In my pre Kitchenaid days, I mixed and kneaded this recipe in a gallon size ziplock bag. Worked great, largely I believe because of the oil in the recipe. Without that, the dough would be too sticky to mix in a bag. But this sure made clean up easy.

    Here’s what I did…

    • Mix the dry ingredients first
    • add the water and oil about a fourth of each at a time
    • mix well until all the flour is hydrated and you form a large dough ball in your bag 
    • continue kneading for about 10 minutes, or if you use your kitchenaid, use the dough hook attachment, and allow the machine to knead for 7 minutes
    • And now, time to divide… Generously sprinkle a work surface with flour. Also, prepare 4 ziplock sandwich size bags (bigger works fine as well) by spraying the insides of them with spray canola oil.
    • Plop the dough ball into the flour and coat well. Divide into 4 equal parts (or fewer if you know you are making larger pizzas). Put each dough ball into a prepared ziplock bag and refrigerate at least 6 hours, and preferably overnight. When it comes cooking time, allow the dough to reach room temp.
    When it comes cooking time, allow the dough to reach room temp.
    If you are making one big one, just roll out round and flat (actually, any shape you like).  Add your toppings and bake in a preheated 500 degree oven for 10-12 minutes.
    Not a bad lunch!
    Dave here from MY YEAR ON THE GRILL. It really is just this easy!  

     … I CAN COOK THAT! 

    And so can you!