Orange Glazed Sesame Shrimp

It’s all over but the shouting.  Day after tomorrow (Saturday), we are off to the land of OZ.  So many things I will miss.  But so many things I have missed.  When we left god’s country (Kansas), it was February and there was 6 inches of snow and temperatures were in the teens.  Looking at the forecast, the 100 degree days are done.  Fall is coming and that is my favorite time to grill and entertain.  Nothing like a crisp fall evening, grilling up something fun and ending up with S’Mores around our fire-pit.  
Yes, I loved every minute I was here. 
Yes, I can’t wait to get home.
I have had an amazing time here.  Done so many things, seen so much, and have a new stack of T-shirts to prove it.  

And I learned to stop and smell the tropical flowers.

I highly recommend everyone living on a tropical island for six months (especially if one of them is February). Puts perspective on everything.
Orange Glazed Shrimp

1 cup Sugar
1 cup Red Wine Vinegar
2 Seedless Oranges, rind removed
1 TBS Honey
1 pound large Shrimp
Sesame Seed/Sea Salt/Garlic Flake mixture to taste
  1. Combine sugar and vinegar in a small sauce pan and cook over high heat until the sugar is melted.  Add the Oranges and cook, stirring occasionally, until the mixture is reduced by half , 5 to 6 minutes.
  2. Transfer the mixture to a food processor and process until smooth.  Strain through a fine mesh strainer into a bowl.  Add the honey and season with the Salt and Pepper.
  3. Place half the glaze in a sauté pan.  Heat over medium heat and add the Shrimp.  Sauté until coated and heated.  I was using precooked shrimp, so all i was doing was heating.  Do not overcook the shrimp.  It will only take a couple of minutes.  Longer (but not much) if you are using raw shrimp.
  4. Add the sprinkle of seasonings (click HERE for the recipe of white and black sesame seeds, garlic flakes and sea salt – I LOVE it and use it for many things).  Add the sesame seed mix while the Shrimp is still in the pan.  The heat will open the seeds and add an aroma to the meal. 
Serve over rice.  The glaze can be made in advance.  Stores in the fridge for a week and can be used for lots of other foods.  How about an Orange Glazed Salmon (on the grill), or Orange Glazed Vegetables (on the grill), or Orange Glazed… Bacon (really, click HERE).

And once you Glaze Bacon with oranges, can Chocolate Covered Orange Glazed Bacon be far behind???
But That’s a post for another day.

Oh, and if you do move to a tropical island, get up early enough to see the sun rise from your deck.  It really is a great place to write your blog posts.
This really was the sunrise just 10 minutes ago, just as I was about to publish this post.  Un-retouched photo, but it looked even better in person.

See you next week from my beloved Cul de Sac

Dave here from MY YEAR ON THE GRILL. It really is just this easy!  

 … I CAN COOK THAT! 

And so can you!

POTATO OMELET MUFFINS

Potato Omelet Muffins
Ingredients:
5 medium potatoes (you could get away with 4, easily)
8 eggs or egg beaters
12 teaspoons bruschetta sauce
2 tablespoons butter or margarine
2 tablespoons olive oil
2 scallions, chopped
2 tablespoons chives, chopped (you can use dried – I ran out half way through so I added dried for the rest.)
2 slices yogurt-herb cheese or cheese of choice
1 orange pepper, diced
1/2 cup milk
1/4 cup sour cream (low-fat)
Method:
Preheat oven to 350 degrees F.
In a large skillet, put the butter and half the olive oil. Use remaining oil if needed. I used it then took another tablespoon and added it to the skillet.
Peel potatoes and shred.
Cook for three minutes, orange pepper and scallions. Add chives for one additional minute.
Remove from pan and replace with potatoes. I did three batches so not to overcrowd.
I browned the potatoes because we like them crisp. You can cook until translucent and then finish baking it, in the oven.
While potatoes are cooking, mix milk, eggs, sour cream, bruschetta sauce, and cheese.
Add peppers, scallions and chives to egg mixture.
Put potatoes on the side.
I did it again. I forgot the bruschetta. I had already filled a few muffin inserts so I put a piece of bruschetta on top of each and then poured the rest into the egg mixture. It added a great flavor to this. You could use liquid cayenne (hot pepper sauce) instead but I am not sure how much you would need since I chose not to use it. You can add heat to this if you like your food hot.
Take potatoes and put them on the bottom of each insert.
Using an ice cream scoop or ladle, scoop the mixture into each muffin compartment.
Bake for 30 minutes. I put a sharp knife in the middle of a few, like we do for baked goods, to make sure I did not have soft eggs. They came out dry but barely dry, the way I would want it to be.

BOHEMIAN PORK CHOPS aka PORK CHOPS IN BEER GRAVY and a drum roll please…

Let’s start the day off with our big CSN giveaway winner.  Drum roll please…

The winner is Julie from Mommie Cooks!
Congratulations!

This was from another scrap of recipe I found in gram’s things.  I don’t know if she ever made it, but pork chops and beer in the same sentence got hubby’s interest and so we had some fun experimenting with this recipe.

BOHEMIAN PORK CHOPS aka PORK CHOPS IN BEER GRAVY
4-6 thick boneless pork chops
1 small onion, cut into thin rings
1 stalk celery, chopped
3 tablespoons flour
salt and pepper to taste
2 tablespoons butter
2/3 cup water
1 beer ~ your favorite flavor
  • In a large skillet, melt butter.
  • Brown pork chops, generously salting and peppering.
  • Remove pork chops, keep warm.
  • Saute’ onion and celery until soft and translucent.
  • Add flour, stirring until golden.
  • Add water, stirring until well blended.
  • Add beer and simmer until begins to thicken.
  • Add pork chops back in and heat through.
aprons 3

Cooking The Italian Way – Zucchini-Sausage Pizza

Posted by Joanne of Eats Well With Others
Zucchinis don’t understand the concept of personal space.
They grow and grow and grow.  Until they are sleeping next to you in your bed at night.  Whispering sweet nothings into your ear.  Trying to explain that, sorry, they have grown out of the garden and could you please move over and make a little room?
At times like these.  You know you have to take matters into your own hands. 
So roll up your sleeves.  Pull the yeast out of your fridge.  And get kneading.
It’s pizza time.
Pizza Dough
Makes 1 12-inch pie, adapted from The Minimalist 
3 cups all purpose flour
1 tablespoon yeast
2 teaspoon coarse sea salt
1 cup water
2 tablespoon roasted garlic-infused olive oil
1. In a small bowl, mix together the yeast with 1/4 cup lukewarm water.  Add a pinch of sugar.
2. In a large bowl, mix together the flour and sea salt.  Add in the olive oil, 3/4 cup lukewarm water, and yeast.  Stir with a wooden spoon until the dough gets too stiff, then incorporate the rest of the flour with your hands.  Knead for 5-10 minutes.  Cover with a damp cloth and let rise for 2 hours.
3. Flour the dough, form it into a ball and let it rise on a floured surface, covered with a damp cloth, for 20 minutes.  Stretch out on a pizza peel, parchment paper, or baking sheet.
Zucchini-Sausage Pizza
Serves 4, adapted from The Minimalist 
3 medium zucchini, sliced thinly
coarse sea salt
2 spicy Italian turkey sausage links, cases removed
1/4 cup parmesan cheese
freshly ground pepper
1. Preheat the oven to 500 degrees, with your baking stone already inside the oven (if using).
2. Mix the zucchini with the salt in a large bowl and let sit for 20 minutes.  In the meantime, heat a small nonstick skillet and saute the sausage, breaking it into crumbles with spatula as you go, until it is cooked through,
3. Rinse the zucchini and pat dry.  Layer the zucchini slices on your pizza dough.  Sprinkle the sausage on top, along with a tad bit of salt, some Parmesan cheese, and freshly ground pepper.
4. Bake for 15 minutes or until nicely browned.

Grilling Tip: Coarse Language

When it comes to grilling and fire roasting, sometimes being “less refined” is better. I like to use much more coarse ingredients in my rubs. I just think that the more intense heat of live fire cooking brings out the rich flavors of chunky ingredients that ground spices just can’t deliver.
Take for example this recipe for Cajun Pork Roast from the National Pork Board.

2-pound pork loin roast
3 tablespoons paprika
1/2 teaspoon cayenne pepper
1 tablespoon garlic powder
2 teaspoons thyme
2 teaspoons oregano
1/2 teaspoon salt
1/2 teaspoon white pepper
1/2 teaspoon cumin
1/4 teaspoon nutmeg

Combine all seasonings and rub well over all surfaces of roast. Place roast in shallow pan and roast in 350 degree F. oven for about 45 minutes, until internal temperature on a thermometer reads 150 degrees F. Remove roast from oven; let rest until temperature reaches 160 degrees F, about 10 minutes before slicing.

The first time I ever made this, I just used powdered spices and it was very good. But since then, I began to adjust it using coarser ingredients. The slight adjustments make a much heartier and more flavorful dish.
3 tablespoons paprika
1/2 teaspoon cayenne pepper (use 1 teaspoon of red pepper flakes instead)
1 tablespoon garlic powder (use 1/2 Tbsp of garlic powder and 1/2 Tbsp of dried minced garlic)
2 teaspoons thyme (use fresh that was dried for a few days and then crumbled)
2 teaspoons oregano (use fresh that was dried for a few days and then crumbled)
1/2 teaspoon salt (use the most coarse grain you can find)
1/2 teaspoon white pepper
1/2 teaspoon cumin
1/4 teaspoon nutmeg (fresh ground)
These little adjustments give you a rub that instead of being a dusty powder, looks like this…

It adds more texture…

And amplifies the flavors of the final dish.

So the next time you are grilling out, give this tip a try. Look at your dry rub ingredients and consider how you can make them “chunkier”. I think you’ll be glad you did.
[Please excuse this rehash of a dish I’ve made several times before. My outdoor kitchen is being demolished and rebuilt this week.]

PASTA CAKE

Believe it or not, this is now one of my “comes together fast and is worthy of serving to guests” presentation recipes…

It really does come together fast.  It takes a little practice to get the shells stuffed, especially with just a ziplock bag.  Would take half the time if you used a pastry bag and wide tip.  But I am ahead of myself…

It really is easy, comes together fast and makes a great presentation…

Here’s what I did…

1 Box Rigatoni, cooked VERY al dente
some raw Spinach, washed, stems removed,
or 1 package of frozen cooked spinach (thawed)
1 pound spicy Italian Sausage, browned
1 tub of Ricotta Cheese
14 ounce jar of Marinara Sauce
1/2 pound of shredded Mozarella Cheese1/2 pound of sliced Mozzarella Cheese

Make do with what you have.  The original version of this recipe calls for the meal to be made in a springform cake pan.  So you build the layers from the bottom up.  I do not have a springform  cake pan here.  I do have an odd shaped pan that is mostly flat on the bottom.  But the sides do not easily remove like a springform pan.  So, I decided to try an upside down cake, build the layers from the top up and flip when the cake is cooked.

Put your rigatoni on to boil.  This is important, you want the pasta underdone.  The box says 10-12 minutes.  I cooked mine only 6 minutes.  It was perfect for what I wanted, which was cooked pasta, but still retains it’s shape.  You will see why in a minute…

Meanwhile, I browned the sausage, and layered the bottom of my pan with the sausage.  I added a thick layer of spinach (it will cook down thin when the cake is done).

Next stand up the barely cooked rigatoni.  
Next up, you want to stuff the shells with the ricotta cheese.  Using a pastry bag with a long tip would work great.  My pastry bag with long tip is in Kansas.  I put the cheese is a ziplock bag, cut just a tiny end of one corner and squeezed a bit into each shell.  Worked fine.

Next, I added a layer of Mozzarella Cheese.  This layer of cheese will hold the whole thing together when it cools, and is very important.  Be sure to put a good bit around the edges. 

Add the Marinara Sauce over the top and spread it around.  As the cake cooks, the sauce will blend into the ricotta cheese and ooze into the shells nicely.

Pop this into a pre-heated 350 degree oven for 30 minutes.

The grease from the sausage will keep it from sticking, but the sides need to have a knife sliced around the sides so it pops out easily…

Put a plate on it, flip over and viola!

I did add at least 1/2 a pound of Mozzarella Cheese, and pop that under the broiler till the cheese melted and browned nicely.

Slices like a cake… Almost like a lasagne cake!

Dave here from MY YEAR ON THE GRILL. It really is just this easy!  

 … I CAN COOK THAT! 

And so can you!

APRICOT PINEAPPLE MONKEY BREAD

APRICOT PINEAPPLE MONKEY BREAD*
BREAD
1 cup scalded milk
1/2 cup shortening
1/2 cup sugar
1teaspoon salt
1/2 cup golden raisins
1/4 cup rum
1/2 cup minced walnuts
2 packages dry yeast
1/2 cup warm water
2 Jumbo eggs, beaten
4 1/2 – 5 cups flour
TOPPING
20 ounce can crushed pineapple, drained well
4 tablespoons butter
1/2 cup light brown sugar, super firmly packed
1/2 cup apricot pineapple preserves**
1/2 teaspoon almond extract
1/2+ teaspoon cinnamon
1/2 cup golden raisins*
1/4 cup rum*

  • Soften the yeast in the warm water.
  • Stir together the sugar and cinnamon and set aside.
  • Soak the raisins in the rum until needed. Drain before adding to the bread.
  • Combine the milk, shortening, sugar and salt. Cool to lukewarm.
  • Add yeast to milk mixture and then the eggs, the raisins and nuts.
  • Add the flour. Mix to a soft dough.
  • Knead on a lightly floured surface until smooth and elastic. Place in a greased bowl. Turn over once, cover with a cheesecloth and let rise until double in size.
  • Punch down and let stand ten minutes.
  • Prepare the topping while the dough is standing.
  • Melt the butter in a saucepan.
  • Add the preserves, brown sugar, cinnamon and almond extract. Cook until smooth and fairly thin.
  • Add the pineapple (and raisins if you’re using refrigerator rolls) and heat through.
  • Roll into many small balls about the size of golf balls.
  • Grease a Bundt cake pan. (I like to use my pineapple upside down cake pan.
  • Arrange a layer of the balls haphazardly in the cake pan.
  • Dribble about half the topping loosely over them.
  • Arrange the other half of the dough balls.
  • Pour remaining sauce over top.
  • Allow to rise until double in size (about 1 1/4-1 1/2 hours)
  • Bake at 350 degrees for 35-45 minutes.
  • Enjoy

*You can cheat and use 3 cans of refrigerator biscuits instead if you’re in a hurry. If you still want the raisins you can add them to the topping instead.
**You can use pretty much any flavor you want – I also use raspberry, peach and blackberry depending on my mood. A lot of times I combine the peach and blackberry half and half.

SIMPLY DELICIOUS SUNDAY ~ ENCHILADAS RANCHERAS LASAGNA

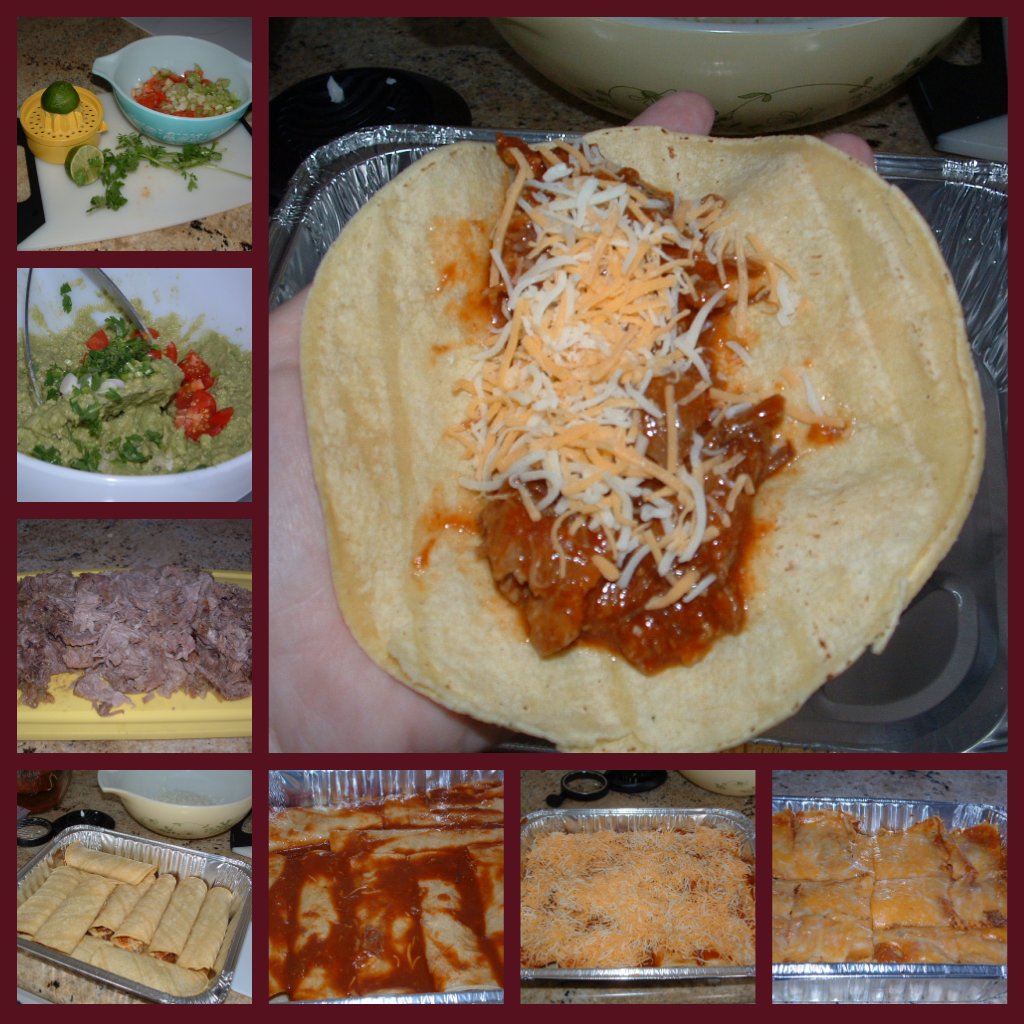
So do you know what the first step is in making Enchiladas Rancheras is?  To make a pot roast one day and pork carnitas the next of course.  I’ve made these enchiladas for years but always find the best flavor comes from using leftover pot roast & leftover pork carnitas in tandem along with fresh made tortillas and tomato sauce.  I’d like to say I made these tortillas, but I ran out of time with company coming and purchased  them from a local market who makes them fresh in the store.  I just love watching those girls work!
ENCHILADAS RANCHERAS
Shredded beef
4 large tomatoes,sliced
3 cloves garlic, smashed
1 teaspoon sea salt
1 teaspoon white pepper
1 large can can chopped green chiles
2 cups shredded cheese (I like a combo of jalapeno cheddar and Monterey jack)
tortillas
PURE
  • Preheat oven to 350 degrees.
  • Spray baking dish with PURE.
  • Roast tomatoes until crushable.
  • Add green chiles and garlic until well blended.
  • Stir in salt and pepper.
  • Puree’.
  • Split sauce in half.
  • Soak shredded meat for at least an hour in the sauce (though I prefer over night).
  • Spread your tortilla lightly with some of the tomato sauce.  
  • Fill with meat and sprinkle with cheese.
  • Roll up and place in baking dish.
  • When full, pour remaining sauce over the enchiladas.**
  • Top with remaining cheese.
  • Bake for 30 minutes.
  • Serve with GARDEN TOMATO SALSA and Fresh Guacamole.
**This time I was trying to feed a full house and was running out of refrigerator space so I tried something new and made 2 layers in the same pan and made a casserole out of it – worked like a dream.  We just called it Lasagna cut it into squares and everyone was happy.

Simple Saturday: One of the best pizzas ever!

Hi friends, long time no see. It’s me, Martha (MM) here to bring you today’s simple meal.
Most of you know I love to cook, but with my super busy schedule I’m very much into meals that are quick and easy while still delicious. As a result I’ve also become a master of meal stretching – cooking a little extra and planning creatively with leftovers. Not only does it make for quick meal preparation, but it’s also very frugal, nothing goes to waste in my house.
Today’s featured pizza was a quick throw-together pizza made using up small amounts of leftovers. I had no idea how it was going to turn out. Trust me, I am not kidding when I say it’s one of the very best pizzas I’ve ever had in my life – and I am extremely picky about my pizza! This one is definitely going onto my “family favorites” list, it’s really that good!

I used a very basic homemade pizza dough or you could use store bought or even premade pizza crusts. This was perfect on a thin crust – quick tip, be sure to let pizza dough come to room temp before trying to work with it.
  • Spread dough thinly and evenly on a large greased cookie sheet (or pizza stone).
  • Spread a light layer of pesto (homemade or from a jar, either will work fine)
  • Top with a thin layer of mozzarella cheese
  • Add a light sprinkle of sharp cheddar cheese
  • Add a layer of finely chopped chicken breast
  • Add some very thinly sliced and then rough chopped tomatoes
  • Top with partially cooked crumbled bacon (or use the precooked bacon like I did 🙂
Bake at 425 for about 10 minutes, cut, enjoy! Seriously one of the most delicious pizzas ever – try it!
b235e5b9-1bd8-482e-91c6-8aed9185d666
1.03.01

Fireday Friday: Beef And Swiss Meat Pies

This is a savory meat pie that is based on one of my favorite childhood meals. I love this because it is easy to make, it is easily adaptable to a variety of ingredients, and you can even get the kids involved.

Don’t worry if you don’t have a Big Green Egg or grill, you can easily do this one in your oven too.

Beef & Swiss Meat Pies
Ingredients

1 pound Ground beef

1/2 ea Vidalia onion chopped fine

1/4 ea Green bell pepper chopped fine

Salt to taste

Pepper to taste

2 ea Cans of refrigerated biscuits

10 slices Baby swiss cheese

Instructions

In a preheated skillet, brown the meat, onion and bell pepper. Drain well.

Flour a surface, take two biscuits, overlap them and then roll them out into a figure 8.


Spoon about 3 tablespoons of the meat mixture onto on half of the dough and top with sliced cheese.

Pull and stretch the empty side over and onto the mixture. We find it helps to slightly moisten the edge of the dough with water first. Then crimp the pie closed with a fork.


Bake the pies at 425 for 8-10 minutes each, until golden brown all over.

If you’re using the a ceramic cooker like the Big Green Egg, set it up with the plate setter LEGS DOWN with a pizza stone on top. If you’re using an oven, a pizza stone would help but you can use a baking sheet if that’s what you have. If you don’t preheat the stone, the bottom of the pies will be a bit doughy, so take your time and preheat!

Other versions:

Cheeseburger turnover: meat, onion, & American cheese

Taco turnover: meat, onion, taco seasoning, and pepper jack cheese. Dip in taco sauce.

Gyro Turnover: gyro meat (google Alton Brown gyro), red onion, & feta cheese. Dip in tzatziki sauce.

Club Turnover: ground turkey, bacon crumbles, small diced tomato. Dip in a flavored mayo.