Polenta with Talegio Cheese ala Year on the Grill via “the Long Quiche Goodbye”

Good Morning…

I’m older than dirt, but learning every day.

But, I am too lazy, too unfocused and too undisciplined to go back to school (don’t really know what I want to be when I grow up, but that’s another story).

I am a BIG fan of murder mysteries and what I like to call “Gentle Learning”.  here’s what I wrote just a couple days ago…
(3 is a magic number).

There is a NEW murder mystery series just released.  I can’t imagine anything more exciting than an authors first published book.  Avery Aames has authored, “The Long Quiche Goodbye”.  That’s the first in a planned series of books set in the cheese shop (Fromagerie Bessesse is the actual name, but everyone in town calls it “The cheese Shop”).

I was very excited when I first heard of Avery’s book.  First, she is “one of us”.  Some of you may know her as one of the Six merry murderesses from The Mystery Lover’s Kitchen.  All six of the contributing authors of the blog are published authors, all mysteries, and all their books have food themes, most with recipes included in their books.  The blog posts daily, with recipes and glimpses into their lives.  Fun daily read (and for contest whores fans among us, they have more give aways than any other blog I know of… but I digress).  My fellow bloggers out there, if/when you get a book deal, sign me up as the first to buy.  We should support our own!

But my new found blog buddy’s setting for the series really turned my crank.  I am pretty good with basic cheese knowledge.  I no longer buy bags of shredded cheese (the more air that gets to the cheese, the faster it losses it’s taste and goes bad, shredding adds surface area, so more air gets to the cheese… buy the bricks and shred yourself, cheaper, tastes better and stays fresh longer… but I digress).  I also buy “real” cheese, and not the low fat versions (half the amount of “real” cheese will add a fuller flavor than twice the amount of the less tasty substitute.  Half the amount is the tastiest way to cut the calories, not pretending you are getting the same taste… But now I am ranting and digressing… Back to “the long Quiche Goodbye”).  But aside from the basics, I still buy most of my cheeses from the tiny cheese section of my store.  My knowledge of better quality cheeses is lacking.  Much the way people of my generation still hum “3 is a magic number”, soft education is a great way to learn without the burden of schooling (extra points if you caught the “Schoolhouse Rocks” reference.  That’s where I was gently educated about math, while watching the Wonder Twins powers activate.  

Do you think the “Cheese Shop Mystery series” will do for cheese what Schoolhouse Rock did to teach me how a bill becomes a law???).  

And sure enough, in one of the recipes Avery provides in the book, I traveled to the only cheese shop on the island and found a new (well, it is at least 11 centuries old, but new to me) cheese… Taleggio Cheese 

And WHOOP de DO, do I ever LOVE Taleggio Cheese!  Think Brie with an attitude. Taleggio melts like brie, so I imagine just about any recipe you have for brie you can sub Taleggio.  But where Brie is a mild gentle cheese, Taleggio will take you down, slap you around and leave you begging for more.  I did a little research (see, learning every day) and found that Taleggio is more related to Limburger (the stinky one) than Brie.  While this doesn’t stink, it certainly does have an oder.  Strong earth scents, makes for a strong nutty taste.

Hunting the cheese down was surprisingly easy.  There is one and only one specialty cheese shop on the island. Center shelf, center of the shelf, and there it was!  I asked the cheese monger for a sample, and was in love. Surprisingly cheap, $16 for a pound, I only needed a small amount (the recipe calls for a garnish of the cheese, so no more than 1/8th pound really needed if you follow the recipe (of course, I didn’t)).  I bought 1/2 a pound, planning to use it for several recipes during the week.

Aren’t cheese shops wonderful places… Just ask, and they will happily slice you off a sample of something that sounds interesting.  I feel a little guilty that it has taken so long for me to leave the safety of the big grocery store here, with their sampling of maybe 7 or 8 cheeses.  Be a cook, don’t be intimidated… Find something new!

OK… Time for the recipe…

First, here’s Avery’s version from The Mystery Lover’s Kitchen.
POLENTA AND TALEGGIO-BASIL
[6-8 portions]
4 cups water

1 tsp. salt

1 cup polenta corn meal

1 cup fresh basil leaves separated

2-4 Tbs. extra-virgin olive oil

8 oz. Taleggio cheese, thinly sliced
Bring water and salt to a boil.
Add polenta corn meal in a thin stream. Keep stirring until corn meal pulls away from sides of pan. (No lumps)Turn down heat to simmer for 25 minutes, stirring every 5 minutes or so.
While it is cooking, stir-fry the basil in olive oil until crispy, then drain on paper towels.
Spoon hot polenta on to each plate. Lay a couple of slices of Taleggio cheese on each portion and finish with the fried basil.
I just couldn’t resist…

Here’s my changes, I LOVE polenta.  But, on it’s own, it doesn’t have much of a taste.  Looking over the recipe, the polenta Avery puts out is unflavored.  She is more generous with the slices of cheese.  It does melt fast and well, so her polenta will certainly have that strong earthy taste I talked about.

But I wanted my flavor in the polenta, not topped…

First, I wanted a stronger Basil taste than just a garnish.  Here’s a Bobby Flay trick to slice thin strips of basil leaves…

Gather a half dozen basil leaves…

Lay them one on top of the other and roll into a tight tube.

Slice the tube lengthwise in half.

Cut thin strip from the end and in less than a minute, nicely cut thin strip of Basil that goes right into the polenta as it cooks…

I also wanted a stronger taste of the cheese.

It melts just fine.

So I added 1/4 pound of the cheese right into the cooking polenta (see top left photo).

I continued to stir during the cooking process… And it all mixed perfectly!

One other suggestion, Polenta cuts nicely.  If you have cookie cutters, they can be used to make nice shapes.  Or, if you don’t have cookie cutters, I just used a glass to get nice round shape.

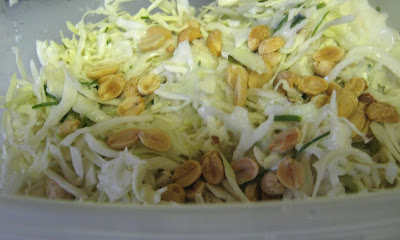
I served this on a bed of OHIO PESTO, made with walnuts.  This also has a stronger, earthier, nuttier taste than pine nut pesto.  Complimented the cheese perfectly!


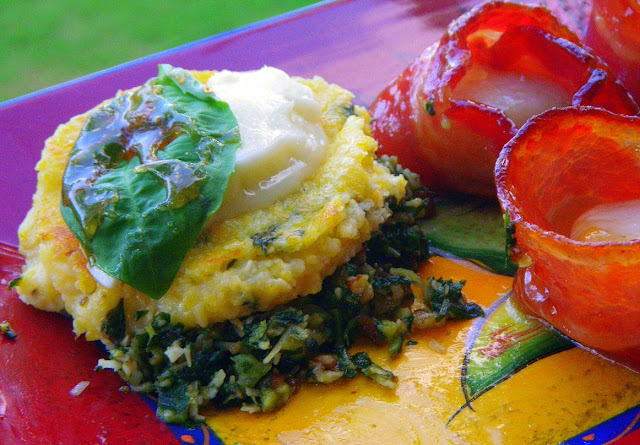
I served this up with some Sea Scallops wrapped in Mango Glazed Bacon

Oh MY!

Dave here from MY YEAR ON THE GRILL. It really is just this easy!  

 … I CAN COOK THAT! 

And so can you!

Cabbage Salad with Peanuts- Quick and Easy

I usually keep a bag of shredded cabbage in the refrigerator.  It is versatile enough, to come up with lots of good recipes.  It is delicious with the peanuts, as it is with any kind of nut.  It adds a nice crunch to the slaw.
Cabbage Salad with Peanuts
Ingredients:
4 cups of shredded  cabbage
Dressing
3/4 cup mayonnaise
1/4 cup sugar
2 tablespoons apple cider vinegar
dash of pepper
1/2 teaspoon salt
……………
1/2 cup peanuts
Method:
Place cabbage in a large bowl and set aside.
Mix all dressing ingredients in a small bowl.
Combine cabbage and dressing.  Mix to coat all of slaw.
Add the peanuts and presto, you have cole slaw.
Quick and easy….
Share your meatless recipes at My Sweet and Savory.  The link stays open throughout the week.  Many people are cutting down on their meat meals.  Share with them. 

Try a New Recipe: Crepes

Don’t forget to visit me at The Bad Girl’s Kitchen for more fabulous recipes!

Bonjour!!!

As this recipe posts, my family and I will be flying over the ocean, on our way to….
PARIS!!!
We’ll arrive today just before noon, Paris time, which means only one thing: It will be Time To Eat!!! I’m very excited. But I just want you to know, I’m not kRaZy enough to post recipes while I’m actually in France, so these next few weeks I’ve done my best to come up with some recipes for French-ish food we love.
When I return, I’ll fill you in on all our luscious culinary adventures. (and it’s possible I’ll sneak in a comment or two while I’m abroad, but don’t count on it!)
So let’s start with crepes. I am looking forward to eating some of these for sure. We love crepes! They are easy to make, and so delicious. This recipe makes quite a lot of them.

We serve ours with several different toppings, depending on what we’ve got: sliced strawberries, peaches, cottage cheese, Mexican crema (table cream), maple syrup, and bananas sauteed in butter, brown sugar and a splash of rum.


Crepes
1 cup milk
6 eggs
1 stick butter, melted
1 cup flour

In blender, mix milk and eggs, mix in flour, then blend in melted butter. Cook on greased medium hot crepe pan. Pour about 1/3 cup batter quickly onto hot crepe pan, quickly tilting pan to cover the entire surface. Cook on one side until beginning to brown, then quickly flip and cook for a few more seconds. This is a fast process that you will need to practice to get the hang of, and the first few crepes never, ever turn out quite right. Just keep after it, and they’ll start to turn out. Serve right away, or you can refrigerate or freeze them for another time.

NUTTY MUSHROOM CASHEW CHICKEN

NUTTY MUSHROOM CASHEW CHICKEN
4 chicken breast halves, cut into bite sized pieces
1 small bunch green onions, sliced
1 ounce dehydrated Maitake mushrooms, re-hydrated and then chopped
1 tablespoon canola oil
1 tablespoon brown sugar
4 tablespoons cornstarch, divided
½ teaspoon sea salt
¼ cup soy sauce
1 teaspoon rice wine vinegar
1 teaspoon Worcestershire sauce
3 tablespoons oil
2 cup hot chicken broth
2 teaspoon lemon juice
½ cup cashews
cooked rice
  • Heat canola oil over medium high heat until JUST sizzling.
  • Saute’ green onions and mushrooms until tender. Using a slotted spoon remove onions and Maitake mushrooms to drain on paper towels.
  • Stir fry chicken in hot oil in frying pan or wok until chicken is lightly brown and tender, about 8 minutes. 
  • Remove chicken from oil and drain excess oil from the pan. 
  • Whisk together the brown sugar, cornstarch, salt, soy sauce, vinegar, and  the  Worcestershire sauce. 
  • Blend well, then add chicken stock to the pan and bring to a boil, stirring constantly. Cook until thickened. 
  • Add lemon juice; add chicken pieces, onions and mushrooms and reheat. Do not boil
  • Taste to correct seasonings. 
  • Add cashews. 
  • Serve over hot rice.
He all but licked his plate!

Don’t forget to enter the new giveaway!

Veggie Tales by Kris! Pasta Time!

I love pasta. I think that it’s safe to say that I have an obsession with it. I love coming up with new ways to incorporate vegetables into my pasta dishes, and here is my latest creation! Have a great weekend and enjoy!
Angel Hair with Shaved Carrot and Zucchini Ribbons
{serves 4-5 hungry Italians!}
What you need:
1 box/lb of Angel hair pasta
1 bay leaf
1/2 cup pasta water
1/4 cup, 2 tablespoons olive oil
5-6 large garlic cloves, thinly sliced
1 teaspoon red pepper flakes
sea salt and pepper to taste
2 large carrots, peeled and shaved in ribbons
1 summer squash, shaved into ribbons
2 pinches dried oregano
3/4 cup white wine
1 lemon juiced, zest
1/2 cup freshly chopped parsley
1/2 cup freshly chopped basil
1/2 cup, plus extra garnish Parmesan cheese

What you’ll do:
  • Boil water for pasta. Salt it and add bay leaf. Add pasta and cook until al dente. About 7-8 minutes. Angel hair is quicker than other pastas.
  • Meanwhile, in a LARGE saucepan heat 2 tablespoon oil. Add pepper flakes. Cook for 1 minute.
  • Add carrot and zucchini ribbon shavings. Salt and pepper the veggies.
  • Add the oregano. Cook for 4-5 minutes.
  • Add in garlic and white wine. Bring to simmer for about 10 minutes. Let the alcohol cook down.
  • Add lemon juice and zest. Cook for another 3-5 minutes. When pasta is done, save 1/2 cup of the water.
  • Drain pasta and discard bay leaf. Transfer pasta to a large bowl.
  • Add 1/4 cup olive oil, 1/2 cup parmesan, salt and pepper and stir up so that pasta is flavored and coated.
  • Dump the veggie mixture over the pasta.
  • Add in fresh herbs and toss.
  • Transfer helping to serving dishes and garnish with any extra herbs and cheese. DELISH!

Mexican ‘Fondue’ with Chorizo & Tomatillo Salsa

When you are grilling for guests, people are always hungry before the food is ready so I’m always on the prowl for good appetizers to keep the wolves at bay while I’m finishing on the grill.
I had some Mexican chorizo sausage that I needed to use tonight and wanted to try something I had not made before. I decided to try this dish that I saw on Serious Eats a while back.

Mexican ‘Fondue’ with Chorizo & Tomatillo Salsa
adapted from Serious Eats
4 ea flour or corn tortillas
1 1/2 cup monterey jack cheese, shredded
1/2 cup queso Cotija, aneejo, or manchego, grated
1/2 lb Mexican chorizo
tomatillo salsa
1 avocado, sliced
Cut each tortilla into 6ths with a pizza cutter. Spray or brush lightly with olive oil and bake 7 minutes in a 400f oven until crisp.

Crumble and brown the chorizo in a hot skillet. Drain.
Reduce oven heat to 375f. In a small oven proof dish, spread half the cheese and bake until the cheese begins melting, about 5 minutes.
For the manchego, I used Cumberland cheese from local Locust Grove Farm. It is their manchego cheese base with green peppercorns, sweet red chili’s, onion, garlic, and ginger. Yeah, how awesome is that?

Top with the cooked and drained chorizo. Top that with the rest of the cheese mix. Bake for another 5-7 minutes until the top layer of cheese is melted.
Finish for a minute under a broiler but we forgot that part.
Serve with the tomatillo salsa, chips, and avocado.

While the flavor was very good, I would have liked for the texture to be a little more “saucy”. Next time I’d probably take half of the cheese and melt it into a white sauce to make a cheese sauce to pour over the chorizo and cheese.

Save Room For Dessert ~ Raspberry Pineapple Cheese Bars

Raspberry Pineapple Cheese Bars
6 tablespoons butter, softened
1/3 cup packed brown sugar
1/4 cup flour
1/4 cup crushed vanilla wafer crumbs
1/2 cup finely minced walnuts
1-8 ounce crushed pineapple
1-8 ounce raspberry cream cheese spread, softened
1/4 cup sugar
1 JUMBO egg
3 tablespoons cornstarch
1/4 cup +/- shredded coconut

  • Preheat oven to 350 degrees.
  • Beat butter and brown sugar until well blended.
  • Add flour, vanilla cookie crumbs and walnuts and mix until well blended.
  • Spray the bottom of 9×9 baking dish with PURE.
  • Press cookie crumb mixture into the bottom.
  • Bake 10 minutes. Cool.
  • Drain pineapple reserving the juice.
  • Beat cream cheese and pineapple juice together until smooth. Add sugar and egg and beat again until smooth.
  • Fold in the pineapple.
  • Pour over the crust.
  • Sprinkle with the coconut.
  • Bake 20-22 minutes.
  • Cool completely.
  • Cut into bars.
We are looking for an avid foodie to host this meme on Mondays. If you are interested, please leave a comment on this post and Martha or I will get back to you ASAP.

Cheers… Creamsicle Ice Cream Drink (hic)

It’s been a couple months since I posted a drink recipe.

With summer temps reaching their highs for the year during the next couple weeks in many areas, now more than ever we need…

ICE CREAM AND BOOZE with a splash of nostalgia.

Remember these guys???

That terrific taste of orange and ice cream on a stick.  Loved em, and missed em…

Till Now!

Only three ingredients…

make 2 drinks
(or only one if you can hide them from your wife while you are grilling)

1/2 cup Orange Juice
3 good size scoops of Ice Cream
2 shots of Creme de Banana Liquor

Plop everything into a blender…
Blend away for @30 seconds.

If you want a thicker drink, add more ice cream.

More orange taste, add more Orange Juice.

In fact, there is a virgin version of this drink…

1/2 cup Orange Juice
3 good size scoops of Ice Cream
1 pealed Banana 

You may need to blend this virgin version longer to get everything smooth.

And when you drink these, plug in that CD of steel drum music that you bought when you were on a cruise.

It just does not sound as good without the ocean in the background.

Dave here from MY YEAR ON THE GRILL. It really is just this easy!  

 … I CAN COOK THAT! 

And so can you!

DEVIL’S FOOD ORANGE CAKE with ORANGE BUTTERCREAM FROSTING

Hi Tamy here filling in for Jen this morning and I thought I’d share one of my niece’s favorite cakes with you.
Save Room for dessert new badge


I don’t seem to have a picture of the iced cake, but it was yummy!

CAKE

4 medium navel oranges, room temperature
3 squares unsweetened chocolate
1 1/2 cups sugar
1 teaspoon ground cinnamon
1 teaspoon baking soda
1/2 cup vegetable shortening
2 Jumbo eggs
1 cup whole milk
2 cups flour

  • Heat oven to 325 degrees.
  • Generously grease a Bundt pan (I like a decorative Nordicware or Wilton pan)
  • Squeeze oranges, saving pulp
  • Melt the chocolate in the microwave. Then add 1/2 cup of the sugar, the cinnamon and 1/2 cup of the orange juice, stirring until the sugar is dissolved. Cool.
  • Mix the baking soda into 2 teaspoons of orange juice.
  • In a large mixing bowl cream the shortening with 1 cup sugar. Add eggs one at a time, beating well after each.
  • Alternate the milk and flour, sifting the flour into the cream mixture and blend until smooth.
  • Add the baking soda mixture and blend well.
  • Add the cooled chocolate mixture and blend well.
  • Pour the batter into the prepared pan.
  • Level pan by dropping on counter top to remove air bubbles.
  • Bake until springy 55-60 minutes.
  • Cool 10 minutes and then invert onto platter.
  • Cool before frosting.
FROSTING

1/2 cup butter, softened
5 cups sifted powdered sugar
1 1/2 teaspoon vanilla
1/3 cup freshly squeezed orange juice, pulp and all
2 teaspoon orange zest

  • Beat butter until fluffy.
  • Beat in 1/2 of the powdered sugar until smooth.
  • Add orange juice, vanilla and orange peel. Blend until smooth.
  • Slowly add the remaining sugar and blend until silky.
  • Adjust sugar and orange juice until desired consistency and flavor is reached.
If you don’t have this mess in the end,
you did it wrong!
aprons 3

Thai Shrimp Curry Over Rice Noodles

Cool Lassie here this week from Pan Gravy Kadai Curry with Thai Shrimp Curry over Rice Noodles.
Ingredients:
  • Mid-sized Shrimps – 25 #s, peeled and de-veined
  • Ripe Tomato – 3, medium
  • Cooked Rice Noodles – 3 cups
  • Salt
  • Olive Oil – 2 tbsp
For the Curry paste:
  • Onion – 1, large, roughly chopped
  • Garlic – 3 cloves
  • Peppercorns – 1/2 tsp
  • Ginger – 1/4 inch
  • Cashew nuts – 1/4 cup (Use Candle nuts if available)
  • Spring Onions – 3 stalks, white and green parts separated (Green for Garnish only)
  • Turmeric Powder – a pinch
Procedure:
  • In a wide saute pan, add a tbsp of oil and add the ingredients under “For the curry paste” one by one.Onions must be sauteed till it is slightly browned.  Then Garlic, peppercorns, Ginger, Cashew and the White part of the spring onions and finally the turmeric powder.Cool the mixture and grind it to a fine paste with a little bit of salt.
  • In the same saute pan, add the remaining oil and add the chopped tomatoes. Once they are partially cooked, add the ground curry paste and check for taste. Add salt/pepper if needed and cook until the mixture is slightly thickened.
  • Add the cleaned shrimp and gently mix. Lid the pan and cook for 5-7 minutes.
  • Transfer rice noodles to a plate and top if with the shrimp curry.
  • Garnish with the green parts of the spring onion and serve immediately.
Makes ~3 mid-sized Servings
Note:
  • Right way to cook the rice noodles –  Bring plenty of water to a roiling boil in a stock pot/pasta pot. Switch off the stove. Add the noodles to the hot water and let it cook for ~5 minutes. Drain it in a colander and fluff it with a fork.
Enjoy!

Chicken Alexis

No, this wasn’t cooked over live fire but it was at least cooked over flame.

I took a class on pan sauces at Rouxbe online cooking school this week and before I take the quiz, I needed to practice the techniques. It’s kind of hard to do a pan sauce if your meats are grilled, so I stayed inside tonight.
One of their practice examples was Chicken Marsala, which is one of my favorites. I took that basic idea and then….well, did a lot different, just adding things Alexis loves. Hence the name.

Chicken Alexis
Source: Nibble Me This
Ingredients
3 ea chicken breasts, boneless, skinless
salt & garlic pepper to taste
3/4 cup flour
3 Tbsp shallot, minced
1/2 cup roasted red bell pepper, chopped
1/4 cup sherry
1 cup heavy cream
1/2 cup chicken stock
Instructions
Season your chicken with salt and garlic pepper. Then place in a gallon zip top bag one at a time and pound to about 1/4″ thickness. Dredge in flour and set aside.
Heat a saute pan to the proper temp. How do you know what that temp is? Here is a great trick that I learned from Rouxbe.
I was always adding oil before the pan was ready until I learned this trick about 3 months ago. Isn’t that the coolest!?!?
Once the pan is hot, add 1/4 cup olive oil and wait for about 20-30 seconds for the oil to heat up. Add the chicken in small batches. Cook for 3-4 minutes until golden brown. Flip and cook another 3-4 minutes until the other side is golden brown. Remove to a warming drawer or 200f oven.
Reserve 1 tbsp of oil and add the shallots to the pan. Stir for about 1 minute and then add the roasted red pepper. Continue stirring until the shallots are softened.
Deglaze the pan with sherry, stirring briskly with a wooden spoon to get all of the goodies scraped off of the pan. Continue cooking until the liquid is almost evaporated.
Reduce heat and slowly add cream while continuing to stir. Add in broth. Bring to a simmer, slightly reduce heat and stir occasionally until the volume is reduced by half. Squeeze in the juice of 1/2 lemon. Taste and season with salt and pepper as needed.

Serve the sauce ladled over the chicken and a bed of pasta.

(The side dish was 1 tbsp shallot, 3/4 cup diced artichoke hearts, and 1 diced tomato that I sauteed for just about 2 minutes. Mixed that in with 8 oz of angel hair and fresh sliced basil.)
This one was so good and it was devoured by the family. I was just sad that I forgot to make garlic rolls to go with it.

July – Cabbage Recipes

I thought for a change of pace, I would look back on some of my old vegetable recipes and decided cabbage would be an interesting vegetable to stress,  I was surprised at some of the recipes, I have made and I am also delighted.  I don’t look back in my blog, often enough.
Cabbage and Noodles Without Real Noodles

Ingredients:
1 carrot diced
2 cups shredded green cabbage
1 onion shredded
3 large potatoes shredded
3 eggs
salt and pepper to taste
1/4 teaspoon garlic powder
2 teaspoon onion powder
Method:
In a large skillet, saute onions and green cabbage.
While the vegetables are cooking, beat 3 eggs and set aside.
Dice carrots and set aside.
In casserole, put cabbage mixture.
Add eggs and mix together.
Add seasonings and carrots and mix well.
Bake at 400 degrees F for 20 – 25 minutes.