PAN SEARED CHICKEN with BROWNED PARSLEY BUTTER

PAN SEARED CHICKEN with BROWNED PARSLEY BUTTER
4 skinless, boneless chicken breasts
flour for dredging
4 tablespoons butter
1 large green onion, sliced thin
salt, pepper and paprika to taste
1/4 cup chopped fresh flat leaf parsley
Juice of 1 lemon
Juice of 1 lime

  • Place chicken between the folds of a clean cheesecloth towel.  
  • Pound chicken breasts to 1/4 inch thick.
  • Cut each breast in half.
  • Generously season both sides of chicken breasts.
  • Dredge chicken in flour.
  • In a large skillet melt butter over medium high heat.
  • When butter is sizzling, but not browning, add onions and chicken pieces.
  • Generously season AGAIN!
  • Cook chicken 4-5 minutes on each side.
  • Plate chicken and keep warm.
  • Add parsley, lemon and lime juices, cooking until browned. 
  • Pour over chicken pieces.
  • Garnish with parsely.

CHICKEN POT PIE, the HEALTHY WAY

When I was growing up, we ate a few too many Swanson frozen chicken pot pies.  For years and years, I wouldn’t eat the stuff.  No way, no how.  But, not too long ago, I asked a co-worker what she was eating, and she gave me a taste, and it was delicious!  It was nothing like that frozen stuff I had growing up.  So, I got to thinking how I could make it taste good and healthy at the same time.  The solution was simple!

CHICKEN POT PIE
2 12-oz cans of white meat chicken (this is the only thing I will eat with canned chicken)
1 can 98% fat free cream of celery soup
1 can 98% fat free cream of chicken soup
1 bag (10-12 ounces) frozen mixed vegetables
1 can refrigerated crescent rolls
salt and pepper to taste

Mix chicken, soups, and vegetables in a large bowl.  Season with salt and pepper.  Pour in a baking dish.  Unroll the crescent dough.  Place on top of the chicken mixture.  Bake at 375 degrees for about 40 minutes or until center is no longer doughy.
This is such an easy recipe.  It served my family of 5 with a serving left over.  Dividing this recipe by 6 servings, each serving has 12 grams of fat and 340 calories.  Enjoy!

BLACK & BLUE COBBLER

BLACK & BLUE COBBLER BOWLS
1 cup blackberries
1 cup blueberries
1 cup whole milk
1 cup self-rising flour*
1/2 cup butter + 2 tablespoons, both melted separately
3/4 cup fine sugar
1/4 cup packed brown sugar

  • Mix together the fine sugar and flour.
  • Whisk in the milk.
  • Whisk in 1/2 cup melted butter.
  • Pour into well greased bowls.
  • Distribute berries evenly on top of batter.
  • Mix 2 tablespoons melted butter with brown sugar until crumbly.
  • Sprinkle on tops.
  • Bake 45-60 minutes until golden and toothpick comes out clean.

*If you prefer a heavier crust, use bisquick

RASPBERRY TURKEY TENDERLOINS ~

RASPBERRY TURKEY TENDERLOINS
1/2 cup seedless raspberry jam
1/3 cup cider vinegar
1/4 cup Dijon mustard
1 teaspoon grated orange peel
1/2 teaspoon minced fresh thyme or 1/8 dried thyme
4 turkey breast tenderloins
1/8 teaspoon salt

Directions:  In a small saucepan, combine the jam, vinegar, mustard, orange peel and thyme.  Cook and stir for 2-3 minutes or until heated through.  Set aside 1/4 cup for serving.
Sprinkle turkey with salt.  Moisten a paper towel with cooking oil; using long-handled tongs, lightly coat the grill rack.  Grill turkey, covered, over medium heat or broil 4 inches from the heat for 13-18 minutes or until a meat thermometer reads 170 degrees, turning occassionaly.  Baste with remaining sauce during last 5 minutes of cooking. 

Let stand for 5 minutes before slicing.  Serve with reserved sauce.

Here’s what you’ll need:

Put jam, apple cider vinegar, mustard, and orange peel in a saucepan on low.

Add the thyme.

Salt the turkey breasts and put them on the grill for 16-18 minutes or until 190 degrees in the center.  Use some of the sauce to baste the turkey.

Pull off the grill and let rest.  

Pour the remainder of the sauce of the turkey breast.

Here’ what you’ll end up with:

SKILLET CHICKEN & RICE

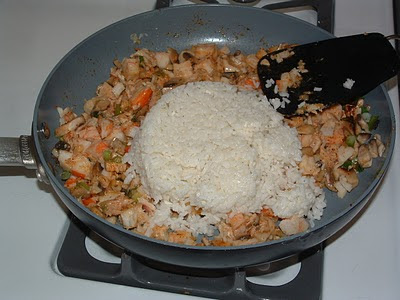
Son2 as a Junior this past year took cooking for one of his electives… This past week he made dinner for the family…


This is the recipe he used from class… I copied it word for word straight from the cookbook he made in class… 

Boneless, skinless chicken breast or thighs 
1 tablespoon oil 
1/2 cup chopped onions 
1-2 garlic cloves 
1 cup broccoli 
1 1/4 cup rice 
2 3/4 cup water 
2-3 teaspoon chicken bouillon 
Pepper, dash 
Garlic salt, dash 
1 cup shredded mild cheddar cheese 
Optional–1/2 cup thinly sliced red peppers and or 1/4 cup shredded carrot
1. Wash and pat dry chicken.
2. Cut chicken into thin strips about 1/4 inch wide.

3. Heat oil in Teflon frying pan or a frying pan with a lid. Be careful for smoke point.
4. Add chicken, onions, garlic, and (shredded carrots if you choose to have them). Stir constantly browning the onions and chicken. Spice with pepper and garlic salt.
5. Carefully add water, bouillon, and rice. Bring to a hard boil.
6. Add broccoli and any other vegetables.
7. Cover and lower temperature to simmer 15 minutes without looking. (Do not allow the steam to escape).
8. After 15 minutes, check to see if rice is soft. If not, cover and cook another five minutes. Add small amount of water if needed.

9. When rice is soft, turn off temperature. Add cheese and cover with lid for 3 minutes to melt the cheese.


Happy Eating…


Fire Day Friday: Spicy Grilled Shrimp

Now that summer is almost here, I like to grill shellfish. The seafood is fresher and grilling it brings out the best in it. This spicy marinade packs the heat of summer into these grilled shrimp.
Grilling Tip: You know how they always say to soak your bamboo skewers for 30 minutes before grilling, right? And you probably know how sometimes that works and sometimes it does not. Sometimes, the skewers still burn off. You can use a “grill shield” like the one I am using here or you can make you’re own by folding up a piece of HD aluminum foil several times to protect the skewers.
Spicy Summer Grilled Shrimp
1 lb medium count shrimp, cleaned, peeled, and deveined
3 oz clarified butter, melted
1 oz lemon juice
1 oz sriracha sauce
1 tsp mirin
1 tsp turbinado sugar
2 cloves garlic, finely minced
½ shallot, finely minced
¼ cup cilantro, finely chopped
¼ tsp kosher salt
¼ tsp black pepper
Mix the marinade ingredients together. Add the shrimp and marinate for 30 minutes.
Meanwhile, fire up your grill to 450f or medium-high. 
Place the shrimp on skewers and grill 2 minutes per side.
They are done when the tails turn pink.
These disappeared with my 22 y/o son’s friends devouring them as fast as I could get them off the grill.

LUAU BENEDICTS

I saw a recipe similar to these on a menu and set out to replicate it.  I’m not sure how close I came, but we loved them!

LUAU BENEDICTS
1 English muffin per person
2 eggs per person
enough leftover sweet and sour pulled pork
hollandaise sauce

  • Prepare Hollandaise sauce.
  • Toast English muffins.
  • Poach eggs.
  • Layer together starting with English muffin, pulled pork, poached egg and the hollandaise sauce.
  • Enjoy.

HOLLANDAISE SAUCE
1/2 cup butter
3 large egg yolks
1 tablespoon plus 1 teaspoon of lemon juice
1/8 teaspoon salt
dash cayenne pepper or hot pepper sauce
2 tablespoons hot water
finely chopped fresh parsley, if desired

  • Heat butter in a heavy saucepan until hot and foamy, but not browned.
  • In a small bowl, whisk or beat egg yolks with lemon juice, salt, and  hot sauce.
  • Gradually beat in butter, then water.
  • Return mixture to saucepan and beat over very low heat until mixture is slightly thickened.
  • Serve immediately or let stand over warm water for up to 30 minutes.
  • If desired, sprinkle with chopped fresh parsley before serving.

Makes about 2/3 cup of hollandaise sauce.

GRILLED CORN with CHIPOTLE LIME BROWNED BUTTER

We grill a lot of corn on the cob in the summer.  Who doesn’t, right?  Well, my standard way is to keep the husks on, soak them in water for awhile and grill them in the husks.  I like this as there is no silk left and they are easy to peel.

Well, I’ve been seeing the corn grilled straight on the grill a lot lately and thought I’d try it today.  It was awesome. I did find the kernels a bit more chewy but not necessarily in a bad way.

Often because of calories, I skip the butter altogether but today I made the most awesome chipotle lime browned butter.  This seriously brought corn to a new level!  It was super tasty! 
The great thing about this butter, if you don’t use it all, just stick it in the frig for next time.

GRILLED CORN with CHIPOTLE-LIME BROWNED BUTTER  Adapted from A Veggie Venture

6 ears sweet corn, silk and husks removed
4 tablespoons butter **
Juice of a lime (about 1 tablespoon)
Pinch of ground chipotle powder
Good salt to taste

Grill the corn, turning occasionally, until many of the kernels have turned dark and caramel-like.

Meanwhile, inside: 
  • melt the butter in a small saucepan, then let it sizzle, stirring occasionally, until the butter begins to brown. 
  • Add the lime, chipotle and salt, let gently sizzle a bit. 
  • Turn off the heat, if needed, rewarm before serving. 
  • Transfer to a small dish. 
  • Refrigerate leftovers, heat and stir before serving again.
**This butter makes enough for at least 12 ears of corn and refrigerates well.

Total calories = 111 calories per ear of corn with about 1 tsp. butter mixture. I just brushed it lightly. The husband put way more butter on his.

CHERRY APRICOT GALETTE

Pie Dough Ingredients*
For a 9-inch crust
  • 1 1/2 cups all-purpose flour
  • 1/4 cup granulated sugar
  • 3/4 teaspoon salt
  • 3/4 cup (1 1/2 sticks) of butter, cold and cubed
  • 1/4 cup ice water
Filling Ingredients**
For one 9-inch galette
  • 3/4 pound fresh apricots, pitted and chopped
  • 1/2 pound fresh cherries, pitted
  • 2 tablespoon cornstarch
  • 1/4 cup sugar + more for sprinkling
  • Juice of half a lemon
Ingredients for Assembly
  • 1 egg, beaten
ASSEMBLY
  • Cut butter into small cubes and place in the freezer for 15 minutes.
  • Preheat your oven to 400 degrees.
  • Pulse flour, sugar and salt in a food processor. 
  • Add butter and pulse until it resembles a coarse meal. 
  • Gradually add ice water and pulse until the dough forms a coarse meal. 
  • Turn the dough out onto a work surface and very lightly and sparingly, knead just to incorporate dry ingredients. 
  • Flatten into a circle; wrap individually in plastic. 
  • Refrigerate dough for at least an hour. 
  • Remove dough from refrigerator; place on floured work surface. 
  • Using a rolling pin, roll out the dough into a rough 11-inch circle. 
  • Trim the edges to a clean circle with a pairing knife. 
  • Transfer the circle to a baking sheet or pizza pan lined with parchment paper. 
  • Mix 1/2 teaspoon cornstarch and 2 tablespoons of sugar in a bowl and spread on the bottom of the dough. 
  • Toss apricots and cherries with the rest of the cornstarch, sugar and lemon juice. 
  • Arrange the fruit on the bottom of the dough, leaving 2 inches of dough left outside. 
  • Fold up and pleat the dough over the top of the fruit, leaving the center uncovered. 
  • Lightly brush the top of the pastry with the beaten egg and sprinkle both the dough and the fruit with 1/4 – 1/3 cup sugar. 
  • Place the Galette in the oven and cook for 40-45 minutes until golden brown and bubbly. 
  • Remove from oven and transfer to a cooling rack immediately. 
  • Serve warm or at room temperature with a scoop of vanilla ice cream.
*If you are in a huge hurry, Pillsbury from the dairy case can be substituted.
**1 can Comstock cherries can be substituted.  Just add apricots!

RANTS, RAVES, BUTTS, BASKETS, PEDESTRIAN RIGHT OF WAY, COMMON SENSE & RESPONSIBILITY and THE PURSUIT OF THE ICONIC TV 50’S WAY OF LIFE

Life is busy these days, real busy, but there are a few things I still notice.  We are all overworked, over stimulated and over tired!  I seem to notice less and less quality in everything around me whether it’s sitting down to dinner as a family or the quality of the products that sit on my kitchen counter.

My brother and I had a conversation not too long ago about the pursuit of the iconic TV 50’s way of life – you know, slower and kinder.  Now you need to know that my brother and I, at times, are as far apart on the political spectrum as 2 siblings can be.  We’re close, but there are many a subject that we have an agreement to agree to disagree on and move on to another topic.  He pointed out that the 50’s that many seem to want to return to is nothing but a TV iconic way of life.  I beg to disagree though.  Now I wasn’t alive in the 50’s, but it doesn’t take a rocket scientist to know that life in general was kinder, slower and calmer and MUCH less stressful.  This is one of those spots that I would go off on a rant about.  You see, I believe that stress is a catalyst of much of what ails us today, specifically cancer.  But, that is a story for another post.

If you were to watch say the Donna Reed Show, Father Knows Best, Happy Days or Leave it to Beaver, you would see homemakers vacuuming in high heels and pearls or maybe cleaning the refrigerator.  Husbands would be in ties and coats or at least a sport shirt and loafers.  Now while I don’t think things need to return to that formal, I do expect guys to pull up their pants.  I don’t want to see their butts.  In my era, the only butt to see was in a pair of tight jeans – where you had to use your imagination and fantasize. WOW that made me sound old, but I’m not really, just tired of seeing ugly underwear hanging out of over sized pants that are falling off some guy’s butt.  Many women aren’t much better though.  No one wants to see rolls of fat hanging out of a midriff top and low cut jeans – both of which are things for teen girls, not overweight 20, 30, 40, 50 somethings or even overweight teens.  Get the picture here – fat is not something to show off, but something to lose and hide while you’re doing it!

Another thing you saw more of in the past was Common Courtesy.  I find this ironic since we seem to need it more now, but it appears to be non-existent many times.  Whether it’s driving on the freeway or driving basket at the supermarket, common courtesy seems to always be in the backseat.  When I was a kid, I was taught to ‘drive’ my basket at the supermarket the same way you would a car on a 2 lane road – stay to the right, park off the pavement and use your signals.  More and more I notice at the supermarket that people leave their baskets in the middle of the aisle while they are roaming up and down looking at various things.  While I commend the label reading, how hard is it to park your cart off to the side and out of the way?  Interestingly enough, if there is no one around and I go to move the basket aside so I can pass, someone always magically appears and is miffed that “their” basket is being moved.  Well excuse me! The sense of entitlement and the self righteous (and unearned I might add) indignation is way too over the top.

On this same subject we all know that pedestrians have the right of way.  But don’t they also have a responsibility to NOT just walk willy nilly and blindly out into traffic?  What happened to looking both ways before entering a street?
Okay, I will get off my soap box now and return you to your regularly scheduled blog hopping.

PHILLY CHEESE STEAK SANDWICHES

Philly Cheese Steak Sandwiches
1/2 pound fresh mushrooms, sliced
2 medium onions, thinly sliced
1 medium green pepper, sliced
2 tablespoons butter
1 pound thinly sliced roast beef
6 hoagie rolls, split
6 slices part-skim mozzarella cheese
4 beef bouillon cubs
2 cups water

Directions: In a large skillet, saute mushrooms, onions and green peppers in butter until tender. Divide beef among rolls. Top with vegetables and cheese; replace tops. Place on an ungreased baking sheet; cover with foil. Bake at 350 degrees for 15 minutes or until heated through. Meanwhile, in a sauce pan, heat bouillon and water until cubes are dissolved; serve as a dipping sauce.

Here’s what you’ll need:
Modifications:
-I used 2 containers of pre-packaged deli style roast beef
-I used the left over Provolone cheese that I had from last week’s Baked Ziti.

Wipe off the mushrooms with a paper towel and cut them up.  Cut up the onion and green pepper, too.  
Put 2 cups of water in a sauce pan and add 4 beef bouillon cubes.
Melt 2 tablespoons of butter in a pan. 
Slice open the bread while the butter is melting.

Saute the mushrooms, green peppers, and onions in the butter.

After the mixture has cooked for a bit, ladle in 1 cup of the beef bouillon stock into the onion mixture.

After the mixture has cooked for a while and onions were soft, add the prepackaged deli roast beef and seasoned the pan with Home Seasoning.

While the mixture cooks, slice up the meat into smaller slices.  Fill in the rolls with meat and veggies and then cover it with a slice of cheese.  

Pop the sandwiches in the oven for about 5-7 minutes so the cheese can melt.  

Here is what you’ll end up with:

:

MELTING MOMENTS SHORTBREAD COOKIES

Martha from A Sense of Humor is Essential here to fill in for Joanne and to share a special shortbread recipe that is easy to make, with ingredients readily at hand, and has a nice, not too sweet taste, which goes wonderfully with coffee and tea. These cookies are also always a hit at baby showers,  bridal showers, and as hostess gifts too.

MELTING MOMENTS SHORTBREAD COOKIES
1 cup salted softened butter
5 1/2 tablespoons powdered sugar
1 cup corn starch 1 1/4 cup flour (I used whole wheat)
1 teaspoon vanilla extract

  • Mix all ingredients using mixer for approximately 3-5 minutes until a soft ball dough is formed. The dough will look like cornmeal prior to the dough ball forming.
  • Refrigerate for 30 minutes.
  • Preheat oven to 350 degrees F.
  • Drop by teaspoons unto un-greased cookie sheets.
  • Bake until golden at edges, approximately 12 – 15 minutes.
  • Allow cookies to completely cool on cookie sheet. 
  • Frost with glaze or frosting if desired. Refrigerate if necessary.