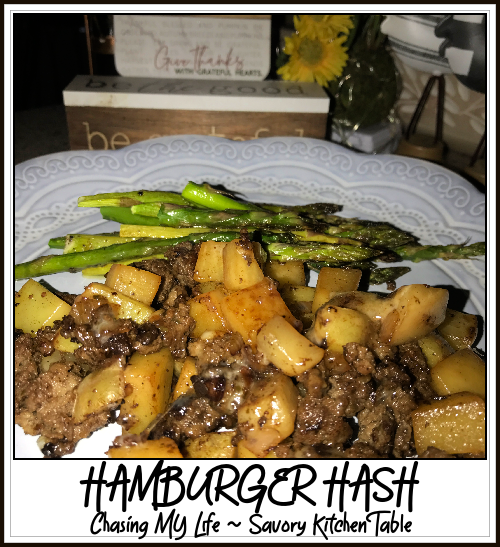
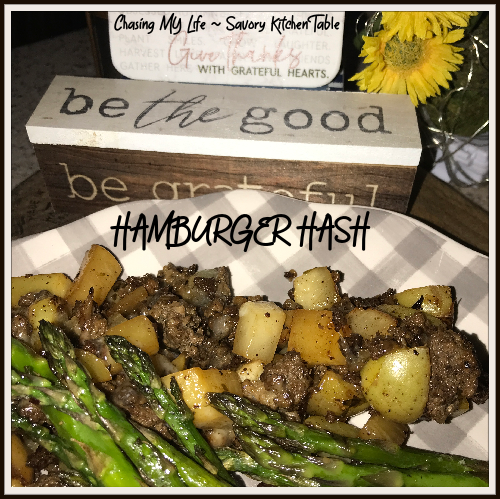
HAMBURGER HASH

Toss out the hamburger helper and make this instead. Another tasty one pot meal full of flavor and texture that’s quick and easy for classic comfort food weeknight family meal. The beauty of this recipe is that it is super easy to adjust the servings. I’m making most recipes for 2 these days, but just double or triple up and feed 4-6 in a jif.

HAMBURGER HASH – serves 2 adapted from SpaceShips and Laser Beams
Prep Time 15 mins Cook Time 20 mins Total Time 35 mins

1 SMALL russet potatoes, peeled and chopped into bite size pieces
1 small turnip or rutabaga, peeled and chopped into bite size pieces

3/4 pound lean ground beef
1/2 Vidalia onion, diced
2 teaspoons avocado oil
1-2 cloves garlic, minced
1 tablespoon Garden Gourmet Italian seasoning (or 2 teaspoons dried)
FRESH ground sea salt and black pepper
1/4 cup beef broth

1 1/4 cup shredded sharp cheddar cheese

  • Boil potatoes 3-5 minutes until tender, BUT NOT too soft.
  • Drain and set potatoes aside.
  • In a large nonstick or greased skillet, over high heat, cook ground beef until browned. Drain off fat. Set cooked beef aside.
  • 
Using the same skillet over medium heat avocado oil.
  • Add onion, potatoes, Italian seasoning, minced garlic, salt, and pepper. Toss well to evenly coat potatoes and onions in seasoning, cooking 10-15 minutes and stirring often until potatoes and onions have started to brown and crisp.
  • Fold ground beef back to the skillet, stirring well to mix.
  • Add broth and simmer until broth is mostly absorbed.
  • Add cheese, stirring until well mixed and melted.
  • Remove from heat.
  • Serve hot. 


NOTES

  • ALWAYS start your potatoes in cold water. Adding them directly to boiling water will immediately cook the outsides while the insides will take longer. Use a fork to gently pierce the potatoes while they are boiling. When the fork will pierce the potato easily but not break it apart, your potatoes are ready.
  • If using dried herbs, use a mortar and pestle or rub them between your clean dry palms to break them up and revive their flavor essence before adding them to your recipe.

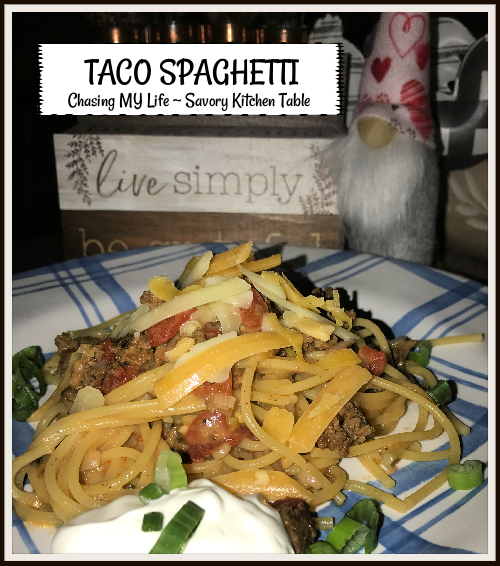
TACO SPAGHETTI

I loved this recipe because it was ALL made in the same pan so it’s quick and easy clean up, but also because I can no longer eat a lot of grain products so I still feel like I’m getting my tacos without have to deconstruct them! After making it exactly as written the first time, I adapted it the next time and found it was just easier and tastier to prepare the noodles separately.

You can always add your favorite taco toppings such as extra cheese, green onions or a dollop of sour cream to make it your own.

TACO SPAGHETTI servings 2 – adapted from Space Ships & Laser Beams

2 teaspoons avocado oil
1/3 pound QUALITY ground beef
1/4 cup chopped yellow onions
2 teaspoons taco seasoning
1/3 cup original Rotel tomatoes with juice
spaghetti noodles for 2, prepared al dente
1/3 cup homemade bone broth (chicken or beef – your choice)
1/2 cup Mexican style shredded cheddar/Jack cheese
scant 1/4 cup cilantro, chopped
minced green onions, for garnish
chopped olives, for garnish
chopped jalapeños, for garnish

  • Heat oil in a LARGE skillet over medium heat. 

  • Brown ground beef and onion in skillet until meat is no longer pink and onions are soft and translucent.

  • Add taco seasoning, tomatoes (including juice) and broth.

  • Cover and simmer for 10 minutes until most of the liquid is absorbed.

  • Stir in noodles, stirring to coat well and simmer 5 minutes more.
  • Remove from heat.
  • Sprinkle half of the cheese and half the cilantro into the pan and stir to coat the spaghetti with the cheese and sauce.

  • Top with remaining cheese and cilantro.
  • Serve with a dollop of sour cream and your favorite taco toppings.


NOTES

  • For the best flavor, grate your own cheese rather than using a store bought bag of grated cheese. The store bought grated version usually has an anti-caking agent on it so it doesn’t melt as well.
  • For a quicker weeknight cooking time, ground beef can be cooked ahead of time. Store in the refrigerator for up to 3 days or in the freezer for up to a month.

APPLE PIE STREUSEL MUFFINS

APPLE PIE STREUSEL MUFFINS adapted from OMG CHOCOLATE DESERTS I made this batch using a Texas size muffin pan, but find they are better as regular size because they are so rich and filling.

CINNAMON STREUSEL TOPPING
1 cup all-purpose flour
¼ cup granulated sugar
¼ cup light brown sugar
6 tablespoons unsalted butter, melted and cooled slightly
1 teaspoon QUALITY cinnamon

  • In a small bowl, whisk together flour, sugar, brown sugar and cinnamon, add melted butter and stir with a fork until crumbly and set in the fridge until ready to use.

MUFFINS
2 cup all purpose flour
3 teaspoons baking powder
½ teaspoon salt
¼ teaspoon ground nutmeg
1 1/2 teaspoons QUALITY ground cinnamon
2 LARGE eggs
1 cup granulated sugar
1 cup vanilla Greek yogurt
1/2 cup vegetable oil
1 teaspoon PURE vanilla extract
1 ½ cups COMSTOCK apple pie filling, chopped small

  • Preheat the oven to 400°.
  • Line standard muffin pan with paper liners and set aside.
  • Prepare streusel topping and set aside.
  • In a large bowl stir together flour, baking powder, salt, cinnamon and nutmeg, then set aside.
  • In a medium bowl, whisk together eggs and granulated sugar until combined.
  • Whisk in yogurt, oil, and vanilla extract – mixture should be a pale yellow.
  • Fold wet ingredients into dry ingredients and mix everything together by hand. The batter will be quite thick.
  • Spoon batter into prepared muffin tins, filling less than two thirds.
  • Tap the pan onto working surface to remove air bubbles.
  • Add a heaping tablespoon of chopped apple pie filling on top of batter and gently press the apples into the batter.
  • Reduce the heat to 375° and place pan in center of shelf.
  • Bake about 19-22 minutes or until the toothpick inserted in the center comes out clean.
  • Cool for 5 minutes in the pan then remove muffins and cool on a wire rack.

Honestly these are great without the glaze, but they are phenomenal with the glaze.

GLAZE
1 cup powdered sugar
1–2 Tablespoons milk

  • Stir together powdered sugar and milk. If it’s too thin add more powdered sugar, if it’s too thick add more milk.
  • Drizzle glaze over cooled muffins.

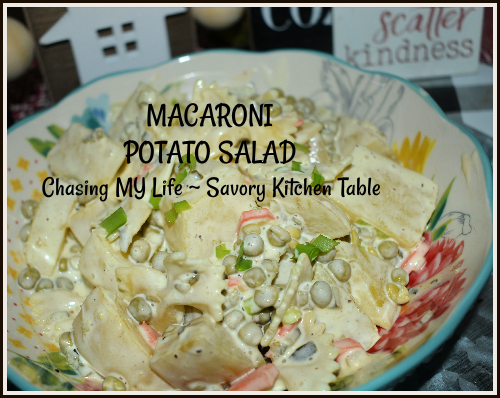
MACARONI POTATO SALAD

MACARONI POTATO SALAD adapted from A Spicy Perspective

2 pounds Russet potatoes, peeled and chopped into half inch cubes
12 ounces macaroni
1/2 cup FINELY minced Vidalia onion
1 large carrot, coarsely shredded
1 can Le Suer peas, drained WELL
1 LARGE bunch green onions, minced
1 1/2 (+as needed) cups Duke’s mayonnaise
1 cup sweet pickle relish
2 tablespoons apple cider vinegar
1 teaspoon mustard (optional)
FRESH ground sea salt and black pepper

  • Cut the potatoes into 1-inch cubes and place them in a large stock pot.
  • Fill the pot with cold water until it is one inch over the top of the potatoes.
  • Set the pot over high heat and bring to a boil.
  • Once water is boiling, add 1 tablespoon salt and cook the potatoes for 5 minutes.
  • After 5 minutes, add the macaroni noodles, stirring to combine and continue boiling for 6-8 minutes, until the pasta is al dente.


  • Meanwhile, in a medium bowl mix the mayonnaise, sweet pickle relish including juices, apple cider vinegar, mustard if using, allspice, FRESH ground sea salt and pepper to taste, stirring until smooth.
  • Use a grater to shred the onions and carrot.

  • Drain the potatoes and macaroni in a colander and place in a large salad bowl.
  • Add in the onion, carrots, peas, and scallions.
  • Pour the dressing over the top and mix until well combined.

  • Cover the potato macaroni salad and refrigerate for at least 4 hours.

NOTES:

  • If you have time, make the salad a day or so ahead of when you want to serve it. It tastes even better on day two!
  • Keep refrigerated in an airtight container for up to one week.

  • You can make this with unpeeled new potatoes for a slightly different texture. Follow the instruction as is, yet leave the potato skins on when you chop them.

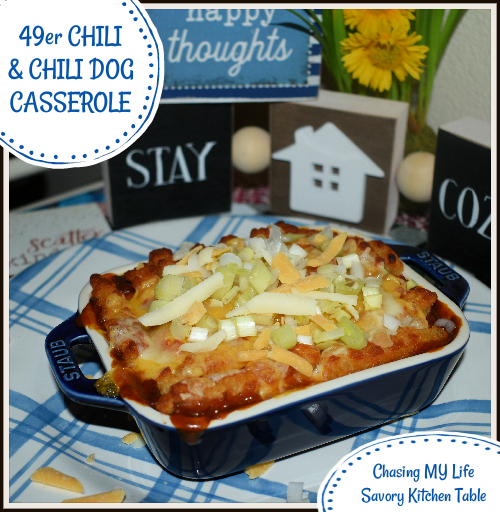
49er CHILI & CHILI DOG CASSEROLE

Like most men, my husband LOVES chili dogs. But, we don’t eat much bread these days. So, when I saw Sandra’s recipe for Chili Dog Casserole it was right up our alley! The only thing I did different was make a batch of 49er Chili! 49er chili is an OLD scrap of a recipe I found on one of our recipe box searches in antique stores. This casserole really is like having your chili dog and fries, all in one spot and gets rave reviews from everyone. It’s perfect for picnics, BBQs, church potlucks or backyard get togethers.

CHILI DOG CASSEROLE
6 hot dogs your favorite brand, sliced into small pieces
15 ounce can chili or 1 1/2 cups homemade
14.5 ounce can diced tomatoes, drained WELL (I used spicy seasoned)
1 cup shredded or very thinly sliced, carrots (optional – hubby didn’t care for them)
12 ounces crinkle cut French fries, frozen
1 cup shredded cheddar cheese

  • Preheat oven to 450°.
  • Spray a 9 x 13” baking dish with cooking spray and set aside.
  • In a medium sized skillet, saute the sliced hot dogs until nice and fragrant and seriously browned. We like them really charred 😀
  • In a medium bowl, add the hot dogs, chili, tomatoes, and carrots.
  • Stir until evenly combined.
  • Pour this mixture into the prepared baking dish.
  • Evenly arrange French fries in a single layer on top of the hot dog mixture.
  • Bake for 30 minutes.
  • Evenly sprinkle the cheese on top of the fries, and bake an additional 3-5 minutes, or until the cheese is melted.

Chile is one of the oldest dishes around and dates back to the Aztecs in Mexico. I assume this one received its name after an old gold miner’s recipe. I have revamped it a little as time went by, but we love it.

49er CHILI
2 pounds SMALL lean beef pieces or ground beef
1 clove garlic, FINELY minced
1 medium white or yellow onion, FINELY chopped
2 teaspoons chile powder
FRESH ground black pepper, to taste
2 cups tomato sauce/puree
3/4 cup room temperature beer
1/4 teaspoon red pepper flakes
1/2 teaspoon paprika
1/2 teaspoon ground cumin
1 tablespoon sugar

  • Combine the beef, onions and garlic in a large dutch oven and brown SLOWLY.
  • Drain off any excess grease.
  • Return meat mixture to pan and add remaining ingredients and simmer for 30 minutes.

1 LARGE can chili beans (optional)

  • Stir in beans if using and and simmer 15 minutes more.

2 tablespoons corn flour
1/4 cup water

  • Whisk corn flour and water together.
  • Stir corn flour mixture into chile.
  • Simmer 20-30 minutes more.

Shredded cheese
Chopped onions
Sour cream

  • Serve HOT with topping of choice.

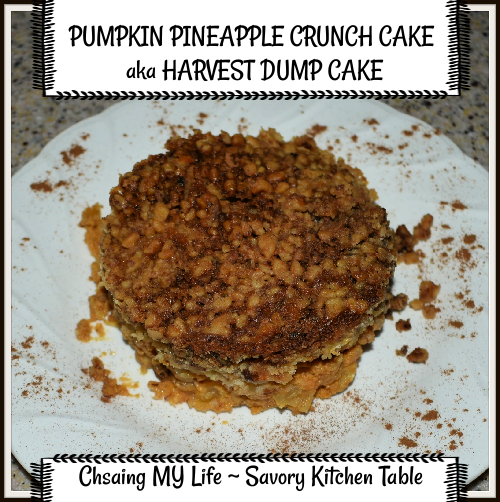
PUMPKIN PINEAPPLE CRUNCH CAKE aka HARVEST DUMP CAKE

Once upon a time this would have been called a DUMP cake, but when I saw a version of it on FaceBook from My Baking Addiction where they called it a Pumpkin Crunch Cake I knew I had to make my own version. This cake epitomizes fall flavors and is wonderful cold or even at room temperature! Don’t forget a dollop of whip cream and a sprinkle of cinnamon. I made some other modifications for taste and we now call it Pumpkin Pineapple Crunch Cake aKa modified HARVEST DUMP CAKE.

Pumpkin Pineapple Crunch Cake aKa modified HARVEST DUMP CAKE Serves 12-18

Prep Time: 10 minutes Cook Time: 1 hour Chill Time: 3 hours Total Time: 4 hours 10 minutes

1 (15 ounce) can pumpkin puree
1 (12 ounce) can evaporated milk
1 (8 ounce) can crushed pineapple (drained WELL)
4 LARGE eggs
1/2 cup sugar
1/2 cup packed light brown sugar
2 teaspoons PURE vanilla extract
1 tablespoon pumpkin pie spice (apple pie spice works well too)
1 teaspoon salt
1/2 cup golden raisins or currants (currants are my favorite)
1 box yellow or white cake mix
1 cup chopped walnuts divided 3/4 cup + 1/4 cup
1 cup unsalted butter, melted
cinnamon sprinkle

  • Preheat oven to 350°.
  • Butter a 9×13 inch baking pan.
  • In a large bowl, whisk together the pumpkin puree, evaporated milk, eggs, sugars, vanilla, pumpkin pie spice and salt and well combined and smooth.
  • Fold in crushed pineapple and raisins.
  • Pour mixture into prepared pan and spread into an even layer.
  • Sprinkle dry cake mix evenly over the pumpkin mixture, followed by the 3/4 cup of chopped walnuts and use you hands to gently press it into the pumpkin batter.
  • Evenly drizzle the melted butter over the entire cake.
  • Bake in preheated oven for 45 minutes. Check your cake. If the top is becoming too brown, cover the cake with a piece of foil for the remaining bake time. Continue baking an additional 15-20 minutes or until set.
  • Remove pan to a wire rack to cool completely.
  • Chill for a few hours before serving.
  • If desired, top with whipped cream, remaining chopped walnuts and a sprinkle of cinnamon before serving.

NOTES:

  • Even if serving at room temperature be sure to chill the cake first!
  • If you don’t have any evaporated milk you can substitute 3/4 cup whole milk and 1/4 cup heavy cream.

CHOCOLATE FUDGE MARBLE CAKE ~ THE PERFECT CELEBRATION CAKE

For the life of me I cannot remember where I adapted this recipe from, but it is a serious home run! It’s actually more sugar than I can tolerate and hubby said it was good, but felt we could go without the fudge layer completely and that it would still be great. I had also added a thin layer of blackberry jam that I will omit next time.
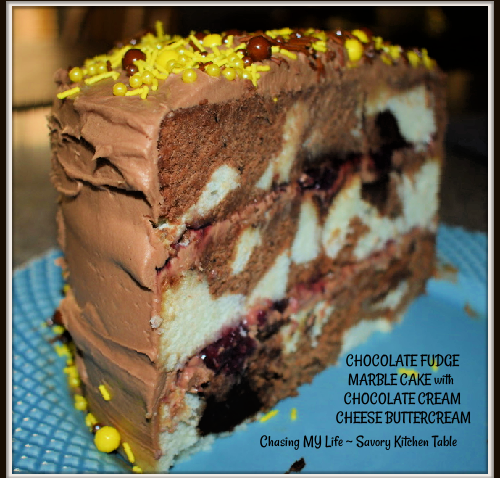
CHOCOLATE FUDGE MARBLE CAKE ~ THE PERFECT CELEBRATION CAKE

This recipe uses 1 batter 2 ways (vanilla and chocolate) swirled with a fudge ripple to create a simply delicious layer cake topped with a fudgy buttercream frosting. This was a scratch recipe that I’ve adapted to use weights trying for a more exact baking science.

VANILLA CAKE BATTER
3 cups all-purpose flour or 390 grams by weight
3 cups granulated sugar or 600 grams by weight
2 1/2 teaspoons baking powder or 10 grams by weight
1 teaspoon salt or 5 grams by weight
1 cup butter or 225 grams by weight unsalted butter, at room temperature
2 teaspoons or 10 grams by weight PURE vanilla extract
1 cup egg whites or 245 grams by weight – about 6 LARGE egg whites
1 1/2 cups buttermilk or 360 grams by weight, at room temperature
1/8 cup vegetable oil or 30 grams by weight

  • Mix together all dry ingredients (flour, baking powder, sugar, and salt) in a stand mixer with a paddle until fully combined.
  • Mix chunks of room-temperature butter slowly into the dry mix, on a low speed. Continue to mix until no large chunks of butter remain, and the mixture becomes crumbly.
  • Pour in egg whites, and mix on low until just incorporated.
  • Mix in the buttermilk in two installments, on a low speed.
  • Add in vanilla and oil, and mix at a low speed until fully incorporated.
  • Scrape down the sides of the bowl with a spatula, then beat on medium speed for about 30 seconds.
  • Pour half of the batter (950 GRAMS) into a separate bowl and set aside.

CHOCOLATE CAKE BATTER
1/3 cup or 35 grams by weight unsweetened baking cocoa powder
1/4 cup or 50 grams by weight granulated sugar
1/2 teaspoon or 2 grams by weight baking powder
1/4 teaspoon or 1 gram by weight salt
1/4 cup egg whites or 60 grams by weight (about 2 egg whites)
1/4 cup or 45 grams by weight buttermilk

  • Whisk together the cocoa powder, sugar, 1/4 salt, and baking powder into the remaining batter.
  • Add the egg whites and buttermilk, mixing on a low speed until smooth.

CHOCOLATE FUDGE SWIRL
1 cup or 150 grams by weight MINI semi-sweet chocolate chips
1/4 cup or 55 grams by weight unsalted butter, at room temperature
1/4 cup or 60 grams by weight heavy cream, room temperature

  • Combine the chocolate chips, butter, and heavy cream into a heatproof bowl.
  • Heat in microwave for two 30-second intervals, stirring in between.
  • Allow the mixture to cool 1 minute, then stir until smooth and set aside to cool.
CAKE PREPARATION

  • Preheat oven to 350°.
  • Line three 9 inch round cake pans with parchment paper AND grease with non-stick baking spray.
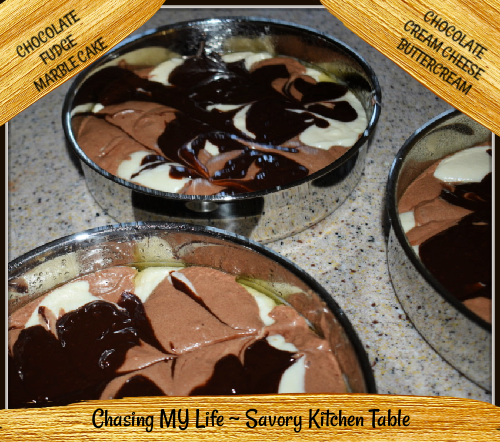
  • Alternate spoonfuls of vanilla cake batter with the chocolate cake batter into the prepared cake pans, filling them roughly one inch high with batter.
  • Randomly add small dollops about one inch in diameter of fudge swirl on top of the vanilla and chocolate cake batter.
  • Drag an offset spatula or butter knife through the batter in horizontal and vertical lines to create a marbled pattern.
  • Bake for 33-35 minutes until tester comes out clean.
  • Allow to cool for 10 minutes, then run an offset spatula around perimeter of the pan to separate the cake from the pan.
  • Level the cakes with a serrated knife as necessary once they’re fully cooled.

FUDGE BUTTERCREAM FROSTING – if simply icing without fancy decoration halve this recipe.

1 1/2 cups unsalted butter or 325 grams by weight (3 sticks) unsalted butter at room temperature
5 1/2 cups or 685 grams powdered sugar
1/2 teaspoon or 3 grams by weight salt
1/4 cup or 30 grams by weight heavy cream
1 tablespoon or 15 grams by weight PURE vanilla extract
1/2 cup or 40 grams by weight unsweetened baking cocoa
1/2 cup or 90 grams by weight semi-sweet or dark chocolate chips

  • Beat the butter on a medium speed for 30 seconds with a paddle attachment, until smooth.
  • Mix in the vanilla extract and salt on a low speed.
  • Gradually add powdered sugar, 1 cup at a time. Alternate with cream.
  • Mix on low for a couple minutes until the ingredients are fully incorporated, and the desired consistency is reached.
  • If the frosting is too thick, add in more cream 1 tablespoon at a time or if frosting is too thin, add in more powdered sugar 1/4 cup at a time.
  • Mix in baking cocoa powder and the melted chocolate chips.
  • Place half of the buttercream into a separate bowl.

CAKE ASSEMBLY

  • Stack the cake layers on a grease proof cake round or large serving plate.
  • Spread a thin dab of buttercream on the center of the board, to help your cake layer stay in place.
  • Next, center the first cake layer the cake board.
  • Spread an even layer of buttercream onto the cake layer with an offset spatula.
  • Repeat with remaining cake layers.
  • Place the top cake layer upside down.
  • Cover the cake in a thin layer of frosting, and smooth using a bench scraper.
  • Chill the cake in the freezer for about 5 minutes, until the frosting is firm to the touch.
  • At this point you can get creative with your decorating or add a final layer of buttercream smoothing as you go.

NOTES

  • You can make the parts in advance and freeze them to make the process A LOT less tedious.
  • Make your frosting ahead of time too and store in an airtight container in the refrigerator. Be sure to stir it well to smooth the consistency.
  • You can add a marmalade or berry layer on top of each buttercream layer for a bit of an added oomph!
  • A frosted cake can last in the fridge for up to a week, or in the freezer for up to a month. The buttercream locks in all the moisture, keeping the cake fresh and delicious! If you cut into the cake and have any leftovers, you can use remaining frosting to cover the cut section to keep it moist and store in the fridge for up to a week.

ALTERNATE CHOCOLATE CREAM CHEESE BUTTERCREAM
8 ounces cream cheese – 1 brick, 226 grams by weight, softened to room temperature
1/2 cup unsalted butter – 1 stick, 113 grams by weight, softened to room temperature
4 cups powdered sugar – 455 grams by weight, sifted
3 tablespoons QUALITY cocoa powder
1/2 teaspoon salt
3 teaspoons PURE vanilla extract

  • Beat the cream cheese, butter until fluffy.
  • Add vanilla and blend until creamy.
  • Add powdered sugar, cocoa, and salt on low until combined.
  • Beat on high 3-4 minutes until smooth, light, and creamy.
  • Decorate as desired.

BRAISED BALSAMIC CHICKEN for 2

This recipe was originally written to serve 6 over at ALLRECIPES.com. It uses dried herbs and a can of diced tomatoes. Unfortunately, diced canned tomatoes don’t come in small enough sizes for 2 so I adapted the recipe to make my own using cherry tomatoes AND use FRESH(er) herbs.  I also don’t particularly care for olive oil so I substitute avocado oil and instead of onion I substitute shallot for a little extra flavor.

BRAISED BALSAMIC CHICKEN
2 boneless, skinless chicken breasts
FRESH ground black pepper
garlic salt, to taste
1 tablespoon avocado oil
1 large shallot, sliced
1 ¼ cup quartered cherry tomatoes
¼ cup QUALITY balsamic vinegar
2 tablespoons Gourmet Garden “squeeze” Italian herbs
1 tablespoon Gourmet Garden “squeeze” Basil

  • In a small bowl whisk together the balsamic vinegar, basil and Italian herbs.
  • Fold in tomatoes, cover and refrigerate until dinner.

  • Generously season chicken breasts with FRESH ground pepper and garlic salt.
  • Heat oil in skillet over medium heat.
  • Add shallot, cooking until browned. Transfer to a bowl.
  • Add chicken to skillet and sear each side, about 3 minutes per side.
  • Top chicken with shallots and tomato mixture.
  • Bring to a QUICK boil, reduce heat and simmer, covered, 5 minutes or until chicken is cooked through. Turn chicken to coat well in glaze.
  • Serve over pasta or mashed potatoes.
  • Garnish with FRESH herbs.

BLUEBERRY BANANA MAPLE MUFFINS

I made these recently for a friend’s birthday and instantly fell in love <3 with them!  I’ve adapted the original recipe just slightly and think it’s absolutely perfect now.

BLUEBERRY BANANA MAPLE MUFFINS slightly adapted from Brandi Milloy
yields 18 muffins

½ cup unsalted butter, room temperature
²⁄³ cups PURE maple syrup
1 LARGE egg, room temperature
2 small VERY RIPE bananas, mashed
¹⁄³ cup WHOLE milk
1 teaspoon PURE vanilla extract
2 cups sifted cake flour
1 ½ teaspoon baking powder
1 teaspoon baking soda
Pinch of sea salt
2 cups SMALL WILD blueberries
¼ cup FINELY chopped walnuts
¼ cup DARK brown sugar, for topping

  • Preheat oven to 350°.
  • Line muffin tin with cupcake liners or grease tins well.
  • In an electric mixer bowl, cream together the butter and maple syrup.
  • Add egg, mashed banana, milk and vanilla extract, mixing until well blended.
  • In a separate bowl, whisk together flour, baking powder, baking soda and salt.
  • If you are using fresh blueberries add the flour mixture to the banana mixture and mix just until combined.
  • Then FOLD in blueberries.
  • If you are using frozen blueberries, add 3/4 of the flour mixture to the banana mixture and mix. Then add your frozen blueberries to the remaining flour mixture and toss. This will keep the frozen blueberries from sinking to the bottom of the muffins.
  • Scoop batter into muffin tins until they’re about ¾ of the way full.
  • Whisk together the brown sugar and walnuts.
  • Top with a generous sprinkle of the brown sugar nut mix.
  • Bake for 25 minutes or until a toothpick inserted into the center of the muffin comes out clean.
  • Cool COMPLETELY on wire rack.

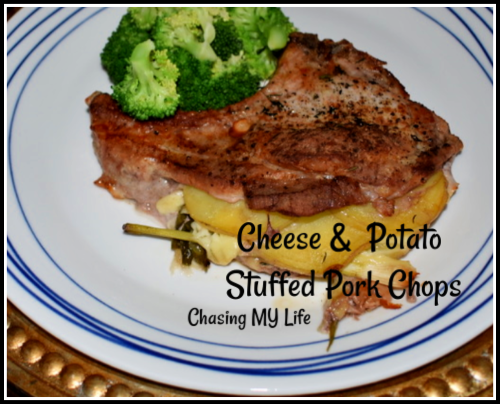
CHEESE & POTATO STUFFED PORK CHOPS

CHEESE & POTATO STUFFED PORK CHOPS serves 4
adapted from Bake At Midnite

4 center cut bone-in pork chops (about ¾-inch thick)
2 medium potatoes, sliced VERY thinly (See note)
4 green onions, sliced thin
½ cup shredded Fontina cheese
4 slices Gruyere cheese
FRESH ground sea salt and black pepper
3 tablespoons melted butter, divided
4-6 sprigs FRESH thyme

  • Preheat oven to 400°.
  • Lightly spray a 13 x 9-inch baking pan.
  • Make a “pocket” in the chops to hold the filling.
  • Peel the potatoes if you wish.
  • Slice the potatoes ULTRA thin…so you can read through them.
  • Place potatoes in a medium bowl.
  • Add green onion pieces, the cheeses, salt, pepper and 1 tablespoon of the melted butter.
  • Stuff each chop with a quarter of the potato-cheese mixture.
  • Heat butter over medium-high heat.
  • Quickly sear each side of chops and then place them in prepared pan.
  • Brush with remaining melted butter.
  • Top with thyme sprigs.
  • Sprinkle lightly with additional salt and pepper.
  • Bake for 40-50 minutes.

NOTES: You may also substitute 2 cups frozen shredded potatoes that are thawed and dried of ALL moisture if you don’t want to bother with the thin slicing.

SLOW COOKER METHOD:

  • Proceed as above except place chops in a 5-7 Quart slow cooker. Try to angle the chops with the stuffed pocket angled upward.
  • Cover and cook on high for 4-5 hrs.

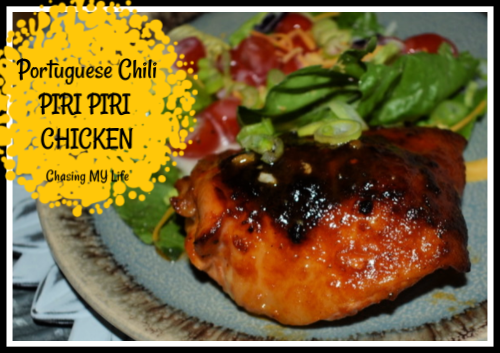
PORTUGUESE PIRI PIRI CHICKEN – marinades for 24 hours – plan ahead

I’d been making a version of this chicken for years – I never knew it had a name 😀 After trying this version I adapted it to a mix of Karina’s and my recipes that is now my preferred method!

PORTUGUESE PIRI PIRI CHICKEN adapted from Karina at CafeDelites

MARINADE
1/2 cup avocado oil
1/3 cup BBQ sauce** (see below)
3 tablespoons Worcestershire sauce
4 cloves garlic, minced
1 tablespoon onion powder
Juice of FRESH LARGE lemon
2-4 teaspoons PIRI PIRI sauce or sriracha
1 teaspoon creamy horseradish
2 teaspoons FRESH ground salt
FRESH Cracked black pepper , to taste

  • Mix all of the marinade ingredients (except for the Piri Piri or Sriracha) together until well combined.
  • Mix in 2 teaspoons of Piri-Piri or Sriracha. Taste test, and work up from there until reaching your desired level of heat.
  • Using 3/4 of the marinade, coat the chicken evenly on the outside, as well as under the skin where possible (the breast especially), until fully coated in sauce.
  • Cover with plastic wrap and refrigerate over night if time allows, but no less than 2 hours. The longer you leave it, the better the flavor.

CHICKEN
3 chicken thighs (bone-in, skin-on)
FRESH ground salt and pepper, to taste

  • When ready to cook, arrange oven shelf to the middle of the oven, and preheat to 400°.
Remove the chicken from the refrigerator and let it sit on the counter top for 20 minutes to take the chill out of the chicken.
  • Heat 2 tablespoons of oil in an oven proof pan or well seasoned skillet over medium heat. When pan is hot, place the chicken, skin side down into the pan, and sear for a good 5-6 minutes, until the skin becomes golden browned. Flip and sear on the other side for 5 minutes more.
  • Add 1 more tablespoon of avocado oil to the remaining marinade, and pour half of it over the chicken. Use a basting brush to coat evenly.
  • Place the chicken in the preheated oven, and cook for 30 minutes, or until cooked through and juices run clear.
  • Once the chicken is done, baste with the pan drippings and serve with any remaining marinade to use as a dipping sauce.

NOTES**:

  • The BBQ sauce you use will make a HUGE difference in the flavor. I wouldn’t use an overly sweet one and prefer to make my own.
  • You can leave the sriracha out all together if you don’t want any heat at all.

BBQ SAUCE
2 cups ketchup
1 cup apple juice
1/2 cup apple cider vinegar
5 packed tablespoons light brown sugar
2 cloves garlic, smashed
2 teaspoons fresh ground pepper
2 teaspoons onion powder
Juice of 1 lemon
1 tablespoon Worcestershire sauce

  • In a large saucepan combine all the ingredients, stirring to blend.
  • Bring the mixture to a boil.
  • Reduce heat and simmer uncovered for an hour, stirring frequently.

ROASTED ASPARAGUS in CAJUN HOLLANDAISE SAUCE

ROASTED ASPARAGUS in CAJUN HOLLANDAISE SAUCE – serves 4
1 1/2 pounds asparagus
2 1/2 tablespoons Avocado oil
1/4 teaspoon Tony Chachere’s or Slap Ya Mama Creole Seasoning
Pinch paprika, for garnish

  • Preheat oven to 450°.
  • Cover baking sheet in foil.
  • Snap off woody asparagus ends.
  • Arrange asparagus in a single layer on baking sheet.
  • Drizzle with avocado oil and seasoning, turning to coat.
  • Roast until asparagus is is tender and beginning to darken in color.
  • Top with sauce and serve immediately.

SAUCE
8 tablespoons salted butter
2 LARGE egg yolks
Juice of 1 small lemon
1/2 teaspoon Tony Chachere’s or Slap Ya Mama Creole Seasoning
1/4 teaspoon FRESH ground black pepper
1/4 teaspoon Frank’s original hot sauce

  • Melt butter in a small saucepan until sizzling.
  • Pulse egg yolks in a small food processor.
  • Add lemon juice.
  • VERY SLOWLY drizzle in the hot butter. Sauce will immediately begin to thicken.
  • Add the Cajun seasoning, pepper and hot sauce, blending JUST until combined.
  • Drizzle sauce over asparagus and serve immediately.

NOTE:  If sauce thickens too much, add 1 tablespoon hot water at a time until you reach desired consistency.