PECAN PIE BROWNIE BOMBS ~ BLOG 366.313

Here’s another FACEBOOK recipe that was actually a success. I altered very little.

GOOEY PECAN PIE BROWNIE BOMBS

BROWNIES
1 recipe for an 8×8 pan of brownies, prepared without nuts (box mix or homemade)
LET COOL COMPLETELY.

PECAN PIE FILLING
2/3 cup chopped pecans or Walnuts, plus more for garnish (optional)
1 egg
1 & 3/4 tablespoons granulated sugar
1/3 cup Corn Syrup
1 tablespoon unsalted butter, melted and cooled
Pinch of salt

  • Preheat your oven to 350°.
  • Grease a 6-inch baking dish with cooking spray and add the chopped pecans.
  • In a small bowl, whisk together the egg, sugar, Karo Corn Syrup, melted butter, and a pinch of salt.
  • Pour this mixture over the pecans in the baking dish.
  • Tap the baking dish a couple of times on the counter to allow the pecans to rise to the top.
  • Bake for 20 minutes, until the center of the pecan filling is very slightly jiggly.
  • LET COOL COMPLETELY.

ASSEMBLY

  • Cut the hard edges off the brownies and discard them.
  • Cut the brownies into 16 even pieces.
  • In the palm of your hand, flatten a brownie piece and place about 1 teaspoon of the pecan pie filling in the center.
  • Wrap the edges of the brownie around the filling, rolling it into a ball and ensuring all the filling is covered.
  • Place the brownie bombs on a parchment paper-lined sheet tray.
  • Refrigerate for 1 hour to set.

FINISHING TOUCH
1 package chocolate almond bark, melted
chopped pecans for garnish

  • Dip each brownie bomb into the melted almond bark, allowing any excess to drip off.
  • Place the dipped brownie bombs back onto the parchment-lined sheet tray.
  • Immediately sprinkle additional chopped pecans on top, if desired.
  • Repeat for each brownie bomb.
  • Place the tray in the fridge for 5 minutes to harden the chocolate coating.
  • Serve and Enjoy.

BOSTON CREAM PIE CUPCAKES ~ BLOG 366.277

Are you a fan of traditional Boston Cream Pie? I AM!!!! Boston Cream Pie is my ALL time favorite dessert. And it is relatively easy to make using simple pantry ingredients, yet appearing beautifully elegant. The moist tender cake filled with rich vanilla pudding and then topped with a silky chocolate ganache is completely irresistible!

Every year since my cousin passed away in 1998 her sister and I make cakes on her birthday. With the passing of their father this past spring we will now also do it on his birthday. The day I made these would have been his 81st birthday and Boston Cream Pie was one of his favorites.

Traditional Boston Cream Pie was a dessert that grams made frequently for Sunday dinners so it has a status of not only a favorite recipe, but also one that evokes fond memories of family long lost. These made as individual cakes are a wonderful modern twist to a beloved classic that allows for individual indulgence in smaller portions. I’ve been making Boston Cream Pie for years in honor of grams, but must admit it never occurred to me to make them as individuals. These layered individual beauties are perfect in the new small bite format and bring a flavor symphony to your mouth!

Now all of that said, next time I will be assembling them differently. I found that there wasn’t enough custard doing it this way and having followed her recipe exactly also found that her ganache was too runny and not chocolatey enough. I will take pictures at that time and update this post to the changes.

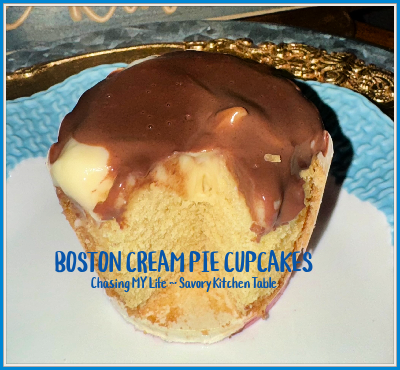
BOSTON CREAM PIE CUPCAKES  Adapted from Recipes by Clare

Clare offers dairy free and gluten free versions of her Boston Cream Pie Cupcakes at her site Recipes by Clare.

CUPCAKES

1 cup all-purpose flour
1 teaspoon baking powder

1/4 teaspoon salt
1/2 cup unsalted butter, room temperature
1/2 cup granulated sugar
2 LARGE eggs

1 1/2 teaspoons PURE vanilla extract

1/2 cup WHOLE milk

  • Preheat oven to 350° and line a muffin tin with cupcake liners or spray well with non-stick baking spray.
  • In a medium bowl, whisk together flour, baking powder, and salt. Set aside.
  • In a large bowl, beat butter and sugar together until light and fluffy.
  • Add eggs one at a time, beating well after each addition.
  • Mix in vanilla extract.
  • In a 3rd larger bowl combine the wet and dry ingredients alternately adding the flour mixture and milk to the butter mixture, beginning and ending with the flour mixture. Mix until JUST combined. DO NOT OVER MIX!!!
  • Divide the batter evenly among the cupcake liners.
  • Bake 18-20 minutes or until a toothpick inserted into the center comes out clean. Let cool completely.

CUSTARD FILLING

1/3 cup sugar

scant 3 tablespoons cornstarch
1 1/2 cup WHOLE milk
3 JUMBO egg yolks
1/2 cup heavy cream
1/4 teaspoon salt
2 teaspoons PURE vanilla extract

3 tablespoons unsalted butter

  • Combine the cornstarch, sugar, milk, eggs, cream, vanilla extract, and salt in a saucepan. Whisk until smooth.
  • Bring the custard to a boil over moderate heat, whisking constantly. Continuing to whisk, let the custard boil for two minutes.
  • Remove from heat, and whisk in the butter. Set custard aside to cool, continuing to whisk occasionally.
  • Once the cupcakes are cool, cut a small circle out of the center of each cupcake and fill with vanilla pudding.

GANACHE

1 cup heavy cream
1 cup semi-sweet chocolate chips

  • In a small saucepan, heat heavy cream JUST until it begins to simmer.
  • Remove from heat and pour over chocolate chips.
  • Let sit for 5 minutes, then stir until smooth and glossy.
  • Spoon the ganache over each cupcake, allowing it to drip down the sides.
  • Let the ganache set before serving.

NOTES WORTH CONSIDERING

  • Ensure that all ingredients are at room temperature to make a smoother batter.

  • Use a piping bag to fill the cupcakes with pudding for a cleaner result.

  • Enhance the flavor by adding a teaspoon of espresso powder to the chocolate ganache.

  • Serve these cupcakes with a scoop of vanilla ice cream or a glass of cold milk.
  • You can use a box pudding and it will work wonderfully, we just prefer homemade.

  • Store the cupcakes in an airtight container in the refrigerator for up to 3 days. Let them come to room temperature before serving for the best texture.
  • They freeze well before the ganache. Add ganache after thawing.

My version that I have made for many, many years!

BOSTON CREAM PIE
CAKE
1 cup sugar
5 tablespoons unsalted butter, softened
1 teaspoon PURE vanilla extract
1 JUMBO egg
1 1/4 cup cake flour
1 1/2 teaspoon baking powder
1/4 teaspoon salt
3/4 cup WHOLE milk

  • Preheat oven to 350°.
  • Butter and flour a 9 1/2-inch spring form baking pan OR line cupcake tin. I use a square spring form pan when I make a whole cake to make pieces easier to cut.
  • Combine the butter, sugar, and vanilla in a bowl and cream together using an electric mixer until the mixture is light and fluffy.
  • Add the eggs one at a time, beating thoroughly after each one.
  • In a separate bowl, sift together the flour, baking powder, cream of tartar and salt.
  • Combine the dry ingredients with the creamed mixture and add the milk.
  • Pour batter into the prepared pan.
  • Bake in the middle of the oven for 50 to 60 minutes, or until a toothpick comes out clean.
  • Remove from oven and let the cake cool in the pan on a wire rack.

CUSTARD

1/3 cup sugar
scant 3 tablespoons cornstarch
1 1/2 cup WHOLE milk
3 JUMBO egg yolks
1/2 cup heavy cream
1/4 teaspoon salt
2 teaspoons PURE vanilla extract
3 tablespoons unsalted butter

  • Combine the cornstarch, sugar, milk, eggs, cream, vanilla extract, and salt in a saucepan, whisking until smooth.
  • Bring the custard to a boil over moderate heat, whisking constantly. Continuing to whisk, let the custard boil for two minutes only.
  • Remove from heat, and whisk in the butter.
  • Set custard aside to cool, continuing to whisk occasionally.

GLAZE/GANACHE
2 ounces semi-sweet chocolate
3 tablespoons unsalted butter
1 cup powdered sugar
3/4 teaspoon vanilla
2 tablespoons hot water

  • In a double boiler, melt together the chocolate and butter until smooth.
  • Remove from heat and stir in powdered sugar and vanilla.
  • Stir in hot water 1 teaspoon at a time until desired consistency.

BUILDING THE PERFECT PIE

  • Remove the cake from the pan and cut it in half horizontally with a long serrated knife.
  • Place one half of the cake on a plate with the cut side facing up.
  • Top with custard.
  • Place the other half of the cake on top, with the cut side down.
  • Coat the top of the cake with glaze allowing it to drip down the sides.

NOTE: The traditional custard substitutes in this recipe for a pineapple custard which is what we like to do.
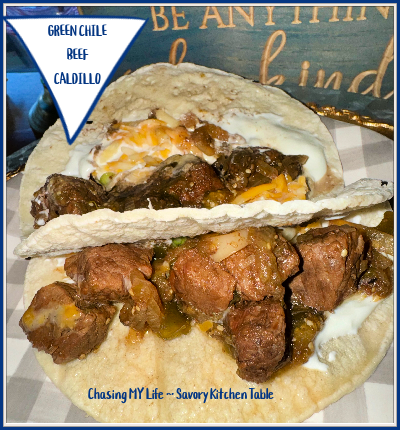
GREEN CHILE BEEF CALDILLO ~ BLOG 366.194

I saw this recipe on facebook and it looked oh so good!!! I just had to try it and am extremely pleased by the results.

GREEN CHILE BEEF CALDILLO

This thick, spicy, and flavorful dish becomes the MOST satisfying soup or stew you’ve ever had.

3 tablespoons avocado oil
1 1/2 – 2 pounds beef stew meat, cut into 1-inch cubes
FRESH ground sea salt and pepper, to taste
1 LARGE onion, chopped
3 cloves garlic, minced
1 pound tomatillos, husked and chopped
3-4 green chiles (such as poblano or Anaheim), roasted, peeled, and chopped
1 jalapeño, seeded and finely chopped (optional for extra heat)
4 cups beef broth
1 teaspoon ground cumin
1/2 teaspoon dried oregano
FRESH cilantro, chopped for garnish
Lime wedges, for serving (optional)

  • Heat oil in a large pot over medium-high heat.
  • Season the beef with salt and pepper.
  • Add the beef to the pot in batches, browning on all sides.
  • Transfer the browned beef to a plate.
  • Add the onion to same pan, cooking 3-5 minutes until softened.
  • Add the garlic, cooking for an additional minute until fragrant.
  • Stir in the chopped tomatillos, green chiles, and jalapeño (if using), cooking 5-7 minutes until the tomatillos start to break down.
  • Return the browned beef to the pot. SEE NOTE
  • Add the beef broth, ground cumin, and dried oregano, bringing the mixture to a boil, then reduce the heat to low.
  • Simmer, partially covered for 1 1/2 to 2 hours, or until the beef is very tender.
  • Taste and adjust the seasoning to taste with additional salt and pepper if needed.
  • Ladle into bowls.
  • Garnish with fresh cilantro and serve with lime wedges and warm tortillas on the side.

NOTE: At this point I usually use the slow cooker for 4-6 hours.

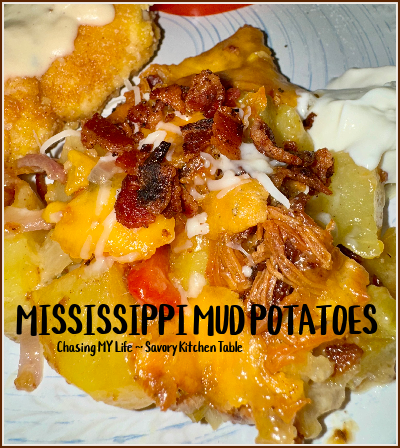
MISSISSIPPI MUD POTATOES ~ BLOG 366.184

This dish full of golden potatoes, sharp cheddar cheese and crisp bacon is baked to a perfect blending making it a decadent and hearty side dish full of creamy texture, rich flavors and a bit of crunch that you’ll find in every good southern cooks recipe box. I’d wager it is prepared by at least one cook for every church supper and/or holiday meal. These are the PERFECT comfort food! The key to these delectable potatoes is baking them LOW & SLOW so the flavors meld together!

Research on how the recipe originally acquired its name shows very little on the original version – its exact origins are unclear and as muddy as the name, but appears to have been named for the earthy flavors and the “muddy” mixture of ingredients. It does embody the spirit of Southern cooking with its generous use of local staples like potatoes and bacon, making them that staple in Southern kitchens and beyond.

MISSISSIPPI MUD POTATOES
6 cups potatoes, peeled and diced
1 cup shredded cheddar cheese
3/4 cup DUKES mayonnaise
FRESH ground sea salt and black pepper, to taste
1 cup cooked and crumbled bacon
3 cloves garlic, FINELY minced
1/2 cup FINELY chopped green onions

  • Preheat your oven to 325°.
  • Grease a 9×13 baking dish.
  • Mix together the diced potatoes, cheese, bacon, garlic and onion.
  • In a larger bowl whisk the FRESH ground sea salt and black pepper into the mayonnaise.
  • Fold the potato mixture into the mayonnaise mixture until everything is evenly coated.
  • Spread into prepared baking dish.
  • Bake for 1 1/2 hours, or until the potatoes are tender and the top is golden brown.
  • Serve hot!

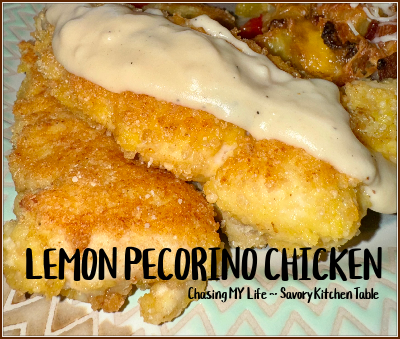
LEMON PECORINO CHICKEN ~ BLOG 366.180

LEMON PECORINO CHICKEN

CHICKEN
8 LARGE chicken tenderloins
½ cup AP flour
2 LARGE eggs
1 cup panko breadcrumbs
Zest from 1 LARGE lemon
FRESH ground sea salt and black pepper
¼ cup FRESH grated Pecorino Romano cheese
¼ cup avocado oil
2 tablespoons butter

  • Flatten all the chicken tenderloins to an even thicknesses.
  • Set up dredging station with flour, beaten eggs, and one with a mixture of panko breadcrumbs, lemon zest, and grated Pecorino Romano cheese.
  • Coat each tenderloin in the flour, then in beaten eggs, and then the breadcrumb mixture.
  • Heat oil and butter in a large nonstick sauté pan over medium heat.
  • Sauté the tenderloins 3-5 minutes on both sides until golden and cooked through. Work in batches if necessary – do not crowd the pan.
  • Drain on paper towels.

SAUCE
1 tablespoon avocado oil
1 tablespoon WONDRA flour
1 tablespoon FINELY minced garlic
¼ cup WHOLE milk
¾ cup heavy cream
¼ cup chicken broth
2 tablespoons lemon juice
1 tablespoon butter

  • In a medium saucepan, heat oil over medium heat.
  • Sauté minced garlic until fragrant.
  • Whisk in flour.
  • Gradually add milk, heavy cream and chicken broth.
  • Increase heat to medium-high and bring to a SLOW boil.
  • Cook 3-5 minutes until the sauce thickens.
  • Remove from heat and stir in lemon juice and butter.
  • Serve with FRESH pasta or mashed potatoes.
  • Drizzle the sauce over the chicken before serving. I made my sauce more like a gravy (thicker, but just as tasty) this time.

As seen on facebook:

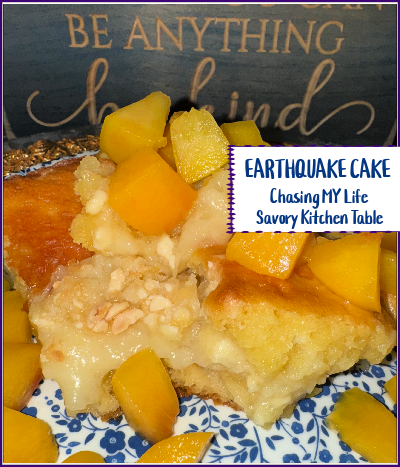
PEACH or STRAWBERRY EARTHQUAKE CAKE ~ BLOG 366.158

I found this recipe on Facebook originally and it looked so intriguing I just HAD to try it and am so glad I did! You won’t be disappointed either. The original recipe called for strawberries, but we LOVE it with peaches too. The picture on facebook is quite deceptive also – they evidently added a great looking glaze that isn’t included in their recipe. I will be adding the glaze below from now on.

EARTHQUAKE CAKE

1 white cake mix prepared per box directions
1 cup fruit pieces, chopped
8 ounces cream cheese, softened
1/2 cup unsalted butter, melted
4 cups powdered sugar
1 teaspoon PURE vanilla extract
1/2 cup sweetened and toasted coconut flakes
1/2 cup white chocolate chips, chopped

  • Preheat your oven to 350°
  • Grease a 9 X 13 baking dish.
  • Fold the chopped strawberries into the prepared cake mix.
  • Pour batter into the greased baking dish.
  • In another medium bowl, beat together the softened cream cheese, melted butter, powdered sugar and vanilla extract until smooth.
  • Drop spoonfuls of the cream cheese mixture over the cake batter in the baking dish.
  • Sprinkle coconut flakes and white chocolate pieces evenly over the top of the batter.
  • Bake 40-45 minutes until the cake is set and the edges have turned golden brown.
  • Allow the cake to cool COMPLETELY before serving. As it cools you’ll notice a beautiful cracked, earthquake cracked effect on the top, with delicious pockets of cream cheese and strawberry throughout. Top with additional chopped fruit if desired.

NOTE: Change up the fruit flavor as desired, peaches, blueberries, raspberries, blackberries or cherries work well also.

GLAZE (optional)
2 cups powdered sugar
1/4 cup lemon juice
1/2 teaspoon PURE vanilla extract

  • Whisk together the powdered sugar, lemon juice and vanilla.
  • Drizzle over cooled cake and let glaze harden 10 minutes or so before serving.
  • Transfer to serving platter and serve with FRESH blueberries or berry of choice 😀

This is what it looked like on facebook.

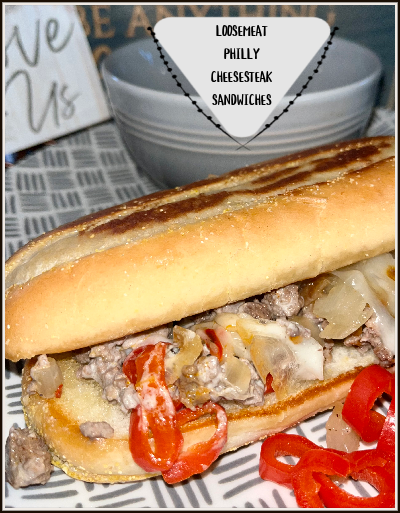
LOOSEMEAT PHILLY CHEESESTEAKS ~ BLOG 366.128

I needed to make Philly Cheese Steak sandwiches for a crowd and didn’t want to be a short order cook ALL night. So this version came to mind using ground beef and a sheet pan.

LOOSEMEAT PHILLY CHEESESTEAKS ~ serves 6, but easily doubles or triples adapted from FACEBOOK

1 1/2 pounds QUALITY ground beef
6 ounces cream cheese, softened
2 teaspoons Montreal hamburger seasoning
2 teaspoons Worcestershire sauce
2 tablespoons avocado oil
8 ounces white button mushrooms, sliced
3 LARGE bell peppers (green, red, or yellow), sliced *SEE NOTES
1 cup diced onion
8 ounces sliced or shredded Provolone cheese
FRESH ground sea salt and black pepper, to taste
Sandwich rolls
butter and garlic salt for rolls
Mayonnaise for rolls
Creamed Horseradish, to taste

  • Preheat oven to 350°.
  • In a small bowl whisk together mayonnaise and creamed horseradish with a little salt to taste. Set aside for dressing rolls before serving.
  • Spray a deep jelly roll sheet pan with non-stick cooking spray or line with foil.
  • In a large skillet, cook the beef over medium-high heat until browned. Drain.
  • Add the cream cheese, steak seasoning and Worcestershire sauce, cooking over medium heat or until cream cheese is melted and combined. Add a little milk or cream if you want the sauce thinner.
  • Add FRESH ground salt and pepper to taste.
  • Spread beef mixture on sheet pan.

  • Wipe out skillet, or use a second pan while the beef is cooking and heat oil over medium high heat.
  • Add the mushrooms, bell peppers, and onion cooking until veggies are soft.
  • Season to taste with FRESH ground sea salt and black pepper.
  • Spread veggies on top of beef mixture.
  • Top veggies mixture with Provolone cheese and bake in the oven for about 5-10 minutes or until cheese is melted.
  • Serve immediately on sliced grilled rolls that have been buttered and toasted with prepared mayonnaise.


NOTES:

  • I omit green bell peppers because I just can’t tolerate them and really prefer the sweetness that a red bell pepper adds to the mix.
  • Adding a little salt and creamed horseradish to the mayonnaise for the bread really OOMPHS up the flavor, but can easily be omitted.

GREEN ENCHILADA CHICKEN SOUP

Thank you Carrie for making me try this recipe. I had seen it on Pinterest and Facebook, but now I’ve gotten around to making it in reality. 😀

GREEN ENCHILADA CHICKEN SOUP

2 1/2 pounds boneless, skinless chicken breasts or thighs
1 recipe homemade green enchilada sauce (recipe below) or 1 (28 ounce) can green enchilada sauce
3 cups homemade chicken bone broth
1 cup half and half or heavy cream, depending on desired consistency
2 cups Monterey jack cheese or pepper jack cheese
4 ounces cream cheese, cubed at room temperature
4-8 ounces green salsa verde, to taste
FRESH ground salt and pepper, to taste

  • In a 6-quart slow cooker add chicken breast or thighs, green enchilada sauce, and chicken broth. Cook on LOW 6 to 8 hours.
  • Remove chicken and shred.
  • Add shredded chicken, jack cheese, cream cheese, half and half, and green salsa to slow cooker.
  • Turn slow cooker to warm and stir until cheeses are melted.
  • Add hot sauce or additional salsa to taste.
  • Top with lime wedges, avocado, cilantro, green onion, shredded cheese and sour cream or any other topping of your choice.
  • Serve and enjoy!

NOTE: you can short cut this recipe using chopped Costco chicken rotisserie pieces. They now come already picked in a large package. Using this chicken also makes it easy to cut the recipe in half or double it 😀

GREEN ENCHILADA SAUCE
Homemade Green Enchilada Sauce is a quick and simple homemade recipe for use in your TEX-MEX recipes.

1 recipe = 1 (28 ounce) can of store-bought green enchilada sauce

2 tablespoons avocado oil
1 cup chopped onion
2 garlic cloves, FINELY minced
1 cup UNDRAINED diced canned green chiles
2 cups homemade chicken bone broth
1 teaspoon cumin
1 teaspoon oregano
FRESH ground sea salt and black pepper, to taste
Optional to spice it up: 1 jalapeno pepper, diced

  • Heat oil in a skillet over medium high heat.
  • Saute onion until soft.
  • Add garlic and cook for 1 minute.
  • Reduce heat to medium.
  • Add green chiles, broth, cumin, oregano, salt, pepper, and jalapeno if using.
  • Simmer, uncovered, for 15 minutes until the liquid is reduced to about 3 cups, by about 25%.
  • Use an immersion blender to blend ingredients to your desired consistency.
  • Transfer back to your skillet.
  • If the sauce is for later use, let it cool, then store it in an airtight container for storage in your refrigerator or freezer. I use a canning jar with an airtight lid.

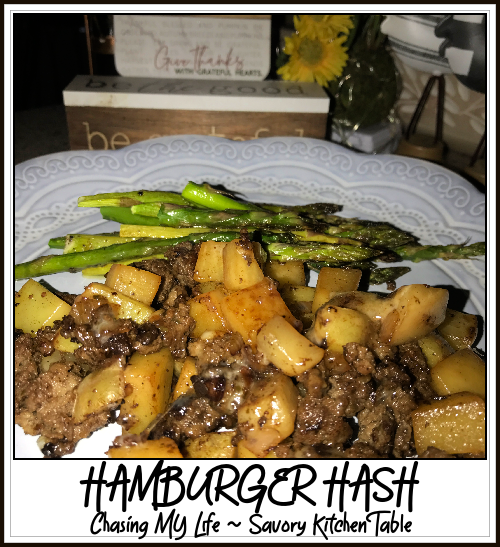
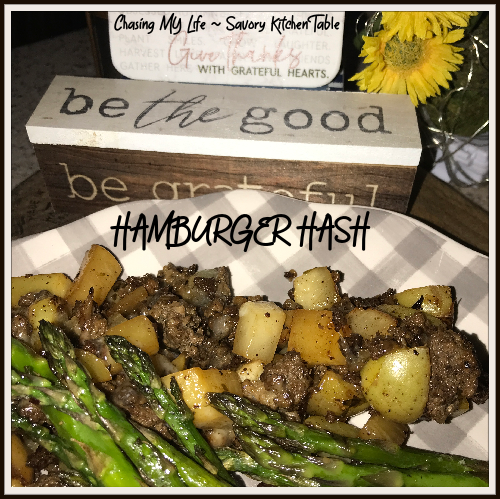
HAMBURGER HASH

Toss out the hamburger helper and make this instead. Another tasty one pot meal full of flavor and texture that’s quick and easy for classic comfort food weeknight family meal. The beauty of this recipe is that it is super easy to adjust the servings. I’m making most recipes for 2 these days, but just double or triple up and feed 4-6 in a jif.

HAMBURGER HASH – serves 2 adapted from SpaceShips and Laser Beams
Prep Time 15 mins Cook Time 20 mins Total Time 35 mins

1 SMALL russet potatoes, peeled and chopped into bite size pieces
1 small turnip or rutabaga, peeled and chopped into bite size pieces

3/4 pound lean ground beef
1/2 Vidalia onion, diced
2 teaspoons avocado oil
1-2 cloves garlic, minced
1 tablespoon Garden Gourmet Italian seasoning (or 2 teaspoons dried)
FRESH ground sea salt and black pepper
1/4 cup beef broth

1 1/4 cup shredded sharp cheddar cheese

  • Boil potatoes 3-5 minutes until tender, BUT NOT too soft.
  • Drain and set potatoes aside.
  • In a large nonstick or greased skillet, over high heat, cook ground beef until browned. Drain off fat. Set cooked beef aside.
  • 
Using the same skillet over medium heat avocado oil.
  • Add onion, potatoes, Italian seasoning, minced garlic, salt, and pepper. Toss well to evenly coat potatoes and onions in seasoning, cooking 10-15 minutes and stirring often until potatoes and onions have started to brown and crisp.
  • Fold ground beef back to the skillet, stirring well to mix.
  • Add broth and simmer until broth is mostly absorbed.
  • Add cheese, stirring until well mixed and melted.
  • Remove from heat.
  • Serve hot. 


NOTES

  • ALWAYS start your potatoes in cold water. Adding them directly to boiling water will immediately cook the outsides while the insides will take longer. Use a fork to gently pierce the potatoes while they are boiling. When the fork will pierce the potato easily but not break it apart, your potatoes are ready.
  • If using dried herbs, use a mortar and pestle or rub them between your clean dry palms to break them up and revive their flavor essence before adding them to your recipe.

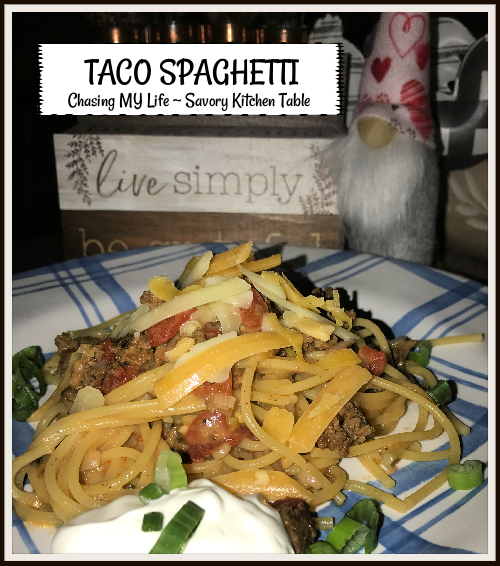
TACO SPAGHETTI

I loved this recipe because it was ALL made in the same pan so it’s quick and easy clean up, but also because I can no longer eat a lot of grain products so I still feel like I’m getting my tacos without have to deconstruct them! After making it exactly as written the first time, I adapted it the next time and found it was just easier and tastier to prepare the noodles separately.

You can always add your favorite taco toppings such as extra cheese, green onions or a dollop of sour cream to make it your own.

TACO SPAGHETTI servings 2 – adapted from Space Ships & Laser Beams

2 teaspoons avocado oil
1/3 pound QUALITY ground beef
1/4 cup chopped yellow onions
2 teaspoons taco seasoning
1/3 cup original Rotel tomatoes with juice
spaghetti noodles for 2, prepared al dente
1/3 cup homemade bone broth (chicken or beef – your choice)
1/2 cup Mexican style shredded cheddar/Jack cheese
scant 1/4 cup cilantro, chopped
minced green onions, for garnish
chopped olives, for garnish
chopped jalapeños, for garnish

  • Heat oil in a LARGE skillet over medium heat. 

  • Brown ground beef and onion in skillet until meat is no longer pink and onions are soft and translucent.

  • Add taco seasoning, tomatoes (including juice) and broth.

  • Cover and simmer for 10 minutes until most of the liquid is absorbed.

  • Stir in noodles, stirring to coat well and simmer 5 minutes more.
  • Remove from heat.
  • Sprinkle half of the cheese and half the cilantro into the pan and stir to coat the spaghetti with the cheese and sauce.

  • Top with remaining cheese and cilantro.
  • Serve with a dollop of sour cream and your favorite taco toppings.


NOTES

  • For the best flavor, grate your own cheese rather than using a store bought bag of grated cheese. The store bought grated version usually has an anti-caking agent on it so it doesn’t melt as well.
  • For a quicker weeknight cooking time, ground beef can be cooked ahead of time. Store in the refrigerator for up to 3 days or in the freezer for up to a month.

SUPERBOWL PARTY DIP TRAY ~ CHEESY GAME DAY DIPS ~ BUFFALO CHICKEN, BACON & CHEESE, SPINACH & ARTICHOKE, PHILLY CHEESESTEAK

ARE YOU READY FOR SOME FOOTBALL? or FOR SOME RACING? or HOW ABOUT SOME OLYMPICS? On this weekend we are doing grazing meals and this recipe I found on Facebook will be perfect!

I found this recipe on Facebook a couple years back and it was written for 4 dips done in a rectangle. Since it’s usually just the 2 of us I make much smaller quantities and have adjusted the flavors to our liking. I’ll then take the leftovers and mix them together if they are compatible and make another plate for the next day!

CHEESY GAME DAY DIPS

serves 12 people if you make ALL 4 dips

1 pound of your pizza dough

Avocado oil

BACON and CHEESE DIP
1 3/4 cup sour cream
8 ounces cream cheese, softened
2 1/2 cups shredded cheddar cheese, split
1 cup cooked bacon bits
1/4 cup chopped spring onions
1/2 teaspoon salt
1/2 teaspoon pepper

BUFFALO CHICKEN DIP
2 cups shredded rotisserie chicken
8 ounces cream cheese, softened
1-4 to 1/2 cup Frank’s original hot sauce (depending on your level of heat)
1/2 cup sour cream
1 cup FINELY grated cheddar cheese
1 clove garlic, FINELY minced
1 tablespoon FRESH chopped chives

SPINACH ARTICHOKE DIP
8 ounces cream cheese, softened
1/2 cup mayonnaise
½ cup sour cream
1/2 cup chopped artichokes
1/2 cup chopped spinach, thawed
1 cup grated mozzarella cheese
FRESH ground sea salt and ground black pepper to taste

PHILLY CHEESESTEAK
1 cup cooked beef, minced
FRESH ground sea salt and ground black pepper to taste
cooking spray
1 cup diced red onion
1 cup diced red pepper
1/4 cup mayonnaise
1/2 cup sour cream
4 ounces cream cheese, softened
4 ounces shredded mozzarella “provolone” cheese

  • Pre-heat oven to 350°.
  • Grease and line a deep sheet pan.
  • Mix together all ingredients for each dip until combined.
  • Roll pizza dough into ping pong size balls (20 grams) and place around the edge of the sheet pan and across through the middle to create four equal quarters. If only making 2 or 3 dips adjust your size and shape accordingly.
  • Spread one dip into each of the areas and smooth out.  
  • Brush the dough balls with avocado oil and let proof for 20 minutes.
  • Bake for 20-30 minutes until dough balls are golden brown and dips are bubbling.
  • Serve while warm, enjoy!

LOADED CHIP CRUSTED CHICKEN with BACON and CHEESE

I found this recipe on FACEBOOK awhile back, but can’t remember who from. I’ve adapted it slightly.  This crispy chip crusted chicken is loaded with a creamy, spicy and cheesy stuffing that’s juicy AND crunchy.

ACTIVE PREP TIME: 15 minutes
COOK TIME: 30 minutes
TOTAL START TO FINISH TIME: 45 minutes
SERVES: 4
WHY I’LL MAKE IT AGAIN: I’ll make this recipe time and again because it was FULL of flavor, crunchy and juicy.  Not to mention, everybody raved about it.
NOTES: Original recipe called for using Kettle cooked salt & pepper chips with a whole chopped seeded Jalapeno in the cheese mixture.  Hubby and I tried the salt and pepper chips and HATED them so I had to rethink the recipe.

LOADED CHIP CRUSTED CHICKEN with BACON and CHEESE serves 4

4 boneless skinless chicken breasts
1 8 ounce bag Kettle Cooked Jalapeno flavored Potato Chips
3 eggs, lightly beaten

STUFFING
8 oz cream cheese, softened
2/3 cup medium Jack or cheddar cheese
1/2 cup crumbled bacon
1 tablespoon BBQ sweet rub (recipe below)

  • Preheat oven to 375°.
  • Line a baking sheet with foil and spray with non-stick spray.
  • Use a sharp knife to slice each chicken breast almost all the way in half.
  • Open the slice and press each breast flat.
  • In a small bowl, combine the cream cheese, cheddar cheese, jalapeno, bacon, and sweet rub.
  • Spread 1/4 of the mixture onto each of the butterflied chicken breasts.
  • Fold the breasts over and press to smear the cream cheese mixture so it is evenly distributed within the chicken.
  • Using food processor pulse chips until they are broken down into crumbs.
  • Pour the crumbs out onto a shallow plate.
  • Add eggs to a shallow dish.
  • Dip the stuffed chicken breasts into the eggs, then into the chip crumbs, coating each side.
  • Once all of the chicken breasts are coated with the eggs and Kettle Chips, place them on your grill or onto a baking sheet and into the oven.
  • Cook for about 25 minutes, or until the internal temperature of the chicken reads 165°.
  • Serve immediately and enjoy!

SWEET RUB
¼ cup dark brown sugar
1 teaspoon FRESH ground sea salt
2 teaspoons FRESH ground black pepper
2 teaspoons sweet smoked paprika
2 teaspoons garlic powder
2 teaspoons onion powder
½ teaspoon cayenne pepper

  • Combine all of the ingredients for the rub in a small bowl.
  • Stir well to combine, using a fork to break up any clumps.
  • Store BBQ sweet rub in an airtight container. It will last 3-4 weeks.