Mushrooms

Mushrooms and Immunity

In cold and flu season, it is important to eat a balanced diet, including foods that can naturally maintain the immune system. While the science on mushrooms and immunity continues to evolve, we already know mushrooms offer a variety of nutrients associated with immunity. Popular mushroom varieties are a rich source of selenium, a mineral that works as an antioxidant critical for the immune system; and also have ergothioneine, an antioxidant that may help protect the body’s cells.

Mushrooms are low in calories, have no cholesterol and are virtually free of fat and sodium. Mushrooms also contain other essential minerals like Selenium, which works with Vitamin E to produce antioxidants that neutralize “free radicals” which can cause cell damage. Studies have suggested that selenium may reduce the risk of cancer, cardiovascular disease, may slow the progress of HIV disease and may aid in symptoms of rheumatoid arthritis, pancreatitis and asthma. Studies show men who eat selenium rich foods may lower their risk of prostate cancer.

Potassium (good for the heart) is also found in mushrooms. It has been suggested a diet with potassium may help to reduce the risk of high blood pressure and stroke. Copper is another essential mineral found in mushrooms. Copper aids iron (also found in mushrooms) in making red blood cells and delivers oxygen to the body. Mushrooms also contain three B-complex vitamins; riboflavin for healthy skin and vision, niacin aids the digestive and nervous systems, and pantothenic acid helps with the nervous system and hormone production. These vitamins are found in every cell and help to release energy from fat, protein and carbohydrates in food. Vegetarians should know that mushrooms are one of the best sources of niacin. The vitamin content of mushrooms is actually similar to the vitamin content found in meat.

Early Greeks and Romans are thought to be among the first cultivators of mushrooms, using them in a wide array of dishes. Today there are literally thousands of varieties of this fleshy fungus. Sizes and shapes vary tremendously and colors can range from white to black with a full gamut of colors in between.

The cap’s texture can be smooth, pitted, honeycombed or ruffled and flavors range from bland to rich, nutty and earthy. The cultivated mushroom is what’s commonly found in most U.S. Supermarkets today. However, those that more readily excite the palate are the more exotic wild mushrooms such as cepe, chanterelle, enoki, morel, puffball, shiitake and wood ear.

Because so many wild mushrooms are poisonous, it’s vitally important to know which species are edible and which are not. Extreme caution should be taken when picking them yourself.

Fresh mushrooms should be stored with cool air circulating around them. Therefore, they should be placed on a tray in a single layer, covered with a damp paper towel and refrigerated for up to 3 days. Before use, they should be wiped with a damp paper towel or, if necessary, rinsed with cold water and dried thoroughly.

Alternatively, store mushrooms unwashed and covered with a damp paper towel, then place inside a brown paper bag.

Mushrooms should never be soaked because they absorb water and will become mushy. Trim the stem ends and prepare according to directions.

Canned mushrooms are available in several forms including whole, chopped, sliced and caps only. Frozen or freeze-dried mushrooms are also available. Dried mushrooms are available either whole or in slices, bits or pieces. They should be stored in a cool, dry place for up to 6 months. Mushrooms are one of nature’s most versatile foods and can be used in hundreds of ways and cooked in almost any way imaginable.

Mushrooms are available all year round. They are best November through March. Caps should be closed around the stems. Avoid black or brown gills as this is a sign of old age. The tops are more tender than the stems. Refrigerate after purchase and use as soon as possible.

Never immerse mushrooms in a pan of cold water when cleaning, since they will absorb too much water. This will also make it more difficult to cook them, without losing flavor.

Mushrooms contain the same flavor enhancing substance found in MSG, glutamic acid.

Mushrooms are 90 percent water and do contain some natural toxins. It is best not to eat too many raw ones; cooking tends to kill the toxins.

There are 38,000 varieties of mushrooms, some edible, some very poisonous.

Truffles grow underground, are an oak or hazel tree fungus and are found by pig or dog sniffing truffellors. There are two types, black and white. They have a distinctive taste and are prized by many chefs in France and Italy. They are very expensive.

A chemical compound extracted from shiitake mushrooms has been approved as an anticancer drug in Japan after it was proven to repress cancer cells in laboratory studies.

To keep mushrooms white and firm when sauteing them, add a teaspoon of lemon juice to each quarter pound of butter.

If you are not sure of the safety of a mushroom, do not eat it regardless of the following test. However, the experts use the method of sprinkling salt on the spongy part, or the gills. If they turn yellow, they are poisonous, if they turn black they are safe.

Fact: The first mushrooms were thought to be cultivated in Southeast Asia, but it is not known why for sure. It is possible that someone discovered that mushrooms grew by accident or perhaps there was a demand and someone sought out a growing method.*

Fact: Whether mushrooms are wild or cultivated they continue to grow after they are picked. People sometimes mistake a thin white material called mycelium for mold, but rest assured it probably is the mycelium growing!

Fact: French farmers grew garden beds in the 1700’s which ended up being too small and too expensive. They later moved their crops to caves created when the stone for building Paris was quarried – this is where the name champignon de Paris originated. American farmers followed the same method.*

Fact: While mushrooms are canned, pickled and frozen, drying mushrooms is the oldest and most commonly used way to preserve mushrooms.

Fact: Mushroom compost can range from being manure or wood based (sawdust, wood chips) to utilizing materials like cocoa bean or cotton seed hulls, brewers grains , even exotic items like banana leaves as substrate.

Fact: One Portabella mushroom generally has more potassium than a banana.

Fact: Mushrooms continue to gain popularity, especially the specialty mushrooms such as Portabella, wild Morels, Oysters and Shiitake. Mushrooms, particularly the Portbella are often used in place of meat in many dishes.

Fact: Commercial mushroom farming began in the early 20th century. Pennsylvania and California are the largest mushroom producers.

Fact: Mushroom “farms” are climate controlled buildings; airflow, temperature and light are all constantly monitored.

Fact: Wild mushrooms can range in price for reasons such as taste, historical significance and availability. European truffles can sell for over $1,600 per pound!

Fact: Wild mushrooms can be found in many wooded areas. If you do choose to harvest wild mushrooms, make certain you have a professional identify your pick. Many mushrooms may resemble safe mushrooms (they are called false mushrooms) and can be poisonous.

*Facts from The Edible Mushroom A Gourmet Cook’s Guide by Margaret Leibenstein

Save

Brussels Sprouts

Recently there has been some good natured kidding with Dave from My Year On The Grill over at 
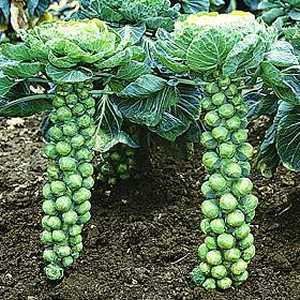
OUR KrAzY kitchen. LOL He’s been a good sport about it all. But I thought maybe it was time for a little education for those other naysayers out there. Brussels sprouts can be GOOD!


Source

Wikipedia history of Brussels Sprouts

From www.azcentral.com. Like all members of the cabbage family, Brussels sprouts are moderately low-carb and highly nutritious. A half-cup contains 7 grams of carbohydrate and 2 grams of fiber, for a usable carb count of 5 grams. It also has 2 grams of protein, a decent amount for a green vegetable. They’re a good source of potassium (247 mgs) and vitamin A (561 International Units). They have respectable amounts of vitamin C and folate, too.

Season: Peak season for Brussels sprouts is October through March.


Selection: Look for firm sprouts with tight, green leaves. Avoid puffy or soft sprouts with loose leaves. Wilted or yellow leaves indicate overripe sprouts.


Storing: Place in sealed container; store in refrigerator. Do not wash until ready to use. Use as soon as possible.


Preparation: Wash, remove loose leaves, trim stems. Cut a cross in each to speed cooking. Or slice into roughly 1/4-inch slices, if sautéing.


Seasonings: basil, caraway seed, dill, mustard seed, sage, thyme, curry powder, nutmeg, garlic, onions, garlic salt, pepper, cumin, marjoram, or savory.


For more information about Brussels:

http://www.brussels-sprouts.com/BSINFO.htm

http://www.foodland.gov.on.ca/facts/bsprouts.htm

The following information is from www.wholehealthmd.com.


Preparation


Before cooking, drop the sprouts into a basin of lukewarm water and leave them there for 10 minutes as this step will eliminate any insects hidden in the leaves. Then rinse the sprouts in fresh water. Trim the stem ends, but not quite flush with the bottoms of the sprouts, or the outer leaves will fall off during cooking.


Many cooks cut an X in the base of each sprout. This nick helps the heat penetrate the solid core so that it cooks as quickly as the leaves.


Whichever cooking method you choose, test for doneness by inserting a knife tip into the stem end, which should be barely tender.


Boiling: Use 1 cup of water for every cup of Brussels sprouts. Bring the water to a rapid boil in a large pot, add the sprouts, and quickly return the water to a boil. Cook the sprouts uncovered just until tender. Drain them, return them to the warm pot, and shake for a few seconds until dry. A little parsley added to the cooking water can reduce the cabbage flavor. Cooking time: seven to 10 minutes.


Braising: If you cook sprouts slowly in stock, you can reduce the liquid after the vegetable is done and use it as a sauce, thereby conserving nutrients. You can braise the sprouts on the stovetop in a heavy covered skillet, or in the oven. For oven-braising, place the sprouts in a casserole or baking dish and pour in enough stock to cover them. Cover and bake in a 350°F oven. Cooking time: 25 to 35 minutes.


Microwaving: Place 1/2 to 1 pound of Brussels sprouts in a microwavable dish; add 1/4 cup of liquid, cover, and cook. Cooking times: for medium sprouts, four minutes; for large ones, eight minutes.


Steaming: Sprouts can be steamed in a vegetable steamer or steam-boiled in a small amount of water. These methods have the advantage of keeping the sprouts intact, minimizing the chemical interactions that cause the sprouts to develop a strong flavor, and maximizing the retention of nutrients. To steam-boil, add the sprouts to 1″ of already-boiling water and cover. Steam or steam-boil for one to two minutes, uncover the pot for 10 to 15 seconds to disperse the strong-tasting sulfurous compounds that form when sprouts (and other members of the cabbage family) are cooking. Cover and finish cooking. Cooking times: steam-boiling, five to 10 minutes; in a steamer, six to 12 minutes, depending on size.

Here’s one of our favorite recipes – Garlic Lemon Brussels Sprouts

Microwaved Brussels Sprouts

Four servings. Quick and easy basic recipe.


1 pound Brussels sprouts (4 cups)

1/4 cup water


Wash sprouts, remove loose leaves, trim stems. Cut a cross in the core of each, if desired, to speed cooking time. Place in a 1 1/2 quart casserole. Cover and microwave at High until fork tender, from 4 to 8 minutes, stirring once. Let stand, covered, 3 minutes.


Season as desired.

Roasted Brussels Sprouts with Parmesan

Two servings.


2 cups small Brussels sprouts (25 to 30 sprouts)

1 tablespoon olive oil

Salt and pepper

1 tablespoon grated Parmesan cheese


Preheat oven to 400 degrees F. Wash sprouts, remove loose leaves, trim stems. Cut a cross in the core of each, if desired, to speed cooking time. Place in a medium-size roasting pan.


Sprinkle with olive oil, and season lightly with salt and pepper to taste. Roast for 20 minutes, or until tender, stirring occasionally. Sprinkle with Parmesan cheese and serve immediately.

Braised Brussels Sprouts with Vinegar and Dill

Twelve servings. From www.justvegetablerecipes.com.


3 lb Brussels sprouts

1/4 cup chopped fresh dill

2 tablespoons wine vinegar

Salt and pepper


Trim sprouts; cut in half if desired. In large pot of boiling salted water, cook Brussels sprouts for 8 minutes if whole, 6 minutes if halved, or until barely tender. Drain, refresh under cold running water and drain again.


In well-greased 13×9 inch casserole, combine sprouts, dill, vinegar, and salt and pepper to taste; mix well. Bake, covered, in 350-degree oven for 10 minutes. Uncover and bake for 5 minutes longer. Makes 12 servings.

Brussels Sprouts for People Who Think They Hate Brussels Sprouts

From Healthy Cooking with Dr. Andrew Weil.


1 pound Brussels sprouts

1 teaspoon salt

2 tablespoons extra virgin olive oil

1 teaspoon hot red pepper flakes, or to taste

5 cloves garlic, finely minced (or equivalent minced garlic in jar)

1/4 to 1/2 teaspoon nutmeg, or to taste (preferably freshly grated)

½ cup freshly grated Parmesan cheese


Trim the ends off the Brussels sprouts and remove and discard any discolored outer leaves. If sprouts are large (more than 1 inch in diameter), cut them in quarters lengthwise through the stem end. If smaller, cut them in half.


Bring 2 quarts of water to boil, add salt and the sprouts. Boil the sprouts uncovered until they are just crunchy-tender, about 5 minutes. Do not overcook them. Drain the sprouts well.


Wipe and dry the pot and heat the olive oil in it. Add the red pepper flakes and garlic and sauté for 1 minute. Add the sprouts and nutmeg and sauté for another minute. Mix in the Parmesan cheese and toss the sprouts until the cheese melts.

Sautéed Brussels Sprouts


12 fresh Brussels sprouts, sliced 1/4-inch thick (do NOT use frozen)

1/2 of a large yellow onion, thinly sliced (about 1/2 cup or or 3 to 4 ounces)

1 tablespoon canola oil

1/4 to 1/2 cup chicken broth (or chicken-flavored vegetarian broth)

1 teaspoon dried parsley (or 1 tablespoon fresh)

Freshly ground pepper to taste


Heat oil in a large, nonstick skillet; add Brussels sprouts and onion, and stir-fry 3 to 5 minutes. Add 1/4 cup broth and simmer about 5 minutes, or until Brussels sprouts are done, adding more broth if necessary.

Nutty Brussels Sprouts

Four servings. Source: Light & Easy Diabetes Cuisine by Betty Marks


1 lb Brussels sprouts

1 teaspoon virgin olive oil

8 toasted hazelnuts or toasted almonds

1/8 teaspoon ground cardamom


Wash Brussels sprouts and trim off bottoms of stems and loose leaves. Steam sprouts over boiling water until tender, 7 to 10 minutes. Remove sprouts to a serving bowl and stir in olive oil, nuts, and cardamon.

Shredded Brussels Sprouts

Six servings. Source: McCall’s Magazine, November 1992


1 1/2 lb Brussels sprouts

1/4 cup trans fat free margarine (Brummel & Brown is good)

1/2 teaspoon salt

1/4 teaspoon ground white pepper

2 teaspoons water

1 tablespoon fresh lime juice


In large bowl of cold, salted water, soak Brussels sprouts for 10 minutes. Drain; trim ends and discard any bitter outside leaves. Cut each sprout in half lengthwise; thinly slice crosswise.


In a large skillet, over medium high heat, melt butter. Add sprouts, salt and pepper; over high heat; sauté 5 minutes or until sprouts start to brown. Add the water; cook, stirring 2 to 3 minutes, until sprouts are crisp-tender. Stir in lime juice.

Brussels Sprouts Casserole

From www.justvegetablerecipes.com.


1 1/2 lb Brussels sprouts

1 medium onion, sliced

Olive oil

5 medium tomatoes, sliced

1/2 cup water

1 cup shredded soy cheese


Sauté onion in olive oil until transparent. Arrange Brussels sprouts in casserole with onions and tomatoes. Cover with water. Cover and bake at 325 degrees F for about 45 minutes. When sprouts are tender, remove from oven, sprinkle with the cheese, and brown under the broiler.

Browned Brussels Sprouts

Adjust amounts as desired. Very tasty.


1 lb Brussels sprouts

1/4 cup olive oil (or more)

2 garlic cloves, crushed


Prepare sprouts: wash, remove loose leaves, trim stems. Heat oil in a heavy-bottomed skillet (iron skillet is good). Add Brussels sprouts and “fry” them until they are dark brown all over. At the last moment, just before serving, stir in 2 crushed garlic cloves (or use 1 teaspoon crushed garlic from jar, or more to taste).


Lift them out with a slotted spoon, drain well (can put on paper towels to absorb excess oil). Salt lightly.

Stir-fried Brussels Sprouts with Carrots and Fresh Ginger

Four servings. From chef Maria Scanlon.


1 tablespoon oil (canola, light olive, or other on the approved SBD list)

1 large onion, thinly sliced

1 large carrot, grated

1 large clove garlic, chopped

1 teaspoon fresh ginger, chopped

12 medium-sized fresh Brussels sprouts, sliced

1 to 2 tablespoons reduced salt soy sauce

1/4 to 1/2 cup water


Heat the oil in a large nonstick pan, add the onion and cook over a high heat until the onion begins to soften and turn golden.


Add the carrot, garlic, and ginger and cook a further few minutes. Add the Brussels sprouts and continue stir-frying until they soften a little. Add the soy sauce and the water and mix well.


Cover the pan, reduce the heat to low and allow the vegetables to steam until they are cooked to your liking.

Sunny Brussels Sprouts

Four servings. This recipe uses frozen Brussels sprouts. From http://www.cooks.com.


1/2 cup sliced celery

1/2 cup thinly sliced carrots

1 (10 oz.) pkg. frozen Brussels sprouts

1/2 tsp. salt

1/2 cup boiling water

1 teaspoon prepared mustard

2 tablespoons trans-fat-free margarine (I use Brummel & Brown)

Salt

Freshly ground pepper

Dash of cayenne pepper


Cook celery, carrots, and Brussels sprouts, and salt in boiling water in saucepan until crisp-tender. Drain. Combine mustard and butter. Spoon mixture over vegetables. Season with salt, pepper, and cayenne pepper.

Save

ARTICHOKE TUTORIAL

One of the many things I miss most about the west coast is all of the available produce and the ability to grill ANY time of year without getting hypothermia while doing it!! I just can’t wait until we’re back home. In the meantime I’m taking advantage of ANY and all produce I can get.

A lot of people find artichokes intimidating. When artichokes are prepared well they are to die for. I even had a cream of Artichoke soup at a little cafe in Carmel a year or so ago that was excellent. I’m still trying to duplicate it.

There are more than 50 varieties of Artichokes. The most common type in the United States is the Green Globe. The mini versions you may see, known as baby artichokes are ideal for sautes and stir frying AND are as flavorful, if not more so than the larger ones. The size difference is due to where they grow on the stalk. The higher on the stalk, the bigger the artichoke.

Choosing an Artichoke:

  • You want an artichoke with a large heart and tender leaves.
  • Artichokes tend to have larger hearts if they are rounder.
  • They also have more tender leaves the smaller they get.
  • Look for deep-green, tight-leafed globes that feels heavy for its size.
  • When you squeeze the artichoke’s leaves together and it squeaks, it’s a fresh one.
  • Discoloration, bruising or split leaves are signs of age. Fresh artichokes may have purple-tinged leaves in late summer and fall.
  • It’s best to choose the smallest and roundest artichoke you can find.
  • I personally find large (grapefruit sized) Artichokes to be less tender and more fibrous. The small (egg sized) and medium (orange sized) ones are much more tender and easier to work with.

There are a few key secrets to preparing a great Artichoke:

  • Wash your Artichoke in cold running water and leave upside down to drain a few minutes.
  • Artichokes cannot be rushed – allow enough time for proper preparation. If you are going to be short on time, plan to prepare it the day before and then reheat.
  • You MUST trim the bottom stem and top leaves. Trimming the bottom rough part of the stem allows flavor to flow into the artichoke as it cooks. Trimming the top leaves (about 3/4 – 1 inch) does the same thing as well as removing the sticker part that WILL cut you if you’re not careful. Depending on how they look trim the very bottom leaves off the stem. Don’t be afraid to trim the tops as necessary. Remember that only about the bottom third of each leaf is actually edible.
  • Immediately rub any cut surface with lemon juice to prevent browning. You can also use flavored vinegars, but lemon juice is the most neutral.
  • Don’t forget even the stems are edible.
  • Never use a cast iron or aluminum pot to cook them in! The will discolor the pot AND the artichoke too! Use enamel or stainless steel.

Preparing your Artichoke:
There are as many ways to prepare an Artichoke as you have imagination. I’ll just list a few of the basic ones. Remember too that your seasoning and liquid all add flavor, so be creative. For example trade the water for chicken broth or add a touch of olive oil and garlic or flavored vinegars or juices…

You can also buy one of those baskets to stand your Artichoke in, but I prefer to use thick sliced onion rings in order to add a bit of flavor and have less mess when it’s all done. Despite most instructions you can cook an artichoke upside down too. I like this if I’m using many flavors. The flavors are being infused into the leaves and then the leaves are constantly draining back down into the base. This works much the same way as the drip knobs on the lid of a roasting pan. The onion rings work also either way.

  • Boiling: This is done with plain old water with a bit of salt. It has been determined that this is the least healthy way to prepare most vegetables since you are boiling the nutrients out of the vegetable itself. You add the Artichokes to rapidly boiling water. They take between 25-40 minutes until tender based on size.
  • Braising: This is the best method for using your flavored oils, vinegars and seasonings. Prepare your flavor combo and then add 2 cups water. Bring the mixture to a boil and reduce to a simmer before adding the onion rings and Artichokes. Cover tightly and simmer 25-40 minutes until tender.
  • DeepFrying: This is good for the hearts only.Dip them in the batter of your choice and fry until golden.
  • Grilling: Yep, you read right. Artichokes can be grilled and are EXCELLENT done that way. You do need to pre-cook them by steaming or microwaving until tender, but then it’s up to you. I then cut them right down the middle so I’ll have a flat side for the grill. I then like to soak them overnight in a lemon juice and garlic butter mixture before grilling. A Tupperware marinader that can be turned frequently without leaking works well. They don’t take long on the grill so just before you meat is finished grilling add the artichokes, turning frequently to prevent burning until the desired charring has been reached. Hubby has been known to add BBQ sauce and they are pretty tastey.
  • Microwaving: This is the fastest way, but not necessarily the tastiest. Stand Artichoke in a microwave safe bowl and add 1-2 inches of water. Cover bowl with a plate. Cooking on high a medium Artichoke will take 7-10 minutes while a large Artichoke will take 12-15 minutes. If cooking more than one at a time, you will need to add 2-3 minutes per additional each Artichoke. Let stand for 5 minutes in the covered bowl before serving.
  • Roasting: Roasting Artichokes will bring out their nutty flavor. This method also requires pre-cooking but reduce the precooking method time by 10 minutes. I like to dip each leaf into a combination of olive oil and garlic rice wine vinegar. I then let them drain a bit on a paper towel. Arrange the leaves on a stainless steel cookie sheet coated with a thin layer of PURE. Sprinkle lightly with salt. Roast in a 425 degree oven for about 10 minutes or until tender and and edges are just crisp. Start with the concave side of leaf down and turn mid way.
  • Sauteing: This method is also just for the hearts. Season with your favorite seasoning and then saute’ 3-5 minutes in your favorite oil.
  • Steaming: This is the most ideal method for maintaining the nutrients. Stand the Artichoke in the basket or onion rings. Add enough liquid that the pan won’t boil dry (you might have to add water so keep an eye on it), but make sure the Artichoke is above the water level. Cover and steam over the rapidly boiling water for 30-50 minutes until Artichokes are tender. Time depends on size.
  • Stuffed and Baked: This is one of my very most favorite ways to prepare an Artichoke. Pre-cook but reduce the precooking method time by 10 minutes. Halve the Artichokes. Mix together olive oil, Parmesan cheese, salt and pepper with a clove of garlic. Pulse into a thick paste. Using a spoon coat the inside of each leaf. Place on a stainless steel baking sheet sprayed with a thin layer of PURE. Bake at 400 degrees until tender. Drizzle with fresh lemon juice and butter immediately out of the oven. Serve with roast chicken or pork chops. YUMMY!

Save

FRENCH ONION & TOMATO SOUP


FRENCH ONION & TOMATO SOUP
4 tablespoons salted butter
3 medium Vidalia onions, thinly sliced
3 medium hot house tomatoes
1 tablespoon flour
1 teaspoon minced garlic, jar
6 cups chicken broth
1 tablespoon Better than Beef Bouillon
1 tablespoon kitchen bouquet
1 teaspoon sea salt
1 teaspoon celery salt
1 teaspoon paprika
1/2 teaspoon Worcestershire pepper
1/2 teaspoon onion powder
4 thin slices french or sourdough bread, toasted
4 slices Gruyere cheese*

  • Melt butter in bottom of stock pot.
  • Separate onions into rings and add to butter. Cook until tender and golden.
  • Add flour and blend well with butter mixture and onions.
  • Add broth, beef bouillon, kitchen bouquet, paprika, onion powder, celery salt, sea salt and pepper and stir well.
  • Simmer 15-20 minutes.
  • Toast bread and then butter it.
  • Ladle soup into 4 oven proof bowls that have been put on a cookie sheet for easier handling.
  • Place 1 slice of toast over top of soup.
  • Lay 1 slice of cheese on top of toast.
  • Bake at 400 degrees for 7 minutes or until cheese is melted.

Another great option is to use these cheesy baked croutons to top the soup. Both ways are super yummy!

BAKED CHEESY CROUTONS
6 slices thick sourdough bread
butter, melted, enough to coat bread
½ cup Fontina Cheese
½ cup grated Parmesan Cheese

Preheat oven to 350 degrees. Place bread slices on oven rack and bake until dry and golden. Melt butter in flat bowl. Combine cheeses in flat bowl. Dip first in butter and the cheese mixture. Bake on cookie sheet 8-10 minutes until cheese is bubbly and melted. Float croutons on top of soup bowls just before serving.

Yields: 6 BOWLS
Time to make: 1½ hr

*you’d think living close to Wisconsin, the cheese state, I could get all sorts of flavors of cheese, but alas I still can’t find gruyere and have been substituting provolone.

BBQ BAKED BEANS ~ OLD FASHIONED BOSTON BAKED BEANS

Not too long ago I researched Navy beans for my Navy Bean & Ham soup. During that research I also found that navy beans, named that for the bean of choice of the U.S. Navy, are the main bean used in Boston Baked Beans. I have been making my BBQ Bean dinner for years using canned BUSH beans, but decided it was time to make true Boston Baked Beans my way. I found that most versions used salt pork, but I like the bacon too so I chose to use both. You could substitute if your prefer though. I also eliminated all mustard due to an allergy, but also because I prefer the sweeter version.

Here is my version:

BOSTON BAKED BEAN DINNER
2 pounds ground beef
1/2 pound bacon, cooked and crumbled
1/2 pound salt pork, cubed & browned
2 large Vidalia or Maui onion, chopped small
4 tablespoons liquid smoke
1 cup ketchup
1 cup molasses
3 cups packed brown sugar
1 1/2 cup vinegar
1 pound navy beans

  • Soak beans overnight.
  • Brown hamburger, drain and layer into the bottom of your slow cooker.
  • Cube and brown the salt pork. Add to slow cooker.
  • Fry bacon until crisp. Crumble bacon into pieces. Add to slow cooker.
  • Chop onion into small pieces and scatter over the meat.
  • Add the beans to the slow cooker.
  • Scatter the brown sugar over top evenly.
  • Stir together the molasses, ketchup, vinegar, liquid smoke and Worcestershire sauce. Pour evenly over everything in the slow cooker slow cooker.
  • Cook on low for 4-6 hours.
  • Serve with Beer Bread or Cheddar Cheese Biscuits.
  • Great dish for a church pot luck.

OLD FASHIONED BOSTON BAKED BEANS
1 pound Navy beans, washed and sorted
1/2 pound salt pork, diced small
1 medium Vidalia onion, chopped
1/4 cup ketchup
1 cup packed brown sugar
1/4 cup apple cider vinegar
1/8 cup PURE maple syrup
1/4 cup molasses

  • Dice salt pork and layer on bottom of slow cooker.
  • Chop onion and scatter over salt pork pieces.
  • Wash and sort beans.
  • Place beans in slow cooker on top of salt pork.
  • Cover with 5 cups water.
  • Cook on low overnight for 12 hours.
  • Drain beans, reserving liquid.
  • Return beans to slow cooker.
  • Add vinegar, ketchup, brown sugar, maple syrup and molasses and blend well.
  • Add in 1/2 cup of bean water as desired for consistency.
  • Heat through for an hour or so.

REFRIED BEANS

REFRIED BEANS
2 1/2 cups pinto beans
1 small onion, chopped fine
4 tablespoons bacon grease
4 tablespoons butter
1 tablespoon sea salt
1 teaspoon pepper
1/2 teaspoon red pepper flakes
1cup sour cream
1 cup cheddar/ Monterey Jack grated cheese

  • Rinse beans and pick out any bad ones.
  • In a small stock pot cover the beans with about 3 inches of water. If there are still any bad beans in there they will float to the top.
  • Bring them to a boil, lower heat and simmer 2 hours or until skins break.
  • Drain.
  • In a heavy skillet (cast iron works best), melt the bacon grease and butter.
  • Saute’ onion until translucent.
  • Add beans and stir well.
  • Smash beans continuously until desired texture is reached.
  • Transfer beans into a large mixing bowl.
  • Use hand mixer and beat smooth.
  • Add sour cream, salt, pepper and red pepper.
  • Beat smooth again.
  • Transfer into a 9×9 casserole and top with cheese.
  • Bake 20 minutes at 350 degrees.

CHICKEN FRIED CHICKEN with PEPPERED GRAVY, Family Favorite Mashed Potatoes and Sugared Carrots

CHICKEN FRIED CHICKEN
2 large boneless chicken breasts
1 cup buttermilk
1 cup flour
1 teaspoon salt
1 teaspoon pepper
2-4 tablespoons butter(enough to keep chicken from burning~add as necessary)

  • Rinse and pat dry the chicken breasts.
  • In a shallow glass pan, pour buttermilk over chicken 1-2 hours prior to cooking.
  • Make sure to coat chicken well and turn at least once during soaking.
  • Drain, but do NOT rinse the buttermilk off.
  • In a medium sized fry pan melt the butter over medium heat. As butter melts and begins to very slightly sizzle, prepare breasts.
  • In a small ziploc bag mix together the flour, salt and pepper.
  • One at a time, put each chicken breast in bag and coat well with flour mix and then into sizzling butter.
  • Cook on one side until edges begin to bleed and then turn.
  • About 6 minutes each side depending on plumpness.
  • Keep chicken warm.

PEPPERED GRAVY
3 tablespoons butter
5 tablespoons Wondra flour
1 1/4 cups whole milk
3/4 cup whipping cream
3/4 teaspoon salt
1/2 teaspoon Black pepper + (to taste)

  • Melt butter into bottom of pan you just cooked the chicken in.
  • Scrape up any of the chicken pieces and mix into new butter.
  • Add flour slowly, stirring until absorbed by butter and golden brown.
  • Slowly add first the milk and then the cream.
  • Stir constantly until thickens.
  • If necessary sprinkle in more Wondra until desired thickness is reached.
  • Serve over chicken and mashed potatoes.

FAMILY FAVORITE MASHED POTATOES
4 large Yukon potatoes, peeled & quartered
4 ounces Philadelphia Cream Cheese, softened
1 small bunch green onions, sliced thin
1/4 + buttermilk
4 tablespoons butter
salt & pepper to taste

  • Boil potatoes in salted water until fork tender.
  • Drain.
  • Mash all together salt and peppering to taste.

SUGARED CARROTS
1 small bag baby carrots, washed
1 cup packed dark brown sugar
4 tablespoons PURE maple syrup
2 tablespoons melted butter

  • Preheat oven to 350 degrees.
  • Blanche carrots in sugared water until just tender.
  • Drain.
  • Blend together brown sugar, maple syrup and butter.
  • Toss with carrots.
  • Bake 20 minutes.

STUFFED MEATBALLS & ROASTED VEGGIE SPAGHETTI SAUCE

  • I start with whatever vegetables I have in the vegetable bin. Today was Roma tomatoes, celery stalks, green onions and snap peas.
  • Then I drizzle olive oil and salt and pepper over it all and bake it for an hour at 400 degrees.
  • I started the sauce with a can of Contadina tomato paste, 1 teaspoon Better than Beef Bouillon paste, 2 cups orange juice and a V8. This truly was a clean out the fridge day.
  • When done roasting add the vegetables to the sauce and set to simmer all day. The vegetables will continue to cook down into a uniform consistency with the sauce. Salt & pepper taste.


For the meatballs:
1 pound hamburger
1 pound sweet Italian sausage, casings removed
3 large slices sourdough bread, crumbled
2 eggs, beaten
1/2 cup grated Parmesan cheeseAlign Center
2 tablespoons fresh minced parsley
1 bunch green onions, finely minced
2 teaspoons minced garlic, jar
mozzarella cheese, about 4 ounces, cut into 1 inch cubes

  • Crumble bread into a large bowl.
  • Toss in Parmesan cheese, parsley, green onions and garlic.
  • Add meat and with your hands mix extremely well until you have a uniform mixture.
  • Roll meatballs around a Parmesan cheese cube.
  • Chill Meatballs until sauce is done.
  • Just before the sauce is finished, brown meatballs.**
  • Add the meatballs to the sauce and bring to a medium high simmer until meatballs are cooked though, about 20 minutes.
  • Prepare pasta and Parmesan Cheese Bread while meatballs are cooking.
  • Enjoy

**If you prefer you can add the meatballs directly to the sauce and SLOW simmer for a couple hours instead of browning.


GARLIC LEMON BRUSSELS SPROUTS & MUSHROOM RAGOUT

GARLIC LEMON BRUSSELS SPROUTS
1 dozen equal sized Brussels sprouts, washed and halved
2 tablespoons champagne vinegar (Balsamic Vinegar works well too)
1 lemon, juiced
3 green onions, sliced
3 cloves minced garlic
3 tablespoons butter

  • Wash, halve and drain the Brussels sprouts.
  • Melt butter over medium high heat.
  • Add green onions and garlic. Saute’ until golden.
  • Add Brussels sprouts and continue sauteing until tender.
  • Add lemon juice and champagne vinegar. Heat through.
  • Serve immediately.

MUSHROOM RAGOUT
3 cups mushroom mix (I used baby bellas and portabellas)
1 small shallot, minced
4 sprigs Thyme, minced
1/2 cup red wine
4 tablespoons butter
1/2 cup heavy cream
2 ounces demi-glace*
2 teaspoons minced garlic, jar
salt & pepper to taste

  • Melt butter in a large skillet over medium high heat.
  • Saute’ mushrooms until golden and tender.
  • Add shallots, garlic and thyme.
  • Continue to saute’ until translucent.
  • Deglaze the pan with the wine.
  • Add the cream and demi-glace.
  • Simmer until desired consistency.
  • Serve over HOMESTYLE MEATOAF and mashed carrots.


STIR FRIED GREEN BEANS WITH CASHEWS

STIR FRIED GREEN BEANS WITH CASHEWS
1 pound green beans; washed, trimmed & cut into bite sized pieces
1/2 cup cashews, chopped small
2 tablespoons butter
1/2 teaspoon ground ginger
1/8 cup soy sauce
Juice of 1 orange*
1 teaspoon honey
1 teaspoon sesame oil
1 teaspoon minced garlic, jar
1 tablespoon cornstarch
1 tablespoon water

  • In a small bowl whisk together the sesame oil, honey, soy sauce, garlic and orange juice until well blended. Set aside.
  • In a small bowl whisk the cornstarch and water together. Set aside.
  • In a skillet melt butter over medium high heat.
  • Stir fry the green beans 5-7 minuted until tender.
  • Add the cashews and soy sauce mixture.
  • Bring to a boil.
  • Add cornstarch mixture and simmer just until the sauce thickens and the beans are well glazed.

We had it with a slice of fresh bread and cantaloupe.
*You could substitute chicken broth.

Kitchen Dreams & Wishes


All about books, cookbooks that is:
Amazon’s book description: She’s taught us every facet of Italian cooking–from traditional and regional to seasonal and contemporary. She even made us fall in love with pasta again by opening us up to lighter, healthier versions that don’t weigh us down. Now the Food Network star and bestselling author of Everyday Pasta, Giada De Laurentiis, takes us down a new path, sharing her love of food with clean, vibrant, simple flavors and bursts of bright colors that look as beautiful on the plate as they are delicious.

Yes, you will still find those fabulous recipes she remembers so fondly from family meals, but you’ll also find updated twists on classic trattoria favorites–California-inflected, hearty but not overwhelming, and with the perfect balance of healthfulness and terrific flavor. Wouldn’t you love a faster, lighter take on osso buco (here made with turkey instead of veal), a salad with real substance (like one of cantaloupe, red onion, and walnuts), and fish that gets an Italian makeover by way of lots of fresh veggies and accents such as fennel and grapefruit salsa? And let’s not forget dessert. After all, what’s not to adore about little doughnuts dipped in chocolate sauce?

Ranging from soups and snacks to easy entres and elegant dinner-party fare, Giada’s recipes are perfect for any day of the week. And for the first time, she includes a full section of dishes that the little ones will love making as much as they love eating (like mini chicken meatballs). With something to please everyone at your table, Giada’s Kitchen deliciously demonstrates why Giada De Laurentiis has become America’s best-loved Italian cook.

Italy meets California in Giada De Laurentiis’s collection of 100 new recipes. She focuses on fresh ingredients, simple preparation, and bright flavors. Anyone who wants to indulge in the pleasures of Italian food without feeling weighed down will find inspiration for delicious, hearty yet healthy weekday meals. Giada’s recipes satisfy both our desire to eat with gusto and to feel good about what we eat.

Amazon’s book description: Slow-roasted meats, marinated vegetables, surprising flavor combinations, this is not your mother’s sandwich.

With acclaimed restaurants located across the United States, and a high-profile job as head judge of the hit show Top Chef, Tom Colicchio is one of the best-known chefs and personalities in the culinary world today. His popular chain of ’wichcraft sandwich shops is known for crafting sandwiches with high-quality fresh ingredients prepared to Colicchio’s exacting standards. And since the first ’wichcraft opened in 2003, diners can’t seem to get enough.

In ’wichcraft, Colicchio shares the shops’ secrets with step-by-step recipes for all their best-loved offerings.

Amazon’s product description: Anyone who has visited Carmine’s flagship Times Square restaurant knows that Carmine’s food is the best of classic Italian cuisine—each dish prepared simply to bring out the most vibrant flavor and make anyone who tastes it smile and reach for seconds.

Carmine’s Family-Style Cookbook reveals the simple secret of Carmine’s longtime success—hearty, rich Italian food, just right for sharing, and perfect for cooking at home!

Carmine’s Family-Style Cookbook’s perfect Italian recipes include:
–Appetizers, Soups and Salads: from Chicken Wings Scarpariello-Style to Carmine’s Famous Caesar Salad
–Carmine’s Heroes: from classic Cold Italian Hero sandwiches to Italian Cheesesteak Heroes
–Pasta: from Country-style Rigatoni to Pasta Marinara
–Fish and Seafood Main Courses: from Salmon Puttanesca to Shrimp Fra Diavolo
–Meat and Poultry Main Courses: from Porterhouse Steak Contadina to Veal Parmigiana
–Side Dishes: from Spinach with Garlic and Oil to Creamy Polenta
–Carmine’s Desserts: from Chocolate Bread Pudding to the world-famous Titanic Ice Cream Sundae

Carmine’s restaurant packs them in every night in its four bustling locations, including its warm, festive Times Square flagship where over a million people from all across the country come every year to share meatballs, chicken parmigiana, linguini with clam sauce, and fried calamari. Carmine’s flavors are the tastes Americans love to cook and eat at home—fresh garlic, bubbling tomato sauce, and pasta boiled just to the perfect al dente. Try any of the recipes in Carmine’s Family-Style Cookbook and bring home that classic Italian flavor to your family.

Almost Meatless by Joy Manning

excerpt from Amazon’s review: Despite its title, almost every recipe in this book uses meat, fish or eggs. A collaboration between Manning, a former vegan, and Desmond, an unabashed meat lover, the aim is to help Americans, who they believe eat far more meat than is healthy or good for agricultural sustainability, compose meals that are both tasty and filling without having a slab of meat as the overbearing star ingredient. Instead, meat appears in smaller quantities supplemented by layers of flavor in the form of additional savory ingredients that should keep people who usually expect lots of meat from noticing the difference.