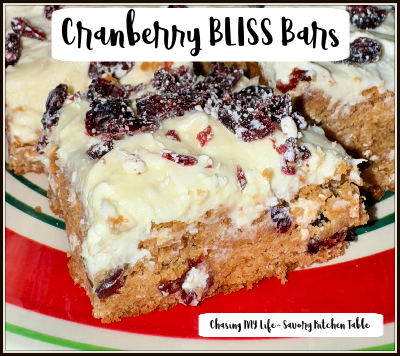
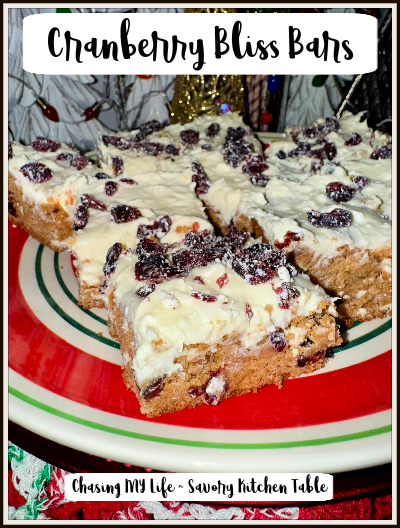
CANDY BAR RICE KRISPIE TREATS

CANDY BAR RICE KRISPIE TREATS adapted from RecipeGirl.com
1 tablespoon salted butter
1/4 cup creamy peanut butter
3 1/2 cups mini marshmallows
4 cups Rice Krispies
5-6 ounces chopped Butterfinger candy bars (or candy bar of your choice)*
1/2 cup milk chocolate chips
1 teaspoon shortening

  • Spray an 8×8-inch pan with nonstick spray.
  • In a large saucepan, melt the butter and peanut butter together over medium heat.
  • Add the marshmallows, stirring until melted.
  • Remove from heat and stir in the rice krispies.
  • Stir in the Butterfingers, reserving 1/4 cup as topping.
  • Scrape the mixture into the prepare pan and press it evenly into the pan with clean hands.
  • Let it cool.
  • Cut the Krispie Treats into nine equal pieces and move them to a platter.**
  • Melt the chocolate chips and the shortening together in a small saucepan or in a small glass bowl in the microwave or until they are melted and smooth.
  • Spoon the chocolate into a zip baggie, snip the corner and squeeze the chocolate into the corner.
  • Drizzle chocolate onto each Krispie Treat and then sprinkle with some Butterfinger crumbs and then drizzle more chocolate on top.
  • Place the Krispie Treats in the refrigerator for 10 minutes to set the chocolate. Do NOT leave them in the refrigerator – they will get too hard!
  • Store them in a covered container.

NOTES:

  • *Use a candy bar with a cookie or nut base along with the chocolate. We prefer Heath bars, KIT KATs or Butterfingers.
  • **You can eat them as they are or store them in a covered container. Otherwise continue with the topping directions.

COWBOY BROWNIES

COWBOY BROWNIES
BROWNIES

1/4 cup butter
2 ounces QUALITY unsweetened chocolate
2 LARGE eggs
pinch sea salt
1 cup sugar
1/2 teaspoon PURE vanilla extract
1/2 cup flour
1/4 cup unsweetened cocoa
1/4 cup caramel bits
1/2 cup chopped nuts – OPTIONAL – (pecans or walnuts)

  • Preheat oven to 325°.
  • Spray 9×9 baking dish with non-stick spray.
  • Add butter and chocolate to double boiler, melting together until smooth.
  • When chocolate mixture is cool add eggs one at a time and salt, stirring to combine until creamy.
  • Add the sugar and vanilla, beating well.
  • Add the flour and cocoa, stirring until JUST combined.
  • Fold in caramel bits and raisins as well as nuts if you are using them.
  • Pour batter into prepared pan and spread smooth.
  • Set aside while you prepare the cheesecake layer.

CHEESECAKE LAYER
8 ounces cream cheese, softened
2 tablespoons butter, melted
1 tablespoon cornstarch
1 cup sweetened condensed milk
1 LARGE egg
1 teaspoon PURE vanilla extract
1/2 cup chocolate mini chips

  • Cream together the cream cheese, butter, cornstarch and sweetened condensed milk until fluffy.
  • Add the egg and vanilla, beating until smooth.
  • Pour this layer over the brownie layer and spread smooth.
  • Sprinkle mini chocolate chips over the cheesecake layer.
  • Bake 50-60 minutes until cooked though and brownies are set.
  • Prepare icing just before brownies come out of the oven.

ICING
1/3 cup butter, melted
1/4 cup unsweetened QUALITY cocoa
1/4 cup WHOLE milk
1 cup powdered sugar
1 teaspoon PURE vanilla extract
1/2 cup chopped nuts – OPTIONAL – (pecans or walnuts)

  • Beat the butter, cocoa, milk, powdered sugar and vanilla together until smooth.
  • Spread icing on the brownies as soon as you remove them from the oven.
  • Sprinkle with nuts if you are using them.
  • Let stand until cool.
  • Cover any leftovers with saran and refrigerate.

NOTES: Good QUALITY chocolate, cocoa and vanilla make ALL the difference in the flavor of a good baked product 😀

HONEY BUTTER ROLLS ala SANDRA & SALLY

I have been looking for a soft and fluffy, but yet sweet like a Texas Roadhouse type roll for ages.  I accidentally found it by way of Sandra at Diary of a Stay at Home Mom who found the recipe over at Sally’s Baking Addiction.

The only change I made to Sandra’s version was to use the bread flour that Sally recommends.

HONEY BUTTER ROLLS  Original Source:  Sally’s Baking Addiction
1 cup whole milk, warmed to about 110°F*
2 and 1/4 teaspoons Red Star® Platinum yeast
1/2 teaspoon granulated sugar
1/4 cup honey
1 large egg + 1 egg yolk
1/4 cup unsalted butter, melted and slightly cooled
1/2 teaspoon salt
3 and 1/2 cups bread flour (spoon and leveled)

  • Pour warm milk into the bowl of a stand mixer fitted with a dough hook attachment.
  • Sprinkle yeast and 1/2 teaspoon sugar on top of the milk. Give it a light stir with a spoon and allow to sit for 5 minutes. The mixture should be frothy after 5 minutes. If not, start over with new yeast.
  • With the stand mixer running on low speed, add the honey, egg, egg yolk, melted butter, salt, and 3 cups of flour.
  • Beat on low speed for 1 minute, then add remaining 1/2 cup of flour.
  • Beat on low speed for 1 minute as it all combines. The dough should be thick, yet soft and only slightly sticky pulling away from the sides of the bowl as it mixes. When it does, it is ready to knead. If, however, the dough is too sticky to handle– add more flour, 1 Tablespoon at a time. Make sure you do not add too much extra flour; you want a soft, slightly sticky dough.
  • Form dough into a ball and turn it out onto a lightly floured surface.
  • Knead for 2 minutes, then place into a greased bowl– I usually just use olive oil or nonstick spray.
  • Turn the dough over to coat all sides. Cover the bowl with plastic wrap and place it in a warm environment to rise until doubled, about 2 hours. For this warm environment, preheat the oven to 200°, then turn oven off and place the bowl inside the warmish oven.
  • Once doubled in size, punch down the dough to release any air bubbles.
  • Remove dough from the bowl and turn it out onto a lightly floured surface.
  • Punch down again to release any more air bubbles if needed.
  • Using a sharp knife, cut the dough in half. Cut each half into 8 equal pieces for a total of 16 pieces that are about 1/4 cup each– golf ball size, give or take. They don’t need to be perfect!
  • Shape into balls as best you can and arrange in a greased 9×13 baking pan.
  • Loosely cover with plastic wrap and allow to rise until doubled in size and puffy, about 1 hour.
  • Preheat oven to 350°.
  • Bake the rolls for 18-21 minutes until the tops are golden brown and the edges of each roll look cooked.

TOPPING
1/4 cup (60g) unsalted butter, very soft
2 Tablespoons (42g) honey

  • Mix the topping ingredients together to make a creamy honey butter.
  • Remove the rolls from the oven when they are done and brush or spread a generous amount of honey butter onto each warm roll.
  • Serve with any remaining honey butter.
  • Cover leftovers and keep in the refrigerator for up to 1 week or freeze for up to 3 months, then thaw overnight in the refrigerator.
  • Warm up in a 300°F (149°C) oven for 10 minutes.

NOTES based on SALLY and SANDRA:

  • WHOLE milk will make the richest soft rolls.  Anything less will make them chewier and dense.
  • Don’t leave off that honey butter topping! The rolls will be lacking a little flavor without it. I prefer spreading the honey butter on the rolls after they bake as opposed to before they bake. The reason is because spreading or brushing butter on top of the delicate, airy unbaked roll weighs them down and encourages them to deflate. Best to spread on the honey butter right after baking.

HONEY BUTTER DIP BUTTERMILK BISCUITS

Tall, fluffy, sweet and buttery!  These biscuits NEVER disappoint!

HONEY BUTTER DIP BUTTERMILK BISCUITS Adapted from Brandie @ The Country Cook

1/2 cup (1 stick) butter
1 tablespoon QUALITY honey
2 1/2 cups all-purpose flour
1 1/2 tablespoon granulated sugar
1 1/2 tablespoon baking powder
1 1/2 teaspoon sea salt
Pinch FRESH ground black pepper
1 3/4 cup buttermilk

  • Preheat oven to 450°.
  • Melt butter.
  • Stir honey into melted butter.
  • Pour melted butter and honey into an 8×8 baking dish.
Sift together the flour, sugar, baking powder and salt.
  • Pour in the buttermilk into flour mixture, stirring until a loose dough forms, batter will be a bit sticky.
  • Pour biscuit dough into baking dish on top of the melted butter and spread as evenly as possible.  An offset spatula sprayed with non-stick spray helps.
  • Pre-cut the dough into 9 squares. This will help later when they are done.
  • Bake for about 20-25 minutes until golden brown and spring back to the touch, rotating dish once during baking.

unMORAVIAN CHICKEN PIE

I originally saw this recipe in Cook’s Country magazine and it sounded perfect for a COLD winter night. Hubby complained that it was too brown though and was really craving the veggies of a more traditional chicken pot pie (let’s face it many of us grew up on Swanson pot pies) so I adapted Kelly Price’s recipe in Cook’s Country magazine just a bit.

The name of the recipe really intrigued me (it sound like one of those made up countries for a royal wedding in a Hallmark movie 😀 ) so I did some research. A little history tutorial from wikipedia helped in understanding this recipe better.

I wanted to maintain the savory portion of this recipe as well as the original crust and gravy base, but needed to add some color and flavor for hubby which I guess makes it more of a a traditional chicken pot pie, but keeps my family happier 😀 I couldn’t do the open hearth so I settled for my oven. I did keep it protein heavy by not eliminating any of the chicken pieces when I added the veggies, so this becomes an overstuffed pie. This version uses a seared chicken instead of the boiled chicken. I think it adds another layer of flavor and makes things much simpler and quicker for me. You can even substitute rotisserie chicken pieces if you are in a serious hurry. I like to use chicken thighs because the dark meat is moister and has more flavor.

Moravians were a West Slavic ethnic tribe from Monravia, a region of the Czech Republic in the Early Middle Ages. Although it is not known exactly when the Moravian tribe was founded, Czech historian Dušan Třeštík claimed the tribe was formed between the turn of the 6th century to the 7th century, around the same time as the other Slavic tribes. The first known mention of the Moravians was in the Annales Regni Francorum in 822 AD. The tribe was located by the Bavarian Geographer between the tribe of the Bohemians and the tribe of the Bulgarians.

Like any historical area during the course of history, the control teetered back and forth. At times, the empire controlled even other neighboring regions, including Bohemia and parts of present-day Hungary, Poland and Ukraine. It emerged into one of the most powerful states in Central Europe. After the breakup of the Moravian Realm the Moravian tribe was divided between the new states Duchy of Bohemia and Hungary.

The western Moravians were assimilated by the Czechs and presently identify as Czechs for the most part. The modern nation of the Slovaks was formed out of the eastern part of the Moravian tribe within the Kingdom of Hungary.

Moravian chicken pie is a savory meat pie that seems to have originated in 1766 Salem, North Carolina by Moravian immigrants and were familiar with the preparation of meat pies, which are a staple of the cuisine of Central Europe, their ancestral home. It is a traditional double crusted pie made with flaky shortcrust pastry filled with only chunks of poached chicken meat and a thick broth-based sauce. In keeping with the simple, frugal Moravian lifestyle, the preparation of chicken pie required only five readily available ingredients (chicken, broth, flour, butter, salt) and a short baking time on an open hearth.  Unlike chicken “pot pies”, vegetables are never included in the filling. The pie is served in slices with hot chicken gravy on top, and extra gravy on the side. Mashed potatoes are a common accompaniment.

The traditional recipe for Moravian chicken pie has changed very little since colonial times, and its culinary fame has spread far beyond being just an iconic North Carolina dish. Moravian chicken pies are a staple of local church fundraisers, so much so that pastors are known to estimate the cost of various church projects by the number of chicken pies that must be sold to fund the project.

unMORAVAIN CHICKEN “POT” PIE serves 6-8 adapted from Kelly Price’s recipe in Cook’s Country
CRUST

1/2 cup sour cream
1 LARGE egg, lightly beaten
2 1/2 cups (12 1/2 ounces) all-purpose flour
1 1/2 teaspoons salt
12 tablespoons unsalted butter, cut into 1/2-inch pieces and chilled

  • Combine sour cream and egg in bowl.
  • Process flour and salt in food processor until combined, about 3 seconds.
  • Add butter and pulse until only pea-size pieces remain, about 10 pulses.
  • Add half of sour cream mixture and pulse until combined, 5 pulses.
  • Add remaining sour cream mixture and pulse until dough begins to form, about 10 pulses.
  • Transfer mixture to lightly floured counter and knead briefly until dough comes together.
  • Divide dough in half and form each half into 4-inch disk.
  • Wrap each disk in plastic wrap and refrigerate for at least 1 hour or up to 2 days. (Dough can be wrapped tightly in plastic and foil and frozen for up to 2 months. Thaw completely at room temperature before using.)
  • Remove 1 dough disk from refrigerator and let sit for 10 minutes.
  • Working on lightly floured counter, roll into 12-inch round and transfer to 9-inch pie plate, leaving 1/2-inch overhang all around.
  • Repeat with second dough disk and transfer to parchment – lined rimmed baking sheet.
  • Cover both dough disks with plastic and refrigerate for 30 minutes.

FILLING

2 1/2-3 pounds bone-in chicken thighs
FRESH ground sea salt and black pepper
1/2 teaspoon sweet paprika
1 tablespoon avocado oil
3 cups low-sodium chicken broth
1 bay leaf
2 tablespoons unsalted butter
1/4 cup WONDRA flour
1/4 cup half-and-half
1 LARGE egg, lightly beaten
1/3 cup chopped onion
3/4 cup frozen peas and carrots, thawed and drained

  • Pat chicken dry with paper towels and generously season with salt and pepper.
  • Heat oil in large Dutch oven over medium-high heat.
  • Cook chicken until browned all over, about 10 minutes; transfer to plate.
  • Pour fat (you should have 2 tablespoons) into small bowl; reserve. If you get less than 2 tablespoons of fat from browning the chicken supplement it with butter.
  • When chicken is cool enough to handle, remove and discard skin.
  • Add broth, chicken, and bay leaf to now-empty pot and bring to boil.
  • Reduce heat to low and simmer, covered 15-18 minutes, until breasts register 175°.
  • Transfer chicken to bowl.
  • When chicken is cool enough to handle, shred into bite-size pieces, discarding bones.
  • Pour broth through fine-mesh strainer into second bowl and reserve (you should have about 2¾ cups); discard bay leaf.

ASSEMBLY & BAKING

  • Adjust oven rack to lowest position and heat oven to 450°.
  • Heat butter and reserved fat in now-empty pot over medium heat until shimmering.
  • Add flour and cook, whisking constantly, until golden, 1 to 2 minutes.
  • Slowly whisk in 2 cups of reserved broth and the half-and-half and bring to boil.
  • Reduce heat to medium-low and simmer gravy 6-8 minutes until thickened and reduced to 1¾ cups.
  • Season to taste.
  • Combine 1 cup gravy with shredded chicken; reserve remaining gravy for serving.
  • Fold in onions, peas and carrots.
  • Transfer chicken mixture to dough-lined pie plate and spread into even layer.
  • Top with second dough round, leaving at least 1/2-inch overhang all around.
  • Fold dough under itself so that edge of fold is flush with outer rim of pie plate.
  • Flute edges using thumb and forefinger or press with tines of fork to seal.
  • Cut four 1-inch slits in top.
  • Brush pie with egg and bake 18-20 minutes until top is light golden brown.
  • Reduce oven temperature to 375° and continue to bake 10-15 minutes more until crust is deep golden brown.
  • Let pie cool on wire rack for at least 30 minutes.

FINAL GRAVY

  • Add remaining ¾ cup reserved gravy and remaining ¾ cup reserved broth medium saucepan and bring to a SLOW boil.
  • Simmer over medium-low heat 5-7 minutes until slightly thickened.
  • Season to taste with salt and pepper.
  • Serve pie with gravy.

NOTE: The pie may seem loose when it first comes out of the oven; it will set up as it cools.

ZUCCHINI GINGER CAKE with GINGER CREAM CHEESE FROSTING

ZUCCHINI GINGER CAKE with GINGER CREAM CHEESE FROSTING ala Valerie Bertinelli

CAKE
Unsalted butter, for the pans
3 ½ cups all-purpose flour, plus more for the pan
1 ½ pounds zucchini
2 teaspoons baking powder
1 ½ teaspoons baking soda
1 ¼ teaspoons salt
1 ½ teaspoons QUALITY ground cinnamon
1 teaspoon ground ginger
½ teaspoon ground cloves
2 cups light brown sugar
4 LARGE eggs
1 ⅓ cups avocado oil
¾ cups whole milk
1 ½ tablespoon finely grated fresh ginger
1 ½ teaspoons vanilla extract

  • Preheat the oven to 350º.
  • Butter and flour two 9-inch cake pans.
  • Grate the zucchini on the large holes of a box grater, then wrap in a clean kitchen towel and squeeze dry.
  • Whisk the flour, baking powder, baking soda, salt, cinnamon, ground ginger and cloves together in a large bowl.
  • In a second large bowl, whisk the brown sugar, eggs, oil, milk, fresh ginger, vanilla and grated zucchini. Add the flour mixture to the wet ingredients and stir until just combined.
  • Divide the batter between the prepared cake pans; smooth the tops with an offset spatula.
  • Bake the cakes until a wooden pick inserted into the center comes out clean, about 30 minutes.
  • Cool in the pans for 10 minutes, then invert onto a cooling rack and cool completely.
  • Use a serrated knife to carefully cut each cake in half horizontally, making four layers. OPTIONAL!

FROSTING
24 ounces cream cheese, softened
2 sticks (1 cup) unsalted butter, softened
6 cups confectioners’ sugar
½ cup finely chopped crystallized ginger, plus a few pieces sliced into thin strips, for garnish

  • Beat the cream cheese and butter in a large bowl with an electric mixer until smooth.
  • Gradually add the confectioners’ sugar, beating until incorporated
  • Beat in the chopped crystallized ginger.

ASSEMBLY (NOTE: – most times I just make a 2 layer cake which really only needs half as much frosting)

  • Place a cake layer on a cake stand or platter.
  • Spoon a quarter of the frosting (about 1 1/2 cups) on top and smooth it evenly with an offset spatula.
  • Stack another cake layer on top; repeat with the frosting.
  • Continue with the remaining cake layers and frosting, leaving the sides of the cake bare. Top with the sliced crystallized ginger.

LEMON POPPY SEED BLUEBERRY ROLLS

LEMON POPPY SEED BLUEBERRY SWEET ROLLS

FILLING
1/2 cup granulated sugar
1/8 teaspoon salt
2 tablespoons unsalted butter melted
1 teaspoon vanilla extract
the zest of one lemon
1 cup FRESH small wild blueberries or defrosted frozen berries

  • Combine  sugar, and salt in bowl.
  • Stir in melted butter, lemon zest, and vanilla extract.
  • Fold in blueberries.
  • Set aside while you prepare the dough.

DOUGH
1 1/4 cup whole milk, divided
4 teaspoons instant or rapid-rise yeast
2 tablespoons granulated sugar; divided
2 3/4 cups all-purpose flour
2 1/2 teaspoons baking powder
3/4 teaspoon salt
1 tablespoon poppyseeds
6 tablespoons unsalted butter, divided

  • Butter a cast iron baker or basking dish.
  • In a small heat proof bowl heat ¼ cup of the milk in the microwave until 110 degrees (about 15 to 20 seconds).
  • Stir in yeast and 1 teaspoon of sugar and let sit until bubbly.
  • Mix together flour, baking powder, salt, poppy seeds and remaining 5 teaspoons of sugar together in large bowl.
  • Stir in 2 tablespoons butter, yeast mixture, and remaining 1 cup of milk until dough forms.
  • Transfer dough to a floured counter and knead until smooth ball forms, about 2 minutes.
  • Roll dough into a 12 by 9 inch rectangle, with long side parallel to counter edge.
  • Brush dough all over with 2 tablespoons melted butter, leaving ½-inch border on far edge.
  • Sprinkle dough evenly with filling, then press filling firmly into dough.
  • Loosen dough from counter and roll away from you into a tight log and pinch seam to seal.
  • Roll log seam side down and cut into 8 equal pieces.
  • Stand buns on end and gently re-form ends that were pinched during cutting.
  • Place 1 bun in center of prepared pan and others around perimeter of pan, seam sides facing in.
  • Brush the tops of the buns with remaining 2 tablespoons butter.
  • Cover buns loosely with plastic wrap and let rise for 30 minutes.
  • Preheat the oven to 350°.
  • After rising, bake buns until edges are well browned, 23 to 25 minutes.

Loosen buns from sides of pan with paring knife and let cool for 5 minutes.

LEMON CREAM CHEESE ICING GLAZE
2 ounces cream cheese, softened
3 tablespoons butter, softened
Juice of one lemon
1/2 teaspoon vanilla
3/4 cup powdered sugar
pinch of salt
*More lemon zest for topping

  • Mix together softened cream cheese and butter until smooth.
  • Add lemon juice, confectioners sugar, vanilla, and salt and mix until combine.
  • Pour glaze evenly over tops of buns, spreading with spatula to cover.

TENDER WHITE CAKE with BUTTERCREAM or CREAM CHEESE BUTTERCREAM

CAKE
1/2 cup (1 stick) salted butter, softened at room temperature
1 3/4 cups sugar
6 large egg whites, room temperature
3 2 3/4 cups + 2 scant tablespoons cake flour
2 1/2 teaspoons baking powder
1/2 teaspoons salt
1 teaspoon CLEAR almond extract
1 teaspoon PURE vanilla extract powder
1 1/4 cups WHOLE milk, room temperature
2 ounces avocado oil

  • Preheat your oven to 335ºF.
  • Oil and flour two 8″ x 2″ cake pans or line 18 cupcake tins.
  • Whisk together flour, baking powder and salt. Set aside.
  • Whisk together milk, oil and extracts. Set aside.
  • Cream butter in a stand mixer until smooth.
  • Add sugar and whip 3-5 minutes on high until light and white.
  • Add in room temperature egg whites one at a time, letting each fully combine after each before adding the next.
  • Add in a third of the dry ingredients, combining well.
  • Add in half of the milk mixture, combining well.
  • Followed by another third of the dry, then the rest of the milk mixture and then the rest of your dry, mixing until just combined.
  • Add batter into prepared cake pans.
  • Bake at 25-35 minutes or until a toothpick comes out clean.
  • Let cool ten minutes in pan and then turn out cakes onto a cooling rack for another 20 minutes.
  • Wrap cakes warm with saran and place into the freezer to flash chill to lock in the moisture.
  • Once cool, but NOT yet frozen, trim off the brown edges of your cakes and frost as desired.
  • Chill cake.

NOTE: Cake flour makes a much more tender cake, but you can substitute 2 3/4 cups all purpose flour. Cake flour and all purpose flour are NOT an exact substitution.

Everyone needs a good creamy, delicious frosting in the recipe file, but sometimes you need options. So here is a plain buttercream AND a cream cheese buttercream.

BUTTERCREAM
8 ounces egg whites (4-6 extra large eggs) room temperature
32 ounces (8 sticks) unsalted butter
4 cups powdered sugar
32 oz unsalted butter room temperature
1/2 teaspoon salt
1 tablespoon CLEAR vanilla extract

  • Whisk egg whites and powdered sugar in a mixing bowl.
  • Whisk to combine on low then whisk on high, adding in your butter in small chunks, vanilla and salt. Turn mixer up to high and whip until light, fluffy and white.

CREAM CHEESE BUTTERCREAM
4 ounces salted butter, room temperature
8 ounces cream cheese, room temperature
4 cups powdered sugar
pinch salt
1 teaspoon of QUALITY, PURE Vanilla

  • Beat cream cheese, butter and vanilla in a mixer until blended.
  • Add pinch of salt and powered sugar a cup at a time and continue to mix until sugar is WELL incorporated.

BRIOCHE PLUM TART ala Dorie Greenspan

Years ago (2009ish) I participated in a baking group called, Tuesdays with Dorie aka TWD, where we baked exclusively from Dorie Greenspan’s cook book, Baking: From My Home to Yours. There was one particular recipe that I REALLY wanted to bake, but I had to miss that week for some reason and am FINALLY getting around to making it.

I love the simplicity of the brioche in this recipe, but LOVE that it’s a bit sweeter than your average brioche. The dough is better made the day before – you get much better results from letting it sit overnight. I happened to have bought some sour plum jam at the Christmas fair just to make this tart with! It’s really hard to find plum jam in the grocery stores, even before the COVID19 shortages. Your beautifully sweet brioche dough is filled with tart jam and fresh plum slices to create a really fancy and decadent coffee cake!

BRIOCHE PLUM TART pg 54-55
DOUGH
1 1/2 teaspoons active dry yeast
1/3 cup whole milk, just warm to the touch
2 cups all-purpose flour
3 tablespoons sugar
pinch of salt
5 tablespoons unsalted butter, melted and cooled
2 large eggs, at room temperature
1 teaspoon PURE vanilla extract

  • Put the yeast and warm milk in the bowl of a stand mixer and stir until the yeast is dissolved.
  • Add the rest of the ingredients to the bowl, and fit the mixer with the dough hook, if you have one.
  • Working on low speed, mix for a minute or two, just to get the ingredients together.
Increase the mixer speed to medium and beat for 7–10 minutes, stopping a few times to scrape down the bowl and the hook, until the dough is stretchy and fairly smooth. The dough will seem fairly thin, more like a batter than a dough, and it may not be perfectly smooth which is fine.
  • Transfer the dough to a clean lightly greased bowl, cover with plastic wrap and leave it in a warm place until nearly doubled in size, 30 – 40 minutes.
  • Deflate the dough by lifting it up around the edges and letting it fall with a slap into the bowl. Cover the bowl again with plastic wrap and put it in the refrigerator.
  • Slap the dough down in the bowl every 30 minutes until it stops rising, about 2 hours.
  • After that leave the dough in the refrigerator overnight – it will be tastier for the wait.

the NEXT DAY

  • Generously butter the pan.
  • Press the chilled dough into the bottom of the pan and up the sides – don’t worry if it’s not even.
  • Cover the pan loosely with plastic wrap and refrigerate for 30 minutes.
  • While the dough is in the refrigerator, prepare the filling.

FILLING
6 LARGE ripe plums, preferably Italian prune plums
2 tablespoons coarsely chopped walnuts, pecans or almonds
3 tablespoons sugar

  • Halve and pit the plums.
  • Slice each plum in half and then into 4-5 slices. Set aside.
  • Toss the chopped nuts with the sugar and set aside.

ASSEMBLY
1/4 cup plum jam

  • Remove the tart pan from the fridge and push and press the dough up the sides of the pan.
  • Spoon the jam onto the dough and spread it over the bottom.
  • Arrange the plums cut side down in concentric circles covering the jam.
    Scatter the nut mixture, and cover the tart lightly with a piece of plastic wrap.
Place the tart on a baking sheet lined with parchment or a silicone mat and let it rest in a warm place for 30 minutes.

BAKING

  • Meanwhile, center a rack in the oven and preheat the oven to 425°.
  • Bake tart for 20 minutes.
  • Cover it loosely with a foil tent to prevent the crust from getting too dark, and continue baking for another 10 minutes, or until the fruit juices are bubbling and the crust is firm and beautifully browned – it will sound hollow when tapped.
  • Transfer the tart to a rack to cool for at least 45 minutes before serving.

NOTE: This tart looks BEST when it’s made in a 9 inch fluted pan, but I also love using my 9 inch spring form for just about everything these days.  I made a second one, but was out of the plum jam now and nuts so I substituted blackberry jam and heath bar pieces for the nuts.  Guess what?  It was even better!!!!


SNICKERDOODLE THUMBPRINTS for EASTER

I don’t know about you, but I have been watching A LOT of television during this pandemic lock down.  Or at least I have had it on to keep me company.  I had a Hallmark movie on the other day while I was cutting quilt pieces and they mentioned a cookie that I had all but forgotten about and can’t even remember the last time I made.  So, I dug out the recipe and made a batch for Easter.  I hope you are enjoying your Easter as best as you can and enjoy these cookies too.

SNICKERDOODLE THUMBPRINTS yield: 4 dozen

2¼ cups all-purpose flour
1 teaspoon cream of tartar
½ teaspoon baking powder
½ teaspoon baking soda
½ teaspoon salt
1 cup unsalted butter, softened
1⅔ cups sugar, divided
2 egg yolks
1 teaspoon PURE vanilla extract
1+ 1 teaspoon QUALITY ground cinnamon
1 cup prepared apple butter

  • Preheat oven to 350°.
  • Line baking sheets with silpats or parchment paper.
  • In a medium bowl, sift together flour, cream of tartar, baking powder, baking soda, 1 teaspoon cinnamon and salt.
    In a large mixing bowl, combine butter and ⅔ cup sugar. Beat at high speed with a mixer until light and creamy.
  • Add egg yolks and vanilla extract, beating until combined.
  • Add flour mixture, beating until incorporated.
  • In a small bowl, combine remaining 1 cup sugar and 1 teaspoon cinnamon, stirring to blend.
    Using a levered 2-teaspoon scoop, drop dough into cinnamon-sugar mixture, tossing to coat.
  • Place dough balls 2 inches apart on prepared baking sheets.
  • Using your thumb or the back of a rounded measuring spoon, press an indentation into the center of each dough ball.
  • Fill each indentation with ½ teaspoon apple butter.
  • Bake for 7 minutes.
  • Remove pans from oven, and fill each indentation with an additional ½ teaspoon apple butter.
  • Bake another 6-8 minutes until edges of cookies are golden brown.
  • Transfer cookies to wire cooling racks, and let cool completely.
  • Store in a single layer in airtight containers, and refrigerate for up to a day.

CINNAMON CRUMB STREUSEL COFFEE CAKE

Years and years ago I made the Bisquick box recipe of Cinnamon Crumb Streusel Coffee Cake and it was always a BIG hit. But as I progressed to scratch cooking it was apparent that my favorite coffeecake recipe had to be revamped! But, it had to remain moist, full of cinnamon flavor, buttery and with a bit of crunch to the top.

CINNAMON CRUMB STREUSEL COFFEE CAKE
CAKE

1 stick butter, softened
3/4 cup sugar
1 teaspoon PURE vanilla
1 LARGE egg
2 cups flour
2 teaspoon baking powder
pinch salt
3/4 cup WHOLE milk

  • Preheat the oven to 350°.
  • Cream together the butter and sugar, scraping down the sides occasionally.
  • Add the vanilla and egg, mix in.
  • In a separate bowl, sift together the flour, baking powder and salt.
  • Add one half of flour mixture to the mixer, and when mostly combined, add the milk.
  • Once the milk is mostly incorporated, add the rest of the flour. This will be a fairly thick batter.

FILLING
3 tablespoons butter, softened
1 tablespoon QUALITY cinnamon
1/2 cup flour
1/2 cup PACKED brown sugar

  • In a small bowl, using 2 forks or a pastry cutter combine everything until soft crumbs form.

TOPPING
5 tablespoon butter, softened
3/4 cup flour
1/2 cup PACKED brown sugar
1 tablespoon QUALITY cinnamon

  • In a small bowl, using 2 forks or a pastry cutter combine everything until soft crumbs form.

ASSEMBLY

  • Grease a 9×9 baking pan.
  • “Pour” in ½ of cake batter, and spread evenly.
  • Sprinkle the filling over top.
  • “Pour” in remaining cake batter, and with an offset spatula spread carefully across the top of the filling.
  • Sprinkle the topping over the top and press lightly so it adheres.
  • If you prefer your streusel to be more distributed, use a knife to create a bit of a swirl throughout the layers.
  • Bake in preheated oven for 45-50 minutes, until a toothpick inserted comes out clean.
  • Cool slightly on wire rack before serving.

NOTE: My dad always would add a pat of butter to the top and let it melt for a few seconds in the microwave when eating it as a leftover 😀

HOMEMADE SWEETENED CONDENSED MILK

During this isolation time, I’m returning to more and more scratch cooking – even more than I normally do 😀 I wanted to make some of my homemade COWBOY BROWNIES, but they called for sweetened condensed milk and I didn’t have any and was NOT going out to get any so decided to dig out the recipe to make my own.

HOMEMADE SWEETENED CONDENSED MILK – Makes 1 1/4 cups.
This Homemade version of sweetened Condensed Milk recipe makes a super delicious, made from scratch version of sweetened condensed milk for baking. It also makes a GREAT coffee mate or protein drink additive 😀

2 cups WHOLE milk
3/4 cup sugar, honey, or maple syrup (depending on the flavor you’re looking for)
4 tablespoons salted butter, cut into small pieces
1 teaspoon PURE vanilla extract

  • Whisk together milk and sugar, honey or syrup in a medium saucepan over medium-low heat.
  • Whisking often, bring to a low simmer and whisking often, simmer until milk has reduced by half, about 30-45 minutes.
  • Once reduced, remove from heat and stir in butter and vanilla.
  • Allow to cool COMPLETELY!
  • Store in a mason jar in the refrigerator for up to 1 week.