Category: BLOG 365
FABULOUS FRIDAY ~ BLOG 365.31
ONE POT WONDER PORK & SCALLOPED POTATO STEW ~ BLOG 365.30 ~ COOKING THURSDAY
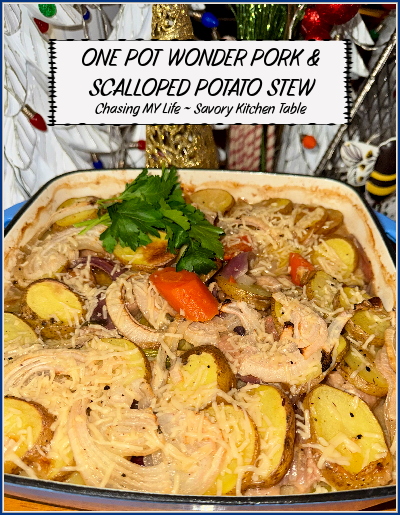
ONE POT WONDER PORK & SCALLOPED POTATO STEW adapted from Mary Berg
PORK STEW
1 1/2 pounds trimmed pork shoulder, cut into 1-inch cubes
FRESH ground sea salt and black pepper
2 tablespoons plus 1 teaspoon WONDRA flour
1 tablespoon avocado oil
1 tablespoon unsalted butter
1 red onion, peeled and cut into 8 wedges
1 LARGE carrot, cut diagonally into 3/4-inch slices
1 leek, white and light green parts only, washed and cut into 1-inch slices
4 garlic cloves, roughly chopped
1 cup dry cider or alcoholic apple cider
1 cup homemade chicken stock
1 sprig fresh sage, leaves picked and chopped and reserved for the topping
1 bay leaf, optional
1 firm sweet apple, such as Gala
Juice of 1 SMALL lemon juice
2 handfuls (about 2 cups) roughly chopped FRESH spinach
- Place a large cast-iron skillet or oven-proof pan over medium-high heat.
- Season the pork in a large mixing bowl with salt and pepper.
- Scatter pork pieces with 2 tablespoons flour and toss to coat well.
- Add the avocado oil to the pan and sear the pork in batches until golden brown.
- Transfer to a plate.
- Add the butter to the pan along with the onion, carrot and leek pieces, cooking 5-7 minutes, just until they begin to develop a little color.
- Stir in the garlic along with the remaining 1 teaspoon flour and cook for 1 minute more.
- Add the pork pieces and any juices back into the pan.
- Add the cider, scraping the bottom of the pan to release any brown bits.
- Stir in the stock, sage sprigs and bay leaf, bringing to a boil.
- Cover the pot, reduce the heat to low and simmer for 45 minutes.
- Peel and cut the apple into 8 to 12 wedges, toss with the lemon juice and set aside with the greens.
SCALLOPED POTATO TOPPING
1/3 cup heavy cream
FRESH ground sea salt and black pepper
FRESH grated nutmeg
1 tablespoon finely chopped lemon thyme, plus more for serving
3 medium yellow potatoes, sliced 1/4-inch thick
1 small Vidalia onion, thinly sliced rounds
Sour cream, for serving (optional)
- In a large bowl, whisk together the cream with salt, pepper, a pinch of nutmeg and chopped lemon thyme.
- Preheat the oven to 400°.
- Remove the bay leaf from the stew.
- Fold in the apples and greens.
- Submerge the potato and onion slices in the cream mixture.
- Arrange the sliced potatoes on top, alternating between the two colors, tucking in slices of onion here and there.
- Transfer the pan to the oven.
- Bake for 45 minutes to 1 hour, or until the potatoes are tender and golden brown on top.
- Cool for 10 minutes before serving.
- Serve with sour cream and a sprinkling of sage if desired.

WORDLESS WEDNESDAY ~ BLOG 365.29
RASPBERRY TRUFFLES ~ BLOG 365.28

RASPBERRY TRUFFLES Yield 25 truffles
Creamy delectable insides with a crunchy outer shell make these the perfect bite! They always impress when I include them in my neighbor plates at holiday time. PLUS there’s no baking involved.
1.6 ounce freeze dried raspberries (about 1/2 cup)
1 package white chocolate chips or bars 14 ounce
2 Tablespoons unsalted butter
¾ cup heavy whipping cream
1 package dark chocolate (bittersweet chocolate) 14 ounce
- Add raspberries to a food processor and pulse until fine powder. Set aside.
- In a large glass bowl, add white chocolate with butter. Set aside.
- In a small saucepan, heat heavy cream over low. Simmer, but DO NOT boil. When warmed through, pour over the white chocolate and butter. Allow to sit for 5-10 minutes.
- After 5 minutes, use a spatula to stir the white chocolate until smooth and combined.
- Stir in freeze dried raspberry powder. Taste for flavor. If not strong enough, add another 1-2 tablespoons of powder. I find that 1/2 cup is plenty for both color AND flavor. Reserve a pinch of powder to sprinkle on top of the truffles later.
- Place plastic wrap over the bowl and chill in the refrigerator for 2 hours.
- Line a baking sheet with wax paper.
- Using a small 1 tablespoon cookie scoop, scoop mixture and roll in ball, place on wax paper. Repeat with remaining mixture.
- Put the tray of truffles back in the refrigerator (or freezer) for 30 minutes.
- Melt dark chocolate in a double boiler for the best results.
- Using a fork (or toothpick), dip each truffle in melted chocolate, tap on side of bowl to remove the excess, then place back on wax paper.
- Sprinkle with a pinch of the remaining raspberry powder or sprinkles.
HAPPY HOMEMAKER MONDAY, MENU & RECIPES week 4 of 2025 ~ BLOG 365.27

Be sure to join Happy Homemaker Monday with our host, Sandra at Diary of a Stay at Home Mom
LAST WEEK RECAPPED
Last week was a bit of a blur as I worked hard to get all my Eagles and Offyce shopping (and they were BIG shopping weeks! – my car, a BIG SUV was SUPER full!) done and work shifts (Tuesday, Wednesday and Thursday) before leaving Friday on our long weekend at the beach which was glorious (COLD, but glorious) by the way!
While we didn’t have snow last Tuesday like so much of the rest of the country (Houston, New Orleans, Alabama, Florida beaches…), but we did have the largest power outage in the country and on our coldest day yet this winter. Our bird bath has been frozen solid for over a week!
We got home yesterday in time for the last football game – YAY for Jean as the Chiefs try to break a record of back to back to back Superbowl wins. I have all the laundry from last week and the trip to do as well as get some groceries shopped for and the house cleaned. I’ll be working again this week on Tuesday night and making the dessert for Friday night as well as the Eagles and Offyce shopping all over again this week so am just going to jump in and finish this post quickly so I can get going even though the temperature outside is only up to 18°.

THOUGHT FOR THE DAY

THE WEATHER OUTSIDE
It’s still SUPER COLD! The rain is returning at the end of the week and our first SNOW is forecasted for the weekend! This is just how SNOWMAGGEDON began!
TO DO LIST, APPOINTMENTS & PROJECTS
|
THIS WEEK’S TO DO LIST, PROJECTS & APPOINTMENTS
|
|
DVR/TV TIME
|
WHAT’S ON THE DVR/TV
|
|
READING TIME
Trying to finish LILAC INK THE KNOCKNASHEE STORY by Jean Grainger. We did start Hang the Moon by Jeanette Walls on audio while we were gone, but that didn’t get very far. I have one to start for book club this weekend, but I hate that it feels like a class assignment so may be skipping this one.

FUNNIES

MENU PLANS
BREAKFAST is always a work in progress for me – it will generally be hot water and a fruit yogurt 😀
|
1/27 MONDAY
|
1/28 TUESDAY
|
1/29 WEDNESDAY
|
1/30 THURSDAY
|
1/31 FRIDAY
|
2/1 SATURDAY
|
2/2 SUNDAY
|
|
|
DINNER
|
AUXILIARY MEETING so will pick up take out on the way home
|
WORKING THE EAGLE’S KITCHEN so will eat there.
|
CHICKEN WINGS and
CORN on the COB
|
TOMALITO CHICKEN ENCHILADAS
|
CHICKEN TETRAZZINI supporting Lu’s dinner at the Eagles
|
POT ROAST & VEGGIES
|
CHILI & CORNBREAD |
|
DESSERT
|
|
BLUEBERRY CHEESECAKE BREAD PUDDING
|
BLUEBERRY PEAR SLAB PIE making this for Lu’s dinner
|
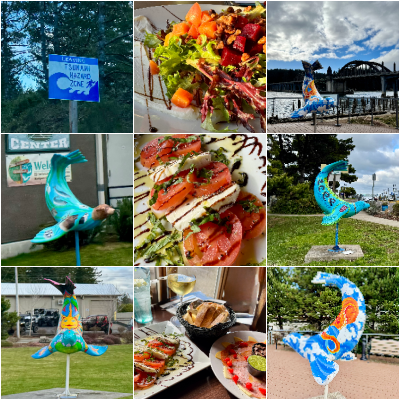
FAVORITE PHOTOS FROM THE CAMERA
It was such a packed weekend that I’m just making a collage of some of my favorite foods, scenes and activities. The picture with the odd guy in it was really funny. He was a window washer and he only washed ONE window out of twenty. We guessed that someone reserved that table for a special dinner that night and paid extra to have it washed 😀


INSPIRATIONS


LIFE TIP

HOMEMAKING / COOKING TIP

RECIPES COMING UP THIS WEEK
- RASPBERRY TRUFFLES

- PORK & SCALLOPED POTATO STEW

RECIPE LINKS FROM LAST WEEK
WEEKLY FEATURED PARTY LINKS

SILENT SUNDAY ~ BLOG 365.26
SATURDAY COFFEE ~ BLOG 365.25
FABULOUS FRIDAY ~ BLOG 365.24
WORDLESS WEDNESDAY BLOG 365.22
HAPPY HOMEMAKER MONDAY, MENU & RECIPES week 3 of 2025 ~ BLOG 365.20

Be sure to join Happy Homemaker Monday with our host, Sandra at Diary of a Stay at Home Mom
LAST WEEK RECAPPED
Last week started fairly SLOWLY, but then took own a life of its own… and by the time it was over I was putting out fires all over the place and trying to cover shifts at the Eagles because so many people are coming down quite sick. I spent Saturday and Sunday avoiding people and staying home to watch the NFL playoff games. (YAY Jean)

THOUGHT FOR THE DAY


THE WEATHER OUTSIDE
It’s been absolutely beautiful this past weekend after the fog FINALLY cleared and we once again saw the sun. Unfortunately, clear nights also mean COLD nights in the mid 20’s. We’ve been lucky to see 40 degrees during the day. Obviously we’re still in layer season 🙂 with UGGs and comfy flannels.
ON MY MIND
On this holiday Monday I decided this quote was perfect! Now if the rest of the world would just listen!

TO DO LIST, APPOINTMENTS & PROJECTS
|
THIS WEEK’S TO DO LIST, PROJECTS & APPOINTMENTS
|
|
DVR/TV TIME
|
WHAT’S ON THE DVR/TV
|
|
READING TIME
I’m back to falling asleep so quickly I forget what I’ve read and end up reading the same paragraph over and over days on end 🙁 I’m STILL just about done with THE ROSE CODE by Kate Quinn and am going to start LILAC INK THE KNOCKNASHEE STORY by Jean Grainger

FUNNIES

MENU PLANS
BREAKFAST is always a work in progress for me – it will generally be hot water and a fruit yogurt 😀
|
1/20 MONDAY
|
1/21 TUESDAY
|
1/22 WEDNESDAY
|
1/23 THURSDAY
|
1/24 FRIDAY
|
1/25 SATURDAY
|
1/26 SUNDAY
|
|
|
DINNER
|
REUBEN SOUP & GRILLED CHEESE
|
PORK CHOPS with SPINACH SAUCE and HALUSKI
|
FLANK STEAK, SMASHED TATERS & GLAZE CARROTS
|
CORN/YOYO clean out refrigerator night or you’re on your own
|
OUT OF TOWN
|
OUT OF TOWN
|
OUT OF TOWN |
|
DESSERT
|
|
WACKY CAKE
|
|
FAVORITE PHOTOS FROM THE CAMERA
Meet TITO, an adorable puppy I saw last week. I popped in to pick up a couple things from our local co-op and found Linda snuggling this little guy that another customer was out and about socializing. I think TITO likes socializing 😀

INSPIRATIONS


LIFE TIP

HOMEMAKING / COOKING TIP

RECIPES COMING UP THIS WEEK
MAPLE WHISKEY PUMPKIN BUTTER  SALTED CARAMEL APPLE BUTTER

RECIPE LINKS FROM LAST WEEK
- APPLE WALNUT CAKE with CARAMEL GLAZE

- BACON CHEESEBURGER BALLS

- TEXAS TRASH DIP aka CHEESY BAKED COWBOY DIP
WEEKLY FEATURED PARTY LINKS


