Freezer Convenience, Garlic Logs

I make this handy dandy convenience product for myself, and it happens to be a great gift to foodie friends as well. If you grow your own garlic, this would be wonderful at harvest time. However I currently do not grow garlic, so I get a big bag at Costco.
This is really simple, takes about an hour, with exception to the cooling time for the roasted garlic. Your investment of time, will give back to you ten fold. Lets get started…..

Frozen Garlic Logs
by the seat of my pants
makes 5 – 4 plain and 1 roasted

3 pounds of garlic cloves, peeled
2 T olive oil
5 gallon freezer bags
10 clothes pins

To make roasted garlic:

Pour a rounded 2 cups of garlic into a roasting pan with a lid, drizzle with the oil.

Cover and bake at 375 for 20 minutes.
Stir, reduce heat to 250, bake 20 minutes, stir and bake 20 additional minutes. When you remove this from the oven, stir one last time.
Keep lid off, and let cool. When cool process the garlic in the same manner as the fresh garlic, and freeze.  

Do be aware that the roasted garlic, has a sticky texture, and will chop much quicker than the raw garlic.

To freeze fresh garlic:
Empty half of the remaining garlic into food processor bowl, process until finely chopped, using the pulse button at the end, to prevent making a mush or puree.

Empty into a glass or stainless bowl (I think this much garlic might smell stain a plastic bowl). Repeat with remaining garlic.

Smooth top of garlic in the bowl, score into 4 sections.

Prepare the wrappers:

Cut the zip strip off the freezer bag. Cut bag at the seam on each side, leaving the folded bottom intact. Open bag flat, you will have a large rectangle.
Spoon 1/4 of the mixture onto the bag. Shape into a compact rectangle. Bring sides together, and the rectangle will fold in half, fold the sides down snug against the garlic. Twist one end, and secure with a clothespin. “Sit” the log on the clothespin end, and gently work out any air. Work the next end to be as flat as possible, twist the plastic and secure with a clothespin. Repeat with remaining chopped garlic, freezer bags and clothes pin.
Place logs in the freezer. When frozen change out the clothespins with a secure closure of your choice, the clothespins were only needed to quickly close the end of the logs and are not meant to be used after the logs have frozen solid and easier to work with.

To use:  Slice a thin slice of frozen garlic, this is equal to a clove of minced garlic.
Enjoy!

As always, thanks for taking a moment to stop and say hello.  I appreciate your time and your comments.

For more great ideas, come and visit me here:
http://momssundaycafe.blogspot.com/

STRAWBERRY BANANA DACQUIRI CAKE ~ Save Room for Dessert

I subscribe to Lagniappe, the free email newsletter of Louisiana Cookin’ magazine.  It’s published each Friday, and typically contains 3 Louisiana-centric recipes.  Friday’s newsletter contained this recipe, and I knew I had to make it, even though I had already written today’s post.  But, as strawberries are in season, I decided to share this recipe with you all.
The flavor is lovely, although the texture was a little moist.  No one seemed to mind, however, and the cake was the perfect ending to a delicious grilled meal on the patio.  I think it would be perfect for a Memorial day cookout, as it’s quick to whip up and if you’re like me, I find it quite nice to have something on my menu that takes little thought and prep.  Be sure to save room for dessert when you make this delicious cake… 

Strawberry-Banana Daiquiri Cake

1 Strawberry Cake Mix
1 1/2 cups fresh or frozen strawberries, thawed
1 ripe banana, mashed
2 eggs
2 tablespoons lime juice
1 tablespoon light rum (did not use, I increased lime juice to 3 tablespoons)
Lime Glaze (recipe follows)
  • Preheat oven to 350.
  • Grease and flour a Bundt pan; set aside.
  • In large bowl, combine the cake mix, berries, banana, eggs, and lime juice.
  • Beat for 2 minutes at highest speed.
  • Pour batter into the prepared pan.
  • Bake for 40 minutes or until a toothpick inserted in the center of the cake comes out clean.
  • Prepare glaze while cake is baking.
  • Cool cake upright for 25 minutes before inverting onto serving place.
  • Spoon glaze evenly over cake. Garnish with lime zest, if using.
Lime Glaze
Juice of 1 lime
1 teaspoon butter
Powdered sugar
  • Microwave lime juice and butter until butter melts. 
  • Whisk in powdered sugar until desired consistency is reached.

SPICY CHICKEN SPAGHETTI

Spicy Chicken Spaghetti adapted from So Are You To Me
2 large boneless, skinless chicken breasts; diced
8 oz. uncooked spaghetti
1/2 OF an onion, chopped
1 bell pepper, chopped
2 cloves garlic, minced
1 can Hot Rotel
1 can cream of mushroom soup
6 oz. Velveeta
1/2 cup sharp cheddar cheese
salt and pepper to taste
olive oil

Directions:  Preheat oven to 350 degrees.  Bring a pot of salted water to a boil and add pasta. Cook 8 to 10 minutes, until al dente. Mean while, saute diced chicken breasts, onion, bell pepper, and garlic in olive oil over medium high heat until chicken is no longer pink, drain and set aside.  Drain the pasta and return to pan. Stir in diced Velveeta, Hot Rotel, cream of mushroom soup, and the cooked chicken mixture. Season with salt and pepper.  Pour into a baking dish and top with sharp cheddar cheese. Bake uncovered for 25-30 minutes.

Modifications:
-I used cream of chicken soup.

Here’s what you’ll need:
Preheat the oven to 350 degrees

Dice up a green pepper, mince 2-3 garlic cloves, and dice up 1/2 of an onion

Cut up the chicken breasts and cook in olive oilAdd the green pepper, garlic, and onion (forgot to take a picture)

Cook the spaghetti until al dente.  Drain and add the cut up Velveeta.
Add the soup.

Add the can of Ro-Tel.

Add the chicken mixture.

Put the spaghetti mixture in a greased 9×13 baking dish.  Spread the cheese over the top and pop into the oven.
What you’ll end up with:

This dish was so good . . . how could it not be?  It has Velveeta and Ro-Tel so it is basically cheese dip with spaghetti.  YUMMY!

MY GRANDMA’S GRANOLA RECIPE

This month for Cultural Connection I am staying right here in America. I am bringing you my grandmother’s recipe for granola, I think she just called it dry cereal when I was a kid. She raised a family during the depression, and because of that was very frugal. She even used to make her own cracked wheat bread, where my grandma and grandpa had use an old (well it’s old to me) glass jar coffee grinder to crack the wheat in.. My dad used to love getting store bought bread as a kid because it was a special treat for him. We never could get that recipe from her, because she didn’t use one (of course, many grandma’s recipes are not written down).

I had to check to see if granola was in fact an American discovery and indeed it is. You can read the long version or check out a brief history of granola (the brief is through the eyes of Crapola-a granola company)…but in short it was JH Kellogg who came up with granola in 1863, and it might of fallen into obscurity, but was rediscovered and popular once again by the health food movement of the 1960’s.
There are many was you can make granola, but this is my grandma’s recipe the way I grew up eating it.
Ingredients:
4 cups rolled oats
1 cup oat bran (she used bran flour)
1 cup wheat germ
1 cup raw sunflower seeds
1 cup unsweetened coconut (I use the wide flakes)
1/2 cup canola oil
1/2 cup honey

The nice thing about granola is there has to be one for everyone and there are many way you can make it: Add some cinnamon and apple or pumpkin pie spice, or nutmeg and ground cloves, or leave out the coconut or sunflower seeds, add some pepitas or other nuts…it is endless….  I added chopped crystallized ginger in this one (I’ve been on a ginger kick lately) I have also used dried cherries or cranberries, but you can use other dried fruit you might like. My grandma didn’t use dried fruit in hers, but as always…you can add what you like.
It’s really simple, just dump and mix! A large bowl works best and I start with a wooden paddle spoon and end up using my hands!
Then spread it on one or two cookie sheets pressing it down in the pans. I use my stoneware bar pan it’s large, I also used my medium size bar pan.
Toast at 350° for 10-12 minute then stir and turn. Continue to toast it for another 10-12 minutes until the desired golden toasted, crispy, goodness. If you are adding dried fruit add that and mix it in when the granola comes out of the oven, that way it doesn’t get too hard and chewy.
You can eat it in a bowl and add milk or just snack on it as is. Use it as a topping for ice creams, yogurts or desserts. I have been making my own granola for years and really have a hard time eating any store bought granola…it’s just not the same. I like how mine is not too sweet, and you can control all the good stuff that goes in it!

Thanks for stopping by on this beautiful Saturday!

SHREDDED CHICKEN VEGETABLE EGG ROLLS

SHREDDED CHICKEN VEGETABLE EGG ROLLS
2 cups finely chopped cooked chicken or pork pieces
1 medium Vidalia onion, finely chopped
1 large stalk celery, finely chopped
1 large carrot, finely chopped
1 tablespoon minced garlic, jar
1 tablespoon sugar
1 teaspoon sea salt
1 teaspoon pepper
1 tablespoon sesame oil
4 tablespoons canola oil
egg roll wrappers (I use Melissa’s)

  • Heat skillet with 2 tablespoons of oil. Add onion, garlic, celery and carrots, Saute’ until tender.
  • Drain, retaining oil.
  • In a large mixing bowl toss meat pieces with sesame oil, sugar, salt and pepper. Add vegetables and blend well.
  • Cool 5-10 minutes.
  • Fill center of each wrapper with 2 tablespoons of filling.
  • Fold 1st corner towards the center. Then fold each edge towards the center. With a pastry brush wet the exposed triangle of dough and roll the bulk onto it.
  • Add oil back into pan and add the additional 2 tablespoons and bring to medium heat.
  • Cook egg rolls on all 4 sides until golden.


BLACKBERRY PINEAPPLE DIPPING SAUCE
1/2 cup Blackberry Pineapple Jam
2 tablespoons honey
2 tablespoons soy sauce

  • Heat jam in microwave for 20 seconds to warm and thin.
  • Whisk in honey and soy sauce.
  • Set aside.

QUESDAILLAS

Yum!  It may not look extra-pretty, but these quesadillas were delicious and healthy.
All you need is flour tortillas, shredded chicken breast, 2 % shredded cheese, mushrooms, and some salsa to dip them in.
Using a flat grill or skillet on medium heat on your stove top, brown each tortilla on one side.  When you flip the tortilla over, add your ingredients.  Place another tortilla on top and continue to grill until browned on the other side.  Carefully turn the entire tortilla over to brown on the last side.  Serve warm!  Use a tomato-based salsa for dipping, and you’re good to go!  You can add any type of vegetables you like instead of or in addition to the mushrooms. Some good choices include grilled onions, bell peppers, and tomatoes.
Each tortilla has approximately 110 calories and 3 grams of fat.
1//2 cup of chicken breast  has 116 calories and 3 grams of fat.
1/8 cup (about 2 tablespoons) of 2% shredded cheddar has 79 calories and 6 grams of fat.
The calories and fat in fresh mushrooms, tomatoes, bell peppers, and onions is negligible, so add plenty of those!  Same with the salsa!

We’re all going Krazy… to OUR KrAzY kitchen that is…

If you like to try new recipes (and who doesn’t?!), we have the gig for you! Our Krazy Kitchen is looking for hosts for the 1st Wednesday of each month. Haven’t been to Our Krazy Kitchen lately? Then it’s time for a visit!  You know you want to.  We’d love to have you join our staff!
Martha and I started Our Krazy Kitchen almost two years ago. It’s turned into a great foodie blog with some seventeen awesome rotating hosts – some post weekly, some bi-weekly, some once a month, and some for fill ins and guest posts.

I currently host the Classic Good Eats theme on Thursdays. In the past I have hosted Simply Delicious Sunday and various fill in posts. As you can see we are always open to new themes and ideas.

We’d love to have you join us!

If you are interested in being part of Our Krazy Kitchen just leave me a comment and I’ll get back with you as soon as possible. Come on and get KrAzY with us!

A SAVORY PAPAYA DISH? – BELIEVE IT! – TRY A NEW RECIPE

When you think Papaya, you think fruit, sweet, desert, right? Well think again it can also be a savory dish. I was quite exited to find this recipe and couldn’t wait to try it…..
Papayas both green and ripe are used in a variety of ways in Caribbean cuisine. Green papayas is frequently used in soups and stews and as a side dish as well.
SAVORY PAPAYA
2 medium sized green Papayas
1 large green onion, chopped
1 tablespoon parsley, chopped
1 tablespoon Chives, finely chopped
5 cloves of garlic, minced
Dash Worcestershire sauce
1 teaspoon black pepper
1 egg beaten
1/4 cup flour
1 cup Gouda cheese, grated
1/2 plain bread crumbs
1 tablespoon butter

I needed to get my hands on a green papaya, all the supermarkets had ripe ones, the market… ripe ones. I bought one that seemed green but when I cut into it, it was 70% ripe.
Then when I’d just about given up and put the cookbook back on my shelf, I found green papayas at the supermarket!!!!
This is what the inside of a green papaya looks like

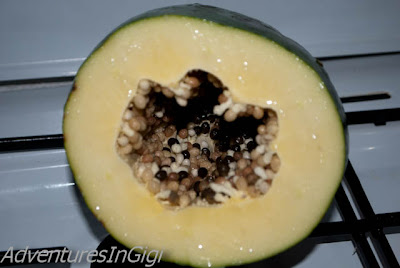
This is it next to the one I’d bought the week before that was now fully ripe, and no good for this recipe.
I got to work, peeling, slicing and grating. Discarding the seeds of course. The ripe fruit for snacking and smoothies. The grated green papaya for salads (wonderful with a simple french vinaigrette).

All of a sudden there were tons of papaya in the house!
I got the rest of my ingredients together and it was time to get to work.

Preparation
I boiled the green papaya in enough water to cover them for 15-20 mn until tender.
Drained well.
And mashed with a fork, the fruit retains quite a bit of water, do not drain again at this stage.
I added all the seasonings.
Let cool a bit before adding the egg and flour.
Here it is mixed and in a greased baking dish.
Top with Cheese.
Then bread crumbs.
Dot with butter.
Bake in a preheated 375F degree over for 20 minutes until golden brown.

This was my first time trying this recipe, it’s pretty easy, once you get your hands on the green papaya that is.
I have to admit I was a bit concerned about the fact that the recipe didn’t call for any salt at all, I thought it would have turned out bland, but it wasn’t at all. It was absolutely delicious.
I had mine with baked chicken but this dish would go well as side to a variety of dishes. I do hope you try it and let me know what you think.
Bon Appetit!

HOLY COW CAKE ~ Save Room for Dessert

Crazy name, huh?  It’s an adaptation of the Holy Cow cake from the Cake Mix Doctor cookbook.  The original recipe calls for a chocolate cake mix, which I think would be divine, but I was making this cake for the husband, who, unbelievably, is not a chocolate lover.  I thought this version was good, but if I made it again, I’d definitely use a chocolate cake mix.  I sprinkled on crushed Butterfinger candy on 1/3 of the cake, chopped Peanut Butter Snickers on 1/3, and I drizzled on extra caramel sauce on the remaining 1/3.  I had many opinions about which was better, and honestly, all three tasted delicious.  So, whichever you choose, be sure to save room for dessert…

Holy Cow Cake
1 package yellow or devil’s food cake mix
1 1/3 cups water
1/2 cup vegetable oil
2 teaspoons vanilla
3 large eggs

  • Preheat oven to 350 degrees.
  • Spray or butter a 13×9 baking pan, and set aside.
  • Combine cake mix, water, vegetable oil, vanilla, and eggs; beat for 1 minute, scraping down sides.  Continue to beat for 2-3 minutes, or until well-mixed. 
  • Pour into prepared pan.
  • Bake cake for 35 – 38 minutes.
  • Remove from oven and with a chopstick or wooden skewer, poke holes into cake.
  • Pour caramel mixture over hot cake, slowly, so that mixture is absorbed into cake.
  • Spread cool whip mixture over cake and sprinkle on crushed Butterfingers, if using, or drizzle on extra caramel topping.
  • Chill in refrigerator for 30 minutes before cutting into squares.

Caramel Mixture and Cream Cheese Topping
8 ounces caramel topping, plus additional for garnish
1 can (14-oz) sweetened condensed milk
4 Butterfinger bars, crushed – optional
12 ounces Cool Whip, defrosted
8 ounces cream cream, softened

  • Stir caramel topping and sweetened condensed milk together; set aside until cake is done.
  • In another bowl, combine the Cool Whip and cream cheese, beat together until smooth.

CREAMY CHICKEN RICE with VEGGIES

Creamy Chicken Rice with Veggies Recipe
4 Chicken Breasts
1 can cream of chicken
3/4 cup of water
1 teaspoon garlic salt
1 teaspoon onion salt
1 teaspoon paprika
1/2-3/4 bag of frozen mixed veggies
1 small can of mushrooms stems and pieces
1 1/2-2 cups of colby jock or your fav cheese
3/4 cup of White or Brown Long Grain Rice (Not Instant)
2 chicken bouillon cubes

  • Preheat 375. 
  • Measure just over 3/4 cup of water and drop in 2 bouillon cubes in water and microwave for 2-2 1/2 minutes. 
  • Spray a 9×13 baking dish with cooking spray or olive oil 13×9 inch dish. 
  • Mix cream of chicken soup, water, garlic salt, onion salt, veggies, mushrooms and rice and put in baking dish. 
  • Top with Chicken (cut into pieces to speed up cooking time). 
  • Sprinkle chicken with paprika or any other herb mixture you prefer. 
  • Bake uncovered at 375 for about 45 min or until chicken is to 165 degrees. 
  • Top with cheese and stick back in oven for about 5 more minutes to melt.

Modifications:

-I think that you could probably add a onion soup mixture to the cream of chicken soup and cut out the garlic salt and onion salt.
-You could trade out chicken stock for the bouillon cubes.

Here’s what you’ll need:
Preheat oven to 375 degrees.
Place 2 chicken bouillon cubes in 3/4 cups of water.  
Pop it in the microwave for 2 1/2 minutes.
Spray down a 9×13 glass baking dish with cooking spray.
Next, place all of the ingredients into a bowl . . .
1 can of cream of mushroom soup
1 can of mushrooms stems and pieces
about 3/4 of a bag of frozen vegetables
3/4 cup of brown rice (not instant)
paprika
garlic salt and onion salt
Next, add the chicken bouillon stock and stir.
Put everything into the baking dish.
 
Place 4 chicken breasts on top of the mixture.
Top the chicken with some Home Seasoning.
Cover it with foil and pop it in the oven for 45 minutes.
After 45 minutes, top each piece of chicken with some cheese.
Here’s what you’ll end up with:

CHICKEN QUESADILLAS


Place a Tortilla Shell on Microwave Safe Plate
Add~
Refried Beans
Cooked Chicken
Shredded Cheese
Place Another Tortilla Shell on Top
Cook on High for 40 Seconds
Cook on High for Another 30 Seconds or Until Cheese is Melted

Cut Into Slices With Knife or Pizza Cutter

Serve With Chips, Corn, Chilli and Your Favorite Toppings

Happy Eating…

TROPICAL GLAZED PORK TENDERLOIN

MOTHER’S DAY IN STYLE
TROPICAL GLAZED PORK TENDERLOIN

2-3 pound pork tenderloin
1 cup apricot pineapple preserves
1 1/2 cup brown sugar
1/2 cup pineapple juice

  • Preheat oven to 425 degrees.
  • Whisk together brown sugar and pineapple juice.
  • Blend in preserves.
  • generously salt and pepper the pork loin.
  • Spread a small layer of the glaze on the bottom of the roasting pan.
  • Lay the pork loin on top and spread the remaining glaze on top and along the sides.
  • Baste as necessary
  • Bake 45-60 minutes or until meat thermometer reads 170 degrees.