HOLIDAY WREATHS

Good Morning everyone, Tamy here again.  Today I’m filling in for Emily and I thought I’d offer you this easy and colorful recipe for the upcoming Christmas season.  Kids LOVE these! Well, to be honest so do the adults.

My great aunt who I only got to see a couple times a year used to make these every year special for me and I would wait out on the front steps for her arrive just to see them and know they were there. She always made them soooooooooo pretty and perfect!

HOLIDAY WREATHS
(these are better when they are made a few days ahead)

30 large marshmallows (or 1 jar marshmallow cream)
1/2 cup butter
1 teaspoon vanilla
2 teaspoon green food color
3 1/2 cups cornflakes
Red Hots
  • Combine marshmallows, butter, vanilla and food color in top of double boiler. Heat and stir frequently until well blended.
  • Gradually stir in cornflakes until well blended.
  • Drop onto wax paper and arrange into wreath shapes. I plop them onto the wax paper and then push out from the center to form the wreaths.
  • Decorate with red hots.
  • Let cool.
  • If your house is warm – chill in refrigerator until set.

Veggie Tales by Kris!

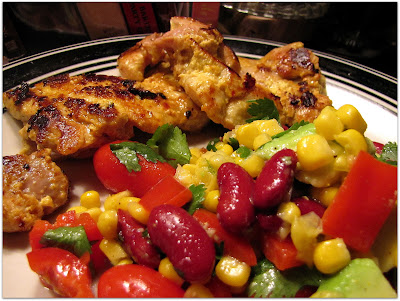
Salsa is not just for dipping! It makes a great side salad for any dish (like chicken or fish). I also love Israeli Salad! How else do you eat your salsa?

For salad: 

(toss all ingredients into a bowl)
1/2 can kidney beans, rinsed
1/2 cup corn niblets
1/2 avocado scooped out in chunks
1 cup whole cherry tomatoes
1 red pepper, diced
1/2 cup chopped cilantro
2 scallions, chopped finely
1 lime, juiced
1 tablespoon olive oil
salt and pepper to taste

Fire Roasted Acorn Squash Soup

It’s Fire Day Friday and the day after Thanksgiving, so naturally you’d expect me to write about the turkey I smoked yesterday, right?


Brined in bourbon and maple syrup and then smoked with hickory/cherry wood, it was a spectacular bird. However, I want to tell you about the soup we made instead. I’m used to making a great turkey but this was my first time ever cooking acorn squash.


Fire Roasted Acorn Squash Soup
adapted from: Acorn Squash Soup

I set up Alexis’ Big Green Egg for indirect heat and got it settled in at 350f. While it was preheating, I halved the acorn squash and removed the seeds. (Note: Keep the seeds, toss with some oil, salt and cinnamon then roast for a tasty treat or garnish.)


I roasted the halves cut side down for 35 minutes while I was also roasting some sweet potatoes.

Then when the turkey was getting close to being done later that day, I made the soup. I could have done this stove top, but it was a gorgeous day with a record high temp of 74f so I could not resist being out on the deck. (NOTE: I don’t know what the heck happens at the 2:21 minute mark, skip to 3:15)

Saute the onions and celery over medium high heat for 5-8 minutes, until softened.

Stir in the flour. Add the dill, curry powder, cinnamon, cayenne, and mediterranian seasoned sea salt.

Whisk in the chicken stock and bring to a simmer.

Whisk in the evaporated milk and bring back to a simmer.

Stir the the acorn squash and heat through.

Let cool slightly and then process in small batches in a blender. I tried just using an immersion blender but found that I had to use a real blender to get the texture I wanted.

Season one last time with salt/pepper to taste.

Garnish with roasted seeds and parsley.

The soup was rich and had a velvety texture. The down side to it was that it was filling and put a dent in how much I could eat when the main course and sides hit the table.

Happy Thanksgiving & the tale of Pickle Eyeballs and the Church Basement Ladies

Happy Thanksgiving all!

Here is the tale of the pickled eyeball and the church basement ladies…

I promise there is food content coming, but first, I want to say a thank you to the ladies that started me on my foodie journey, the church basement ladies of Liberty Baptist Church in Pekin, Illinois. I have a long and sad story that I will not be telling today. But the short version of that story (the part you need to know to appreciate the happier parts) is that when I was a freshman in high school, my father got very sick. He spent several months at a hospital 150 miles from me. My mother stayed by his side most of that time. My older brother and I were asked to take care of ourselves while doctors do what they do.

A sad enough time, but in a way, very exciting. I was asked to grow before my time. But, 2 high school age kids could not have managed without a support system in place. We had friends and some family that looked in on us often. Not the least of which was my church family. Activities kept me busy, and church pot-luck dinners kept me fed beyond blue box max and cheese.

Church pot-luck dinners were amazing things. The ladies of the church would try to out do each other. Very competitive. Simple casseroles were followed by plates of imaginative meat dishes, followed by incredible desserts. Some of the best eating of my life happened in that basement. I still recall that miracle Sunday when the very first green bean casserole with French’s fired onions appeared on the table (I am old).

Like I said, the ladies were very competitive. On pot-luck day, there were a handful of “church basement ladies” who warmed all the dishes during service so that when the singing, praying and eating the heads of live roosters was finished, the congregation was fed hot items. It was a difficult task, and there were a small select few members of the youth group that helped set up and do the beck and call of the ladies. I was one of those youth. I also got to be a part of the clean up. Which gave me a chance to be a bug on the wall, as these ladies would critigue the finished meal. I listened to the ladies discuss the best (and more often, they discussed the worst) of the meal. They knew which church members were taking home empty plates (a huge honor), and which dishes were barely touched. Not all comments were… Christian. Like I said, very competitive.

Which brings me to the ladies that started me on my journey to my first culinary success… 

One Sunday afternoon, the ladies challenged me to bring a covered dish for the next potluck. During the Witty banter that followed, I not only vowed to bring a covered dish, but by the end of the day, I would be taking that dish home empty. Remember, due to the volume of foods served, for one dish to be emptied, it would need to be an exceptional item.

This recipe came from a friend’s mother who assured me that no one could resist these.
Three ingredients:
Cream Cheese
Buddig meat
Pickles

3 steps…

  • wrap a pickle with a bit of cream cheese 
  • wrap that with a few slices of buddig meat 
  • cut into slices
And sure enough, when these were made, when they were presented at the pot-luck, the plate was empty at the end of the day. Whatever smallmeasure of success I may have had since then as a cook or host, I will never be as thrilled as when I was announced by the church basement ladies to have an empty dish to take home! These ladies gave me the first and best encouragement I ever received regarding foodie matters.

So, to those unsung heroines of the basement, those ladies that kept the social wheels of the church greased… To those wonderful ladies that went out of their way to befriend a sad child, worried about his family… And to the ladies that encouraged me after my first, albeit simple, culinary success… Today I am thankful…
Thanksgiving has a complicated origin in the United States. Only occasionally were there presidential proclamations of a national day of thanks prior to the American Civil War. In 1863, President Lincoln proclaimed a national Thanksgiving day. Since that day, Thanksgiving has been observed annually. Likewise, only a month before the attack on Pearl Harbor, in 1941, Thanksgiving became a federal holiday. It is not a coincidence that this most “family” centric of all our holidays has it’s origins when we were asking our best and bravest to sacrifice to the fullest measure of devotion. Enjoy your day with your family, make all your friends welcome in your home, and consider for a moment (dare I be politically incorect and ask you to pray for) the people in harm’s way who earn our thanks every day.

Happy Holidays, enjoy your day and have a moist, tender, golden brown and delicious bird!

Dave here from MY YEAR ON THE GRILL. It really is just this easy!  

 … I CAN COOK THAT! 

And so can you!

Balsamic Sauteed Chicken Breasts

I needed something in a hurry. 

I had this awesome Butternut Squash Bake that I was making but needed something to go along with it. 

With nothing thawed.

My brother saved the day by bringing home a whole bunch of fresh boneless chicken breasts from Sam’s Club.  So chicken it was!
These were very simple but incredibly delicious.  Great for dinner when you’re in a hurry!  Very healthy and low calorie too! We ate these with a delicious Butternut Squash Bake!
Balsamic Sauteed Chicken Breast Recipe
1/2 cup chicken broth
1/2 cup balsamic vinegar
1 tbsp. honey
1 tbsp. sugar
5 (6 oz) boneless chicken breasts (not too thick)
Salt and pepper
2 green onions, chopped
  • Combine broth, vinegar, honey and sugar. 
  • Spray non stick pan with cooking spray.  
  • Salt and pepper chicken breasts and brown in pan.
  • Cook 4 – 5 minutes on each side until there is a nice brown.  
  • Add balsamic mixture, scraping to loosen bits on the bottom.  
  • Add green onion.  
  • Bring to a boil and cook until reduced to about 1/2 cup.  About 4 – 5 minutes.  If chicken isn’t quite done, cover and cook before sauce reduces. 
  • Serve sauce over the chicken. 
Check out more great recipes at Debbi Does Dinner Healthy!

Save Room for Dessert…Eggnog Coffee Cake

I was browsing through my recipe binder, you know, the kind filled with yellowed newspaper clippings, handwritten recipes jotted onto scraps of paper, and occasionally, a nicely done recipe card.  Today’s post is a recipe written in my own handwriting on a piece of paper from a yellow legal pad.  No idea of its origins.  Maybe from my brief foray into law school?  Who knows, what I do know is that it’s super yummy, moist, perfect for dessert with a cup of coffee, and luckily, everytime I come across the recipe, it’s the holiday season, and eggnog is readily available.  It goes together super quickly, and needs no other adornment in addition to the yummy streusel.

Eggnog Coffee Cake
2 cups flour
1 cup sugar
1/2 teaspoon salt
6 oz unsalted butter, cut into small pieces
2 teaspoons baking powder
1 teaspoon freshly grated nutmeg, divided
1 cup eggnog
1 large egg, beaten
3 tablespoons bourbon
1 teaspoon vanilla
1/3 cup brown sugar
1/2 teaspoon cinnamon

Preheat oven to 375 degrees.
Butter and line a 9″ cake with parchment paper, or butter and flour the pan; set aside.
Using a pastry cutter, combine flour, sugar, salt, and butter together until crumbly. 
Measure out 1 cup of the mixture and add the brown sugar, cinnamon, and 1/2 teaspoon nutmeg; set streusel aside.
Add baking powder and 1/2 teaspoon nutmeg to the remaining crumb mixture; beat in the eggnog, egg, bourbon, and vanilla until well mixed.
Pour batter into prepared pan and top with streusel mixture.
Bake at 375 degrees for 50 minutes, or until a toothpick inserted comes out clean.
Serve warm.
Printable recipe

IT’S TAILGATING TIME!

We’re HUGE football fans!  Well, it’s that time of year again! Football season is already way too many weeks old (where does the time go?) and that means it’s time for tailgating again, serious football food and game day buffets.  Bring over your best appetizers and your biggest appetite and oh don’t forget the Brewskis to go with it all.  I like mine really cold please with a side of lime!

Tailgating Time will be posted every Sunday at noon and open all week for you to add your football favorites. We’ll play each and every week until Superbowl Sunday. I can’t wait to see what you’ll be bringing!
It’s Tailgating Time!
HOSTED BY: 
Tamy at 3 sides of Crazy 
Lyndsey at Tiny Skillet 
Martha at Seaside Simplicity 
Martha will be back with us next week.

Would you like to be a host of Tailgating Time too? 
Leave me a comment here with your email or with Martha over at Seaside Simplicity so we can send you the code and add you to the host list – more exposure, more links, more football food!

APPLE RICE STUFFING ~ SIMPLY DELICIOUS SUNDAY

Hi! I’m Wendy from The Local Cook, where I blog about eating simply and in season. I get to share a new recipe with you the 3rd Sunday of every month here at OUR KrAzY kitchen.
Believe it or not, some people (like my in-laws, cough cough) cannot stand the texture of soggy bread. So stuffing is a big “no!” Here is an alternative that I made last Thanksgiving and was a hit.

Apple Rice Stuffing             Source: Simply in Season
1 cup brown rice
2 1/3 cup apple juice
2 Tbsp butter
1/2 large onion diced
1 stalk celery chopped
2 large apples, unpeeled, diced
1/2 cup walnuts, roughly chopped
1/4 cup brown sugar
1 tbs dried herbs (any combination of oregano, basil, thyme, etc.)
salt and pepper to taste
1. Cook rice and apple juice until tender and set aside (about 40 minutes).
2. Melt butter in frying pan and sauté the onion and celery until soft.
3. Add everything else together and either stuff in poultry or place in a covered casserole dish and bake at 350F for 45-55 minutes.
It’s a really nice change of pace from the standard stuffing, even if you do like soggy bread! It’s sweet from the apples and brown sugar, but savory as well.

3 secrets you should do for the perfect Thanksgiving Turkey

  First thing… I made my first video… what do you think????

And now, on to Thanksgiving…

A body of work is an interesting thing.

Last year I posted about making a… Beer Butt Turkey.

Also, I made a… Fried Turkey.

And of course I made a… Smoked Turkey.

If you haven’t decided how you want to cook your bird, take a look at those links for tips.  BUT, no matter how you make your bird this year, there are three simple steps you can use to make sure your bird is tender, juicy and most important, NOT dried out.

First is the easiest, pull that pop-up thermometer thingy out of your turkey and invest in a meat prop thermometer.  Internal temperature of a fully cooked turkey is only 170 degrees.  Those pop up thingies pop up when the bird is 185 degrees.  And 185 degrees on the outer layer of the bird.  Guaranteed to be too dry on the inside.

170 degrees is safe, cooked and moist and delicious.  Be sure to measure the temp at several points of the bird (including the thickest part of the thigh).  If all are 170 degrees, your bird is done!

Second is to cook your stuffing as dressing.  DO NOT STUFF YOUR TURKEY.  There are two reasons, first, if you densely stuff the cavity, it is possible that the turkey juices will not reach a high enough temperature to kill bacteria.  Food poisoning your guests will make for a memorable holiday, but it is not as much fun to watch football.

But also, it makes the bird thicker, harder to reach that consistent 170 degree temperature throughout.  If the cavity is empty, the hot air circulates inside as well as around the outside of the bird.  Bird cooks faster and more even.  That 170 degree mark is reached sooner and the bird is juicy throughout.

Finally… BRINE YOUR TURKEY!

Here’s how…

A honey brine. the night before the cook, I assembled my brining liquid…

3 gallons of water 
1 1/2 cups kosher salt
5 cups vegetable broth
1 1/2 cups honey
5 cups ice

Heat 1 gallon water and the salt. Stir til all the salt is dissolved. Add the honey, again, stir til dissolved. Dump into a clean cooler, mix together everything else and add the bird. This also works well in one of those BIG freezer bags. Don’t add the ice, but put the bagged bird into a cooler and than add ice and some water to surround the bagged bird and keep it from getting to room temps.

Let sit for 12 to 24 hours.

I was sharing space with my neighbors bird, who was also frying his bird.

Making a brine is simple, and is a wonderful way to add moisture to your finished product. My sainted mother would use that hideous pop-up built in thermometer as her way of telling when the turkey is done. IN FACT, those thermometers are set to go off at about 180 degrees, guaranteeing your bird will be dry and tough prior to serving. Ideal internal temperature is only 165 degrees. Every degree above that only dries out your bird. But I digress…

Brining adds moisture to your bird, and allows the bird to cook more evenly. Smarter people than I have done the science research. Click HERE to go to The Kitchen Project‘s page on brining. He goes through the science of what a brine does, recipes, history and techniques.


Happy Holidays, enjoy your day and have a moist, tender, golden brown and delicious bird!

Dave here from MY YEAR ON THE GRILL. It really is just this easy!  

 … I CAN COOK THAT! 

And so can you!

Healthy Meals ~ Winter Soup ~ VEGETABLE BEEF

We’ve had several cold-snaps here in Texas already. It’s what I call “soup weather.” Makes you feel all warm inside. And I have a great, low fat recipe for vegetable beef soup that is super-simple! It uses ready-to-drink tomato juice as a base.

Ingredients
14.5 ounce can stewed tomatoes
14..5 ounce can green beans
8.5 oz can green peas
11 ounce can corn
14.5 ounce can carrots
1 pound lean ground beef (93/7)
46 ounce can of tomato juice
Italian seasoning (to taste. I just pour it in. I never measure. I’d guess 2 teaspoons minimum)

Preparation
Brown ground beef in a skillet. Drain the grease. Pour all ingredients into a stock pot and heat to boiling. Serve and enjoy! It’s a hearty, filling, tasty, low fat soup.
This will serve at least 8 people and has approximately 240 calories per serving and approximately 8 grams of fat per serving (less if you buy lower fat ground beef). I hope you like it!

Save Room for Dessert…Sweet Potato Pie

You can’t walk into any Louisiana market without seeing a display of sweet potatoes – they are everywhere, and I am ecstatic!  I love sweet potatoes, and the first recipe I thought of when I saw them in their glory was my sweet potato pie.  Since Thanksgiving is literally just around the corner, I thought I’d share my recipe with you, just in case you were looking for something familiar, yet slightly different, to serve at your own feast.

Sweet Potato Pie
3 lbs sweet potatoes, baked and pureed
2 large eggs
2/3 cup light brown sugar, packed
1/2 cup milk
1/2 cup orange juice
1/4 cup heavy cream
1 teaspoon cinnamon
1/8 teaspoon cardamom
1/2 teaspoon salt
1 teaspoon vanilla
1 9″ unbaked pie crust (I made my own, but frozen will work just fine)

  • Preheat oven to 450 degrees.
  • Combine all ingredients and mix together until smooth and creamy.
  • Pour mixture into unbaked pie crust.
  • Bake at 450 degrees for 15 minutes; lower temperature to 325 degrees and bake for 60 minutes, or until a tester inserted in middle of pie comes out clean.
  • If pie crust begins to brown too quickly, loosely cover with a piece of foil.
  • Allow to cool to room temp before serving; store leftovers in refrigerator.

Printable recipe

Spices Inc Giveaway Contest
at Louanne’s Kitchen

ARE YOU READY FOR SOME MORE FOOTBALL??

We’re HUGE football fans!  Well, it’s that time of year again! Football season is already way too many weeks old (where does the time go?) and that means it’s time for tailgating againt, serious football food and game day buffets.  Bring over your best appetizers and your biggest appetite and oh don’t forget the Brewskis to go with it all.  I like mine really cold please with a side of lime!
Tailgating Time will be posted every Sunday at noon and open all week for you to add your football favorites. We’ll play each and every week until Superbowl Sunday. I can’t wait to see what you’ll be bringing!
It’s Tailgating Time!
HOSTED BY: 
Tamy at 3 sides of Crazy 
Lyndsey at Tiny Skillet 
Martha at Seaside Simplicity Martha will be back with us next week.

Would you like to be a host of Tailgating Time too? 
Leave me a comment here with your email or with Martha over at Seaside Simplicity so we can send you the code and add you to the host list – more exposure, more links, more football food!