Going out to dinner??? Order the Cheese Tray and make a 3 Cheese Artisan Macaroni and Cheese

I am going to give a recipe, but really, this is more of a technique post. But not even technique, as much as a get bang for your buck post.

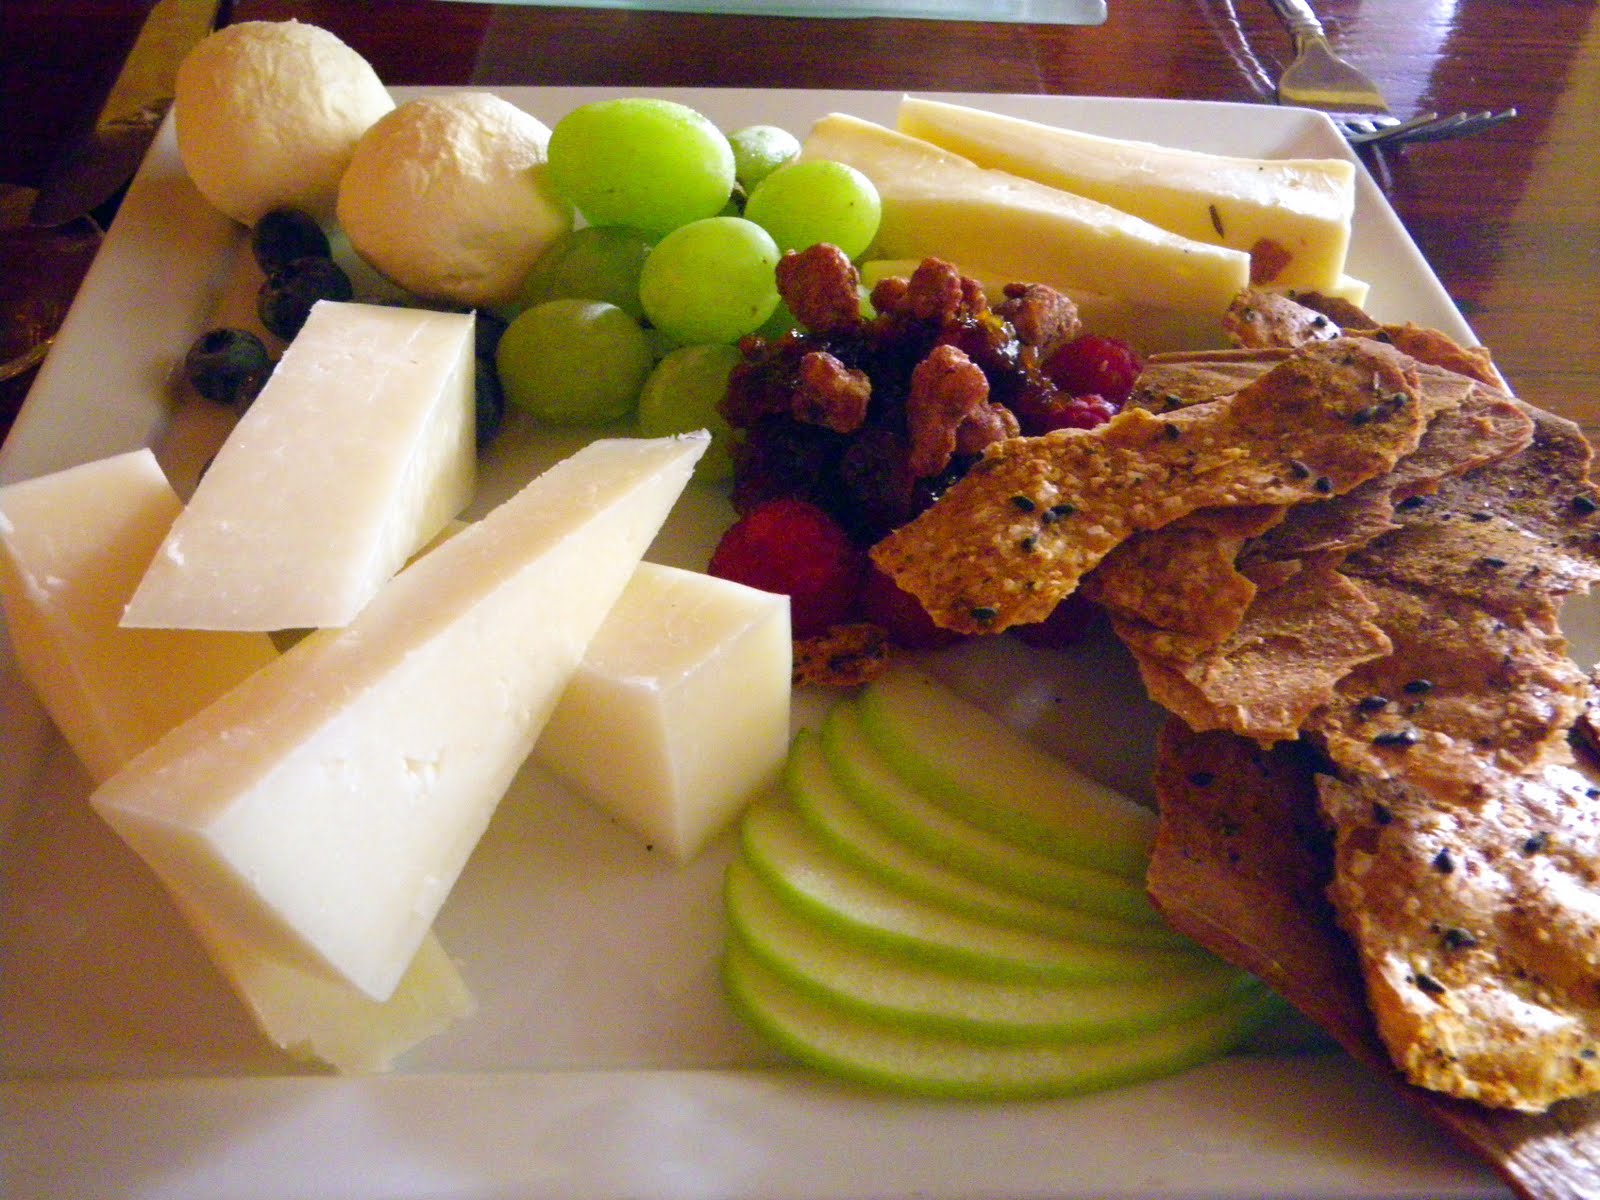
Recently, Jackie and I went out for a rare night on the town. Fancy Schmancy. Whenever I get a chance, I will always order an artisan cheese plate. Some places offer one for an appetizer course, salad course or dessert course. Doesn’t matter, I will order one. I would rather have a fancy cheese plate than just about anything else offered for those courses.

This is the cheese plate I received. Sadly, the cheeses change every night, so the menu does not list them. I was enjoying the night out, and did not make notes when the cheeses were explained, but I know there was a goat, a cheddar and something from Switzerland (but it was not swiss cheese). They were all excellent. And a real bargain, as there was so much, I took at least half home, knowing I would be having macaroni and cheese for lunch!

Dave here from MY YEAR ON THE GRILL. I have over 400 posts up in my blogging career. But I have never done a Mac and cheese post but I make one at least a couple times a month. My problem is I view mac and cheese as a left over dish. It is never the same ingredients, never the same recipe twice, but always satisfying … I CAN COOK THAT! Anyone can!!! And anyone can make a winner…

There really is not much of a recipe, other than cheese coating macaroni. But there are a few things I do to kick it up a notch…

First I make a rough…3 TBS Butter, 3 TBS Flour
I stir the rough for about 5 minutes under medium low heat.
I dice up a small red onion and add it to the rough.
I add a cup of milk.

now it’s time to add the cheese. Always best to only add a soft easy melting cheese. Avoid the hard cheeses. They just don’t melt well.

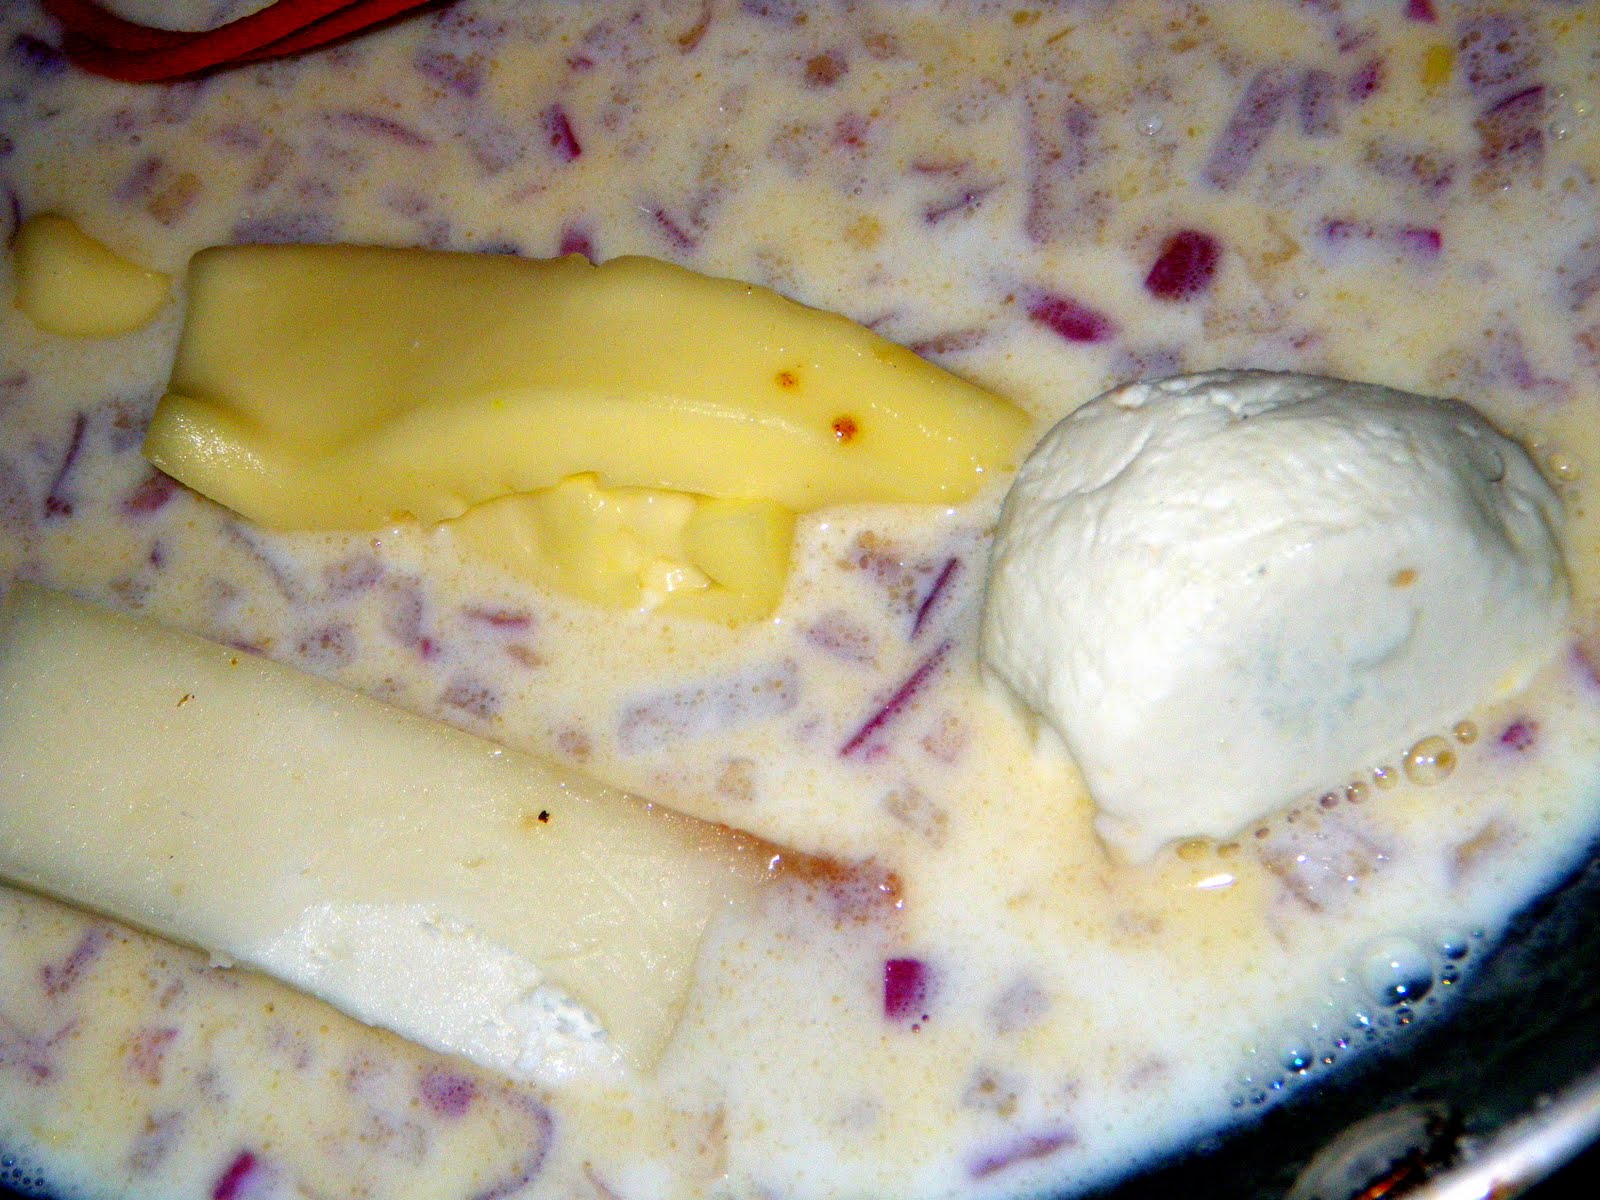
But the goat, cheddar and not swiss cheeses all melted perfect!

I considered doing a snooty post labeling this Artisan Three Cheese Mac and Cheese. Doesn’t that sound fancy? But truth is I only had enough of each to make about 6 ounces total cheese. If I had 6 ounces of one cheese, I probably would have used only one cheese.

BUT, I had two ounces of three cheeses, so here is my Artisan Three Cheese Mac and Cheese… Just like I planned.

OK, cook the Macaroni al dente. Meaning, just cook to barely done, still a little tough. I like using shells for the pasta, I think they hold the cheese better and just make a more dynamic presentation. Elbow or Penni pasta works as well (or whatever you have in the pantry. I have even made this with spaghetti).

Mix the cheese sauce and the Macaroni and pour into a baking dish.

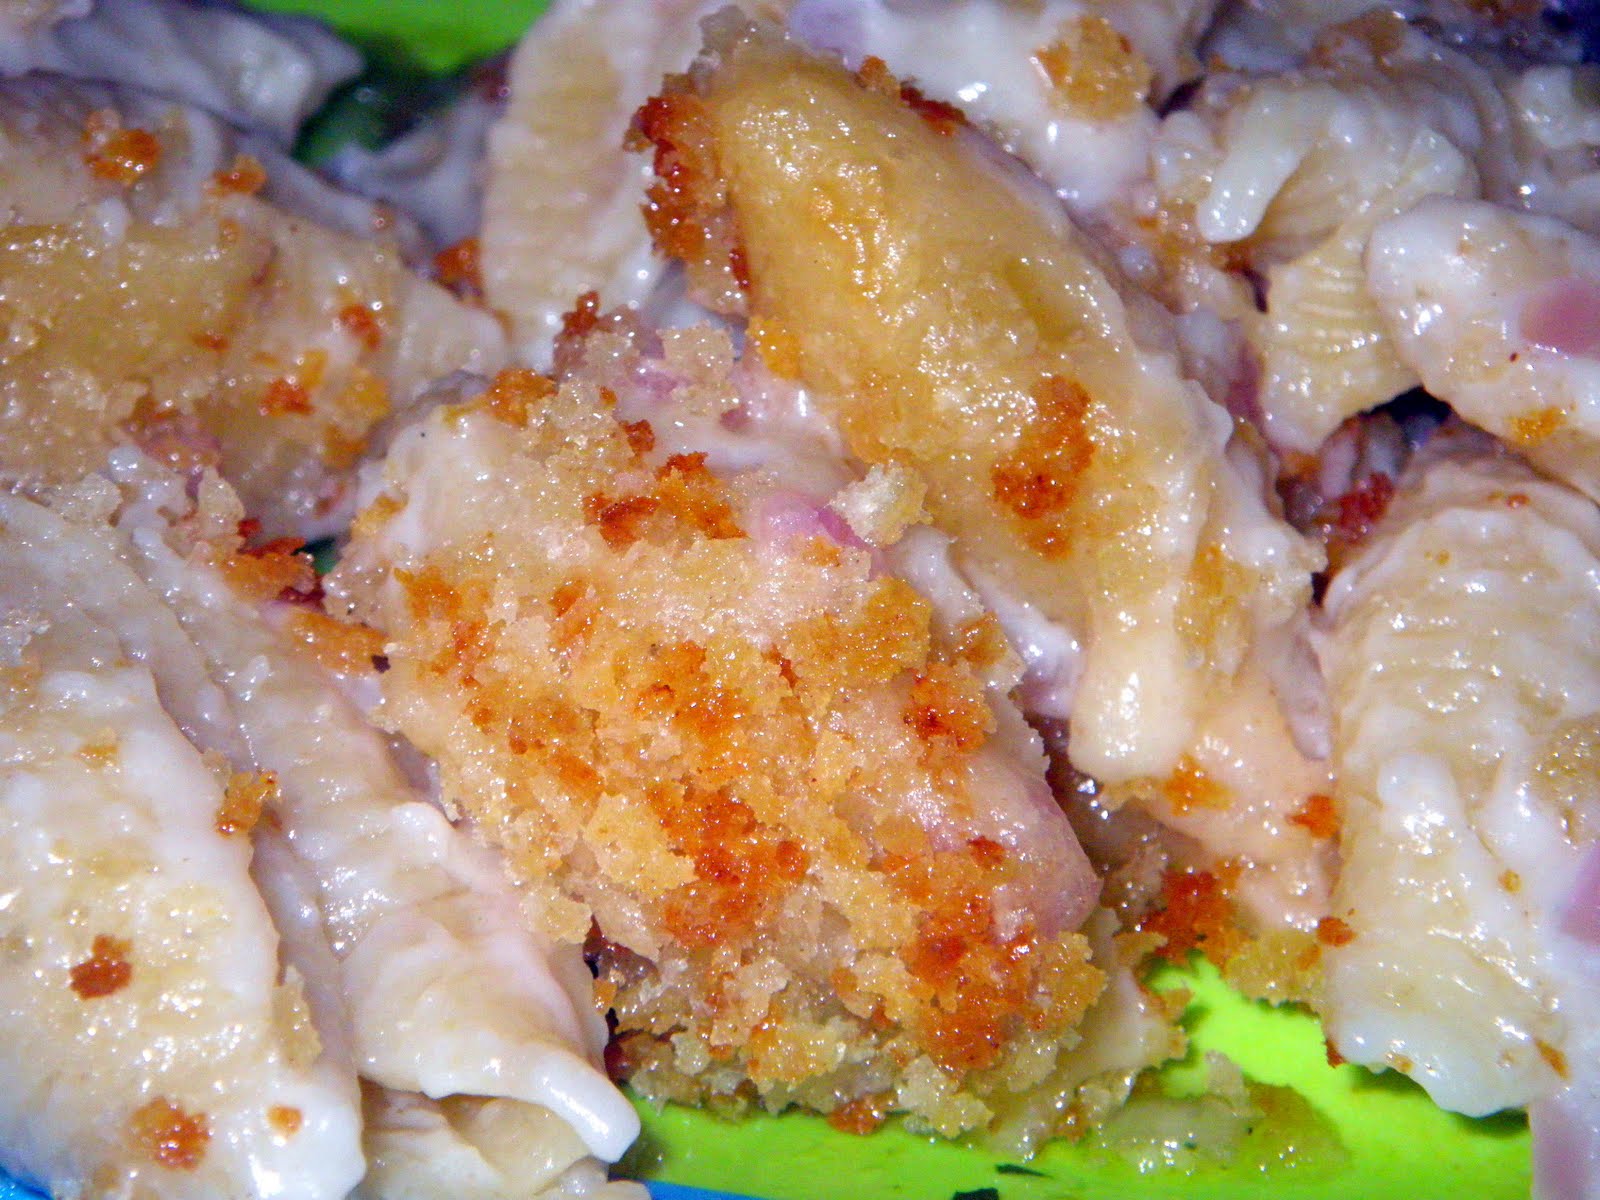
I like to add some seasoned panko bread crumbs on the top for color and texture.

Bake at 350 degree pre-heated oven for 30 minutes…

It’s just a way to use left overs. You can change the cheese and have a dramatically different dish. Change the pasta and it;s a different look.

But bottom line… it’s always good!

Next time you get to go to a Fancy Schmancy restaurant… Order the cheese tray and plan on lunch tomorrow. Takes a little of the bite of the cost of the meal out.

Chocolate Cinnamon Coffe Cake

Stop by Comfy Cook for a fabulous giveaway – your choice of 4 gifts. Someone has to win. Why not you?

Coffee Cinnamon Chocolate Squares adapted

Last week, I found a plastic bag, filled with chocolate goodies, brownies, these squares, some cookies. They are odds and ends, leftover from previous times. When I took a bite out of these coffee cinnamon chocolate square, memories came flashing back. I had brought these to my middle son and family’s home. I loved them then and I love them now.
There is something about these bars that makes them better than average. The combination of the coffee, cinnamon and chocolate flavors meshed completely and left with us an aroma and a taste that warms the heart. If you are coffee or tea drinker, sit down with one of these and a cup of java, and enjoy/
This could be my dream cake.
(from Baking: From My Home to Yours) (another Dorie success story)
Cake:
1 1/4 cups + 2 tbsp sugar
1 tbsp + 2 tsp cinnamon
1 1/2 tsp instant coffee/espresso powder
1 3/4 cups all purpose flour
2 tsp baking powder
1/4 tsp salt
3/4 Vanilla Rice Dream
2 egg beaters
1/2 tsp vanilla
10 tbsp margarine, melted and cooled
1/2 cup mini chocolate chips or 3 oz bittersweet chocolate, chopped
Glaze:
6 oz bittersweet chocolate, chopped
2 1/2 tablespoons margarine, softened

Method:
Preheat oven to 350F. Spray with cooking oil an 8-inch square cake pan and line the bottom with parchment paper. (I used aluminum foil). I also used a 9 inch square pan and it was too big. My cake would have risen to a more appropriate height with the proper size.
In a small bowl, combine 2 tbsp sugar, 2 tsp cinnamon and the espresso powder. Set aside.
In a large bowl, whisk together flour, sugar, baking powder, the remaining cinnamon and salt.
In a medium bowl, whisk together Rice Dream, eggs, vanilla and slightly cooled, but melted, margarine. Pour into the flour mixture and stir until just combined.

Pour half of the batter into the prepared pan, spreading it evenly over the bottom. Evenly sprinkle on sugar/espresso mixture and mini chocolate chips, then top with the remaining batter, spreading it evenly.

Bake for 35-40 minutes at 350F, just until a toothpick comes out clean. Let the cake cool in the pan for 15 minutes, then turn out onto a wire rack and remove the parchment. Let cool completely before frosting.

Confession 1 – I added more mini chips to the filler.

Glaze:
For the glaze, melt together the chocolate and the margarine in a double boiler and stir until smooth. If it is runny, let it stand for a minute or two, but otherwise the chocolate should be thick, smooth, shiny and spreadable. Spread on the top of the cake (the flat bottom side should be facing up, which makes it easy to frost) and allow the frosting to set up before serving.

Try a New Recipe: French Dressing

Don’t forget to visit me at The Bad Girl’s Kitchen for more fabulous recipes!

This is a recipe from Julia’s Mastering the Art of French Cooking, which I made recently for my book club. I just downloaded the picture from my new camera, so I thought I’d post it over here–you saw it here first!

The vinaigrette is super simple and simply delicious! Honestly, you won’t believe how easy it is. Try it and see. I served Salad Composée avec sauce vinaigrette. [Mixed Salad with Vinaigrette]

I used red wine vinegar and the “optional” mustard and left out the herbs on accident! No need to “correct” anything at all. I stored this in the refrigerator overnight, pulled it out early to let the oil come back to room temperature, and shook it up right before I tossed the salad. Quick and easy.


Sauce Vinaigrette

[French Dressing]
For about 1/2 cup

For: salads and simple marinades
Salad dressings are always best when freshly made; if they stand around for several days they tend to acquire a rancid taste.

1/2 to 2 tablespoons good wine vinegar or a mixture of vinegar and lemon juice
1/8 teaspoon salt
Optional: 1/4 teaspoon dry mustard
6 tablespoons salad oil or olive oil
Big pinch of pepper

Optional: 1 to 2 tablespoons minced green herbs, such as parsley, chives, tarragon, basil; or pinch of dried herbs

EITHER beat the vinegar or lemon juice in a bowl with the salt and optional mustard until the salt is dissolved, then beat in the oil by droplets, and season with pepper, OR place all ingredients in a screw-top jar and shake vigorously for 30 seconds to blend thoroughly.

(guess which method I chose?)

Stir in the optional herbs and correct seasoning just before dressing the salad.

Easy Apple Dumplings – Save Room for Dessert

If it’s Monday, it must be time for dessert! And I’m here to share some with you!

So. You wanna know how to make the easiest, most incredible apple dumplings you’ll ever make in your whole life?

Well I’ll tell you!

This is a recipe I found on Pioneer Woman’s website and let me tell you, the person who came up with this recipe was a genius. It is the most incredible concoction you can imagine! My brother equated it with crack. I guess that’s a good thing.

Let’s get started!

Peel 2 Granny Smith apples and cut them into eighths. Wrap each apple segment in a triangle of crescent roll dough and line up in a 9×13 pan.

Please don’t count the number of dumplings above.

Okay, I know you counted because I told you not to. We had a problem – namely, the first time we made this, Yours Truly bought 6-to-a-can crescents so we cut pieces off of a few rolls and tried our best to make it work out. We still only ended up with 14. Oh well.

Melt two sticks of butter in a saucepan and mix in 1 1/2 cups of sugar. It doesn’t need to be dissolved at all, just mixed in. Along with that, add 1 teaspoon of vanilla and a shake or two of cinnamon, if you’re so inclined.

Pour this butter mixture over the pan of dumplings, making sure to cover every dumpling with at least some butter and sugar. Mmmm! Then, against all logic…pour in a 12 oz can of Mountain Dew. Yes. Mountain Dew. Don’t ask me what this adds to the recipe. Just believe that it DOES add something.

Place your pan in a 350 degree oven and bake for 40 minutes.

This was a double batch I made another time.
Because 16 reeeeeally wasn’t enough.
These are just the most amazing, unbelievable things I’ve ever eaten. And in case you couldn’t figure it out on your own, let me tell you: They go great with vanilla ice cream. Perhaps with some of the buttery sauce drizzled (poured?) on top.

Bliss!

Would you make this with apples? Or would you use another fruit? I think I’ll try peaches some time.

Apple Dumplings a la Pioneer Woman

2 Granny Smith Apples, peeled and cut into eighths
2 cans crescent rolls (8 rolls each)
2 stick butter, melted
1 1/2 cups sugar
1 tsp vanilla
12 oz can Mountain Dew soda
Cinnamon (optional)

Roll each apple segment in a section of crescent roll dough. Line these up in two rows in a greased 9×13 pan.

Melt 2 sticks of butter and mix in 1 1/2 cups of sugar – do not dissolve sugar, just stir to mix. Add 1 teaspoon of vanilla extract and a shake or two of cinnamon (if you prefer – this can be left out). Pour butter mixture over dumplings, being careful to spread over all. Pour 1 12 oz can of Moutain Dew around outer edges of dumplings and between the two rows.

Place pan in a preheated 350 degree oven and bake for 40 minutes.

Be sure to serve with sauce. Enjoy!

Chocolate Snowdrop Cookies – Simple Saturday

Attention chocolate lovers – if you want a delicious, soft, gooey, rich cookie these are for you! They are fancy enough for a holiday cookie tray yet easy enough to make anytime. My kids call them little chocolaty bites of heaven.


Chocolate Snowdrop Cookies
Recipe from allrecipes.com

Ingredients

  • 1 package devil’s food cake mix with pudding
  • 2 1/4 cups frozen whipped topping, thawed
  • 1 egg
  • 1/3 cup confectioners’ sugar for decoration


Directions

  1. Preheat oven to 350
  2. Combine cake mix, whipped topping and egg; mix well (mixture will be sticky).
  3. Drop 1 inch sized balls of dough into confectioners’ sugar; roll slightly to form uniform size balls. Place on lightly greased baking sheet 2 inches apart. Bake 10-12 minutes. Remove to racks to cool. Store in tightly covered container.

Can’t get any more simple than this can it? Enjoy!

Previously posted at Seaside Simplicity

Pizza Casserole: Lovin’ From The Oven

This recipe was originally meant for the slow cooker, but after making it, I realized it would have been a lot easier to simply bake it.  Any crock pot recipe that isn’t easy, that makes you cook two or three things separately, just shouldn’t be a crock pot recipe in my opinion. So that being said, the pictures you are about to see take place in a slow cooker.   You will have to use your imagination.  (Tamy, this would look great in your new white roaster!)

Pizza Casserole: 
1 package egg noodles, cooked
1 1/2 pounds ground beef (a combo of beef and pork would be great)
1/2 onion, chopped
1 jar spaghetti sauce
1 small can mushrooms
1 1/2 tsp Italian seasoning
+ your favorite pizza toppings (1 cup ham or pepperoni, green peppers, black olives, etc)
3 cups each shredded mozzarella and cheddar cheese (I added some Provolone, too)
Cook the hamburger with the onion.  Combine the meat with the spaghetti sauce, mushrooms, and Italian seasoning. 

For Crockpot: Spray crock with PAM.  Layer the meat sauce, then noodles then pizza toppings then cheese three times.  This completely filled my large crock pot.  Cook on low 3-4 hours.
For Oven: Spray a very large casserole or maybe two 9 X 13 pans with PAM and layer 2 or 3 times like you would in the Crockpot.  Cover with foil and bake 350 degrees for 40 minutes or until cheese is melted and all is heated through.  (Note: you could eat one and freeze one before you baked it)

French Market Beignet Doughnuts – Real ones this Time


Look Closely…


Photo above…


And Below…


Remember last week


Dave here from MY YEAR ON THE GRILLI was ashamed that I declared… I CAN COOK THAT! But then, who couldn’t???  I actually bragged about opening a tube of dough and whipping cheater Beignets off in a matter of minutes.


I was ashamed, the guilt was over powering and I confessed… Today I want to finish the cycle of penance and give an authentic recipe for those delightful little breakfast snacks.

Fortunately, Mary at DEEP SOUTH DISH, had already provided a recipe for FRENCH MARKET BEIGHET DOUGHNUTS on her site!


Anyone who has ever visited New Orleans has a warm spot in their heart for these beauties.  Been a goal for awhile to learn to make authentic French market (OK, Cafe du monde) style Beignets.  Here’s Mary’s recipe…

French Market Beignet Doughnuts
Posted at http://www.deepsouthdish.com

1 envelope of yeast
1/4 cup of warm water
4 cups of sifted flour
2 tablespoons of shortening
1/3 cup of boiling water
1/4 cup of sugar
1/2 teaspoon of salt
1/2 cup of evaporated milk
1 egg, beaten
Powdered sugar, sifted

Dissolve the yeast in the warm water and set aside. Sift the flour and set aside. Pour the boiling water over the shortening and stir until the shortening is melted.

Preheat deep fryer to 360 degrees. In a large bowl, combine 2 cups of the sifted flour with the sugar and salt, melted shortening, milk, egg, and yeast mixture. Add enough additional flour to form a shaggy dough. Sometimes you will need all of the flour, sometimes you’ll need less – depends on the weather, rain, humidity, etc. in my opinion! Turn out onto a lightly floured surface and roll thin – somewhere between 1/4-inch and 1/8-inch thick. Using a  pizza wheel, cut the dough into 2-inch squares. Drop into hot fryer and brown on one side until golden, flip and brown on the other side. Remove and drain on paper towels, sprinkle with sifted powdered sugar and serve immediately with a cup of café au lait.

Makes between 30 and 40, depending on how thick you roll them.


I did cut the recipe in half, made plenty for the two of us…


And they came out great…


My penance is now complete, I can indeed cook authentic scratch Beignets.

Lemon Meringue Pie – Save Room for Dessert!

I’m not afraid to say it:

I’m a total dork for citrus at this time of year. Well, this or any other time, really. But especially now when so many recipes lend themselves to that lovely freshness that citrus offers. It’s like eating sunshine.

Or maybe I’m just reading too much into the situation. I don’t know.

Either way, my husband challenged me to make a lemon meringue pie after he saw me devour a slice at a diner a couple of weeks ago. Never one to back down from a challenge, I squinted my eyes and squared my shoulders and accepted. Even though I’d never dealt with meringue before and was a bit wary of it.

But all worry was for naught!

Start with 2 large lemons, or if they’re small like mine, use 4. Juice the heck out of them.

In a medium saucepan, combine 1 1/4 cups of sugar, 2 tablespoons of flour, 3 tablespoons of cornstarch and a pinch of salt. Add the lemon juice and 1 1/2 cups of water, then on to the heat it goes. This will come to a boil and needs to be stirred frequently.

After you’ve reached a boil, add two tablespoons of butter and melt them into the lemony goodness. Mmm…

While your lemon filling is bubbling away in the hopes of getting nice and thick (which it will!), separate 4 egg yolks and whites into separate bowls. Set the yolks aside, you’ll be using them for meringue in a little while.

Beat the yolks a bit, then pour approximately 1/2 cup of your hot filling into the bowl with the yolks, WHISKING CONTINUOUSLY AND RAPIDLY. Why did I just virtually scream those words at you? Well, because if you let the eggs sit still they will scramble. You want to keep them moving in order that they may mix with the filling and cook without little tough bits of egg getting in the way. Then, pour the egg/filling mixture into the pan on the stove, which you are whisking as you pour. Get the message? Whisk whisk whisk!

Once the filling is nice and thick and yummy looking, set it aside to cool.

Now it’s time for the crust. I used a Pillsbury crust, the kind you just unroll and bake. Ever so much easier and really very good and flaky.

Line your pie plate, flute the edges of the crust, prick all over with a fork and set it in a 450 degree oven for 10 minutes.

In that time, you can work on your meringue.

Remember those 4 egg whites you set aside a little while ago? Beat them with your mixer until they start to get foamy.

Then add 1/2 tsp of cream of tartar, 1/2 tsp of vanilla and 6 tbs of sugar. And whip them all up until stiff peaks form.

Finally time to assemble! Pour your filling into your baked crust and spread the meringue on top of that.

Into a 350 degree oven for 10 minutes, and you get…

THIS!

And after an hour in the fridge you get THIS!

It really is heavenly, and well worth the effort. So give it a try and let me know how it works for you!

Lemon Meringue Pie

Crust
1 Pillsbury crust

Filling
2 large or 4 small lemons, juiced
1 1/4 cup white sugar
2 tbs cornstarch
3 tbs flour
Pinch of salt
1 1/2 cups water
2 tbs butter
4 egg yolks

Combine dry ingredients in medium saucepan, stirring well to incorporate flour and cornstarch. Whisk in lemon juice and water, making sure flour and cornstarch are broken down. Heat to boiling over medium high heat, then add 2 tbs butter and stir until melted.

Whisk egg yolks together in separate bowl, then slowly add 1/2 cup of hot filling to the eggs, all the while whisking to ensure that yolks do not cook. Once eggs and filling are incorporated, add this to the rest of filling in saucepan. Allow to boil until thickened, stirring continuously, then set aside off-heat.

Unroll crust into pie plate. Flute edges and prick crust all over with a fork to prevent swelling and bubbling while baking. Bake crust for 10 minutes in a 350 degree oven. In the meantime prepare meringue.

Meringue
4 egg whites
1/2 tsp cream of tartar
1/2 tsp vanilla extract
6 tbs white sugar

Beat egg whites until they start to foam. Add other ingredients and beat until stiff peaks form.

Fill crust with cooled lemon filling and top with meringue, spreading meringue over filling until it touches the crust all the way around.

Bake pie for 10 minutes in a 350 degree oven. Allow to cool sufficiently once out of oven, then place in fridge for at least an hour for filling to set up.

Enjoy!

Oh, and when you get a chance, hop on over to my blog and drop me a line! There’s lots of food-centric adventures under the Cooking tab, and I’d love to hear from you on anything you see there!

STRAWBERRY KIWI HOMEMADE BUTTERMILK SHORTCAKE

This is even better when you take the time to make fresh whipped cream or homemade vanilla ice cream to go with it.

GLAZE
2 baskets fresh strawberries, sliced
2 kiwis, chopped
1 cup pureed strawberries*
1 cup sugar
2 tablespoons KARO light corn syrup
3 tablespoons cornstarch
½ cup water

*I use the less than pretty berries for the puree.

Mix together sugar, corn syrup, cornstarch and water in a 2 quart sauce pan, cover and bring to a slow boil.

When you reach a boil remove the lid. Add the 1 cup pureed strawberries and boil a few minutes more and then chill 10 minutes.

After chilled pour over sliced berries and toss gently.

BUTTERMILK SHORTCAKE
2 cups flour
1½ teaspoons baking powder
½ teaspoon baking soda
dash of salt
4 tablespoons sugar
¼ teaspoon cinnamon
½ cup butter, softened, but not melted
¾ cup buttermilk**

Sift the dry ingredients together. Add the milk and butter and mix well into a soft dough. DO NOT over knead – it will become tough.

Grease an 8 inch pie pan really well. Gently arrange dough into an even mound and pre-cut into your serving portions before baking.

Bake at 400° for 15 to 20 minutes or until toothpick done and golden brown.

Slice each shortcake open, bot with a thin layer of honey, arrange on plate and top with a scoop of strawberry kiwi glaze and vanilla ice cream or whipped cream.

**As a substitute, Buttermilk can be made by adding 2 tablespoons of vinegar to regular milk.

AND MY REVIEW FOR LE CRUSET:

I was recently made aware that there is a wonderful online shopping experience available right from your desk top. Whether you are looking for tv stands, dining room furniture or cookware, they have it all.


Remember all these wish list posts I did about all the wonderful quality kitchen dreams and wishes I have? Well, all the items I’m dreaming about to complete my dream kitchen are available from these sites from CSN stores.

CSN stores sent me this awesome LeCruset Baker to review. I have dreamed of owning one for sooooooo long. I decided in order to review it properly I had to makes lots of great recipes like THE ULTIMATE COMFORT MAC & CHEESE, POT ROAST & ROASTED VEGGIES and RITZY CARROT & BROCCOLI CASSEROLE.


My conclusion: VERY FAVORABLE! Everything cooked up beautifully and the clean up was so easy! This is a beautiful quality piece of cookware. I can’t wait to buy more pieces from CSN stores – their shipping and customer service are well above the norm.

Spicy Chipotle Shrimp Over Sweet Corn Cakes

Welcome to Simple Saturday!

I’ve been participating in a challenge this month, do you think you could eat on a Dollar a Day? (Check out the link for details). I’ve been doing the challenge but with an unfair advantage – I allowed myself to use anything I already had on hand. It’s turned out to be more of an “eat from the pantry and freezer month” than anything else so far.

Here is last night’s yummy, frugal and very simple recipe. It was definitely the Meal of the Week!

http://2.bp.blogspot.com/_WPbjJzRqviA/S7-qngfQFUI/AAAAAAAAGzI/8kg8KfIKdok/s1600/chipotle+shrimp+corn+cakes.jpg

Chipotle Shrimp – 1 pound of shrimp marinated overnight in bottled chipotle sauce (with one teaspoon of cornstarch added). Put shrimp and marinade in large, deep skillet, add a can of diced tomatoes. Simmer on low, stirring occasionally while preparing corn cakes.

Corn Cakes – 2 boxes of Jiffy corn muffin mix, 2/3 cup milk, 2 eggs, one can of sweet creamed corn and 1/2 can regular sweet corn. Mix and prepare just as you would pancakes.

Spoon shrimp and sauce over corn cakes and serve with fruit smoothies. Trust me, it’s a perfect combo, it was delicious – except for the fact that I used shrimp I had in the freezer that had been cleaned and shelled, but it didn’t occur to me that it still had the tails on until dinner was ready. Be sure to take the tails off if you try this, duh!

We have two birthdays at Our Krazy Kitchen this week – be sure to stop by to wish our Tuesday host Min and our Wednesday host Chaya a Happy Birthday!

Have a great weekend 🙂

Butterscotch Brownies: Lovin’ From the Oven

Here’s an oldie but goodies from my blog, Frugal Antics of a Harried Homemaker: Butterscotch Brownies.  My grandmother used to make them for the school children in her town.  She was the head baker for the school district back in the 1970s.  They are full of butter and sugar, so dieters beware!

Butterscotch Brownies: 
2 cups brown sugar
2/3 cup butter
2 eggs
1 tsp salt
2 tsp vanilla
1 tsp baking powder
2 cups flour
1 package butterscotch flavored chips
Combine the moist ingredients with a mixer. Sift together the dry ingredients in a bowl and add to the wet. Fold in the chips. Spread in a greased 9 X 13 pan and bake 350 degrees 30 minutes or until done.

Beignets – or How to LIE to your Guests

One year… I figure I now owe the cooking gods one full year in purgatory.

To be fair, I got the idea for this from Mary at DEEP SOUTH DISH, one of my all time favorite bloggers (How has she not been found by the Food Network yet???). So, Mary is my Fagin to my innocent Oliver Twist… Mary, for the record, I am easily led astray. Be careful when you put temptation in my path…

A while back, Mary did an excellent post on making your own Beignets. You know, those New Orleans treats most often associated with cafe Du Monde in the French Quarter. Anyone and I suspect everyone who has visited the city knows of and sampled these treats. Squares of sweetened dough (extra sugar and evaporated milk), covered with generous amounts of powdered sugar. You can find her post on making AUTHENTIC Beignets by clicking HERE.

But she also gave a “cheater” version that I thought was funny at the time… And then Eve and the apple and Satan and temptation began working it’s ugly way with me. I had all the supplies on hand to make the legit Beignets. I did. I had company last week that I could make them for and I wanted to. I wanted to be authentic… I should have been authentic… But I wasn’t.

Get thee behind me Satan is what I should have said…

Temptation, thy name is DEEP SOUTH DISH MARY.

I beg for absolution. I beg the gods for forgiveness… As a penance, I must confess in full…

Here’s what I did…

Oil for frying…
Powdered sugar for generously dusting

and..

I can’t say it…

But I must confess in full…

and…

the final ingredient is…

A tube of refrigerator buttermilk biscuits.

I am so ashamed.

What would Bobby Flay say??? Paula Dean… Alton Brown… All would condemn me, and justifiably so.

But Bobby, Paula and Alton, it was so easy… Just cut each biscuit in half…

Fry in the oil and dust with the sugar…

And if you get up on the last morning your guests are staying, after force feeding them RUM Drinks night after night… after night after night; you can make these and hide all the evidence before they stumble out of bed (or floor if that was where they passed out).

I served these, and accepted the praise due a scratch baker. Without exception, these were accepted as authentic Beignets.

I am A squeezing, wrenching, grasping, scraping, clutching, covetous, old sinner.

Bobby, Paula and Alton… Bless me chefs for I have sinned.

!Dave here from MY YEAR ON THE GRILL. I am ashamed that i can declare… I CAN COOK THAT! But then, who couldn’t???


Don’t do as I did… save yourself the guilt. Make from scratch. Ignore the needs of time and the desire to just wanting to get something on the table. The guilt is just not worth the convenience and great taste… Spend those hours in the kitchen. Ignore your family and guests and resist the temptations that are put in front of you.


OK, let me take my tongue out of my cheek for a second and do a little advertising for a GREAT FUN site…


I love bloggers! I was new to the world of blogging (and to cooking) just a few months ago. I went from hamburgers and hot dogs once a month to a 3 meal a day, 7 days a week cook. I needed help, and I found it. I am always thrilled to find new blogs. Without bloggers who provide insight you do not get from books, I would not be as brave as I am in the kitchen. Last month I was introduced to a wonderful opportunity. TASTE & CREATE is a cultural exchange program for bloggers. Click on the logo to the left, but the premise is simple…Once you sign up, monthly, you are paired with another blogger. Hopefully, someone you have never seen before. You take a look at their blog, hunt down a recipe that you find appealing and cook and post the results. You are introduced to a new recipe, and at the same time, because you dig a little deeper into a new blog, you find bits of personal information that gets you a new blogger buddy!


So, at the least, one day out of next month, you will have a topic for your blog. But at best, you get a new blog buddy, you get to try a new recipe and look at blogging from another person’s shoes!


In the next two days, match ups for this month happen. NOW is the time to sign up. Live on the wild side, it is a challenge, and it is rewarding… Contact Min at –

cowgirlmin07@gmail.com
She does the matchups and is handling the cyber paperwork. If you have any questions, drop Min a line. She would be thrilled to have some “New Blood”! It is a month by month commitment. So if you don’t care for the experience, dropping out is easy. But, you may just get hooked like I did… Click HERE to see the fun I had.