CHEESE TUTORIAL

While I’m on a limited diet after surgery, I decided to start some research type tutorials to help me develop some new recipes for when I can rejoin the real world of food.

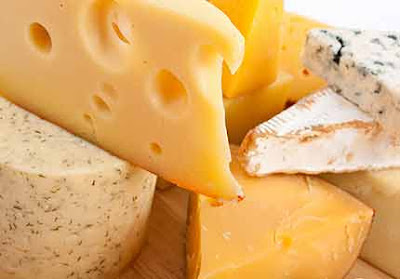
Today’s research starts with cheese.  Knowing whether a cheese is hard, soft, bacteria or mold grown makes a difference on how to incorporate them into your recipe.
Cheese consists of proteins and fat from milk, usually the milk of cows, buffalo, goats, or sheep. It is produced by coagulation of the milk protein casein (acid). Typically, the milk is acidified and addition of the enzyme rennet (enzyme) causes coagulation. The solids are separated and pressed into final form. Some cheeses have molds on the rind or throughout. Most cheeses melt at cooking temperature.
Their styles, textures and flavors depend on the origin of the milk (including the animal’s diet), whether they have been pasteurized, the butterfat content, the bacteria and mold, the processing, and aging. Herbs, spices, or wood smoke may be used as flavoring agents. The yellow to red color of many cheeses, such as Red Leicester, is formed from adding annatto (slightly nutty, sweet and peppery) giving you yellow, orange and red tints.
For a few cheeses, the milk is curdled by adding acids such as vinegar or lemon juice. Most cheeses are acidified to a lesser degree by bacteria, which turn milk sugars into lactic acid, then the addition of rennet completes the curdling. Vegetarian alternatives to rennet are available.  You’re not likely to find these at your standard grocery store, more likely Whole Foods or Trader Joes.
Cheese is a generic term for a diverse group of milk-based food products. Cheese is produced in wide-ranging flavors, textures, and forms.
A SOFT cheese is un-ripened cheese made by coagulating milk proteins with acid. Examples include cream and cottage cheeses. 
HARD cheeses are ripened, or aged, cheeses made by coagulating milk proteins with enzymes (rennet) and culture acids. The cheeses are then ripened by bacteria or mold. 
  • Cheddar, Swiss, Colby, brick and Parmesan are bacteria-ripened hard cheeses. 
  • Blue, Roquefort, Camembert and Brie are mold-ripened cheeses.
Because aging depletes cheese of moisture, hard cheese is drier and harder than soft cheese. Bacteria can’t grow as readily in dry environments as in moist environments, which is why hard cheeses keep longer than soft cheeses. Pretty much any cheese that is aged long enough becomes firm. During the aging process, the moisture in the cheese evaporates and the salt in the cheese crystallizes, this is what gives Parmesan and other aged cheeses their distinct crunchiness
Normally cheeses are left to rest under controlled conditions. This aging period also called ripening, lasts from a few days to several years. As a cheese ages, microbes and enzymes transform the texture and intensify the flavor. This transformation is largely a result of the breakdown of the casein (acidic) proteins and milkfat.
Differences among hard and soft cheeses is not always clear cut though, especially among semi-hard and semi-soft varieties. Also, some cheeses can be made in softer or firmer grades, depending on how long the cheese is aged and the pressure with which it is packed into molds.
Examples of soft, semi-soft, semi-hard, and hard cheeses are as follows:
  • Soft cheese includes Brie, Camembert, and Ricotta varieties.
  • Semi-soft cheese includes Gouda, Havarti and Jack, all of which are suitable for melting or eating as is.
  • Semi-hard cheese include Cotija, Colby Havarti, Mozzarella and cheddar.  
  • Hard cheese are better known as grating cheeses and include Parmesan, Swiss, aged Cheddar and aged Gouda.  
For storing cheeses,  wrap the cheese in waxed paper, and if you are planning on keeping it for a length of time, then change the wrapping regularly (weekly).

FOR HARD CHEESE: If you find that mold is growing on the cheese, then just scrape the mold off, and change the wrapping.

HOMEMADE CHEEZ-IT CRACKERS

Inspired by Amy at New Nostalgia
HOMEMADE CHEEZ-IT CRACKERS

1 cup flour
4 tablespoons cold butter, cut into small squares
1 (8-ounce) bag grated extra-sharp Cheddar cheese
1 teaspoon salt
1/4 teaspoon cayenne pepper

  • Preheat oven to 350 degrees. 
  • Combine all ingredients in food processor, and pulse until crumbly. 
  • Add cold water, a tablespoon at a time, until dough comes together. 
  • Form into ball, wrap in plastic wrap, and chill in the freezer for at least 30 minutes. 
  • Place dough between two pieces of plastic wrap or parchment paper, and roll out to 1/8 inch thickness. 
  • Transfer to parchment-lined baking sheet, and, using pizza cutter or sharp knife, cut into 1 inch squares. 
  • Sprinkle with kosher salt and bake for 25 minutes. 
  • Test for crispiness; crackers may take a few minutes more to finish crisping. 
  • Remove from oven when crisp and just starting to brown. 
  • Let cool and serve.

WEEKLY MENUS

WEEKS 3-6 ON THE MODIFIED DIET


DATE MEAL#1 MEAL#2 MEAL#3 MEAL#4 SNACK SNACK SNACK
Monday 6/25 7/2 7/9 7/16  YOGURT
CREAM OF MUSHROOM (STRAINED)
JELLO
WAFFLE
CANNED PEACHES
GLASS OF MILK

CHEESE STICKS
Tuesday 6/26 7/3 7/10 7/17 CHERRIOS
RICE
 JELLO
FRENCH TOAST
CANNED PEARS
GLASS OF MILK
CHEESE STICK
Wednesday 6/27 7/4 7/11 7/18 WAFFLE
MASHED POTATOES
 JELLO
COTTAGE CHEESE
FRUIT COCKTAIL
GLASS OF MILK
CHEESE STICK
Thursday 6/28 7/5 7/12 7/19 OATMEAL
CREAM OF CHICKEN (STRAINED)
 JELLO
STEAMED CARROTS
CANNED PEACHES
GLASS OF MILK
CHEESE STICK
Friday 6/29 7/6 7/13 7/20 WAFFLE
RICE
 JELLO
YOGURT
CANNED PEARS
GLASS OF MILK
CHEESE STICK
Saturday 6/30 7/7 7/14 7/21 YOGURT
MASHED POTATOES
 JELLO


STEAMED CARROTS
FRUIT COCKTAIL
GLASS OF MILK
CHEESE STICK
Sunday 7/1 7/8 7/15 7/22

PANCAKES RICE
 JELLO
YOGURT
CANNED PEACHES
GLASS OF MILK
CHEESE STICK 

HOMEMADE CHEEZ-IT CRACKERS

Inspired by Amy at New Nostalgia
HOMEMADE CHEEZ-IT CRACKERS

1 cup flour
4 tablespoons cold butter, cut into small squares
1 (8-ounce) bag grated extra-sharp Cheddar cheese
1 teaspoon salt
1/4 teaspoon cayenne pepper

    • Preheat oven to 350 degrees. 
    • Combine all ingredients in food processor, and pulse until crumbly. 
    • Add cold water, a tablespoon at a time, until dough comes together. 
    • Form into ball, wrap in plastic wrap, and chill in the freezer for at least 30 minutes. 
    • Place dough between two pieces of plastic wrap or parchment paper, and roll out to 1/8 inch thickness. 
    • Transfer to parchment-lined baking sheet, and, using pizza cutter or sharp knife, cut into 1 inch squares. 
    • Sprinkle with kosher salt and bake for 25 minutes. 
    • Test for crispiness; crackers may take a few minutes more to finish crisping. 
    • Remove from oven when crisp and just starting to brown. 
    • Let cool and serve.

    BAD BLOGGER, BAD, BAD BLOGGER A.K.A. IT’S TIME TO GET

    I’ve been a bad, bad blogger.  Well, no not really, I’ve been recuperating from another surgery.  But I’m on the mend and while still under some restrictions, can try to do some light cleaning and laundry AND get back to blogging.
    The idea of a GIT Challenge is to play catch up with whatever we need to get done. 

    Just leave a comment saying you’ll play along, minimize this post so you can easily come back to it throughout the day, stop what you are doing (meaning get off the computer and stop procrastinating!), take an hour right now to catch up on things you need to do and work as fast as you can!


    Come back every hour or two and leave a comment with your progress. Check out what other participants have accomplished – all in the comment section, no blog hopping necessary. After updating, get back to work for another hour or so until you’re done for the day. We always accomplish so much during these challenges! Jump in anytime, there’s no special time to start or finish. It’s fun working together – join us!

    Our Macaroni Salad

    Like most every other family, the macaroni salad we eat, has evolved. I prefer a light dressing, so that the individual components of the salad can shine through. This is basic and of course can (and should be!) be adapted for your own family. The last time I made this salad, I used dried tortellini for the pasta, it was delicious.

    Macaroni Salad
    by the seat of my pants
    serves 6-8

    3/4 c small shell macaroni or salad macaroni
    OR
    2 1/2 c dried tortellini
    1 c frozen peas
    4 green onions, thinly sliced or 1/2 c diced onion*
    2 hard cook eggs, diced
    2 stalks celery (try to use the inner stalks, they are tender and sweet)
    1/3 c chopped “bread and butter” style pickles
    1 tomato, diced
    1/3 c sliced black olives, if desire

    3/4 c mayonnaise
    2 T dijon mustard
    2 T sweet pickle juice
    2 T milk
    1/4 t garlic salt
    fresh ground pepper to taste

    Cook pasta according to package directions.

    When ready to drain pasta, add peas to the colander and if using regular onion, top the peas with the diced onions, drain pasta over the peas and onions. This will blanch the onion and thaw the peas. Let cool.

    Combine all salad ingredients in a large bowl.

    Combine all ingredients for the dressing, mix until smooth.

    Gently fold the dressing into the salad ingredients to combine well.

    Refrigerate until serving time.

    You may want to add in one or two of the following:

    1/2 diced cheddar or other cheese desired
    1/2 c diced ham
    1 c “pulled” BBQ chicken
    1/2 c crumbled smoked salmon or cooked shrimps

    As always, thanks for taking a moment to stop and say hello. I appreciate your time and your wonderful comments!

    For more great recipes and a story or two, visit MomsSundayCafe.

    Loaded Baked Potato Salad

    Min here, from The Bad Girl’s Kitchen.  Long time no see!  I was lured over here yesterday by Melynda’s Apricot Pie, if you must know.  Then I just had to come back over and share my new creation with you!!

    This recipe came about when I received an email listing “summer salads.”  There was a link to a recipe someone had called “Loaded Baked Potato Salad,” which I thought sounded great…but when I read through the recipe, it was really a casserole…?! 

    What do I mean by “casserole?”  It was a potato dish that was assembled and then BAKED in a 9×13 pan.  Sort of reminiscent of my Twice Baked Potato Casserole, actually.  Totally not a “salad” at all, (salad in my mind means “cold”), and certainly not a dish I would think about serving in the heat of summer.

    I set out to create a true potato salad.

    First, I used my grill to bake the potatoes.  I just clean them, rub them with olive oil, then grill on the top rack over medium-ish heat for about one hour, turning over halfway through.  You want them baked but not too soft, keep in mind your grill may cook differently than mine.  Remove potatoes from grill and let cool before chopping, of course. I found that using a serrated knife helps the potatoes hold together better, while keeping the skin pieces intact.

    Once salad ingredients are prepped, it’s important not to mix it until you’ve added everything, because the potatoes are a bit fragile.  You want to gently fold the ingredients together.  I used a mixture of sour cream and real mayonnaise because that’s what I prefer.  The real mayo adds a bit of flavor you wouldn’t get with sour cream alone.  You need to put this salad together ahead of time, and I’d recommend chilling it in the refrigerator for at least an hour or so if you have time.

    I have to tell you, this is an amazing potato salad!  Make it for your next barbecue, and everyone will be impressed!  I think the baked potatoes add so much to the flavor compared to a traditional potato salad made with boiled potatoes, that I may actually try to bake all my potatoes for salads from now on.

    My family and I loved this potato salad; in fact my oldest son H-Bomb even asked for seconds although he’s not a huge potato fan.  It’s my new favorite, and I’m going to make more today!

    Loaded Baked Potato Salad 
    Serves 6 to 8 

    6 baked potatoes, skin on
    1/2 pound bacon, chopped and cooked until crisp, then drained and cooled on paper towels
    3 – 4 scallions, chopped
    1 cup shredded sharp cheddar cheese
    1/2 cup sour cream
    1/2 cup mayonnaise
    Salt and pepper to taste

    Reserve a few pieces bacon, some green onions and cheese to use as garnish. 

    Use a serrated knife to gently chop potatoes, leaving skin on.  I cut each potato in quarters lengthwise, before chopping in pieces.  Add to large mixing bowl.

    Add bacon, onions and cheese; do not mix. Season with salt and pepper. Set aside.

    In a small bowl, mix sour cream and mayo.  Add to potato mixture and mix gently with a rubber spatula.  Taste and adjust salt and pepper, if needed.  Refrigerate until ready to serve.

    Before serving, garnish with reserved cheese, bacon and green onions.

    Don’t forget to visit me at The Bad Girl’s Kitchen for more fabulous recipes!

    I also host the fun monthly food blog event, Taste & Create!  Please join us!

    Apricot Pie

    This is my first Apricot Pie, I have made many apricot cobblers and crisps, but never a pie. While marketing yesterday I came across these beautiful apricots and knew the time was right. And this pie did not disappoint, it is delicious with sweetness and a bit of tart as apricots are known to offer.

    Apricot Pie
    adapted from:  The Fannie Farmer Cookbook
    6 – 8 servings/pieces 

    4 c apricot halves – I cut my fruit into quarters, thinking the pie will be easier to cut and serve. (2-21/2 pounds fruit).
    1 c sugar
    2 T tapioca
    juice of 1/2 lemon
    1/4 t cardamom (my addition, Fannie called for no spice in her pie)
    2 T butter
    double crust pie dough

    Wash and cut fruit,

    add sugar, tapioca, spice and lemon juice. Stir to combine.

    Place bottom crust dough into pie pan, easing into pan to avoid stretching. Add fruit mixture, dot with butter.

    I usually do not use the butter listed in a pie recipe…but added it this time for richness.

    Cover with top crust, crimp edges.

    Bake 400 degrees for 10 minutes, reduce heat to 350 and bake an additional 35-40 minutes or until done in your oven.

    Serve with a small scoop of vanilla ice cream.

    As always thanks for taking a moment to stop and say hello. I appreciate your time and your wonderful comments!

    For more great recipes visit Moms Sunday Cafe, you might also enjoy a story or 2!

    Homemade Chocolate Syrup

    One of my favorite treats is a peanut butter, vanilla ice cream, sliced banana with chocolate syrup over the top, Sundae. Just the other night I went to have one, and yep you guessed it, no chocolate syrup. That will not happen again…..

    Chocolate Syrup
    adapted from: one good thing
    makes approximately 1 1/2 cups

    1 1/2 c sugar
    3/4 c cocoa
    dash salt
    1 c water
    2 t vanilla

    Combine dry ingredients, stir well to mix.

    Add water, stir to combine.

     
    Bring to a boil,

    lower heat, simmer for 1 minute.

    Stir in vanilla, let cool and decant.

    Store in the refrigerator. Shake gently before using, if needed.

    Oh and here is how to make a peanut butter banana sundae,

    Take a small bowl, “frost” the bottom of the bowl with 1 – 2 tablespoons of peanut butter, add a scoop of ice cream. Slice a banana over the top and drizzle with chocolate syrup, YUM!

    As always, thanks for taking a moment to stop and say hello. I appreciate your time and your wonderful comments!

    And for more great recipes and a story or two, visit Moms Sunday Cafe

    The Art of the RSVP

    Acceptance of a social invitation is not a legal obligation;
    your RSVP just communicates your best intentions to attend.

    More and more often I have heard that hosts/hostesses are not receiving firm indications of whether guests plan to attend their parties, even when R.S.V.P. is boldly printed on their invitations. This leaves us with a couple of choices. First it could mean that rudeness is a increasingly growing trend in our society or that people no longer understand what the term R.S.V.P. actually means. I prefer to think positively and assume that ignorance of the term is the case versus rudeness. I know it’s hard to believe ignorance to be good, but better that than rudeness!

    R.S.V.P is French for “répondez s’il vous plaît” and is an acronym that loosely translates to Please Reply (one way or the other)! Check your calendar and ask yourself how you truly feel about attending this event. Don’t keep your host in suspense, reply as soon as you are sure one way or another. To be proper, you should reply in writing, by hand. But you may reply in the same format that one was invited; for example, an email invitation can be answered by email, etc… R.S.V.P.’s can sometimes be oral or written, but are always determined and based on the level of formality of the invitation. You wouldn’t just pick up the phone to reply to an invitation from the White House or the Pope now would you? These situations and many others require a written response.

    Filling out an RSVP card is a basic and important courtesy. The hostess collect R.S.V.P. cards so that they know how many guests to expect, which will help them to make seating and catering arrangements. Your hostess needs to know how many are coming in order to prepare for the event properly. R.S.V.P.’s are the most important determining factor to help her do that well.
    You never need to give a reason for not attending. Just let the host know whether you’re currently planning to be there or not.

    Communicate last minute changes immediately to your host.
    Maybe you become ill or there was an emergency. As soon as you know, you must get in touch with the host (by telephone is fine) to let them know you can’t come, and apologize. Do you remember to communicate your intentions clearly to your hostess?

    WEEKLY MENU

    MODIFIED MENU FOR THE 1ST 2 WEEKS OF RECOVERY.

    Menu Plan Monday hosted by Laura at I’m an Organizing Junkie

    DATE MEAL#1 MEAL#2 MEAL#3 MEAL#4 SNACK SNACK SNACK
    Monday 6/11 6/18  Yogurt
    ENSURE
    JELLO
    CHICKEN BROTH
     CANNED PEACHES
    GLASS OF MILK

    SHERBET
    Tuesday 6/12 6/19

    ENSURE
    CREAM OF CELERY (STRAINED)
    JELLO
    BEEF BROTH
    FRUIT COCKTAIL
    GLASS OF MILK
    SHERBET
    Wednesday 6/13 6/20

     Yogurt
    ENSURE
    JELLO
    CHICKEN BROTH
    CANNED PEARS
    GLASS OF MILK
    SHERBET
    Thursday 6/14 6/21

    CREAM OF WHEAT
    CREAM OF CHICKEN (STRAINED)
    JELLO
    BEEF BROTH
     CANNED PEACHES
    GLASS OF MILK
    SHERBET
    Friday 6/15 6/22

    Yogurt
    ENSURE
    JELLO
    CHICKEN BROTH
    FRUIT COCKTAIL
    GLASS OF MILK
    SHERBET
    Saturday 6/16 6/23

    Yogurt
    ENSURE
    JELLO
    BEEF BROTH
    CANNED PEARS
    GLASS OF MILK
    SHERBET
    Sunday 6/17 6/24

    ENSURE CREAM OF MUSHROOM (STRAINED) JELLO
    CHICKEN BROTH

    CANNED PEACHES
    GLASS OF MILK
    SHERBET

    Sauce Pan Cake, with cinnamon and chocolate chips!

    I have been making saucepan cakes for years and years. You know the kind where you bring your water to a boil add the oats and butter, remove it from the heat and when it has cooled, continue. Using the saucepan as your mixing bowl, hence saucepan cake.

    Saucepan Oatmeal Chocolate Chip Cake
    adapted from: Bake or Break

    1 1/4 c water
    1 c rolled oats
    1/2 butter
    Bring water to a boil, stir in oats and butter. Remove from heat, let cool until lukewarm.

    2 eggs, beaten
    3/4 c sugar
    1 1/4 c brown sugar
    Add sugar and eggs to the oat mixture, combine well.

    1 1/2 c flour
    1/2 t salt
    1 t baking soda
    1 t baking powder
    2 t cinnamon
    Stir together in a large bowl, add to the oat mixture, beat by hand until mixture is smooth.

    1 1/2 – 2 c chocolate chips – if you are not using mini chips, chop them up a bit, then they won’t sink
    1/2 t water
    2 T flour
    Toss the chips with the water to coat, sprinkle with the flour, fold into the cake batter.

    Pour into a prepared 9X13 pan. Bake 40-45 minutes or until tests done in your oven. Let cool. Make frosting!

    4 T butter
    4 oz cream cheese
    2 c powdered sugar
    2 t vanilla
    Beat until creamy. Spread over cake and enjoy!

    This was one of our desserts from May’s Sunday Cafe dinner. We all loved it, it is a keeper!

    As always, thanks for taking a moment to stop and say hello. I appreciate your time and your wonderful comments.

    For more great recipes and maybe even a good story to read, visit MomsSundayCafe !