THE perfect over medium egg!!

Do you love eggs?  I do and there is nothing better than a perfect over medium egg for me.  I like my whites done and my yolks runny so I can sop them up with my toast. So many times the yolks break trying to flip the eggs, but I have finally figured it out and it is soooooooooooooo simple!
THE PERFECT “OVER MEDIUM” EGG
per egg:
1 teaspoon butter
1 teaspoon water
salt and pepper to taste
  • Melt the butter in your pan over a medium high heat.
  • Crack eggs into the butter.
  • Salt and pepper to taste.
  • When whites begin to solidify add the water and cover.
  • The rest of this is a matter of watching closely.  When the whites are done they will no longer jiggle.  Turn off the heat immediately and your yolks will be perfect.
  • Serve with your favorite toast.

aprons 3

Garlic Smashed Potato Salad – Cooking The Italian Way

potato salad

You know how celebrities always have to be worried that the non-celebrities that they date are only dating them for their VIP status?  Or their money?  Or their looks?
Well.  That’s how I feel about this potato salad.
015
I served it to Sophie, my roommate, last summer.  And when she heard I was bringing it to my parents’ house for father’s day this year.  She insisted on coming too.
I just think it would be nice to spend time with your family!” she exclaimed when I questioned her about her motives.  
Um, yeah.  Sure.  I’ll bet you do, Soph.
potato salad
I’m kind of scared to think what will happen when I serve it to the next guy I date.
Better serve with caution.
Unless I’m absolutely sure that he’s the one I want to marry.
Then I’ll serve with reckless abandon.
potato salad
Garlic Smashed Potato Salad
Serves 5+, adapted from Sunset Magazine
2 1/2 lb potatoes
2 heads garlic
1/4 cup olive oil
3 tbsp white wine
1 1/2 tsp salt
1/2 tsp freshly ground black pepper
1/4 cup chives
1. Preheat oven to 400.  Cut garlic heads in half widthwise and wrap tightly in foil.  Bake until garlic is very soft and golden (45-60 minutes).  When garlic is cool enough to handle, squeeze cloves into a small bowl.  Add olive oil, wine, salt, and black pepper.  Mash until mixture is smooth.
2. Cut potatoes into quarters or small chunks.  Put in pot of water.  Bring to a boil and then cook until potatoes are fork-tender.  Drain and return to pot.
3. Add garlic mixture and chives to the potatoes.  Let cool and serve.
Happy 4th of July!
Joanne

Rum Cake – Cause they don’t even serve nuts on the plane anymore

That’s a bold statement.  But I would be willing to enter my Upside Down Pineapple Rum Cake in any taste test.
And I did try.  I have made half a dozen different rum cakes in my quest to avoid processed foods. Unfortunately, none of them have the smoothness, creaminess of this pudding cake with a shot.  You see, in the ingredient list is a box mix of cake, AND a box mix of a pudding.  I am against it.  I prefer to avoid boxes, and to be honest, I believe this is the only recipe I have used this year with a box as the main ingredient… let alone two boxes.
But, here is is…
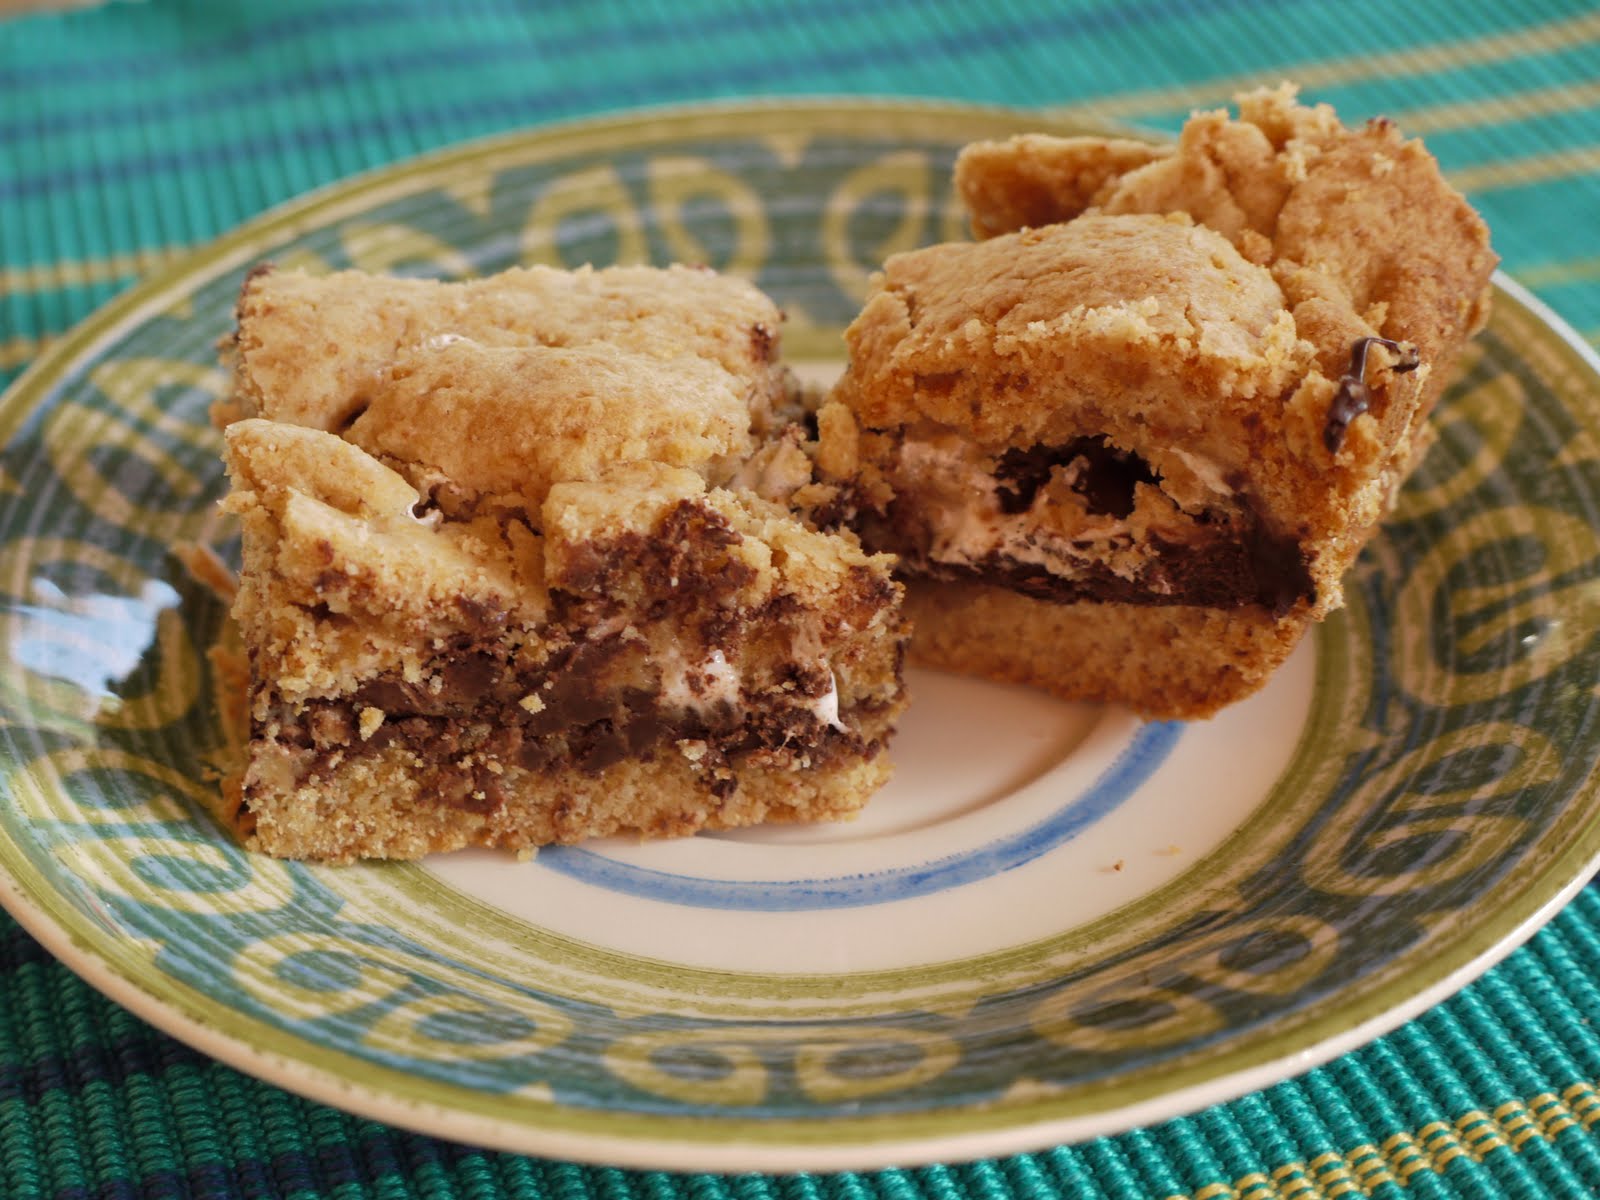
The cake collects on the bottom (well, the top actually, but then you turn it upside and the top becomes the bottom).  Anyway, the cake on the bottom (in the photograph, and the heavier pudding collects on the bottom (as it cooks, the top when you flip it upside down… understand???) makes a fabulous mixture of textures.
I always make this when we have stateside visitors.
Like these two…
Tradition, there are only half a dozen planes that land each day, but most people arrive on the last one… 8:40 PM.  Takes a bit to collect luggage, and the 10 mile trip up hills, over dales and around the corners takes 30 minutes.  So, our guests arrive tired and hungry (the airlines don’t feed you like they used to … in fact, American now CHARGES $3 for a bag of snacks… not even peanuts… but I digress).
So, tradition, I make one of these on the first night our guests arrive.  But the next morning when we have a slice for breakfast (hic), it does taste better.
And I am going to justify all the calories…

Since you need energy to partake in all the relaxing we do here in paradise.
Being the expert I am now, I have another tip for you… Allow this to relax in the fridge overnight before you serve it.
But I digress from the recipe…
The inspiration comes from a recipe that Marguerite (call her Mags) at Cajun Delight, posted ages and ages ago…
Here is her original recipe…

Cajun Pineapple Rum Cake

This heavenly cake is so simple to make and the flavor is so fabulous that you will have a hard time resisting a second piece, cher! Worth the calories, cher!! Cest bon! Bon appetit!

1/2 cup pineapple rum
1 pkg. yellow cake mix
1 pkg. French vanilla instant pudding and pie filling mix
4 eggs
1/2 cup pineapple juice
1/2 cup vegetable oil
1/2 cup chopped pecans

****************************************************************************************


Spray a bundt pan with “Baker’s Joy” baking spray. In large bowl, combine first six ingredients. beat at medium speed for two minutes. Stir in nuts, and pour into prepared pan. Bake at 325 degrees for 50 to 60 minutes. Cool and remove to cake plate. Make glaze and drizzle over cake.
*****************************************************************************************
Glaze
******
Melt 1/4 cup butter, in saucepan. Add 2tbs. pineapple juice and 1/4 cup sugar. Cook and stir, until sugar is melted. Boil gently for 5 minutes, stirring often. Remove from heat and slowly add 1/4 cup pineapple rum, until blended. Prick top of cake with a fork and drizzle glaze over warm cake. Divine!
*****************************************************************************************

Of course, I made a couple of changes… mainly that I dropped the bundt cake idea.  I do not have a bundt cake pan.  But I sure do like the idea of an upside down pineapple rum cake.  SO, I lined a rounded baking dish with pineapple slices.  I added some brown sugar to bring out the sweetness.

I was unable to find a simple yellow cake mix here.  So, I used a lemon mix and a lemon pudding mix.  I also did not have any pecans, so I left those out.
Other than those changes, I tried a little experiment…
I don’t have a photograph, but instead of putting the dish on the oven rack, I put the dish on a larger baking dish.  the dish had a 1 inch lip, about the same size as what did not brown on the cake below… make sense, can you picture it in your mind?  Remember this is an upside down cake, so when it was baking, the top was the bottom.
Alright, now that I have you completely confused, this method had an unexpected consequence…
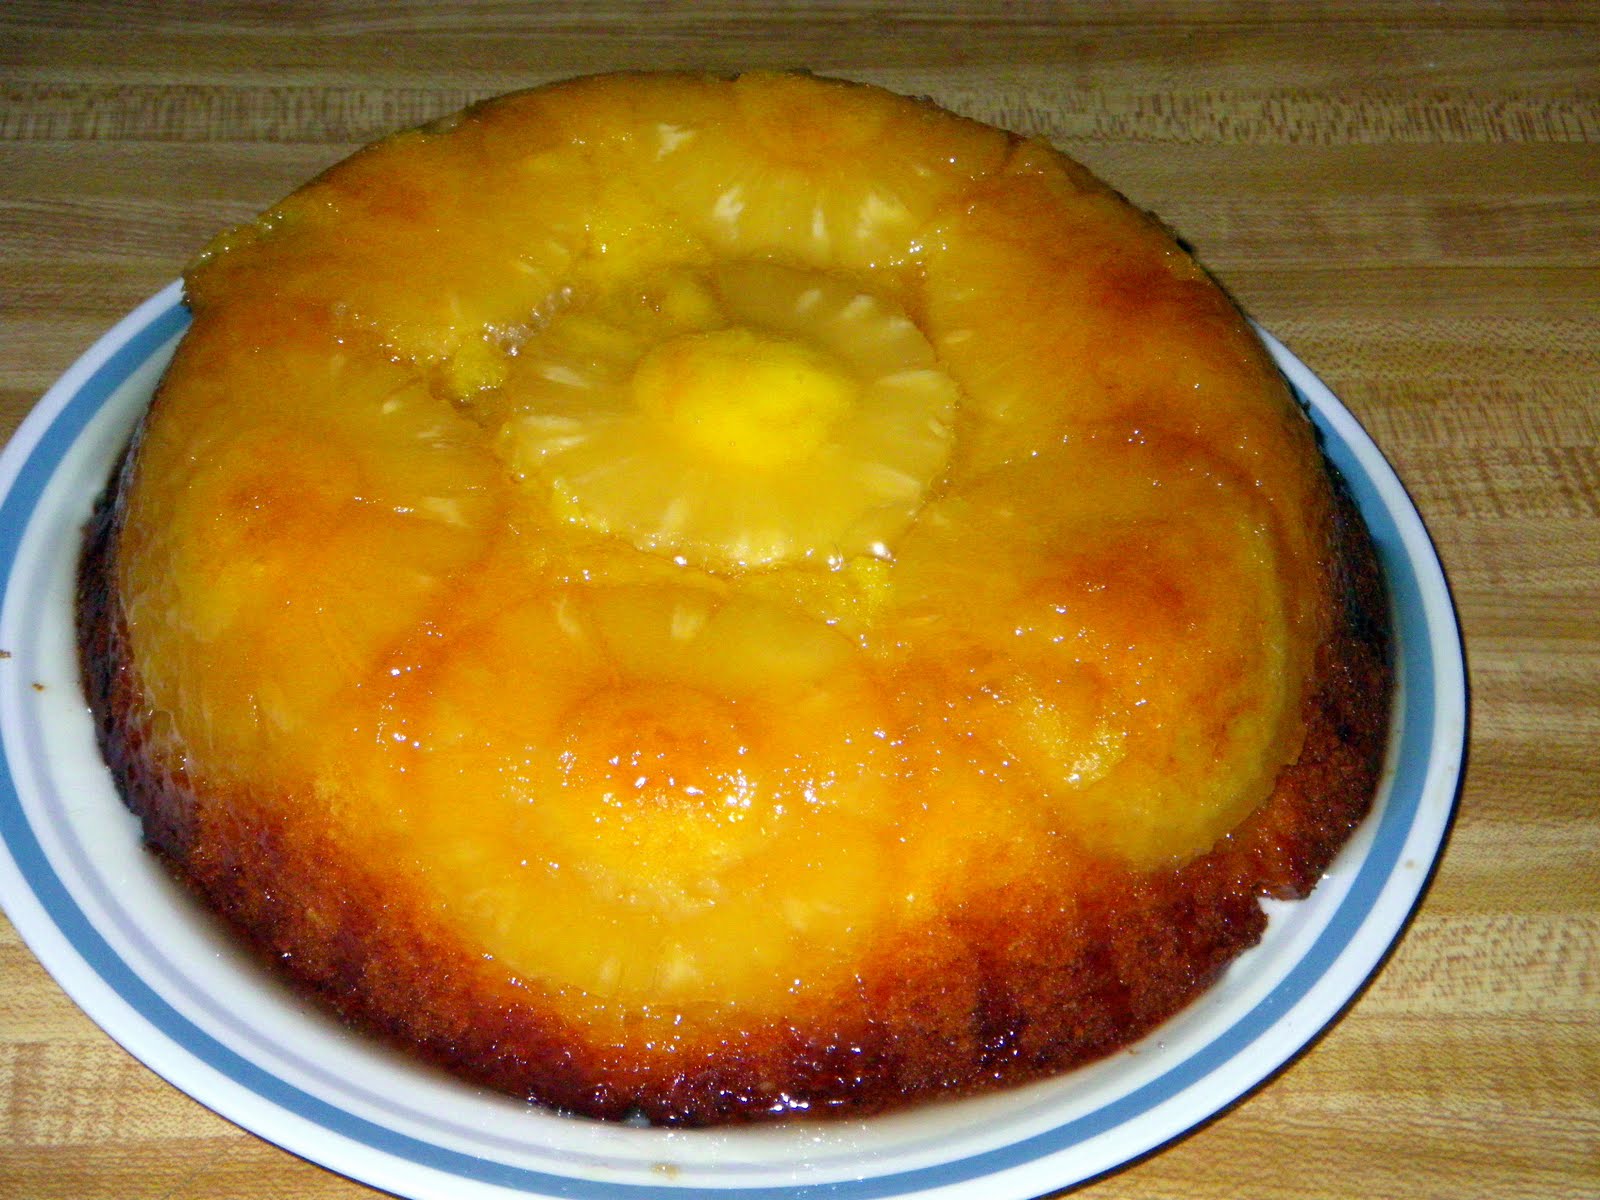
The base (top while it was cooking, the part that was above the lip of the second baking dish) browned nicely.  It has a bit of a crunch and is almost all cake.
The top (bottom while it was baking, the part that was below the lip of the second baking dish) was only gently browned, and that was mostly the brown sugar and sugars in the pineapple rings caramelizing.  The “cake” part was much more pudding than cake.  If you look at the photo below, you will see the cake texture around the bottom (which, in an effort to REALLY confuse you is the top of the photo), while the top half (bottom of the photo) is more pudding texture.

I put the cake in the fridge overnight before cutting into it so it would set solid.
So, you now have two ways to get a slice of this cake…
Use the above recipe and make it yourself…
OR come visit the islands, you bring the sunscreen, I’ll bring the Rum Cake!
Dave here from MY YEAR ON THE GRILL. It really is just this easy!  

 … I CAN COOK THAT! 

And so can you!

Korean Pancakes

I don’t know if other foodie bloggers find themselves, looking for new recipes, rather than making old favorites. I do. I love to try new recipes and see what turns out. No matter what the recipe tells me is going to happen, I really never know what I am going to turn out with. By now, you know, I tend to make changes in recipes. Oh, I have good reasons, like not having a necessary ingredient, or I may not like a particular ingredient or time causes a change in the method. The fun is in the doing and meeting new challenges and seeing the results. This is one of those recipes. The final results are definitely not what Emeril had in mind and not what I had in mind. Despite this, the resulting dish was filled with flavor and had an unexpected texture.
Ingredients:
For the sauce:
3 teaspoons low sodium soy sauce – gluten-free
2 tablespoons rice vinegar
2 teaspoons honey
1 frozen chili cube
1 teaspoon garlic powder
2 teaspoons lightly toasted sesame seeds 
½ teaspoon sugar
pancakes:
9 teaspoons vegetable oil
1 bunch scallions, trimmed, quartered lengthwise, and cut into 2 inch lengths
4 ounces mushrooms, chopped
½ teaspoon salt
2 cups gluten-free flour mixture
1 ½ cups water
2 eggs
Method:
Make the sauce by combining the soy sauce, vinegar, honey, chili, garlic powder, sesame seeds and sugar in a small bowl, stirring until the sugar is dissolved. Set aside while you make the pancakes.
In a medium sauté pan over medium high heat, add 1 teaspoon of the vegetable oil.
Next, add the scallions and mushrooms and sauté until the mushrooms begin to wilt, about 3 minutes. Set aside and let cool.
In a mixing bowl, combine the flour, water, and eggs and mix gently until just combined.
Add the cooked scallions, mushrooms, and salt and fold together briefly just to combine.
Heat a large nonstick skillet over medium-high heat and, when hot, coat with 2 teaspoons of the vegetable oil.
Add ½ of the pancake batter and use a spoon to spread into a 6 to 8-inch circle, trying to get the filling ingredients as evenly spread out as possible.
Cook the pancake about 4 minutes.
Once the pancake has begun to set and is golden brown on the bottom, flip the pancake to the other side, pressing with a spatula to compress ingredients.
Cook until golden brown on the second side, about 2 minutes longer, transfer to a warm plate and cover loosely with foil to keep warm while you prepare the remaining pancakes.
Once all the pancakes have been cooked, cut into wedges and serve warm with the dipping sauce in small bowls for dipping.
Yield: 4 large pancakes or 10 appetizer servings 
Where I went wrong: Four minutes is a long time to cook a thin pancake and mine did not even change color at four minutes. I had this pale, emaciated pancake staring at me and telling me to cook it longer. I did. When it changed to a golden color, I turned it and cooked the other side until it became golden, also, longer than the prescribed two minutes. What happened, was those soft pancakes, hardened and became deliciously crisp. I know , this is not the way, they should be, but they were almost like a favorable cracker but not that crisp. The veggies were soft so I ended up with a crispy pancake with soft vegetables. Everyone ate them and my husband did his usual, mentioned that they were spicy. That was from the chili cube. Spicy is good in this recipe but if you are not a spicy lover, eliminate the chili flavoring. I am getting more and more used to spicy flavoring and like some of them. I have to say, my hubby was a doll, and took seconds. I am hoping, in time, he will adjust to a bit more spice, in his food. In the meanwhile, I modify, most times.
Please visit me at the Comfy Cook and My Sweet and Savory.
Don’t forget to link up to My Meatless Mondays.

And the winner is………

Congratulations to BloggerCool Lassi(e) who said…

Advanced Happy Birthday to your Blog!  My favorite appliance color is Silver. Well, I like Stainless Steel Appliances the best..if the color of steel is Silver, that is what I like best.
CSN will be contacting you with with details.
Be sure and check CSN stores for a wonderful online shopping experience  and it’s available right from your desk top. Whether you are looking for a sofa, TV stands, dining room furniture or cookware they have it all.

Disclosure: I did not receive any type of compensation for this post. CSN stores is sponsoring this giveaway and will handle prize fulfillment. All opinions are my own and I was not influenced to post them.


Aw Shucks, we’re blushing…again…

We’re blushing yet again, twice in fact thanks to The Overloaded Mommy and what a way to celebrate our birthday yesterday!  Thank you Casey!
The Rules:
•Thank the blogger who awarded it to you, which we sincerely do.
•Sum up your blogging philosophy, motivation, and experience using five (5) words.

OUR followers are everything!

•Pass it on to 10 other blogs which you feel have real substance. That’s all of you.

We are also extremely grateful for our loyal followers, commenters and our wonderful creative cooking crew here at OUR KrAzY KiTcHeN and pass this award along to all of you!  There are “rules” for this award, but since we are a co-op so to speak we are bending those a bit.
The Rules:
1. Thank the person who gave you this award. Which we do profusely.
2. Share 7 things about yourself. How about 10?  We’ll give you the 10 people who make up this blog and their home sites.
3. Pass the award along to 15 bloggers who you have recently discovered and who you think are fantastic! That’s all of you.
4. Contact the bloggers you’ve picked and let them know about the award.

MENU PLANS

Menu Plan Monday hosted by Laura at I’m an Organizing Junkie

DATE BREAKFAST LUNCH DINNER
MONDAY 6/28 CEREAL SANDWICHES Pork Chops & Broccoli Rice
TUESDAY 6/29 TOAST LEFTOVERS Lazy Chicken in Herb Sauce
WEDNESDAY 6/30 YOGURT SOUP Chicken with Cashew Cream & Onions
THURSDAY 7/1 FRUIT CHEESE & FRUIT Carnitas Tacos
FRIDAY 7/2 OATMEAL C.O.R.N. Boeuf Flamande
SATURDAY 7/3 pancakes leftovers Chicken Saltimboca
SUNDAY 7/4 out out Hamburgers & Potato Salad

aprons 3

Save Room for Dessert: S’mores Bars

Save Room for dessert new badge 
Hi there, Min from The Bad Girl’s Kitchen and Try A New Recipe filling in here today, with a DESSERT that everyone who has ever camped simply must try!
This recipe comes from Rebecca of Cooking With My Kid, who’s actually a friend of a friend of mine, and who is on a mission to make 365 recipes in 365 days, with her kid. Although I like cooking with my kids, I still think it’s an ambitious project.
When she posted this recipe, I knew I had to make these right away. Just Had To. After all, I’d bought all the ingredients for s’mores recently, but before we could make them someone ate all the Hershey’s bars. Someone else snuck half a bag of marshmallows. And who knows who ate most of the graham crackers. It’s just the way it works around here I guess.
Note: when opening a jar of marshmallow fluff at altitude, just for a “taste,” be prepared to immediately make your recipe because it will just keep expanding and you won’t be able to “taste” that much without making yourself sick. Just trust me on this.
I didn’t do the shopping yesterday, and to be honest my entire grocery list was this:
1 large jar marshmallow fluff
2 king-size Hershey’s Special Dark bars
1 box graham crackers
=)
I took Rebecca’s advice and planned to use dark chocolate from the start. So Number One brought home 4 bars of Hershey’s Special Dark, in two sizes. I’m guessing that the 4.25 ounce bar is the “king size,” but I didn’t come to that realization until I already had the “giant size” bars unwrapped and discovered they wouldn’t fit as neatly as Rebecca’s had in the pan. Oh well, we’ve got some extra dark chocolate to eat!
Now that I’m thinking about it, I can’t say I recall ever eating marshmallow fluff. I know that seems like blasphemy for a Midwestern girl like myself to admit, but I just don’t remember it in my life. Of course I’ve seen the jars around, and of course when someone took that little taste, it tasted like heaven, but it didn’t ring any bells. I didn’t remember the stickiness, or anything. I do love it though, so I think that makes up for my possibly faulty memory.


The verdict: These are very good, but dare I say it, with dark chocolate, I think you need to use MORE fluff. There, I said it. It really needs more fluff!! Next time, I will try it with milk chocolate, which is probably the more classic flavor, and maybe just a little extra fluff.

Let me know which chocolate YOU would use, and how you like them!

S’More Bars
Prep Time:15 minutes
Cooking Time: 30 to 35 minutes
Makes 16 squares
1 stick of butter, room temperature
1/4 cup brown sugar
1/2 cup sugar
1 large egg
1 teaspoon vanilla
1-1/3 cups all-purpose flour
3/4 cup graham cracker crumbs (~7 full-sized graham cracker sheets, processed until fine)
1 teaspoon baking powder
1/4 teaspoon salt
2 king-sized dark chocolate bars (*note: I believe “king-size” is 4.25 ounces. “giant-size” is too big, but will work if you use a little more than one bar. I know because we used “giant-size.”)
1-1/2 cups marshmallow creme/fluff
Preheat the oven to 350 degrees. Grease an 8-inch square baking pan. (I used butter). Use an electric mixer to cream together butter and sugars until light and fluffy. Beat in egg and vanilla. Set aside.
Meanwhile,whisk together flour, graham cracker crumbs, baking powder and salt. Slowly add flour mixture to the creamed butter mixture until combined. Divide dough in half and press half of dough into an even layer on the bottom of the prepared pan.
Place chocolate bars over dough. 2 king-sized Hershey’s bars should fit perfectly side by side.
Spread chocolate with marshmallow creme or fluff. Place remaining dough in a single layer on top of the fluff (most easily achieved by flattening the dough into small shingles and laying them together). Bake for 30 to 35 minutes, until lightly browned. Be sure to cool completely before cutting into 16 squares.
Don’t forget to visit me at The Bad Girl’s Kitchen for more fabulous recipes!

CHOCOLATE PAVLOVAS WITH CHOCOLATE MASCARPONE MOUSSE

THE DARING BAKERS JUNE, 2010 CHALLENGE: CHOCOLATE PAVLOVAS WITH CHOCOLATE MASCARPONE MOUSSE


The challenge is primarily based on a recipe from Chocolate Epiphany by Francois Payard and is called Chocolate Pavlovas with Chocolate Mascarpone Mousse.
Recipe Source: Chocolate Epiphany by Francois Payard
Blog-checking lines: The June 2010 Daring Bakers’ challenge was hosted by 
Dawn from Doable and Delicious. Dawn challenged the Daring Bakers’ to make Chocolate Pavlovas and Chocolate Mascarpone Mousse. The challenge recipe is based on a recipe from the book Chocolate Epiphany by Francois Payard

Mandatory items: The recipe is comprised of three parts, four if you include the crème anglaise. You must make the chocolate pavlovas, the mascarpone mousse and the mascarpone cream using the recipes provided.
Variations allowed: You can use orange juice for the Grand Marnier in the mousse if you don’t use alcohol You can omit the sambuca from the mascarpone cream. You may substitute any crème anglaise recipe you might already have in your arsenal.
Preparation time: The recipe can be made in one day although there are several steps involved.
Equipment required: Baking sheet(s) with parchment or silpat Several bowls Piping bag with pastry tip Hand or stand mixer


While the pavlovas are baking, the crème anglaise should be made which will take about 15 minutes. While it is cooling, the chocolate mascarpone mousse can be made which will take about 15 minutes. There will be a bit of a wait time for the mascarpone cream because of the cooling time for the Crème Anglaise. If you make the Crème Anglaise the day before, the dessert should take about 2 hours including cooking time for the pavlovas.


Recipe 1: Chocolate Meringue for the chocolate Pavlova
3 large egg whites
½ cup plus 1 tbsp (110 grams) white granulated sugar
¼ cup (30 grams) confectioner’s (icing) sugar
1/3 cup (30 grams) Dutch processed cocoa powder


Directions:
 

  • Place a rack in the center of the oven and preheat to 200º F (95º C) degrees. Line two baking sheets with silpat or parchment and set aside. 
  • Put the egg whites in a bowl and whip until soft peaks form. Increase speed to high and gradually add granulated sugar about 1 tbsp at a time until stiff peaks form. (The whites should be firm but moist.) 
  • Sift the confectioner’s sugar and cocoa powder over the egg whites and fold the dry ingredients into the white. (This looks like it will not happen. Fold gently and it will eventually come together.) 
  • Fill a pastry bag with the meringue. Pipe the meringue into whatever shapes you desire. Alternatively, you could just free form your shapes and level them a bit with the back of a spoon. (Class made rounds, hearts, diamonds and an attempt at a clover was made!) 
  • Bake for 2-3 hours until the meringues become dry and crisp. Cool and store in an airtight container for up to 3 days.


Recipe 2: Chocolate Mascarpone Mousse for the top of the Pavlova base
1 ½ cups (355 mls) heavy cream (cream with a milk fat content of between 36 and 40 percent)
grated zest of 1 average sized lemon
9 ounces (255 grams) 72% chocolate, chopped
1 2/3 cups (390 mls) mascarpone
pinch of nutmeg
2 tbsp (30 mls) Grand Marnier (or orange juice)


Directions: 

  • Put ½ cup (120 mls) of the heavy cream and the lemon zest in a saucepan over medium high heat. Once warm, add the chocolate and whisk until melted and smooth. Transfer the mixture to a bowl and let sit at room temperature until cool. 
  • Place the mascarpone, the remaining cup of cream and nutmeg in a bowl. Whip on low for a minute until the mascarpone is loose. Add the Grand Marnier and whip on medium speed until it holds soft peaks. (DO NOT OVERBEAT AS THE MASCARPONE WILL BREAK.) 
  • Mix about ¼ of the mascarpone mixture into the chocolate to lighten. Fold in the remaining mascarpone until well incorporated. Fill a pastry bag with the mousse. Again, you could just free form mousse on top of the pavlova.

Recipe 3: Mascarpone Cream for drizzling
1 recipe crème anglaise
½ cup (120 mls) mascarpone
2 tbsp (30 mls) Sambucca (optional)
½ cup (120 mls) heavy cream

Directions:

  • Prepare the crème anglaise. Slowly whisk in the mascarpone and the Sambucca and let the mixture cool. Put the cream in a bowl and beat with electric mixer until very soft peaks are formed. Fold the cream into the mascarpone mixture.

Recipe 4: Crème Anglaise a component of the Mascarpone Cream above
1 cup (235 mls) whole milk
1 cup (235 mls) heavy cream
1 vanilla bean, split or 1 tsp pure vanilla extract
6 large egg yolks
6 tbsp (75 grams) sugar


Directions:
 

  • In a bowl, whisk together the egg yolks and sugar until the mixture turns pale yellow. 
  • Combine the milk, cream and vanilla in a saucepan over medium high heat, bringing the mixture to a boil. Take off the heat.
  • Pour about ½ cup of the hot liquid into the yolk mixture, whisking constantly to keep from making scrambled eggs. Pour the yolk mixture into the pan with the remaining cream mixture and put the heat back on medium. Stir constantly with a wooden spoon until the mixture thickens enough to lightly coat the back of a wooden spoon. DO NOT OVERCOOK. 
  • Remove the mixture from the heat and strain it through a fine mesh sieve into a bowl. Cover and refrigerate until the mixture is thoroughly chilled, about 2 hours or overnight.

Assembly:

Pipe the mousse onto the pavlovas and drizzle with the mascarpone cream over the top. Dust with confectioner’s sugar and fresh fruit if desired.

aprons 3

Not Julia Child’s Coq au Vin, but just as flavorful and easier too!

WHITE ZINFANDEL COQ AU VIN
1/3 cup flour
1 teaspoon sea salt
1/2 teaspoon white pepper
1 teaspoon Italian seasoning
1/4 pound bacon. choppped
1 1/2 pounds chicken tenders, cut into bite sized pieces
2 tablespoons butter
1 & 1/2 cups carrot slices
2 stalks celery, sliced thin
1 really large bunch green onions, sliced thin (I used Mexican green onions)
1 & 1/2 cups white zinfandel
2 tablespoons Better Than Chicken Base
2 cups boiling hot water
fresh parsley sprigs
fresh tarragon sprigs
  • Place flour in a large plastic bag, add chicken, seal and shake to coat chicken with flour.
  • In a large saute’ pan brown bacon until crumbly.  Remove with a slotted spoon and drain on paper towels.
  • In the bacon drippings stir fry the chicken pieces until browned. Remove with a slotted spoon and drain on paper towels.
  • Add butter.  Scrape bottom to loosen and browned bits.  These will add great flavor.  When butter is melted add carrots and cook 2-3 minutes.  Add celery and onions and saute until tender.
  • Whisk together wine, boiling water, chicken base and seasonings.  Pour over vegetables.
  • Add back in the chicken and bacon pieces. 
  • Cover and bring to a boil.
  • Lower heat and simmer 15-20 minutes until sauce is thick.
  • Serve over Parmesan Potatoes.
Now just for your pleasure, here is Julia’s recipe that I found on the net.

This is Julia Child’s recipe for her famous Coq Au Vin (Casserole of Chicken in Red Wine). Most of Julia’s cookbooks included this recipe. In every version in Julia’s cookbooks, she slightly updates the recipe.

Coq au Vin

Coq au Vin (literally “rooster in red wine”) is probably the most famous of all French chicken dishes, and certainly one of the most delicious, with its rich red wine sauce, its tender onions and mushrooms and its browned pieces of chicken with their wonderful flavor. Ideal for a party because you may prepare it completely a day or more before serving. In fact, Coq au Vin seems to be even better when done ahead so all its elements have time to steep together.
The History: Coq Au Vin is a Burgundian dish, and is considered a French comfort food. The traditional recipe for Coq au Vin did not include chicken, but rather a “Coq,” which is a rooster. A lot of recipes originally called for old barnyard fowl, roosters, capon (a de-sexed rooster), and old laying hens. Coq au Vin was originally considered peasant food, and the farmers would make do with what they had on hand. 
 
The red wine in the recipe was used not to mask flavor, but to allow the acids to help break down the old meat of the rooster True coq Au Vin was actually finished with the blood of the rooster stabilized with brandy and vinegar, this would help the blood not clot.

Julia Child’s Coq au Vin
2 1/2 to 3 pounds cut-up frying chicken, skin on and thoroughly dried (I used skinless boneless breasts and thighs instead)*
4 ounces lean thick-cut bacon
2 tablespoons
olive oil
Salt and pepper
1/4 cup cognac
2 cups red wine (Pinot Noir, Burgundy, Beaujolais or Chianti)**
2 cup homemade chicken stock or low-sodium chicken stock or broth
1 tablespoon tomato paste
2 cloves garlic, mashed or minced
1 bay leaf
1/4 teaspoon thyme
Brown-Braised Onions (see recipe below)
Mushrooms (see recipe below)
3 tablespoon all-purpose flour
2 tablespoons butter, softened
Parsley sprigs
Dry chicken thoroughly in a towel. Season chicken with salt and pepper; set aside.
Remove any rind off the bacon and cut the bacon into lardons (rectangles 1/4-inch across and 1-inch long). In a saucepan, simmer the bacon sticks in 2 quarts of water for 10 minutes; remove from heat, drain, rinse in cold water, and pat dry.
In a large heavy frying pan, casserole dish, or electric skillet over medium heat, heat olive oil until moderately hot. Add the bacon and saute slowly until they are lightly browned. Remove bacon to a side dish. Place chicken pieces into the hot oil (not crowding pan), and brown on all sides. Return bacon to the pan, cover pan, and cook slowly for 10 minutes, turning chicken once.
After browning the chicken, uncover pan, pour in the cognac. Flambé by igniting with a lighted match. Let flame a minute, swirling pan by its handle to burn off alcohol; extinguish with pan cover.
Pour the red wine into the pan and add just enough chicken broth to completely cover the chicken pieces. Stir in tomato paste, garlic, bay leaf, and thyme. Bring the liquid to a simmer, then cover pan, and simmer slowly for about 30 minutes or until the chicken meat is tender when pierced with a fork or an instant-read meat thermometer registers an internal temperature of 165 degrees F.

While the chicken is cooking, prepare the Brown-Braised Onions and the Mushrooms.
When the chicken is done cooking, remove from the pan to a platter, leaving the cooking liquid in the pan. Increase heat to high and boil the cooking liquid rapidly until approximately 2 cups of liquid remains. 
While the liquid is boiling, in a small bowl, blend the 3 tablespoons flour and 2 tablespoons softened butter into a smooth paste; beat the flour/butter mixture into the approximately 2 cups hot cooking liquid with a whisk. Simmer and stir for a minute or two until the sauce has thickened (the result will be a sauce thick enough to lightly coat a spoon – just thick enough to coat the chicken and vegetables lightly). If sauce is too thin, boil down rapidly to concentrate; if sauce is too thick, thin out with additional spoonfuls of chicken stock. Taste the final sauce, adding more salt and pepper if necessary.
Before serving, reheat the onions and mushrooms (if necessary). 
Storing:  Chicken is now ready for final reheating, but can be set aside in the sauce until cool, then covered and refrigerated for 1 to 2 days. To reheat, simmer slowly, covered, over low heat. Baste and turn chicken every 2 minutes until thoroughly warmed through (6 to 8 minutes). NOTE: Do not overcook chicken at this point.
To serve immediately: Shortly before serving, bring the sauce and the cooked chicken to a simmer, cover and simmer slowly for 4 to 5 minutes, until chicken is hot through. NOTE: Do not overcook chicken at this point.
To serve:  Either serve from the casserole dish or arrange the chicken on a large platter. Pour the sauce over the chicken. Arrange the Brown-Braised Onions on one side of the chicken and the Mushrooms on the other side. Decorate with sprigs of parsley. Accompany with parsley potatoes, rice, or noodles; buttered green peas or a green salad; hot French bread; and the same red wine you used for cooking the chicken. NOTE: This dish is traditionally served with wide egg noodles.
Makes 4 to 6 servings.
 
Brown-Braised Onions:
12 to 24 small white
onions, peeled (or double the amount if you want to use tiny frozen peeled raw onions)*
1 to 2 tablespoons olive oil
Salt to taste
* If neither frozen nor fresh pearl onions are available, substitute one large onion cut into 1/2-inch pieces. (Do not use jarred pearl onions, which will turn mushy and disintegrate into the sauce.) 
  • While chicken is cooking, drop onions into boiling water, bring water back to the boil, and let boil for 1 minute. Remove from heat and drain. Cool onions in ice water. Shave off the two ends (root and stem ends) of each onion, peel carefully, and pierce a deep cross in the root end with a small knife (to keep onions whole during cooking).
  • In a large frying pan over medium heat, heat the olive oil, add parboiled onions, and toss for several minutes until lightly browned (this will be a patchy brown). Add water to halfway up onions and add 1/4 to1/2 teaspoon salt. Cover pan and simmer slowly for 25 to 30 minutes or until onions are tender when pierce with a knife.
NOTE: Onions may be cooked in advance, set aside, then reheated when needed. Season to taste just before serving.

Mushrooms:
1/2 pound fresh mushrooms, washed, well dried, left whole if small, sliced or quartered if large
1 tablespoon butter
1/2 tablespoon olive oil
  • In a large frying pan over medium heat, heat butter and olive oil; when bubbling hot, toss in mushrooms and saute over high heat for 4 to 5 minutes or until lightly browned. Remove from heat.
NOTE: Mushrooms may be cooked in advance, set aside, then reheated when needed. Season to taste just before serving.