NUT BUTTERS – DARING COOKS JULY CHALLENGE

The July Challenge is brought to you by Margie of More Please and Natashya of Living in the Kitchen with Puppies. We decided to go nuts and get creative with nut butters!
Nutrition research suggests that nuts are good for your health. Nut butters, or pureed nuts, make it easy to use nuts in cooking. Although peanut butter is a staple in North America, most popular as the star ingredient in peanut butter and jelly sandwiches and beloved in peanut butter cookies and other sweets, it’s seldom used in preparing savory dishes. Nut butters — including not only peanut butter but almond, cashew, and walnut butters — are common ingredients in many Asian and African countries, used in a wide array of savory dishes. Nut butters add complex & interesting flavors to dishes, provide body & thickness to sauces, and can be used to replace the dairy fats or other oils in recipes.
The challenge is make a fresh nut butter and to use it in one savory recipe. You choose the type of nut (peanuts, walnuts, cashews, pecans, almonds, hazelnuts, macadamias, etc.). Then puree the nuts into a paste or butter. Then use your fresh homemade nut butter in at least one savory recipe. The nut butter challenge was inspired by the article “Better with Nut Butter” by Kathy Baruffi in Cooking Light magazine.
In addition to instructions for making nut butters, we have provided 4 challenge recipes from which to choose: Chicken with Pecan Cream & Mushrooms, Asian Noodle Salad with Cashew Dressing, Chicken with Curried Tomato Almond Sauce, and Walnut Walnut White Bean Dip with Rosemary & Sage.
What about dessert? We chose to focus on using nut butters in savory recipes, but we know nut butters make fabulous sweet treats. An extra but optional challenge this month is to use a homemade nut butter in a sweet recipe. The type of nut and the recipe is up to you. Can’t wait to see the results!
Recipes Sources:
Homemade Nut Butters (including almond, cashew, hazelnut, macadamia, peanut, pecan, pistachio, & walnut): adapted from Better with Nut Butter article from Cooking Light magazine online
Chicken with Pecan Cream & Mushrooms: adapted from Cooking Light, October 2002
Asian Noodle Salad: adapted from Thai Noodles with Peanut Sauce from Cooking Light, October 2002
Asian Cashew Dressing: adapted from “Chinese Peanut Dressing” recipe (p. 22) in Asian Noodles by Nina Simonds
Chicken with Curried Tomato Almond Sauce: adapted from Butter Chicken recipe at Food Network online
Walnut & White Bean Dip with Rosemary & Sage adapted from Cooking Light, August 2007

The July 2010 Daring Cooks’ Challenge was hosted by Margie of More Please and Natashya of Living in the Kitchen with Puppies. They chose to challenge Daring Cooks to make their own nut butter from scratch, and use the nut butter in a recipe. Their sources include Better with Nut Butter by Cooking Light Magazine, Asian Noodles by Nina Simonds, and Food Network online.

NOTES:
  • We had best results making nut butters in a food processor rather than a blender. My basic two-speed, household blender worked fine for soft nuts like pecans and walnuts, but was unable to blend harder nuts like almonds & macadamias. Unless you have one of those high-powered blenders guaranteed to puree almost anything, we recommend using a food processor.
  • The four challenge recipes include instructions for making the appropriate amount of nut butter for the particular recipe. If you made the nut butter in advance, substitute the appropriate volume of nut butter for the nuts.
  • The yield of nut butter is about half the original volume of nuts. If you start with 1 cup (240 ml) nuts, you’ll get about ½ cup (120 ml) nut butter.
  • We have provided recipes for unsweetened nut butters since the challenge is to use the nut butter in a savory recipe. You may sweeten the nut butters as desired for use as a spread or in dessert recipes.
  • Despite the name, there is no dairy butter in nut butters. They are essentially pureed nuts, also called nut pastes.
  • To use nut butters in sauces as a substitute for heavy cream, first make a nut cream. Whisk the nut butter with about twice the volume of water, adding more water until you reach your desired consistency. For example, start with ¼ cup (60 ml) nut butter with ½ cup (120 ml) water; add more water as needed.
Simple Suggestions for Using Nut Butters:
  • sauce for grilled meat or fish
  • topping for pancakes or French toast
  • dip with apples or celery
  • spread for toast or sandwiches
HOMEMADE NUT BUTTERS
  • The process for making various types of nut butters is essentially the same. Pour nuts into bowl of food processor. Grind the nuts in the processor until they form a paste or butter. The nuts first turn into powdery or grainy bits, then start to clump and pull away from the side of the bowl, and finally form a paste or butter. The total time required depends on the fat and moisture content of the nuts; grinding time will vary from roughly 1 to 4 minutes (assuming a starting volume of 1 to 2 cups [240 to 480 ml] nuts). Processing times for a variety of nuts are described below.
  • You may add oil as desired during grinding to make the nut butter smoother and creamier or to facilitate grinding. Add oil in small increments, by the teaspoon for oily nuts like cashews or by the tablespoon for dryer/harder nuts like almonds. You may use the corresponding nut oil or a neutral vegetable oil like canola.
  • The inclusion of salt in the nut butters is optional and to taste. If you make nut butters from salted nuts, peanuts or cashews for example, you will not need additional salt. We recommend making unsalted nut butters for use in the challenge recipes (and other savory recipes) since the recipes call for salt or salty ingredients. You can then adjust the salt to taste. If you are making nut butter for use as a spread, you should add salt according to your preference.
  • Roasting the nuts before making nut butters is optional according to your preference. To roast nuts in the oven, preheat oven to 350 degrees F (180 degrees C/Gas Mark 4). Spread nuts in a single layer on a baking sheet or roasting pan. Bake for approximately 10 minutes or until nuts are fragrant and a shade darker in color. Allow nuts to cool before grinding. Roasted nuts will make butter with darker color than raw nuts.
  • It’s helpful to keep in mind that the yield of nut butter is about half the original volume of nuts. If you start with 1 cup nuts, you’ll get about ½ cup nut butter.
  • The consistency of nut butters varies from thin & soft (almost pourable) to very thick and hard depending on the fat content of the nut. (See links below for nutrition info on variety of nuts.) Homemade nut butters will probably not be as smooth as commercial products.
  • Homemade nut butters are more perishable than commercial products and should be stored in the refrigerator. The nut butters harden & thicken somewhat upon chilling.
  • See links at bottom of post for additional information about making nut butters at home.
What variations are allowed:
  • We tested the challenge recipes below with particular types of nut butters as indicated in the ingredient list. You are free to experiment with other types of nuts. For example, you may want to substitute walnut butter in the Chicken with Pecan Cream and Mushrooms. You may also substitute the chicken or shrimp in the challenge recipes with your protein of choice.
  • If you are unable to eat nuts due to allergies or other dietary restrictions, we suggest you consider making a seed butter (sesame, sunflower, pumpkin, etc) and use it in a savory recipe of your choice. Making seed butters is very similar to making nut butters. We have provided links at the bottom of this post with information on seed butters and recipes. You’re also welcome to use other alternates as discussed in next bullet point.
  • If you are unable to eat nuts or seeds, you might consider making a fruit butter and then using it in a sweet or savory recipe. (Fruit butters are fruit cooked to form a paste, see links at bottom of post for recipes.) We are also open to other ideas for those with allergies or food restrictions. For example, pureed beans or pureed roasted vegetables could be used in a variety of savory soups, stews, or sauces.
  • If you do not own a food processor or high-powered blender to make your own nut butter, you may complete the challenge with store-bought nut butter.
  • Vegans, vegetarians, and those with food restrictions may substitute accordingly in the challenge recipes.
Preparation time:
  • Homemade Nut Butters: 10 minutes (optional) roasting, 5 minutes preparation
  • Chicken with Pecan Cream & Mushrooms: approximately 30 minutes
  • Asian Noodle Salad with Cashew Dressing: approximately 30 minutes
  • Chicken with Curried Tomato Almond Sauce: approximately 30 minutes
  • Walnut White Bean Dip with Rosemary & Sage: approximately 10 minutes
Approximate Processing Times in Food Processor for Nut Butters:
  • Almonds: form a thick butter in about 2 to 3 minutes for slivered almonds, or 3 to 4 minutes for whole almonds; the skin of whole almonds will leave dark flecks in the butter
  • Cashews: form a smooth, spreadable butter after about 2 minutes of processing
  • Hazelnuts: form a firm, thick, and grainy butter in about 2 to 3 minutes; to remove the skin from whole hazelnuts, roast in a 400 degree F oven (200 degrees C/Gas Mark 6) for about 5 minutes or till skins loosen, then rub hazelnuts in a clean dishtowel to remove some of the skin; the remaining skin will leave dark flecks in the butter
  • Macadamias: form a soft and smooth butter in about 2 minutes
  • Peanuts: form a thick, grainy butter in about 2 or 3 minutes
  • Pecans: form a very soft, oily, pourable butter in 1 or 2 minutes; the skins give pecan butter a slightly tannic and bitter flavor
  • Walnuts: form a very soft, oily, pourable butter in 1 or 2 minutes; the skins give walnut butter a slightly tannic and bitter flavor
  • Pistachios: According to the Nut Butter Primer from Cooking Light, pistachio butter is dry and crumbly with a tendency to clump during processing; they recommend combining it with softened cream cheese for easy spreading and report a processing time of 3.5 to 4 minutes. Please note, we did not test pistachio butter.
I chose CHICKEN with PECAN CREAM & MUSHROOMS with a few deletions and changes. to make it palatable to my family I substituted cashews for pecans and onions for mushrooms.  Hubby also asked that I make it chunky so I used 1/2 cup water instead of the 3/4 cup it called for.
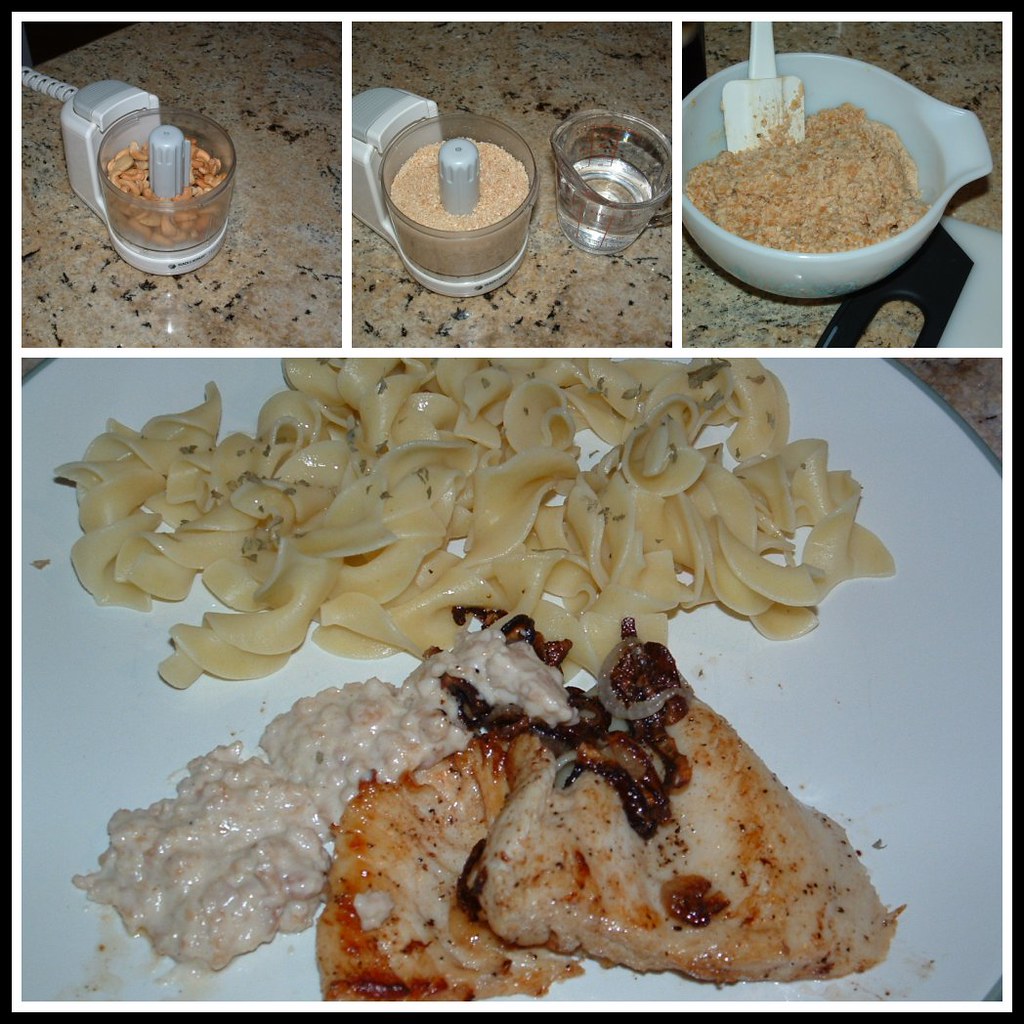
Chicken with Cashew Cream & Onions

Cashew Cream:
3/4 cup coarsely chopped cashews, roasted
3/4 cup  water
¾ teaspoon salt, more as needed
½ pound egg noodles or pasta
4 ~6-ounce boneless, skinless chicken breast halves
1 teaspoon olive oil, more as needed
Salt & pepper to taste
Sauce:
1 tablespoon deglazing liquid (water, broth, wine; optional)
1 teaspoon olive oil, more as needed
1/4 cup finely chopped shallots
1 large Vidalia Onion, sliced thin
1 Tablespoon fresh thyme leaves
Chopped cashews, (optional garnish)
Directions: 
  • Prepare cashew cream. Grind cashews in a food processor for about a minute or so until smooth, scraping down the sides of bowl as needed. Add water and 3/4 teaspoon (3 ml) salt; process until smooth, scraping sides of bowl as needed. Set aside cashew cream.
  • Cook noodles according to package instructions in salted water. Drain, rinse, and keep warm.
  • If desired, pound chicken to ¼ inch (6 mm) thickness to promote even cooking. Sprinkle with a bit of salt and pepper to taste. Heat 1 teaspoon (5 ml) olive oil a large nonstick skillet over medium-high heat. Add half the chicken; sauté 3 to 5 minutes on each side or until cooked through. Cook the chicken in 2 batches, adding more oil if needed for second batch. Set aside cooked chicken on a clean plate, cover to keep warm.
  • Add deglazing liquid to pan if using and stir up any browned bits. If needed, add another teaspoon (5 ml) of oil (or more) to pan for sautéing the shallots and onions. Sauté the shallots and onion slices over medium heat for 4 to 6 minutes or until onions are tender and starting to brown. Add fresh thyme to the pan. Stir in pecan cream; bring to a boil. Reduce heat and simmer for about 1 1/2 minutes till reduced slightly.
  • Slice chicken into thin strips. Divide the noodles among serving plates. Add a scoop of the onion cashew sauce on top of noodles. Lay sliced chicken on top. Garnish with fresh thyme and/or a pinch of chopped cashews if desired.


aprons 3

DEVIL’S FOOD ORANGE CAKE with ORANGE BUTTERCREAM FROSTING

Hi Tamy here filling in for Jen this morning and I thought I’d share one of my niece’s favorite cakes with you.
Save Room for dessert new badge


I don’t seem to have a picture of the iced cake, but it was yummy!

CAKE

4 medium navel oranges, room temperature
3 squares unsweetened chocolate
1 1/2 cups sugar
1 teaspoon ground cinnamon
1 teaspoon baking soda
1/2 cup vegetable shortening
2 Jumbo eggs
1 cup whole milk
2 cups flour

  • Heat oven to 325 degrees.
  • Generously grease a Bundt pan (I like a decorative Nordicware or Wilton pan)
  • Squeeze oranges, saving pulp
  • Melt the chocolate in the microwave. Then add 1/2 cup of the sugar, the cinnamon and 1/2 cup of the orange juice, stirring until the sugar is dissolved. Cool.
  • Mix the baking soda into 2 teaspoons of orange juice.
  • In a large mixing bowl cream the shortening with 1 cup sugar. Add eggs one at a time, beating well after each.
  • Alternate the milk and flour, sifting the flour into the cream mixture and blend until smooth.
  • Add the baking soda mixture and blend well.
  • Add the cooled chocolate mixture and blend well.
  • Pour the batter into the prepared pan.
  • Level pan by dropping on counter top to remove air bubbles.
  • Bake until springy 55-60 minutes.
  • Cool 10 minutes and then invert onto platter.
  • Cool before frosting.
FROSTING

1/2 cup butter, softened
5 cups sifted powdered sugar
1 1/2 teaspoon vanilla
1/3 cup freshly squeezed orange juice, pulp and all
2 teaspoon orange zest

  • Beat butter until fluffy.
  • Beat in 1/2 of the powdered sugar until smooth.
  • Add orange juice, vanilla and orange peel. Blend until smooth.
  • Slowly add the remaining sugar and blend until silky.
  • Adjust sugar and orange juice until desired consistency and flavor is reached.
If you don’t have this mess in the end,
you did it wrong!
aprons 3

MENU PLANS with a CHALLENGE

Jen over at THE Motivation Station has challenged us to make $200 last the rest of the summer.  Can you do it?  I’m sure going to try. That means $40 a week to feed 3 adults, 2 dogs, 2 cats and a family of 4 1/2  + 3 for 3 days next week when my cousins visit.
Almost all of my cooking is done from scratch so this will be a big challenge for me.  Fortunately I am well stocked on dairy, meat and produce to get started.
Menu Plan Monday hosted by Laura at I’m an Organizing Junkie

DATE BREAKFAST LUNCH DINNER
MONDAY 7/12 CEREAL SANDWICHES Wine & Vinegar Chicken
TUESDAY 7/13 TOAST LEFTOVERS Vegetable Pork Stir Fry
WEDNESDAY 7/14 YOGURT SOUP Taco Ring
THURSDAY 7/15 FRUIT CHEESE & FRUIT Mexican Meatloaf
FRIDAY 7/16 OATMEAL C.O.R.N. Chicken Apple Puff Bundles
SATURDAY 7/17 Shirred Eggs leftovers ORANGE HONEY CHICKEN
SUNDAY 7/18 Toasted French Toast out Chicken Marsala
aprons 3

LEMON PARMIGIANO BASIL PASTA

I searched for a lemon recipe to go along with Dave’s choice for the lemon mystery ingredient this month and was pleased to find this gem. It looks plain, but packs a punch with all the lemon juice.
 LEMON PARMIGIANO BASIL PASTA
1 pound Country Pasta egg noodles
1 1/2 cups freshly grated Parmesan cheese 
3/4 cup fresh lemon juice (3 to 4 lemons) 
2/3 cup extra-virgin olive oil 
1/2 tsp. sea salt 
1/2 tsp. freshly ground pepper 
2 tsp. grated lemon zest 
2 cups firmly packed basil leaves, slivered
  • In a large pot, cook pasta in salted, boiling water until al dente. Place a colander over a large serving bowl, then drain pasta into it (hot water will warm bowl). Pour water from bowl, wipe bowl dry, then empty pasta into it. 
  • Meanwhile, combine cheese and lemon juice in a small mixing bowl. Gradually beat in olive oil until mixture becomes thick and creamy and cheese “melts” into oil. Season with salt and pepper. Stir in lemon zest. 
  • Pour sauce over cooked pasta in serving bowl; toss thoroughly. Add basil, toss again and serve.

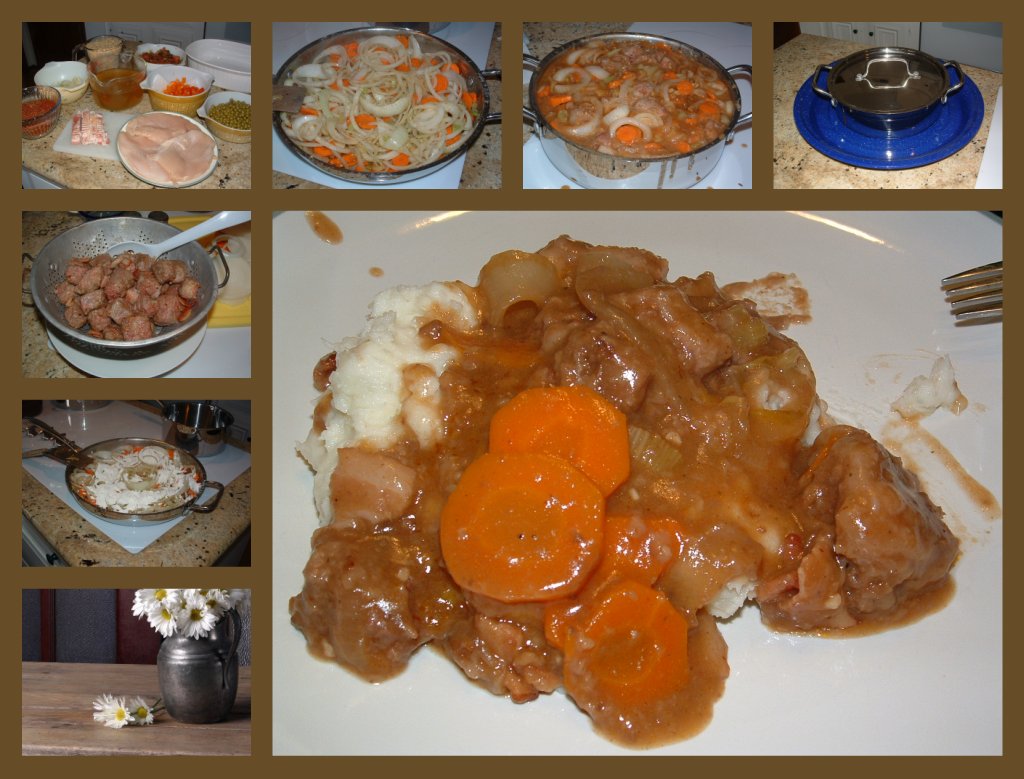
BOEUF FLAMANDE aka BEEF IN DARK BEER, well sort of

I previously posted this over at OUR KrAzy kitchen, but it is worth repeating ~ it was that good!

I found this recipe in the bottom of grams pile of magazine/book clippings to try one day.  It just screamed, “try me for the guys”.  BOEUF FLAMANDE translates into ‘Beef Stew in a rich sauce made with beer’. But I don’t like dark beer so I adjusted the recipe and it worked really well. The guys we’re asking when we’re doing the leftovers.  This will be perfect on a cold winter’s night!

BOEUF FLAMANDE
1/2 pound bacon, cut into 1/4″ cubes
3 pounds beef stew meat, cut into bite size pieces (I used brisket)
1 teaspoon sea salt
1/2 teaspoon white pepper
3 tablespoons butter
3 cloves garlic, minced
2 large Vidalia onions, cut into thin slices
2 large carrots, sliced
1/2 cup flour + dredging flour
1/2 cup Country Bob’s All Purpose Sauce
3/4 cup Dr. Pepper (yep you read that right)
3 cups boiling water
3 tablespoons Better than Beef Bouillon
1/2 teaspoon thyme
2 teaspoons sugar
1 tablespoon Worcestershire sauce
3 tablespoons champagne vinegar
fresh parsley sprigs

  • Preheat oven 325 degrees.
  • Place the flour into a plastic bag.
  • Brown bacon pieces until crisp.  With a slotted spoon remove to drain.
  • Dredge beef pieces in the flour mixture.
  • Brown beef pieces in bacon fat*.  With a slotted spoon remove beef pieces to a colander to drain.
  • Add butter to saute pan. 
  • Saute’ carrots for several minutes.
  • Add the onions and garlic until fragrant and translucent.
  • Stir in 1/2 cup flour, salt, pepper and thyme.
  • Whisk together the hot water, sugar and bouillon. 
  • Add Country Bob’s sauce, Worcestershire sauce, champagne vinegar and Dr. Pepper until well blended. 
  • Add to veggies.
  • Bring to a fast boil.
  • Lower heat to a simmer for 5 minutes.
  • Spray a casserole with PURE.
  • Add browned meat to the casserole.
  • Top with onions and carrots.
  • Pour sauce over top and blend well.
  • Bake for 2 1/2 hours or until meat is tender.
  • Serve over Parmesan Potatoes.

*May have to add a bit of butter or oil if not enough bacon grease.

aprons 3

BOEUF FLAMANDE aka BEEF IN DARK BEER, well sort of

I previously posted this over at OUR KrAzy kitchen, but it is worth repeating ~ it was that good!

I found this recipe in the bottom of grams pile of magazine/book clippings to try one day.  It just screamed, “try me for the guys”.  BOEUF FLAMANDE translates into ‘Beef Stew in a rich sauce made with beer’. But I don’t like dark beer so I adjusted the recipe and it worked really well. The guys we’re asking when we’re doing the leftovers.  This will be perfect on a cold winter’s night!

BOEUF FLAMANDE
1/2 pound bacon, cut into 1/4″ cubes
3 pounds beef stew meat, cut into bite size pieces (I used brisket)
1 teaspoon sea salt
1/2 teaspoon white pepper
3 tablespoons butter
3 cloves garlic, minced
2 large Vidalia onions, cut into thin slices
2 large carrots, sliced
1/2 cup flour + dredging flour
1/2 cup Country Bob’s All Purpose Sauce
3/4 cup Dr. Pepper (yep you read that right)
3 cups boiling water
3 tablespoons Better than Beef Bouillon
1/2 teaspoon thyme
2 teaspoons sugar
1 tablespoon Worcestershire sauce
3 tablespoons champagne vinegar
fresh parsley sprigs

  • Preheat oven 325 degrees.
  • Place the flour into a plastic bag.
  • Brown bacon pieces until crisp.  With a slotted spoon remove to drain.
  • Dredge beef pieces in the flour mixture.
  • Brown beef pieces in bacon fat*.  With a slotted spoon remove beef pieces to a colander to drain.
  • Add butter to saute pan. 
  • Saute’ carrots for several minutes.
  • Add the onions and garlic until fragrant and translucent.
  • Stir in 1/2 cup flour, salt, pepper and thyme.
  • Whisk together the hot water, sugar and bouillon. 
  • Add Country Bob’s sauce, Worcestershire sauce, champagne vinegar and Dr. Pepper until well blended. 
  • Add to veggies.
  • Bring to a fast boil.
  • Lower heat to a simmer for 5 minutes.
  • Spray a casserole with PURE.
  • Add browned meat to the casserole.
  • Top with onions and carrots.
  • Pour sauce over top and blend well.
  • Bake for 2 1/2 hours or until meat is tender.
  • Serve over Parmesan Potatoes.

*May have to add a bit of butter or oil if not enough bacon grease.

aprons 3

Where I’ve been and where I want to go

You are never given a wish without also being given the power to make it true.  You may have to work for it, however,” ~Richard Bach, Illusions
Many of you know I was taking care of my mother-in-law earlier this year.  She just turned 90 and has Alzheinmers.  We have also been fighting the VA for several years now over hubby’s last deployment leaving me knee deep in paperwork, phone calls and appointments trying to straighten it out and now I find myself in a psuedo care taking position for my aunt who has end stage Parkinson’s disease and a lousy attitude closed mind and cry wolf attitude.
Without a long story full of petty details let’s just say it has been a long, long, long year.  We have lived in 4 separate states in the past 9 months and dealt with everyone else’s needs except our own.  My blogging is suffering, my health is suffering and my peace of mind is suffering.  So what is the answer?  
I have finally decided the answer is putting my/our needs first.  It may be selfish, but the time has come to be just that! So the plan is to get back on track with regular posting, menu planning, recipe experimenting and living life to the fullest.  I will be hitting the “mark all read” button on my google reader and allowing myself a “FRESH” start.  I hate doing that, but feel it is the best and only way to dig myself out of this hole!
I look forward to getting back to regular blog reading and a quality life. I’ll see you all in blogland soon.

aprons 3

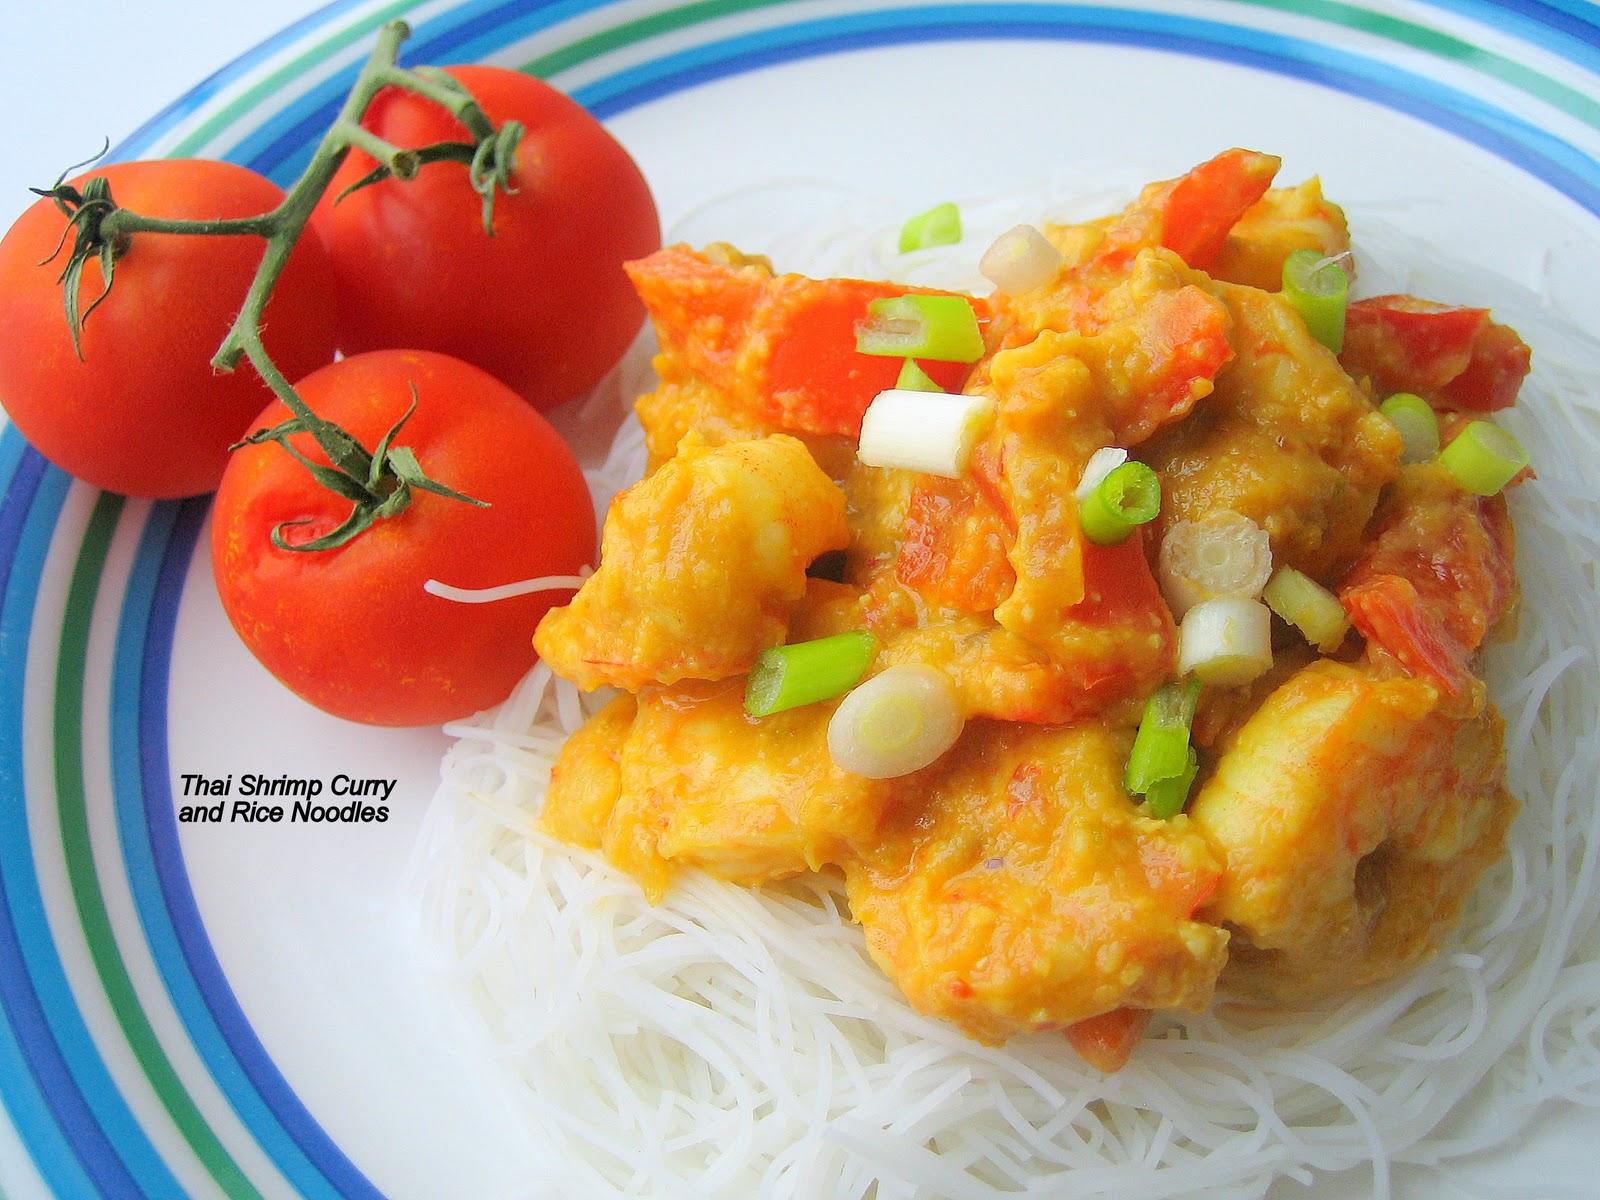
Thai Shrimp Curry Over Rice Noodles

Cool Lassie here this week from Pan Gravy Kadai Curry with Thai Shrimp Curry over Rice Noodles.
Ingredients:
  • Mid-sized Shrimps – 25 #s, peeled and de-veined
  • Ripe Tomato – 3, medium
  • Cooked Rice Noodles – 3 cups
  • Salt
  • Olive Oil – 2 tbsp
For the Curry paste:
  • Onion – 1, large, roughly chopped
  • Garlic – 3 cloves
  • Peppercorns – 1/2 tsp
  • Ginger – 1/4 inch
  • Cashew nuts – 1/4 cup (Use Candle nuts if available)
  • Spring Onions – 3 stalks, white and green parts separated (Green for Garnish only)
  • Turmeric Powder – a pinch
Procedure:
  • In a wide saute pan, add a tbsp of oil and add the ingredients under “For the curry paste” one by one.Onions must be sauteed till it is slightly browned.  Then Garlic, peppercorns, Ginger, Cashew and the White part of the spring onions and finally the turmeric powder.Cool the mixture and grind it to a fine paste with a little bit of salt.
  • In the same saute pan, add the remaining oil and add the chopped tomatoes. Once they are partially cooked, add the ground curry paste and check for taste. Add salt/pepper if needed and cook until the mixture is slightly thickened.
  • Add the cleaned shrimp and gently mix. Lid the pan and cook for 5-7 minutes.
  • Transfer rice noodles to a plate and top if with the shrimp curry.
  • Garnish with the green parts of the spring onion and serve immediately.
Makes ~3 mid-sized Servings
Note:
  • Right way to cook the rice noodles –  Bring plenty of water to a roiling boil in a stock pot/pasta pot. Switch off the stove. Add the noodles to the hot water and let it cook for ~5 minutes. Drain it in a colander and fluff it with a fork.
Enjoy!

Chicken Alexis

No, this wasn’t cooked over live fire but it was at least cooked over flame.

I took a class on pan sauces at Rouxbe online cooking school this week and before I take the quiz, I needed to practice the techniques. It’s kind of hard to do a pan sauce if your meats are grilled, so I stayed inside tonight.
One of their practice examples was Chicken Marsala, which is one of my favorites. I took that basic idea and then….well, did a lot different, just adding things Alexis loves. Hence the name.

Chicken Alexis
Source: Nibble Me This
Ingredients
3 ea chicken breasts, boneless, skinless
salt & garlic pepper to taste
3/4 cup flour
3 Tbsp shallot, minced
1/2 cup roasted red bell pepper, chopped
1/4 cup sherry
1 cup heavy cream
1/2 cup chicken stock
Instructions
Season your chicken with salt and garlic pepper. Then place in a gallon zip top bag one at a time and pound to about 1/4″ thickness. Dredge in flour and set aside.
Heat a saute pan to the proper temp. How do you know what that temp is? Here is a great trick that I learned from Rouxbe.
I was always adding oil before the pan was ready until I learned this trick about 3 months ago. Isn’t that the coolest!?!?
Once the pan is hot, add 1/4 cup olive oil and wait for about 20-30 seconds for the oil to heat up. Add the chicken in small batches. Cook for 3-4 minutes until golden brown. Flip and cook another 3-4 minutes until the other side is golden brown. Remove to a warming drawer or 200f oven.
Reserve 1 tbsp of oil and add the shallots to the pan. Stir for about 1 minute and then add the roasted red pepper. Continue stirring until the shallots are softened.
Deglaze the pan with sherry, stirring briskly with a wooden spoon to get all of the goodies scraped off of the pan. Continue cooking until the liquid is almost evaporated.
Reduce heat and slowly add cream while continuing to stir. Add in broth. Bring to a simmer, slightly reduce heat and stir occasionally until the volume is reduced by half. Squeeze in the juice of 1/2 lemon. Taste and season with salt and pepper as needed.

Serve the sauce ladled over the chicken and a bed of pasta.

(The side dish was 1 tbsp shallot, 3/4 cup diced artichoke hearts, and 1 diced tomato that I sauteed for just about 2 minutes. Mixed that in with 8 oz of angel hair and fresh sliced basil.)
This one was so good and it was devoured by the family. I was just sad that I forgot to make garlic rolls to go with it.

Caribbean Muffin Top Banana Cookies

These were so good, I couldn’t even get a photograph of the cookies without taking a bite.

I mean REALLY and REALLY good.joyed

Awhile back, I adapted a recipe from Mary over at ONE PERFECT BITE…

I read the recipe for Hawaiian Banana Bread and knew I was going to make it. You all know Mary, she publishes daily, but better than just volume, ONE PERFECT BITE has amazing quality.  I have said it before… Of all the bloggers I read, Mary is most ready for the book deal.  Would be the easiest edit job the publisher ever tackled.
Sure enough… 


Muffins instead of bread was made, eaten and enjoyed.  

We eat a lot of bananas around here.  One of the bad things about paradise is that the bananas go bad after only 3-4 days.  The good news about paradise is that bananas go bad after only 3-4 days.  Meaning I could make a dirty banana drink (rum of course).  But now, I am saving up bad bananas to make these.

And now that I am making cookies, well, there isn’t a rotten banana safe on the island.

As to why a cookie instead of the muffins?  Come on, admit it; The muffin top is the best part of a muffin.  Just ask Seinfeld.

But before I get to the recipe…

Chris, and all the fabulous bloggers from Tennessee were on my mind when I was making these muffin top cookies.  I now have 2 verses and a chorus for my new soon to be hit song…

Good Old Muffin Tops…
Muffin Tops Tennessee!

I have got to get back to my Kansas Kitchen where running these through a Kitchenaid will keep my mind from wandering…

But I digress… here’s what I did, still basically Mary’s recipe… With a few additions…

2-1/2 cups all-purpose flour
3/4 teaspoon double-acting baking powder
1/2 teaspoon baking soda
1 teaspoon salt
1-1/2 sticks (3/4 cup) unsalted butter, softened
1 cup firmly packed light brown sugar
1/2 cup granulated sugar
1 shot Cointreau (an Orange Liquor)
3 large eggs
1 tablespoon freshly grated lemon zest
2 mashed ripe bananas (just a bit less than a packed cup)

1/2 cup drained of juice, finely diced pineapple
3 tablespoons sour cream
3/4 cup chopped walnuts
1 cup sweetened flaked coconut
1 cup Sun Maid brand TROPICAL TRIO 
I am going to take a break from the recipe for a moment to talk about Sun Maid TROPICAL TRIO.  I found this in the raisin section of the store.  I am hoping that it is not just an island thing, and is available stateside.  This is a terrific product.  All natural, diced up pieces of Pineapple, Papaya and mango.  They are dried, but still sweet and moist. They are perfect to cook with.  I am using them in recipes in place of raisins.  I am also measuring carefully, hoping that there are a couple of TBS left over so i can eat them like candy.  I did check the ingredients carefully.  I can pronounce all the ingredients, no high fructose corn syrup or the like added.  I can not recommend this product more, especially if you think raisins are a mistake.  Nothing but dried up useless grapes…

But I digress…

the Directions are pretty easy…

1) Pre-heat oven to 350 degrees. prepare a jelly roll pan with parchment paper

2) Sift flour, baking powder, baking soda, and salt together in a medium bowl. In another large bowl, cream butter with sugars with an electric mixer. When mixture is light and fluffy beat in rum, eggs, one at a time, zest, banana, pineapple, TROPICAL TRIO and sour cream. Add flour mixture, beating batter until it is just combined. Stir in walnuts and coconut.
3) I put 2 rounded tsp of batter in cookie shape. Bake 30 minutes. Remove from pans. Complete cooling on racks. Yield: 36 cookies. 

Look at the TROPICAL TRIO in the batter…
And think about all the fruit in the recipe… Why, it’s almost healthy!

Even my buddy the puffer fish wouldn’t find these cookies too fattening…


Dave here from MY YEAR ON THE GRILL. It really is just this easy!  

 … I CAN COOK THAT! 

And so can you!
…

July – Cabbage Recipes

I thought for a change of pace, I would look back on some of my old vegetable recipes and decided cabbage would be an interesting vegetable to stress,  I was surprised at some of the recipes, I have made and I am also delighted.  I don’t look back in my blog, often enough.
Cabbage and Noodles Without Real Noodles

Ingredients:
1 carrot diced
2 cups shredded green cabbage
1 onion shredded
3 large potatoes shredded
3 eggs
salt and pepper to taste
1/4 teaspoon garlic powder
2 teaspoon onion powder
Method:
In a large skillet, saute onions and green cabbage.
While the vegetables are cooking, beat 3 eggs and set aside.
Dice carrots and set aside.
In casserole, put cabbage mixture.
Add eggs and mix together.
Add seasonings and carrots and mix well.
Bake at 400 degrees F for 20 – 25 minutes.

Save Room For Dessert: Wedding Cookies!

Kris here from Behold the Metatron, The Motivation Station, The Writer’s Blog, Where to Vegan, AND Veggie Tales here at the crazy kitch! I don’t think I have enough time on my hands! Anyway… in the spirit of our love for all things dessert, here’s one of my favorites!
 

Wedding Cookies

Whether you call them Italian, Russian, Greek… these cookies are still the same delicious, powdery balls of nutty sweetness. And what better way to celebrate Wedding Season with a treat fit for a scrumptious reception!

Ingredients

1 1/2 cups unsalted butter
3/4 cup confectioners’ sugar
3/4 teaspoon salt
1 1/2 cups finely ground almonds (I used 1/2 pecan 1/2 almond)
4 1/2 teaspoons vanilla extract
3 cups sifted all-purpose flour
1/3 cup confectioners’ sugar for rolling

Directions

  1. Preheat oven to 325 degrees F (165 degrees C). 
  2. Cream butter or margarine in a bowl, gradually add confectioners’ sugar and salt. Beat until light and fluffy. Add almonds and vanilla. Blend in flour gradually and mix well.
  3. Shape into balls (or crescents) using about 1 teaspoon for each cookie. Place on ungreased cookie sheets, and bake for 15-20 min. Do not brown. Cool slightly, then roll in the extra confectioners’ sugar.


Now, this recipe is for up to 80 cookies. If you are not in the mood to make that many… just click here and the recipe adjuster will help you out!