Hello again… Dave here from MY YEAR ON THE GRILL! I am very excited to come back for a second week of I CAN COOK THAT! Real quick, if you missed last week, I am a novice. For the last 8 months, I have been handling almost all of the cooking duties. Prior to that, I was a great eater, but rarely cooked. I am learning as I go, and am constantly surprised when I discover that I CAN COOK THAT!
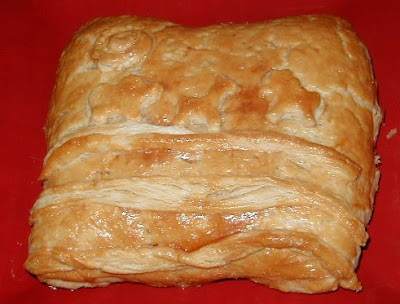 And this week, I am making PUFF PASTRY WITH BLUE CHEESE FILLING!
Go ahead, if you read my post last week, you are saying it to your self, “What’s that goof doing, bragging about making the same dish two posts in a row???”
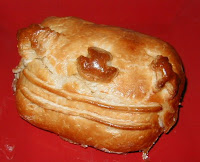 Well, yes… and no. There is a big big difference in the picture above, and the little picture to the left of last week’s post. That difference, I did not buy the Pepperidge Farms prepackaged frozen (and expensive) Puff Pastry. Instead, today I feel I made a giant step towards becoming a less frightened cook. Today I made a Julia child recipe.
MAZALTAF… Today I am a man!
So, on the surface, it looks like I am repeating a recipe. But, in fact, the spirit of my series is to be amazed that in fact, I CAN COOK THAT. And much of learning to cook is to develop a skill, and then build on it. Trust me, there are so many layers to this recipe that I would never have attempted when I first took over the cooking duties in my household. It has taken me months of cooking every day to get to the point where I would be confident enough to try one of Julia’s recipes.
Be warned in advance that the entire process takes several hours. It is not hours and hours standing at a counter, but it is 5 minutes out of each hour. But, in the end… I could not have been more pleased…
Here’s what Julia says…
French puff pastry dough is paper-thin layers of dough separated by paper-thin layers of butter; when it goes into the oven, the dough layers puff and the pastry rises. Properly made, it is flaky, light as a feather, and tender. It is used for making patty shells, turnovers, puffed cases for various foods, Napoleons and other dessert pastries, and cookies.
(Note: Granular “instant-blending” all-purpose flour needs no sifting. To measure it for this recipe, dip a dry-measure cup into the bag of flour, shake cup to level flour even with lip of cup, and pour measured flour into mixing bowl.)
OK, let’s get to it… Here’s what I did…
First, as always, assemble your ingredients in advance…
For the pastry which Julia calls,
THE DETREMPE,
you need…

1/3 cup salad oil
3 cups granular “instant-blending” flour
A mixing bowl
2 tsp salt dissolved in ¾ cup cold water
2 or more Tb additional cold water if needed
2 sticks (1/2 pound total) unsalted butter
And her is how Julia tells us to make our own puff pastry (Her words are in red, my commentary is in black)…
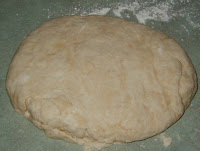 With a rubber spatula, blend the oil into the flour in the mixing bowl. When mixed, blend in the salted water, pressing firmly with your spatula, then with your fingers. Add more water by droplets until you have a firm but pliable dough. Knead as briefly as possible into a cake 6 inches in diameter. Wrap in waxed paper and refrigerate for 1 hour.
THE DOUGH AND BUTTER PACKAGE
 2 sticks (1/2 lb.) chilled, unsalted butter
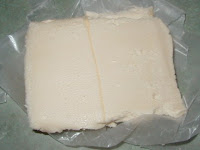
Just before proceeding to next step, pound the butter with a rolling pin, then knead with the heel of the hand to smooth out butter and get out all lumps. Butter must be cold but malleable. Form it into a 5-inch square. I did this between sheets of waxed paper… worked very well, and was easy to clean up. Also, be sure that the butter is still mostly cold. If it is too soft, it will not work as well. Use your rolling pin and whack away.
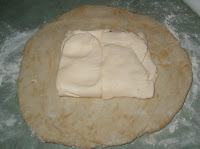
 Roll dough into a 10-inch circle, place the butter in the center of the dough-circle, then bring the edges of the circle up over the butter to enclose it completely. Do not stretch dough at sides of butter; press dough well together on top and seal by pressing with fingers.
FIRST TURN (“Premier Tour”)
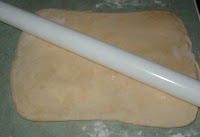 Sprinkle board and top of dough lightly with granular flour, and roll dough rapidly and evenly into as perfect a rectangle as possible, about 6 by 16 inches. Keep lifting dough and sprinkling underside and top lightly with flour as necessary, to prevent sticking.
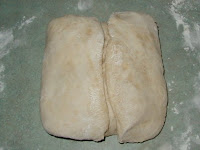
 Then, as though you were folding a long sheet of letter paper, lift up the bottom (one of the small ends) of the dough and fold it over a third of the dough;
 lift the top and fold it down to meet the bottom edge of the first fold, making three even layers of dough.
SECOND TURN
Turn dough so that the top edge of top layer is to your right; roll into a rectangle as before, and fold again in thirds. Wrap in a large sheet of waxed paper, then in a plastic bag or damp towel, and chill for 1 hour.
THIRD AND FOURTH TURNS
Make two more turns in the same manner: wrap and chill again for 1 hour.
FIFTH and SIXTH TURNS
Repeat with final two turns, then let dough rest for at least 2 hours or overnight before rolling or shaping. Dough will keep for several days in the refrigerator, or may be frozen.
(Notes: Work as rapidly as possible so butter does not soften; if dough softens and is hard to handle, stop where you are, and chill. Whenever dough seems rubbery and is hard to roll, or retracts after rolling, stop where you are; wrap and chill dough until it has relaxed. If dough is too cold, leave at room temperature until butter has again become malleable.)
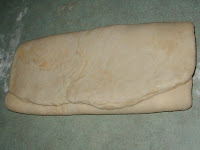
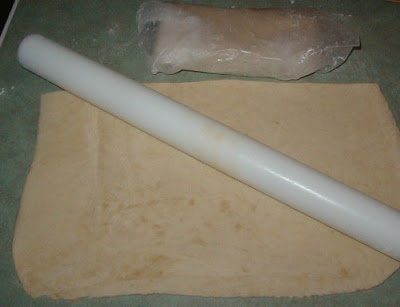 And here’s the final product… Note the bundle in the wax paper above. The recipe makes a double batch. Like the Pepperidge Farm stuff, it freezes just fine. It sounds very time consuming, but honestly, it takes five minutes a “turn” or hour. Then pop it in the fridge and go about your chores, or sit and eat bon bons and watch Oprah reruns (I played Sit and Go on-line Poker games). While the entire process took about 6 hours, in fact, I probably only spent 20-30 minutes total at the counter. And Julia was absolutely right, the colder the dough is, the easier it is to work with. Once it starts sticking to the rolling pin, you will need to immediatly get it back in the fridge.
And, that’s all there is to it. I read this recipe a dozen times before trying it. I was actually surprised how easy it all came together. Of course, it takes a lot of time, and for the better part of a day, there is flour all over your kitchen counter top. It begs the question, would I do it again over just buying the pre-made stuff? Yep, in a heart beat. It is easy to make ahead of time, it is MUCH less expensive to make vrs buy. And, to be honest… The fact that I can cook a Julia Child recipe is just about as exciting as it gets.
OK, while I went into much more detail last week about how to make the cheese stuffing, here are Julia’s instructions…
FEUILETEE AU ROQUEFORT
( Roquefort Cheese Case)
( As a first course, or main-course luncheon dish)
For a 16-inch case serving 6 to 8 people
Puff pastry (1/2 the amount made in preceding recipe)
1/2 pound Roquefort cheese
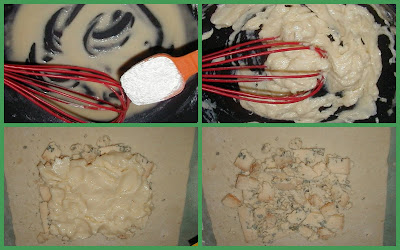
About 2/3 cup thick cream sauce
Egg glaze (1 egg beaten with 1 tsp water)
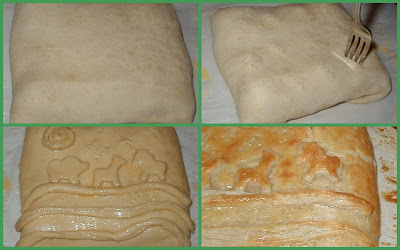
Roll puff pastry into a rectangle 16 inches long and about 8 inches wide. Cut in half lengthwise and refrigerate one half until you are ready to use it. Roll out other half to widen it by 2 or 3 inches. (It should be about 1/16th inch thick.) Run cold water over a cookie sheet and shake off excess. Fold the widened strip in several places so you can lift it easily. Unfold it on the cookie sheet. Prick a 4-inch strip down the center at ¼-inch intervals with a fork, to keep bottom from rising when baked.
Cut the Roquefort cheese into slivers and place down the center of the dough strip, leaving a 1-inch margin all around. Cover with the cream sauce, then fold the margin of the dough up over the cheese filling on all four sides.
Paint the dough margin with cold water; cover rectangle completely with the second strip, and seal the 2 dough layers firmly by pressing with your fingers. Refrigerate for 1 hour. Just before baking, preheat oven to 425 degrees, paint top of case with egg glaze. Then draw the tines of a fork over the glaze. Bake for 20 minutes at 425 degrees; lower thermostat to 350 degrees and bake 30 minutes more.
Serve hot with a white burgundy wine or a rose. If it is to be used as a main course for luch or supper, serve a green or mixed vegetable salad
 I have much more details about how to cook the Thick Cheese Sauce on last week’s post that you can read by clicking HERE. The knowledge and ability to make a roux, turn pastry dough and accent to create this dish were great learning opportunities for me. I was intimidated by all the procedures, but I researched the techniques, studied the recipe so I was prepared, learned from my previous attempts and got the results I was after!
So, now that I have puffed pastry in my repertoire, anyone have a puffed pastry recipe from their archives they want to share????


