TORTILLA ROLL UPS ~Perfect for upcoming Superbowl parties~CLASSIC GOOD EATS

TORTILLA ROLL-UPS
8 ounces sour cream
8 ounces cream cheese softened
1 bunch green onions, sliced thin
1/3 pound ham, chopped fine
7 ounce can roasted chiles, drained well
1 small can chopped olives
flour tortillas

  • In a small food processor blend all ingredients together until smooth.
  • Spread 4 tablespoons on each tortilla leaving 1/2 inch along one edge.
  • Roll up each tortill ending on the dry edge.
  • Lay side by side on a plate.
  • Cover loosely with saran.
  • Chill overnight.
  • Slice into 1/2 inch rounds just before serving.

CLASSIC GOOD EATS ~ TORTILLA ROLL UPS ~Perfect for upcoming Superbowl parties

TORTILLA ROLL-UPS
8 ounces sour cream
8 ounces cream cheese softened
1 bunch green onions, sliced thin
1/3 pound ham, chopped fine
7 ounce can roasted chiles, drained well
1 small can chopped olives
flour tortillas

  • In a small food processor blend all ingredients together until smooth.
  • Spread 4 tablespoons on each tortilla leaving 1/2 inch along one edge.
  • Roll up each tortill ending on the dry edge.
  • Lay side by side on a plate.
  • Cover loosely with saran.
  • Chill overnight.
  • Slice into 1/2 inch rounds just before serving.

This recipe is linked to:
Recipe Swap
Recipe Swap Thursday
Fun with Food Friday
Recipes I Can’t Wait to Try 

    BACON CHEDDAR CHEESE BALLS

    I have no idea where this recipe came from, but it has become a family favorite.  I also borrowed this picture from Claudia to show that these or ANY cheese ball can be made what you want by just changing what you decorate the outside in and/or making them bite size by just adjusting how much you roll into each ball.  We prefer them “bite” sized.

    BACON CHEDDAR CHEESE BALLS
    1 pound extra sharp cheddar cheese, finely shredded
    8 ounce package Philadelphia cream cheese
    1/4 cup apricot pineapple preserves
    2 ounce jar pimentos, drained, rinsed and dried (optional)
    2 tablespoons milk
    1 teaspoon Worcestershire sauce
    1/2 teaspoon Franks Red Hot Pepper Sauce*
    8 slices bacon, cooked crisp & crumbled
    Additional toppings as desired – crushed nuts, chives, carrot pieces, pickle pieces, etc…

    • In a very large bowl combine the cheddar cheese and cream cheese.  Cover and let sit at room temperature for 1 hour.
    • Add the preserves, milk, Worcestershire sauce, hot sauce and half the bacon.  
    • Beat with a mixer until smooth.
    • Cover and refrigerate 2-4 hours.
    • Roll mixture into desired number of balls.
    • Roll each ball in desir4ed topping.
    • Chill for at least an hour.
    • Serve with crackers, celery sticks, toast points, etc…

    *Frank’s Red chile pepper sauce makes an awesome substitution

    BACON CHEDDAR CHEESE BALLS

    I have no idea where this recipe came from, just a little magazine clipping in the pile, but it has become a family favorite.  I also borrowed this picture from google images to show that these or ANY cheese ball can be made what you want by just changing what you decorate the outside in and/or making them bite size by just adjusting how much you roll into each ball.  We prefer them “bite” sized.

    BACON CHEDDAR CHEESE BALLS
    1 pound extra sharp cheddar cheese, finely shredded
    8 ounce package Philadelphia cream cheese
    1/4 cup apricot pineapple preserves
    2 ounce jar pimentos, drained, rinsed and dried (optional)
    2 tablespoons milk
    1 teaspoon Worcestershire sauce
    1/2 teaspoon Franks Red Hot Pepper Sauce*
    8 slices bacon, cooked crisp & crumbled
    Additional toppings as desired – crushed nuts, chives, carrot pieces, pickle pieces, etc…

    • In a very large bowl combine the cheddar cheese and cream cheese.  Cover and let sit at room temperature for 1 hour.
    • Add the preserves, milk, Worcestershire sauce, hot sauce and half the bacon.  
    • Beat with a mixer until smooth.
    • Cover and refrigerate 2-4 hours.
    • Roll mixture into desired number of balls.
    • Roll each ball in desir4ed topping.
    • Chill for at least an hour.
    • Serve with crackers, celery sticks, toast points, etc…

    *Frank’s Red chile pepper sauce makes an awesome substitution.
    Submitted to Tailgating time & Magazine Mondays.

    How To Make Your Own Smoked Cheese Without A Smoker

    It’s time for Fire Day Friday when we take Our Krazy Kitchen outdoors and experiment with live fire (grilling, smoking, roasting, baking using flame).

    Today we are going MacGyver! I (Chris from Nibble Me This) am going to show you how to cold smoke your own cheese by using just a cardboard box, a soldering iron, a tin can, and a few miscellaneous items. This is a fun project that you can use to involve the non-foodies in your house.

    You can turn this…..

    Into this….. (I think this is the first officially licensed OKK product)

    But first, the Legal Department here at OKK “asked” (okay….they locked me in a dungeon and force fed me Brussels sprouts until I agreed) to post the following Safety Notice:


    For this project you will need:

    • A medium sized box slightly narrower than the racks you will use
    • 1 unused soldering iron without the tip ($14)
    • 1 tin can (burn out the inside with a torch or grill if it has a bpa lining)
    • a rack or two of some sort. I used two resting racks that were slightly larger than the box. You could use the rack out of your toaster oven.
    • Several blocks of various cheeses
    • 1 cup of hardwood or fruit wood chips (you can buy these at many grocery stores and hardware stores these days by their grilling/coal section)
    I was using two resting racks so I measured down three inches and 6 inches from the top on the side. I cut slits at both marks on both sides. Work one end of your rack(s) through the slit on one side and then back through the other side like this so the slits are supporting the rack. The rack should stick out a little on each side.

    Drill several 1/8″ holes on one side of the can (which will become the “top” side of the can) and a hole in the base of the tin can large enough to accommodate the base of the soldering iron like this:

    Add the wood chips around the soldering iron like this. TIP: Use the smallest chips in the bag, you want to maximize surface contact with the iron.

    Cut your cheeses into 1″ x 1″ rectangles (however long the length is doesn’t matter) and place them on the racks with room between the pieces.

    Place the smoke generator on a trivet or other heat resistant, non-conductive surface in the bottom of the smoke box.


    Plug in the soldering iron and wait for the first wisps of smoke (3-5 minutes)…..

    Then close the box and tape it shut. You might be tempted to try to seal all the seams of the box for an air tight fit. DON’T. You want the little air gaps and a slight airflow. If you have an airtight fit, the wood won’t be able to smolder and the cheese would sit in stale smoke for an hour. You will have smoke escaping the box like this:

    This generator should give you 90 minutes of smoke time, perfect for cheeses. After the 90 minutes, remove the cheeses. They won’t look too different and they may or may not smell very smoky (Your smoke smeller will probably be overloaded at this point). Don’t bother tasting or smelling a piece at this point. IT HAS TO AGE AND MELLOW!!!!!

    Vacuum seal the cheeses and refrigerate for two weeks. If you don’t have access to a vacuum seal, double wrap them in plastic wrap and then seal them in a zip top back. This is partially to help them mellow but mostly to keep your fridge from smelling like smoke!


    Here are some quick tips I can think of

    1. Bacteria spoils cheese. Make sure your hands, cutting boards, and knives are all sanitized during every step of this process.
    2. Cold smoke. The inside of the container has to remain below the melting point of your cheeses (roughly 70-80f). The smoke generator will raise the temp of your box by 10-15 degrees (the smaller the box, the greater the temp increase). So do this in the shade on a day when the air temps are 45f or less. Don’t you just love the high tech digital control panel of the OKK Smokerator 3000?
    3. Packaging – If packing the cheese for gift packs, pick cheeses that alternate in color and can be cut into roughly the same size pieces.
    4. Experiment with a variety of cheeses – my favorites have been gouda, cheddars, pepper jack, and monterey jack. It occurs to me that I’ve never smoked a blue cheese….and can’t imagine doing so but whatever floats your boat.
    5. Experiment with a variety of woods – my favorites have been hickory, cherry, and a mix of the two.
    6. Soft cheeses take on smoke more readily, hard cheeses take longer.
    7. Use as natural of a cheese that you can. Cheeses with a lot of flavorings and preservatives don’t seem to fare as well.
    8. Use the best quality cheese that you can.
    9. Smoked cheeses are great simply with crackers. But when used as an ingredient with sauces, sandwiches, soups and casseroles, it adds a nice subtle layer of flavor.
    10. Once you have smoked your own cheese, you probably won’t enjoy “smoked” cheese bought at a store because a lot of them just use “smoke flavorings”.
    11. Once you have tried smoking cheese, try smoking nuts, salts, and peppers.
    On that note, I wish you all a Merry Christmas and Happy Holidays. May your stockings be full of high quality, natural hardwood lump charcoal…..

    Fire Day Friday: Beefy Bite Appetizers

    It is the holiday season, which unleashes a torrent of parties and get togethers.

    That means it is advantageous to have an extra appetizer, hors d’oeuvres, or dessert snack trick up your sleeve. So tonight I played around with an idea I had for an appetizer. This is work in progress kind of thing.

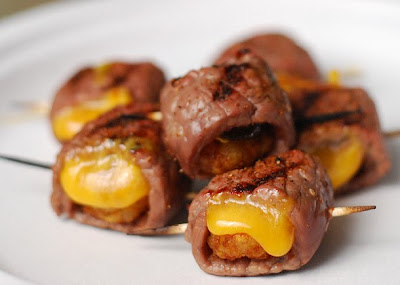
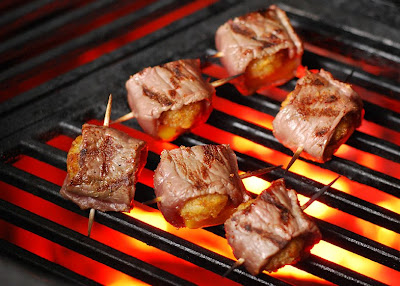
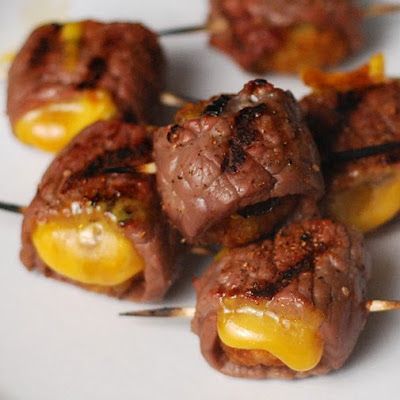
    Steak Wrapped Tater Tots

    I know. That’s twisted. But sometimes you just have to cut loose and do something different.

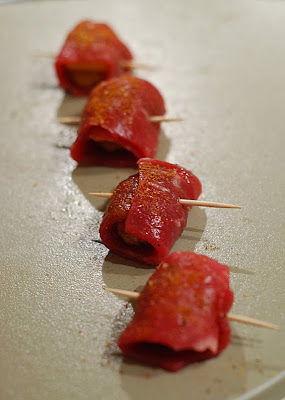
    For the first round, I cooked tater tots (well, actually Ore Ida Crispy Crowns) according to directions. I placed each one on a 1″ strip of milanesa style sliced beef (thin sliced sirloin) and topped with a variety of ingredients like pickled sweet jalapeno (we used Hobo Howey’s Jalapeno Treats), cheddar cheese, and steak sauce.

    I rolled them up and secured with a toothpick and seasoned with a little bit of steak rub (I used Dizzy Pig Cow Lick).

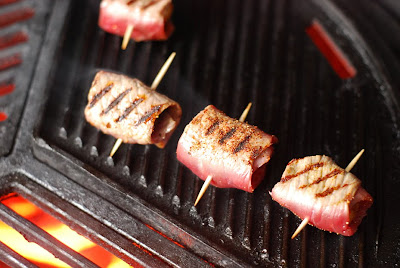
    I tried cooking them on the griddle plate of my grill cooking at 450f. It only took 1-2 minutes per side.

    While it gave good sear marks, the sides didn’t get much radiant heat so they weren’t as evenly cooked as I would have liked.

    It was 35f outside while I was cooking these, but I could not resist making a second attempt. This time I did the same thing but went with direct heat.

    That cooked through much better.

    And despite my fears the cheese would melt out during the cook, it finished just right.

    Lessons learned:

    1. Instead of using a griddle pan, go for direct heat like grilling or broiling.
    2. If using cheese, start with your tater tot facing the hot side (below for grilling, above for broiling) for the first minute.
    3. Serve these quickly after cooking. These are not a “cook and leave on the table” kind of thing if you want to impress.
    4. Idea for the world’s most awesome slider – A juicy lucy style slider with a crispy crown and cheddar inside. Gonna work on that one.
    5. After testing the varieties twice tonight, I think our favorite is a combo of the sweet pickled jalapeno and cheddar. The sweet and heat combine perfectly.

    Tell me: When the pressure is on during the holidays, what is your “go to” appetizer/snack?

    Buffalo Chickpea Patties

    I’ve been enjoying a lot of vegetarian meals lately. I LOVE beans, they are healthy and cheap!

    I’ve made bean patties before but so far, these are my favorite. I got the recipe from Veggie by Season and I even attempted to copy her presentation!  It looked so nice! 

    I liked how she pureed some of the oats, I think that led to them sticking together better.  They made a very nice appetizer! 

    We ate these with a delicious Apple and Caramelized Onion Pizza
    Buffalo Chickpea Patties
    Adapted from Veggie by Season
    1 – 15 oz. can garbanzo beans, drained and rinsed
    1/2 cup rolled oats
    1/2 c. buffalo sauce, I used Franks
    1 egg white
    1 small onion
    1 tsp. garlic powder
    Salt and pepper

    For serving:
    Buffalo sauce
    Ranch or blue cheese
    Carrot Sticks
    Celery
    Cucumber

    Add chickpeas to a bowl, use a potato masher or fork to mash, some chunks are okay.  Add the buffalo sauce to the chickpeas. 

    Add half the oats to a food processor, pulse to create a crumb, add to the chickpeas. Then add the rest of the oats. Beat the egg white into the chickpeas.  Grate onion into the chickpeas, finally add the garlic powder, salt and pepper.  Combining ingredients well. 

    Heat a griddle over medium, spray with nonstick spray.  Use a 1/4 measuring cup to portion out chickpea mixture onto griddle.  Cook patties for about 5 – 7 minutes, until crispy and brown, flip gently and cook for another 5 – 7 minutes.  Serve immediately to retain crispness. 

    I served these as an appetizer and got about 7 patties.  You could make larger patties and serve as a burger as well. 

    Total calories = 616 calories
    7 patties = 88 calories per patty

    HOT BEEF DIP

    Just in time for football season!!


    HOT BEEF DIP
    1 1/2 pounds ground beef
    1/2 cup chopped red onion
    8 ounce can tomato sauce
    1/4 cup Country Bob’s All Purpose Sauce

    8 ounce package cream cheese
    1 cup grated Monterey jack cheese
    2 teaspoons minced garlic, jar
    1 tablespoon parsley
    2 teaspoons sugar
    1 teaspoon salt
    1/2 teaspoon white pepper
    1 teaspoon Frank’s red pepper sauce

    • Brown Hamburger.
    • Add onion and garlic.
    • Drain off fat.
    • Add all other ingredients.
    • Stir until well blended.
    • Transfer to slow cooker ad keep warm.
    • Serve with tortilla chips.

    CRAB PUFFS for TAILGATING TIME

    Last week Martha posted her puffs recipe with her shrimp filling and it made me think of my crab salad and it was a good thought!  The crab salad was an awesome filling!

    PUFFS recipe from Martha at Seaside Simplicity
    1/2 cup water
    1/4 cup butter or margarine
    1/2 cup all purpose flour
    1/4 teaspoon salt
    2 eggs
    • Heat oven to 425 degrees. 
    • In a medium saucepan heat water and butter until boiling. 
    • Lightly spoon flour into measuring cup and level off. 
    • Stir in flour and salt. 
    • Cook over medium heat until mixture leaves sides of pan in a smooth compact ball, about 2 minutes, stirring vigorously. 
    • Remove from heat. 
    • Add eggs one at the time, beating vigorously until smooth and glossy. Do not under-beat! Drop by teaspoons full onto parchment paper lined cookie sheets. 
    • Bake for about 15 minutes or until golden brown and crisp.
    • Once puffs are cooled completely split and stuff with crab salad when ready to serve.
    This recipe makes about 20 puffs.
    CRAB SALAD
    8 ounces Louis Kemp Crab, finely chopped
    1 stalk celery, finely chopped
    1/3 cup minced red onion
    salt and pepper
    mayo (about 1/4 cup)
    • Mix crab, celery, onion, salt and pepper together until well blended using enough mayonnaise for desired consistency.
    • Place a large scoop of crab salad in each puff.

    BEER CHEESE DIP

     
    8 ounces cream cheese, softened
    1 teaspoon favorite Dijon mustard
    2½ cups shredded extra-sharp cheddar cheese
    2 tablespoons heavy cream
    ¼ teaspoon sea salt
    ¼ cup favorite beer
    2 tablespoons chopped fresh parsley (I substituted 2 teaspoons dried)
    • Combine the cream cheese, mustard, cheddar cheese, heavy cream and salt in a food processor.
    • Pulse until well blended.
    • Add the beer, and continue processing until very smooth. 
    • Enjoy!
    • Be sure to take it out an hour before serving if you refrigerate it first.
      Don’t forget to join us Sunday for 
    Tailgating Time will be posted every Sunday at noon and open all week for you to add your football favorites. We’ll play each and every week until Superbowl Sunday. I can’t wait to see what you’ll be bringing!
    It’s Tailgating Time!
    HOSTED BY:
    Martha at Seaside Simplicity 
    Tamy at 3 sides of Crazy 
    Lyndsey at Tiny Skillet

    The Perfect Bean Dip!

    I love bean dip and this recipe happens to be a staple for any party that I may be throwing or attending. It’s a great alternative to hummus… even though hummus is equally awesome.

    Italian White Bean Dip

    What you’ll need:
    1x 15 oz can of Cannellini beans
    1/4 cup olive oil, 1 tsp for topping
    1/2 cup basil leaves
    1/4 cup italian parsley
    1 lemon juiced
    1 garlic clove, chopped before puree
    1 tsp red pepper flakes for a kick!
    salt and freshly cracked red pepper to taste

    What you’ll do:
    Chop the garlic and herbs before putting in blender. Rinse the beans. Add all ingredients to a food processor or blender. Blend until smooth. Serve in a cute bowl and garnish with a little olive oil and some leftover herbs. Serve with pita chips. This is a crowd pleaser!

    Visit me any time at Behold the Metatron , and on Tuesday at The Motivation Station!

    SALTY BACON CRISPS ~ Perfect Football Food Snacks

    SALTY BACON CRISPS
    12 bacon strips, cut in half*
    6 slices Havarti or aged white American cheese, cut into quarters
    24 saltine crackers
    • Top each cracker with a slice of cheese.
    • Wrap each cracker with a half strip of bacon.
    • Place on a cookie rack over a shallow drip pan.
    • *Bake 12 to 15 minutes, turning once, at 400° F.
    • Serve hot.

    *I used thick bacon today and quartered each slice.  Then I laid it just on top and I prefer this I think.  Thick bacon does alter the bacon time to 15-20 minutes. 

    They were soooooooooooo easy and tasty too.  The crackers soften up and absorb the cheese and bacon flavors.  Let them cool just a bit and they are perfect!