The exact origin of the lemon has remained a mystery, though it is widely presumed that lemons first grew in India, northern Burma, and China. In South and South East Asia, lemons are known for its antiseptic properties and it was used as an antidote for various poisons.
The lemon is a small evergreen tree (Citrus limon) originally native to Asia, and is also the name of the tree’s oval yellow fruit. The fruit is used for culinary and non-culinary purposes throughout the world – primarily for its juice, though the pulp and rind (zest) are also used, mainly in cooking and baking. Lemon juice is about 5% citric acid, which gives lemons a sour taste, and a low pH. This makes lemon juice an inexpensive, readily available acid for use in educational science experiments. Because of the sour flavor, many lemon-flavored drinks and candies are available, including lemonade.
Culinary uses: Lemons are used to make lemonade and as a garnish for many drinks. Lemon zest has many uses. Many mixed drinks, soft drinks, iced tea, and water are often served with a wedge or slice of lemon in the glass or on the rim. The average lemon contains approximately 3 tablespoons of juice. Allowing lemons to come to room temperature before squeezing (or heating them briefly in a microwave) makes the juice easier to extract.
Lemons left unrefrigerated for long periods of time are susceptible to mold.
Fish are marinated in lemon juice to neutralize the odor.
Lemon juice, alone or in combination with other ingredients, is used to marinate meat before cooking: the acid provided by the juice partially hydrolyzes the tough collagen fibers in the meat (tenderizing the meat), though the juice does not have any antibiotic effects.
Lemons, alone or with oranges, are used to make marmalade. The grated rind of the lemon, called lemon zest, is used to add flavor to baked goods, puddings, rice and other dishes.
Pickled lemons are a Moroccan delicacy. Numerous lemon liqueurs are made from lemon rind.
When lemon juice is sprinkled on certain foods that tend to oxidize and turn brown after being sliced, such as apples, bananas and avocados, the acid acts as a short-term preservative by denaturing the enzymes that cause browning and degradation.
VARIETIES‘Armstrong’ (‘Armstrong Seedless’)–a sport discovered in a private grove at Riverside, California, about 1909. Patented in 1936 by Armstrong Nurseries. Resembles ‘Eureka’ except that it usually bears seedless or near-seedless fruits. If planted among other lemon trees will occasionally have a few seeds.
‘Avon’–first noticed as a budded tree in Arcadia, Florida. A budded tree propagated from the original specimen around 1934 was planted in the Alpine Grove in Avon Park; it produced heavy crops of fruits highly suitable for frozen concentrate. It, therefore, became the source of budwood for commercial propagation by Ward’s Nursery beginning in 1940.
‘Bearss’ (‘Sicily’, but not the original introduction by Gen. Sanford in 1875, which has disappeared)–a seedling believed to have been planted in 1892, discovered in the Bearss grove near Lutz, Florida, about 1952. Closely resembles ‘Lisbon’. It is highly susceptible to scab and greasy spot and oil spotting. The tree is vigorous and tends to produce too many water sprouts. Nevertheless, it has been propagated commercially by Libby, McNeill & Libby since 1953 because the peel is rich in oil. It constitutes 20% of Brazil’s lemon/lime crop. ,
‘Berna’ (‘Bernia’, ‘Vema’, ‘Vernia’)–oval to broad-elliptic, with pronounced nipple, short neck; peel somewhat rough, medium-thick, becoming thinner in summer, tightly clinging. Seeds generally few or absent. Ripens mostly in winter; fruits keep well on tree until summer but become too large. Tree is vigorous, large, prolific. This is the leading cultivar of Spain and important in Algeria and Morocco. It is too much like the ‘Lisbon’ to be of value in California. In Florida, it has been found deficient in acid, low in juice, and too subject to scab.
‘Eureka’–originated from seed taken from an Italian lemon (probably the ‘Lunario’) and planted in Los Angeles in 1858; selected in 1877 and budwood propagated by Thomas Garey who named it ‘Garey’s Eureka’. The fruit is elliptic to oblong or rarely obovate, with moderately protruding nipple at apex, a low collar at the base; peel yellow, longitudinally ridged, slightly rough because of sunken oil glands, medium-thick, tightly clinging; pulp greenish-yellow, in about 10 segments, fine-grained, tender, juicy, very acid. Fruits often borne in large terminal clusters unprotected by the foliage. Bears all year but mostly late winter, spring and early summer when the demand for lemons is high. Tree of medium size, almost thornless, early-bearing, prolific; not especially vigorous, cold-sensitive, not insect-resistant; relatively short-lived. Not suitable for Florida. Grown commercially in Israel. One of the 2 leading cultivars of California, though now being superseded by clonal selections with more vigor, e.g., ‘Allen’, ‘Cascade’, ‘Cook’, and ‘Ross’. ‘Lambert Eureka’ is a chance seedling found in 1940 on the property of Horace Lambert in New South Wales. It is vigorous and productive.
‘Femminello Ovale’–one of the oldest Italian varieties; short-elliptic with low, blunt nipple; slightly necked or rounded at base; of medium size; peel yellow, finely pitted, medium-smooth, medium-thick, tightly clinging; pulp in about 10 segments, tender, juicy, very acid, of excellent quality, with few, mostly undeveloped, seeds. Fruits all year but mainly in late winter and spring; ships and stores well. The tree is almost thornless, medium-to very-vigorous, but highly susceptible to mal secco disease. This is the leading cultivar in Italy, accounting for 3/4 of the total lemon production, and 1/5 of the crop is processed as single-strength juice.
‘Genoa’–introduced into California from Genoa, Italy, in 1875. Almost identical to ‘Eureka’; ovoid or ovate-oblong with blunt nipple at apex; base rounded or slightly narrowed; of medium size; peel yellow, medium-thick, tightly clinging; pulp in 10-12 segments, melting, medium-juicy, with 29 to 51 seeds which are light-brown within. Tree is shrubby, nearly trunk-less, spreading, very thorny, cold-hardy. Grown commercially in India, Chile and Argentina.
‘Harvey’–of unknown parentage; was found by Harvey Smith on the property of George James in Clearwater, Florida. Fruit much like ‘Eureka’. Tree highly cold-tolerant, compatible with several rootstocks. Commercially propagated by Glen St. Mary Nurseries Company, near Jacksonville, Florida, since 1943.
‘Interdonato’ (‘Special’)–a lemon X citron hybrid that originated on property of a Colonel Interdonato, Sicily, around 1875; oblong, cylindrical, with conical, pointed nipple at apex, short neck or collar at base; large; peel yellow, smooth, glossy, thin, tightly clinging; pulp greenish-yellow, in 8 or 9 segments, crisp, juicy, very acid, faintly bitter. Very few seeds. Earliest in season; mostly fall and early winter. Tree vigorous, usually thornless, medium-resistant to mal secco; of medium yield; accounts for 5% of Italy’s crop.
‘Lisbon’ (perhaps the same as ‘Portugal’ in Morocco and Algeria)–originated in Portugal, possibly as a selection of ‘Gallego’; reached Australia in 1824; first catalogued in Massachusetts in 1843; introduced into California about 1849 and catalogued there in 1853; introduced into California from Australia in 1874 and again in 1875. Fruit almost identical to ‘Eureka’; elliptical to oblong, prominently nippled at apex, base faintly necked; peel yellow, barely rough, faintly pitted, sometimes slightly ribbed, medium-thick, tightly clinging; pulp pale greenish-yellow, in about 10 segments, fine-grained, tender, juicy, very acid, with few or no seeds. Main crop in February, second crop in May. Fruit is borne inside the canopy, sheltered from extremes of heat and cold. Tree large, vigorous, thorny, prolific, resistant to cold, heat, wind. Not well adapted to Florida. It is low-yielding and short-lived in India. Surpasses ‘Eureka’ in California. Has given rise to a number of clonal selections, particularly ‘Frost’, originated by H. B. Frost at the Citrus Research Station, Riverside, California in .1917 and released about 1950; also ‘Prior Lisbon’ and the more vigorous ‘Monroe Lisbon’.
‘Meyer’–a hybrid, possibly lemon X mandarin orange; introduced into the United States as S.P.I. #23028, by the agricultural explorer, Frank N. Meyer, who found it growing as an ornamental pot-plant near Peking, China, in 1908; obovate, elliptical or oblong, round at the base, occasionally faintly necked and furrowed or lobed; apex rounded or with short nipple; of medium size, 2 1/4 to 3 in (5.7-7.5 cm) wide and 2 1/2 to 3 1/2 in (6.25-9 cm) high; peel light-orange with numerous small oil glands, 1/8 to 1/4 in (3-6 mm) thick; pulp pale orange-yellow, usually in 10 segments with tender walls, melting, juicy, moderately acid with medium lemon flavor; seeds small, 8 to 12. Tends to be everbearing but fruits mostly from December to April. Tree small, with few thorns, prolific, cold-resistant; produces few water sprouts, and is only moderately subject to greasy spot and oil spotting. It is easily and commonly grown from cuttings. Does well on sweet orange and rough lemon rootstocks; is not grafted onto sour orange because it is a carrier of a virulent strain of tristeza. Grown for home use in California; in Florida, both for home use and to some extent commercially for concentrate though the product must be enhanced by the addition of peel oil from true lemons, since that from ‘Meyer’ peel is deficient in flavoring properties. Has been fairly extensively planted in Texas and in Queensland, Australia, and New Zealand.
‘Monachello’ (Moscatello’)–suspected of being a lemon X citron hybrid; elliptical, with small nipple and no neck, merely tapered at apex and base; medium-small; peel yellow, smooth except for large, sunken oil glands, thin, clinging very tightly; pulp in 10 segments, tender, not very juicy, not sharply acid. Bears all year but mainly winter and spring. Tree not vigorous, slow-growing, almost thornless, with abundant, large leaves; bears medium-well, resistant to mal secco, and has been extensively planted in Italy in areas where the disease is common.
‘Nepali Oblong’ (Assam’, ‘Pat Nebu’)–originated in Assam; fruit resembles citron in some aspects; long-elliptic to oblong-obovate, with wide, short nipple; medium-large; peel greenish-yellow, smooth, glossy, medium-thick; pulp greenish-yellow in 11 segments, fine-grained, very juicy, of medium acidity, with few or no seeds. Everbearing. Tree large, vigorous, spreading, medium-thorny, prolific; foliage resembles that of the citron. Commercial in India.
‘Nepali Round’–of Indian origin; round, without distinct nipple; juicy; seedless. Tree large, vigorous, compact, nearly thornless, medium-prolific. Successfully cultivated in South India.
‘Perrine’–a Mexican lime X ‘Genoa’ lemon hybrid created by Dr. Walter Swingle and colleagues in 1909, but still a fairly typical lemon; it is lemon-shaped, with small nipple at apex, necked at base; of medium size; peel pale lemon-yellow, smooth, slightly ridged, thin, tough; pulp pale greenish-yellow, in 10 to 12 segments having thin walls; tender, very juicy, with slightly lime-like flavor but acidity more like lemon; seeds usually 4 to 6, occasionally as many as 12, long-pointed. Everbearing. Tree cold-sensitive but less so than the lime; resistant to wither tip and scab but prone to gummosis and other bark diseases. In the early 1930’s, was extensively planted in southern Florida on rough lemon rootstock, but no longer grown.
‘Ponderosa’ (‘Wonder’; ‘American Wonder’)–a chance seedling, possibly of lemon/citron parentage, grown by George Bowman, Hagerstown, Maryland around 1886 or 1887; appeared in nursery catalogs in 1900 and 1902; obovate, lumpy and faintly ribbed, slightly necked at base; large, 3 1/2 to 4 1/8 in (9-11 cm) wide, 3 1/2 to 4 3/4 in (9-12 cm) high; peel light orange-yellow, with medium-large oil glands, flush or slightly depressed; 3/8 to 1/2 in (1-1.25 cm) thick; pulp pale-green, in 10 to 13 segments with thick walls; juicy, acid; seeds of medium size, 30 to 40 or more, brown within. Everbearing. Tree small, moderately thorny; buds and flowers white or barely tinged with red-purple. More sensitive to cold than true lemons. Grown for home use and as a curiosity in California and Florida and in small-scale commercial plantings since 1948. Rather widely cultivated as an indoor potted plant in temperate regions.
‘Rosenberger’–a clone found in a grove of ‘Lisbon’ and ‘Villafranca’ trees at Upland, California; was planted in the Rosenberger orchard and gained recognition as a superior cultivar. Tree closely resembles that of ‘Villafranca’. Fruit is somewhat like ‘Lisbon’ but is shorter and broader and less tapered at base. Tree vigorous and prolific. Became popular in California in the 1960’s.
‘Rough Lemon’ (‘Florida Rough’; French’; ‘Mazoe’; Jamberi’)–perhaps a lemon X citron hybrid, but has been given the botanical name of C. jambhiri Lush. Believed to have originated in northern India, where it grows wild; carried in 1498 or later by Portuguese explorers to southeastern Africa where it became naturalized along the Mazoe River; soon taken to Europe, and brought by Spaniards to the New World; is naturalized in the West Indies and Florida; oblate, rounded or oval, base flat to distinctly necked, apex rounded with a more or less sunken nipple; of medium size, averaging 2 3/4 in,(7 cm) wide, 2 1/2 (6.25 cm) high; peel lemon-yellow to orange-yellow, rough and irregular, with large oil glands, often ribbed; 3/16 to 3/8 in (5-10 mm) thick; pulp lemon-yellow, usually in 10 segments, medium-juicy, medium-acid, with moderate lemon odor and flavor; seeds small, 10 to 15, brownish within. Reproduces true from seeds, which are 96% to 100% nucellar. Tree large, very thorny; new growth slightly tinged with red; buds and flowers with red-purple. The scant pulp and juice limit the rough lemon to home use. It is appreciated as a dooryard fruit tree in Hawaii and in other tropical and subtropical areas where better lemons are not available. The tree has been of great importance as a rootstock for the sweet orange, mandarin orange and grapefruit. It is not now used as a rootstock for lemon in Florida because of its susceptibility to “blight” (young tree decline). It is also prone to Alternaria leaf spot (A1ternaria citri) in the nursery, to foot rot (Phytophthora parasitica). Incidence varies with the clone and certain clones show significant resistance. In trials at Lake Alfred, 3 atypical clones showed immunity to leaf spot, while a typical rough lemon clone, ‘Nelspruit 15’, from South African seed, proved highly resistant to leaf spot and also extremely cold tolerant.
‘Santa Teresa’–an old tree discovered to be disease-free in a ‘Fermminello Ovale’ orchard in Italy that had been devastated by mal secco. Budded trees from the original specimen were being commonly planted in the 1960’s wherever the disease was prevalent in Italy.
Sweet Lemon (C. limetta Risso)–a general name for certain non-acid lemons or limettas, favored in the Mediterranean region, In India, they are grown in the Nilgiris, Malabar and other areas. The fruits are usually insipid, occasionally subacid or acid. The seeds are white within and the tree is large, resembling that of the orange. One cultivar, called ‘Dorshapo’ after the plant explorers, Dorsett, Shamel and Popenoe, who introduced it from Brazil in 1914, resembles the ‘Eureka’ in most respects except for the lack of acidity. Another, called ‘Millsweet’, apparently was introduced into California from Mexico and planted in a mission garden. It was reproduced at the old University of California Experiment Station at Pomona. Neither is of any commercial value.
‘Villafranca’–believed to have originated in Sicily; introduced into Sanford, Florida, from Europe around 1875 and later into California. Closely resembles ‘Eureka’; of medium size. Tree is more vigorous, larger, more densely foliaged, and more thorny than ‘Eureka’ but becomes thornless with age. One strain is everbearing; another fruits heavily in summer. This was the leading lemon cultivar in Florida for many years; is cultivated commercially in Israel; is low-yielding and short-lived in India. It is little grown in California but has given rise to certain selections that are of importance, particularly ‘Galligan Lisbon’ and ‘Corona Foothill Eureka’.


 sources

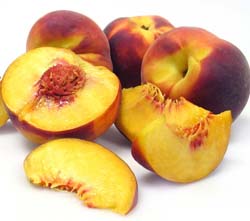 stone, or freestone, where the stone readily twists away from the fruit. The former type is generally used for canning; the latter is generally found in supermarkets. Clingstone and freestone peaches are available in both white and yellow varieties.
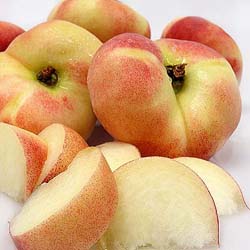 and white varieties. The most widely-available peaches are round with a pointed end, but they can also be flat and disc-shaped. The donut peach, which is flat with rounded sides that draw in toward an indented center, like a
 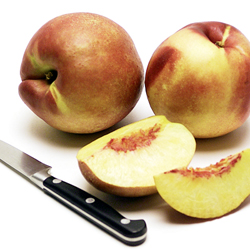 Nectarines are a variety of peach with a smooth skin, not a cross between a peach and a plum.


