PORK MEDALLIONS with ONION GRAVY ~ BLOG 366.319

PORK MEDALLIONS with ONION GRAVY serves 4

Tender pork medallions topped with a savory caramelized onion brown gravy and served over fluffy mashed potatoes makes a satisfying yet easy meal for any night of the week.

PORK
1 pound pork tenderloin, sliced into 1-inch thick medallions
FRESH ground sea salt and black pepper, to taste
2 tablespoons avocado oil

  • Season the pork medallions with salt and pepper on both sides.
  • Heat oil in a large skillet over medium-high heat.
  • Add the pork medallions and cook for approximately 3 to 4 minutes on each side or until they are browned and cooked thoroughly.
  • Transfer to a plate and cover them with foil to keep them warm.

GRAVY
2 tablespoons butter
1 large onion, thinly sliced
2 cloves garlic, minced
1 tablespoon WONDRA
1 cup beef broth
1 teaspoon Worcestershire sauce
1/2 teaspoon dried thyme
FRESH ground sea salt and black pepper, to taste

  • In the same skillet, melt the butter over medium heat.
  • Add the thinly sliced onion and cook 8-10 minutes until they are soft and caramelized.
  • Add the minced garlic to the skillet and cook until fragrant, about 30 seconds.

  • Sprinkle the WONDRA over the onions and garlic, stirring constantly for 2 minutes until golden.

  • Gradually add the beef broth to the skillet, stirring continuously to avoid forming lumps.
  • Stir in the Worcestershire sauce and dried thyme.
  • Adjust seasoning to taste.
  • Allow the sauce to simmer2-3 minutes until it thickens.
  • Return the pork medallions to the skillet, turning to coat in the gravy.
  • Cook until pork is well-coated and cooked through.
  • Serve over mashed potatoes.


NOTES: This recipe was written to conserve washing dishes, but I like to use 2 separate skillets. I start to onions first and coordinate so they finish at the same time.

MISSISSIPPI POT ROAST or CHICKEN updated ~ BLOG 366.273B

I have a NEW toy and I LOVE it! I’m updating many of my instant and crock pot recipes and getting rid of ALL my old appliances!

MISSISSIPPI POT ROAST

3+ pound chuck roast (3/4 pound per person to allow for shrinkage) OR chicken breasts
¼ cup avocado oil
1 Vidalia onion, chopped
1 stalk celery, sliced
2-3 cloves garlic, minced
6 Pepperoncinis
½ cup of pepperoncini juice
12 ounces of beef broth OR homemade chicken broth if using chicken
2 tablespoons dark brown sugar (omit for chicken)
1 package QUALITY AU JUS mix
1 packet HIDDEN VALLEY ranch dip mix
1 stick butter, cut into tablespoons (omit for chicken)
¼ cup WONDRA flour
1 1/2 pounds golden Yukon potatoes, washed and quartered to 1 1/2 inch pieces

  • Turn Ninja Foodi on Sauté.
  • Pour in avocado oil.
  • Cut pot roast into large chunks, 4×4 inches.
  • When oil is hot, sear roast chunks 3-4 minutes on all sides.
  • Once roast is browned on all sides, remove from pot and set aside.


  • Add the celery and onion to pot, stirring continuously to sauté and using a wooden spoon to “scrape” the browned bits off the bottom and side.
  • Add garlic, stirring for a minute or two more.
  • Add in pepperoncinis and pepperoncini juice.
  • Whisk Hidden Valley Ranch dip mix, Au Jus powder and brown sugar into the beef broth, stirring until all ingredients are combined well. Pour over pepperoncinis.
  • Return the roast chunks to the pot, gently stacking the meat as necessary.
  • Dot roast with 4 tablespoons of butter.
  • Set to braise for 4-6 hours.
  • At the 2 hour mark add the potatoes.


  • Plate roast on platter, cover and keep warm.
  • Melt remaining butter and whisk in ¼ cup of flour until smooth.
  • Change to saute function and let simmer 3-4 minutes.
  • Whisk in butter and flour mixture to the pot, simmering 3-4 minutes to desired thickness.
  • Ladle gravy over pot roast and serve immediately. I serve with mashed potatoes and glazed carrots.

NOTE: Despite appearances, DO NOT USE METAL utensils in your NINJA pot.

ORIGINALLY posted 11-10-2013 UPDATED September 2024

SALISBURY STEAK with TOMATO ONION GRAVY ~ BLOG 366.242

SALISBURY STEAK with TOMATO ONION GRAVY
1 LARGE egg, lightly beaten
10 1/2 ounce can undiluted tomato soup
1/2 cup FINELY ground bread crumbs
FRESH ground sea salt and black pepper
1 LARGE shallot, diced
1 1/2 pounds QUALITY ground beef
1 tablespoon butter
1 tablespoon WONDRA
1/4 cup (jalapeno) ketchup – see note
1/4 cup beef broth
1 teaspoon Lea & Perrins Worcestershire sauce
1/2 teaspoon mustard – optional
Hot buttered noodles or mashed potatoes

  • In a large bowl stir together the egg, bread crumbs and 1/3 cup of the soup.
  • Season well with FRESH ground sea salt and black pepper.
  • Add ground beef and mix gently.
  • Form 6 round or oval patties.
  • In a large skillet melt butter over medium heat.
  • Add beef patties searing 3-4 minutes on each side. Remove and set aside.
  • Add shallots, sauteing 1-2 minutes.
  • Whisk together the water and WONDRA.
  • Add to skillet with the ketchup, Worcestershire sauce, remaining soup and mustard if using. Stir regularly bring to a SLOW boil.
  • Reduce heat, add beef patties to pan, turning to coat.
  • Cover and simmer 10 minutes until cooked through and gravy is desired consistency.
  • Serve over buttered noodles or mashed potatoes.

NOTE: We like the jalapeno ketchup for the extra kick, but plain works great too!

The History of SALISBURY STEAK and my favorite recipe for it ~ BLOG 366.191

There is nothing quite as satisfying as a plate of classic home cooked scratch made Salisbury Steak, with the favorite stick-to-your-ribs side dishes like glazed carrots, and mashed potatoes with thick beef gravy poured on top – a throwback to TV dinners, but oh so much better, on the table quickly and completely family friendly. 

Salisbury steak originates in the United States and is made from a blend of ground beef and ground pork with onions and seasonings and is considered a version of Hamburg steak.

The Interesting History Behind Satisfying Salisbury Steak as per MIAMI BEEF

“A Close Cousin to the Hamburger – Like the name implies, we have Hamburg Germany to thank for the popularization of the hamburger patty. In the late 19th century, sailors from German brought the delicious meal to the Port of New York, where the minced beef was smoked, lightly salted and then served along with onions and breadcrumbs as a quick hearty meal. In 1873, historians say that you could buy a plate of Hamburg steak with all the toppings for about 11 cents.

Today, some people wince at the idea of having a hamburger for breakfast, but the truth is that in the late 1800’s it was the protein of choice to start your day. In fact, it was such a popular health food, that hospitals even served it to patients raw or slightly cooked, with a raw egg. Which doesn’t sound appetizing compared to our contemporary tastes, but it was a vitamin and protein rich meal at a time when proteins were both expensive to purchase, as well as difficult and time consuming to cook.

Why Is It Called ‘Salisbury Steak’ and Who Is It Named After? Did you know that Salisbury Steak got its start as a famous food in America, when it was used as stand-by high-protein meals for soldiers during the American Civil War? It makes sense, when you think about it, because of the nutritional content of the meat and the fast preparation time. Not to mention that for American soldiers fighting through cold weather, it was a taste of home and comfort food during some pretty difficult conditions.

A physician named Dr. James Henry Salisbury was an early dietician and studied gastrointestinal health, digestion and nutrition in the mid 1800s. One of the most serious threats to American soldiers during the Civil War was wasting, due to malnutrition, and symptoms of chronic diarrhea. Dr. Salisbury was convinced that while other types of food like soup and bread, and some fruits and vegetables were provided to the soldiers, it was really protein (and specifically beef) that they needed to stay healthy.

The challenge was cooking and preparing meat for the troops, as well as the increased costs of providing high-protein meals for them. Toward the middle and end of the American Civil War, soldiers were looting communities in search of food, given the shortage of funds to supply the advancing soldiers (on both sides).
Soldiers were traditionally provided with ‘soldier biscuits’ which were dried, and which contained some fortified vegetable and fruits, but the high yeast content and the low protein content of the biscuits began to create disease. Wounded soldiers that were nutritionally famished, didn’t heal quickly to return to active duty, and the Northern and Southern American armies were forced to start addressing the nutrition they provided to their troops (or lose the war).

During the American Civil War, Dr. Salisbury tested his theory by providing “chopped beef” which was a little easier to digest for soldiers than root vegetables and other protein sources. After the war, he wrote a book called “The Relation of Alimentation and Disease” which could be one of the first real diet trending publications, that helped people understand the link between health and a balanced diet, which included animal proteins rich in B vitamins.

Dr. James Henry Salisbury was also one of the first physicians to indicate that animal fats were necessary for metabolic health; something that contemporary nutritionists have embraced again, after a long-time social moratorium on animal fats.

American Quality Standards for Salisbury Steak – Salisbury steak as a product, can be a mix of different proteins. Per the United States Department of Agriculture standards, Salisbury steak must have a minimum meat content of 65%, and up to 25% of that can be derived from pork. If the pork meat is de-fatted, the limit is 12% pork meat in the constitution of the Salisbury steak. No more than 30% of the Salisbury steak can be fat.

Extenders or fillers can be used in Salisbury steak, which also help to reduce the cooking time in this fast-preparation protein, however meat by-products are not permitted. Extenders may include bread crumbs, flour or oat flakes, but the limit for approved fillers is not to exceed 12% of the product volume. Soy proteins may be added but are limited to 6.8% or less by finished product volume.

The rest is a proprietary blend that depends on the processor, and that is where much of the flavor is unique and innovated to specification for commercial clients. Special seasonings, and the addition of fresh vegetables such as onion, mushrooms or sweet peppers may be added, along with binding ingredients such as eggs, cream, buttermilk, water, vinegar or brine.

To be labeled as Salisbury steak, the product must be completely cooked. It may not be called “hamburger patties” if it contains a blend of animal proteins and fats. So, while you may think a Salisbury steak is just a burger with gravy on it, there is a distinctly different recipe and food standards behind it. Most of the standards mentioned apply only to Salisbury steak produced in USDA Inspected meat processing facilities; other products may not carry the USDA inspection label. Salisbury steak must be pre-cooked prior to being frozen, or the product label must state “Patties for Salisbury Steak”.

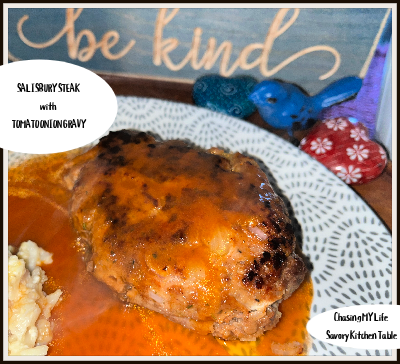
Add Salisbury Steak to Your Menu – The classic flavors of tender beef, or a blend of pork and beef is rich and satisfying. When combined with the American favorite side-dish of mashed potatoes and gravy? You have the perfect comfort food, and Salisbury steak fits on just about any scratch or fast-casual menu. It is also popular for pubs and bars, as an economical lunch special.”
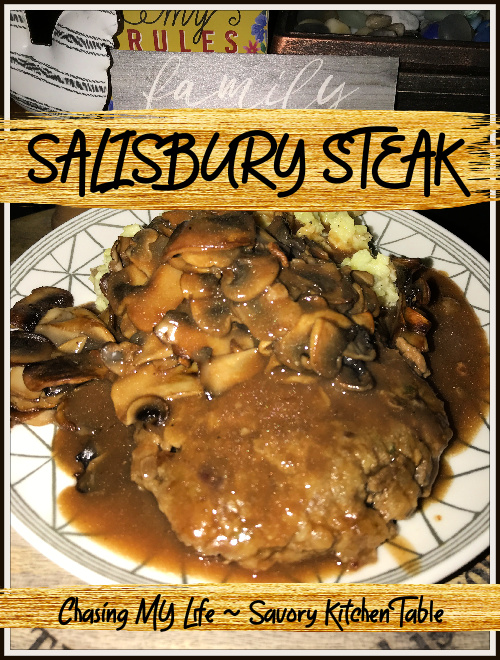
SALISBURY STEAK

STEAKS
1 pound lean ground beef
1/4 cup panko breadcrumbs
LARGE egg , beaten
2 teaspoons ketchup
1 teaspoon Dijon mustard
1/2 teaspoon dried oregano
FRESH ground sea salt and black pepper, to taste
1 tablespoon avocado oil

  • In a large bowl, combine all the ingredients for the steaks except the oil until combined, but do not overwork.
  • Shape the mixture into equal oval patties, about 3/4-inch thick.
  • In a large nonstick skillet, warm the oil over medium+ heat; add the steaks and cook 2-3 minutes per side until you have a nice golden crust.
  • Transfer to a plate.

GRAVY
2 tablespoons unsalted butter
2 tablespoons WONDRA flour
1 1/2 cups beef stock
1 tablespoon ketchup
1 teaspoon Worcestershire sauce
1/2 teaspoon onion powder
6 ounces sliced cremini mushrooms
FRESH ground sea salt and pepper, to taste

  • Reduce the heat to medium in the skillet.
  • Add the butter to the drippings.
  • Whisk in flour until combined and lump free.

  • Reduce heat to medium-low and add in the beef stock, whisking well.
  • Add in the ketchup, Worcestershire, onion powder, whisking to combine.

  • Add in the mushrooms, simmering for 4-5 minutes to thicken.
  • Season with salt and pepper, to taste.

  • Add the partially cooked steaks back to the skillet and nestle into the gravy; cover and cook another 10 minutes until cooked through.
  • Serve steaks with mashed potatoes and mushroom gravy drizzled on top.

GREAT GRANS CHICKEN & GRAVY ~ BLOG 366.165

GREAT GRANS CHICKEN & GRAVY

1 tablespoon avocado oil
1 tablespoon butter
1 medium Vidalia onion, FINELY chopped
1 box grape tomatoes, halved
1 1/2 – 2 cups of carrots, small diced
1-2 tablespoon FRESH lemon thyme leaves
1/2 teaspoon sweet paprika (see note)
FRESH ground sea salt and pepper, to taste
2-3 cloves garlic, minced
1-2 cups homemade chicken broth
1-2 pounds chicken breasts or tenders, cut into small bite size chunks

  • In a large skillet melt oil and butter together.
  • Add onions, tomatoes and carrots, cooking for 2-3 minutes until onions are translucent. 
  • Add in the garlic, thyme, paprika, salt and pepper.
  • Add chicken pieces and 1 cup of chicken broth.
  • Turn the heat to medium and simmer for 15 to 20 minutes, or until chicken is cooked through. Keep checking to make sure nothing is sticking to the pan, adding broth as necessary to keep it moist and make the gravy.
  • When chicken is cooked through check to make sure thicken gravy as necessary with corn starch.
  • In a small bowl whisk together a few tablespoons of the pan gravy with a tablespoon or 2 of cornstarch.
  • Mix well, then pour slowly into the pan, stirring constantly until the gravy thickens up and heats through.

NOTES:

  • Paprika comes sweet or smokey. Choose accordingly as it will alter your flavor a bit.
  • If I have some in the fridge I’ll add about 1/2 cup chopped marinated artichokes.
  • You can substitute rotisserie chicken pieces, but if you do, don’t add the chicken pieces until after the veggies have simmered 10-15 minutes and are crisp tender.

Great gran served this over homemade noodles and never used rotisserie chicken. Her chicken was farm fresh and simmered to make the broth fresh. Grams amped up the carbs by serving it with noodles in it and serving it over homemade mashed potatoes, but it’s great without either of those.

SLOW COOKED BEEF IN GRAVY ~ BLOG 366.114

SLOW COOKED BEEF IN GRAVY

3 tablespoons of avocado oil
1 1/2 – 2 pounds of top round roast, sirloin steak, chuck roast, rump roast or pork butt
1 medium Vidalia onion, sliced
8 ounces mushrooms, cleaned & sliced (I LOVE Beech mushrooms – see note)
2-3 cloves garlic, minced
1 red bell pepper, sliced
2 cups beef broth
1/4 cup Worcestershire sauce
1/4 teaspoon each of thyme, tarragon and oregano
FRESH ground salt and pepper, to taste

2-3 tablespoons of cornstarch whisked together with 2 tablespoons of beef broth

  • Heat oil in a large non-stick frying pan over medium heat.
  • Add beef, sautéing on both sides until it browns.
  • Spray the slow cooker liner with non-stick spray.
  • Add the onion, peppers, mushrooms, and garlic on the bottom then the beef slices on top.
  • Whisk together the beef broth, Worcestershire and seasonings. Pour over top of meat and veggies.
  • Cook on HIGH for 5 hours.
  • 30 minutes before the end, fold in the cornstarch mixture, stirring together evenly.
  • Thinly slice meat and serve over noodles, baked potatoes, rice, or hard-crusted sourdough bread topped with gravy.

NOTES:

  • If using Beech mushrooms DO NOT add them until the last 1/2 hour. They also don’t need to be sliced. They have a wonderful nutty flavor.
  • The last time I made this I forgot to take the roast out of the freezer. So I couldn’t sear it, but it worked out even better than normal!

BRINED ROAST TURKEY BREAST ~ BLOG 365.

We’re had a SMALL group for Thanksgiving this year and I ordered a LARGE boneless turkey breast, but was afraid it would be too dry so decided to try a brine to keep it juicy. This recipe calls for an overnight wet brine overnight creating maximum flavor and keeping it extremely moist. It is then roasted to a golden perfection.

BRINED ROAST TURKEY BREAST
Prep Time 15 minutes
Brine Time 12 hours

Cook Time 3 hours
Rest Time 15 minutes
+/- Total Time 15 hours 15 minutes

BRINE
8 cups water
½ cup kosher salt
½ cup PACKED brown sugar
8 cloves garlic, FINELY minced
1 cinnamon stick
¼ cup FRESH tarragon
2 sprigs FRESH rosemary
2 lemons, cut in half and juiced
1 LARGE orange, peeled, cut in half and juiced
4 cups ice, optional

  • Bring the water to a boil in a LARGE pot.
  • Add all ingredients to the pot except the ice and return to a boil, stirring to dissolve all the salt and sugar.
  • Remove from heat and cool completely.
  • To speed up the cooling add about 4 cups of ice to the brine.
Once the brine is cooled, place the turkey breast in the brine making sure it’s fully submerged. You may have to weigh it down with another pot of water to keep it submerged.
  • Store it in the refrigerator overnight or for at least for 12 hours.


TURKEY
2 medium onions, quartered
4 large carrots, rustic cut
4 cloves garlic, FINELY minced
5-8 pound turkey breast, thawed
FRESH ground sea salt and black pepper, to taste
4 tablespoons butter, cut into small pieces
8 tablespoon butter, melted
1 cup homemade chicken broth

  • Preheat your oven to 350°.
  • Remove the turkey breast from the brine solution and pat it dry with paper towels.
  • Rinse the turkey breast thoroughly to remove excess salt and pat dry.
Place the quartered onions, carrot pieces, minced garlic and 4 tablespoons diced butter in a large roasting pan then place the turkey breast on top.
  • Rub the turkey with the melted butter, keep remaining butter for later.
  • Generously season with salt and pepper on both sides. 
Add the chicken broth to the pan. 

  • Cover the pan with aluminum foil and place in the oven.
  • Roast covered for 1½ hours, basting with the melted butter, remelting as necessary every 20 minutes.
  • After 1½ hours, remove the foil and roast for another 1 hour or until golden brown. The breast is done when a meat thermometer inserted in the thickest part of the breast registers at 165°.
Transfer the turkey breast to a platter or cutting board and let it rest for a full 15 minutes before slicing into it.
  • With a slotted spoon remove carrots to a serving bow. Cover and keep warm.


GRAVY
pan drippings
¾ cup homemade chicken broth
1 tablespoon cornstarch or more for a thicker gravy

  • Skim some of the fat from the pan drippings if necessary.
  • Place the pan on the stove over medium-high heat.
  • In a small bowl whisk together the cornstarch with a couple tablespoons of the chicken broth. Add mixture to the pan, whisking it all together.
  • Strain gravy through a sieve pressing all the liquid out of the onions and garlic for additional flavor.
Add more cornstarch until you reach the desired consistency. Cook for a few minutes, until the gravy thickens a bit.
  • Adjust seasoning as necessary.

NOTES

  • Turkey breast cooking guidelines:
    4 to 6 pounds – 2 1/2 to 3 hours
    6 to 8 pounds – 2 1/2 to 3 1/2 hours
  • Use a shallow roaster so that the oven air can flow completely around the turkey breast.

ULTRA CREAMY MASHED POTATOES & FLAVORFUL GRAVY

I start the prep for my gravy 2 days before the holiday. I use whatever green veggies I have in my crisper to begin my gravy.

ULTRA CREAMY MASHED POTATOES & FLAVORFUL SCRATCH GRAVY

ULTRA CREAMY MASHED POTATOES
3 pounds russet potatoes, peeled and cubed
1 cup chicken broth
1/4 cup heavy cream
6 tablespoons butter, softened
1/2 teaspoon FRESH ground sea salt
1/4 teaspoon FRESH ground black pepper

  • In a large saucepan add potatoes, chicken broth and enough water to cover the potatoes.
  • Bring to a boil.
  • Reduce heat and simmer uncovered 15-20 minutes until potatoes are tender.
  • Drain.
  • In a large bowl combine the butter and cream.
  • Add potatoes to bowl and whip until creamy.
  • Season with salt and pepper.
  • Serve immediately.

SCRATCH GRAVY
Turkey parts from the cavity
4 cups chicken broth
1 tablespoon lemon juice
2 medium carrots, chopped
2 celery stalks, chopped
1 large onion (skin on), chopped
1 shallot (skin on), chopped
2-4 cloves garlic (skin on), crushed
1 large bunch thyme
1 large bunch oregano
FRESH ground sea salt, to taste
FRESH ground black pepper, to taste
any other greens (asparagus, snap peas…)
1/4 cup cornstarch
1/4 cup COLD water

  • In a large stock pot add all the above and bring to a SLOW boil.
  • Reduce heat and simmer 3-4 hours.
  • Strain broth and discard all bones and remnants.
  • Return broth to pan.
  • In a small bowl whisk together the cornstarch and water.
  • Whisk cornstarch mixture into the broth until thickened.
  • Season to taste.

SWEDISH MEATLOAVES with MASHED POTATOES, ROASTED CARROTS & LINGONBERRY JAM with HOUSE SEASONING

Meatloaf is really just an oversized meatball. So, why not make it a personal size so you can get more finished edges covered in delicious gravy?

Swedish Meat Loaves are spicy beef meatloaves smothered in a rich tasty gravy served over mashed potatoes with roasted carrots with Lingonberry jam on the side—in other words, Thanksgiving for the rest of the year.

SWEDISH MEATLOAVES with MASHED POTATOES, ROASTED CARROTS & LINGONBERRY JAM

2 Carrots, peeled and sliced into thick coins
3/4 pound Yukon potatoes, peeled and cubed
1/3 cup minced yellow onion
several sprigs Parsley, finely chopped
1 slice white bread
3 tablespoons + 1/4 cup milk
2/3 pound ground beef
1 teaspoon Nutmeg
1 teaspoon thyme
1 teaspoon white pepper
1 tablespoon flour
1 cup beef consomme
2 tablespoon Lingonberry Jam
1 tablespoon avocado oil
2 tablespoons butter
FRESH ground salt and pepper, taste

  • PREHEAT oven to 425° and adjust rack to upper position.
  • Toss carrots on a baking sheet with a drizzle of oil and a large pinch of salt and pepper.
  • Roast in oven for 15 minutes.
  • Add potatoes to a medium pot with a large pinch of salt and enough water to cover by 1 inch. Bring to a boil and cook until tender, about 15 minutes. Drain and return to empty pot off heat.
  • Place bread and 3 tablespoons milk in a medium bowl. Break up bread with your hands until pasty.
  • Add in beef, 2 tablespoons minced onion, half the parsley, 1/2 teaspoon nutmeg, 1/2 teaspoon thyme, 1/2 teaspoon white pepper and salt to taste. Mix by hand gently until thoroughly mixed.
  • Shape mixture into two 1-inch-tall loaves.
  • Heat a drizzle of oil in a large pan over medium-high heat.
  • Add meatloaves and cook until browned on surface but not yet cooked through, about 3 minutes per side.
  • Once carrots have roasted about 15 minutes, remove sheet from oven and give carrots a toss. Add meatloaves to same sheet and place back in oven.
  • Bake until meatloaves are cooked through and carrots are tender, about 15 minutes more.
  • Melt 1 tablespoon butter in the same pan you browned the meatloaves in over medium heat.
  • Add remaining minced onion. Cook, sauteing, until soft, about 2 minutes.
  • Add flour and cook, stirring, until pasty, about 1 minute.
  • Slowly whisk in beef stock and 1/4 cup milk.
  • Bring to a simmer, then whisk until thickened, about 1 minute.
  • Season with salt, pepper, and a pinch of nutmeg to taste.
  • Add more water if too thick.
  • Place pot with potatoes over low heat.
  • Add 1/4 cup milk and 1 tablespoon butter mashing until smooth. Add more milk if too stiff.
    Season to taste with additional salt and pepper.
  • Plate potatoes and meatloaves.
  • Drizzle with gravy.
  • Add carrots and jam to the side.
  • Garnish with remaining parsley.

HOUSE SEASONING MIX

1/4 cup fine sea salt
1/4 cup garlic powder
2 tablespoons onion powder
1 tablespoon FRESH ground black pepper

  • Combine in a small bowl until well blended.
  • Store in an air tight container.

APPLE CIDER PAN GRAVY PORK CHOPS

This recipe is good year round, but tastes especially GREAT during the fall when apples are at their prime.

APPLE CIDER PAN GRAVY PORK CHOPS
2 tablespoons avocado oil
4 3/4 inch pork chops
2 cloves garlic, minced
1 teaspoon honey
2 tablespoons heavy cream
1/2 teaspoon apple pie spice
FRESH ground sea salt and black pepper, to taste
3-4 sprigs FRESH thyme
1 cup apple cider
1 tablespoon + 1 teaspoon cornstarch
2 tablespoons water
thin sliced apples,  for garnish SEE NOTE

  • Generously sprinkle pork chops with salt and pepper.
  • Heat avocado oil in large skillet over medium heat.
  • Sear pork chops on both sides.
  • In a small bowl whisk together the honey and apple pie spice.
  • Add in garlic and apple cider until well blended.
  • Pour over pork chops.
  • Reduce heat to medium low, cover and simmer 5 minutes.
  • Remove pork chops to a plate, tent and let stand 5 minutes.
  • Whisk together the cornstarch and water.
  • Add to pan gravy and whisk until well blended.
  • Add heavy cream and whisk to blend.
  • Increase heat and bring to a SLOW boil until desired consistency is reached.
  • Serve pork chops with apple stuffing, your favorite vegetable and top with pan gravy.

NOTE:

  • You can serve with thin sliced apple slices or you can use a little butter and apple pie spice to saute the apple slices for a sweet treat.
  • Many times I prefer to sear the pork chops for 3 minutes on each side over high heat and then place them into a 400° oven for 6-8 minutes to finish cooking while I prepare the veggies. I find that the pork chops stay moist and juicy this way.

APPLE STUFFING
2 honey crisp apples, peeled,, cored and chopped
3 Kaiser rolls, chopped small
1 large carrot, chopped
1 small bunch green onions, halved and sliced
2 cloves garlic, minced
2 + 2 tablespoons butter
1/2 cup apple cider
2 packets pork flavored top ramen seasoning packets

  • Preheat oven to 350°.
  • Heat 2 tablespoons of butter in skillet on medium high heat.
  • Add carrots and saute 2-3 minutes until they begin to soften.
  • Add green onions and garlic sauteing until fragrant.
  • Add apples, sauteing until beginning to soften.
  • Whisk together the pork seasoning packets into the apple cider.
  • Add the remaining butter and apple cider mixture to pan.
  • Fold in bread pieces, stirring to coat.
  • Cook until liquid is completely absorbed.
  • Fold into a casserole and bake 15 minutes or so to heat completely through.


CHICKEN in BACON RANCH GRAVY ala SLOW COOKER

This is a wonderful fall or winter recipe!

SLOW COOKER CHICKEN with BACON GRAVY serves 4
adapted from Sarah Olson

1.5 pounds boneless skinless chicken breasts
FRESH ground pepper, to taste
4 sprigs FRESH thyme
2 bunches green onions, sliced thin
2-4 cloves garlic, minced
6-8 slices bacon, diced and cooked crisp
1 Pioneer country gravy packet dry mix DO NOT PREPARE PER PACKAGE
1 Hidden Valley Ranch Dressing packet dry mix DO NOT PREPARE PER PACKAGE
2 1/4 cups water
1 cup heavy cream

  • Spray slow cooker with non-stick spray.
  • Add the chicken to the slow cooker.
  • Generously salt and pepper the chicken breasts.
  • Add the garlic, green onions and bacon.
  • Lay thyme sprigs on top.
  • Whisk together the gravy mix and ranch dressing packets water until smooth.
  • Pour the gravy mixture over the chicken.
  • Cover and cook on HIGH for 3 hours without opening the lid during the cooking time.
  • Remove the chicken and shred with 2 forks.
  • Stir heavy cream into gravy mixture until well blended.
  • Return chicken to gravy mixture and stir to coat well.
  • Serve over mashed potatoes.


BISCUITS AND SAUSAGE GRAVY BAKE

BISCUITS AND SAUSAGE GRAVY BAKE
1 pound ground pork sausage
1 tablespoon avocado oil
5 tablespoons butter
1/4 cup Wondra flour
3 cups milk
FRESH ground salt and pepper
1 can Pillsbury JUMBO biscuits
1 small bunch green onions, chopped
3/4 cup shredded cheddar cheese (hubby like sharp – I prefer medium)

  • Preheat oven to 350°
  • Heat oil in large skillet over medium high heat.
  • Add sausage and cook until completely browned and crumbly.
  • Drain sausage in colander until free of oil.
  • Return pan to heat and add butter.
  • Whisk in flour until a golden roux appears.
  • SLOWLY add milk, whisking constantly until heated through.
  • Season with salt and pepper.
  • Add sausage pieces.
  • Coat 11×7 baking dish with non-stick cooking spray.
  • Place dish on baking pan to catch any drips.
  • Separate biscuits and then separate each biscuit in half so you have 16 pieces.
  • Place 8 halves in baking dish.
  • Cover with half the sausage mixture.
  • Sprinkle half the green onions over the sausage.
  • Repeat layers and sprinkle with cheese on top.
  • Bake 40 minutes or until golden.

NOTE: CAN EASILY BE MADE INTO INDIVIDUAL SERVINGS & I OFTEN SERVE IT WITH AN EGG ON TOP.

Linking up to FULL Plate Thursday.