I hope everyone had a wonderful week and are having a wonderful holiday season. I’m home from the hospital, but will address that in the Things On My Mind section. The weekend was quiet and VERY uneventful thankfully.
OUTSIDE MY WINDOW & THE WEATHER OUTSIDE
Temperatures are FINALLY down into the tolerable range. We even had to turn the heat on when we got home from the hospital on Friday. Friday was an ironic day here in southeast Texas. 7 years ago when I had my cancer surgery, we had a rare ice storm in the area. Then we moved away for several years, but came back to work on my grandparent’s house and are here again for this surgery. Ironically, we had SNOW last Thursday and Friday. yep I said snow! What a shock that was to wake up to in the middle of the night! I don’t get to go outside for another week give or take so am not yet enjoying the change in temperatures though.
ON THE BREAKFAST PLATE
3 ounces of peach high protein drink.
AS I LOOK AROUND THE HOUSE / WEEKLY TO DO LIST & HOUSE PROJECTS
Unfortunately for the next 90-120 days this is hubby’s category. I am not allowed to do anything or lift anything heavier than a bag of flour. Hubby is being a GREAT sport though and tending to my every need. Because of the risk of infection we are still having to wash every day. He’s just not used to doing it, the vacuuming, cleaning up after the cat and dog, etc…
- LAUNDRY... quite a few loads this week, towels, bedding and clothing
- LIVING AREAS... I did a serious deep clean just before surgery so am hoping this will get hubby through until March LOL NOT
- KITCHEN… pretty clean
- STUDIO… is mainly storage these days so nothing going on there
- YARD… nothing much
- BLOG… some recipe updating, future post planning and holiday post planning
CURRENTLY READING & TELEVISION / DVR
I haven’t done any reading since last Tuesday, but am hoping to do some later today and get back into a routine. I’m still trying to finish Ava Miles book #9 Calendar of New Beginnings.
- BIG BANG THEORY and YOUNG SHELDON
- NCIS, NCIS NEW ORLEANS and NCIS LA, CRIMINAL MINDS, S.W.A.T.
- MADAM SECRETARY, SCANDAL, DESIGNATED SURVIVOR
- CHICAGO FIRE, CHICAGO PD, CHICAGO MED later this season
- BRAVE, VALOR, SEAL TEAM
- LAW & ORDER SVU, BLUE BLOODS, HAWAII 5-0
- MACGYVER, SCORPION, BLINDSPOT, ORVILLE, WISDOM OF THE CROWD
- Z NATION, WALKING DEAD, FLASH, DC LEGENDS, INHUMANS
- THE GOOD PLACE, AMERICAN HOUSEWIFE, SPEECHLESS, GREAT NEWS
- THIS IS US, ONCE UPON A TIME, THE GOOD DOCTOR
- GUY’S GROCERY GAMES, BEAT BOBBY FLAY, BOBBY AND DAMARIS
CRAFTS / PROJECTS
Probably nothing this week, but am hoping to start sketching the door series and tree of life next week.
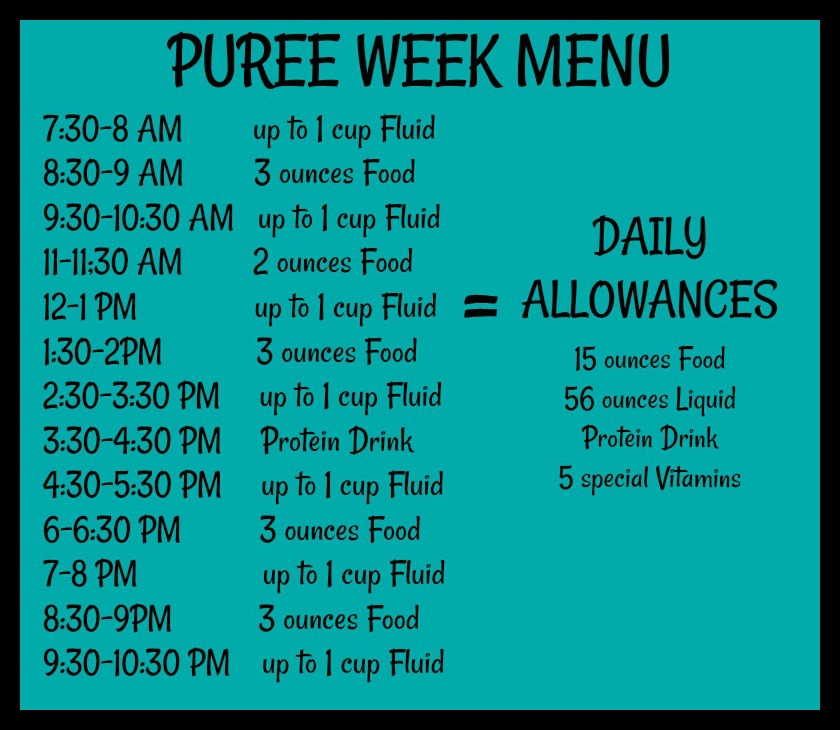
MENU PLANS FOR THE WEEK
This category is a sad and sore subject for me until about March. My surgery did not go as planned which is changing so much about food, but sure beats the alternative of being 6 foot under. Hubby is loving being able to eat what he calls bachelor food – S.O.S., chili, hot dogs, hamburger helper, etc… I told him NOT to get used to it though, as soon as I can cook again we will be eating healthier than ever.
|
MONDAY
|
TUESDAY
|
WEDNESDAY
|
THURSDAY
|
FRIDAY
|
SATURDAY
|
SUNDAY
|
|
2 times a day
|
3 ounces PROTEIN drink and GREEN Tea
|
3 ounces PROTEIN drink and GREEN Tea
|
3 ounces PROTEIN drink and GREEN Tea
|
3 ounces PROTEIN drink and GREEN Tea
|
3 ounces PROTEIN drink and GREEN Tea
|
3 ounces PROTEIN drink and GREEN Tea
|
3 ounces PROTEIN drink and GREEN Tea
|
| 2-4 times a day |
4 ounces strained pureed soup
|
4 ounces strained pureed soup
|
4 ounces strained pureed soup
|
4 ounces strained pureed soup
|
4 ounces strained pureed soup
|
4 ounces strained pureed soup
|
4 ounces strained pureed soup
|
| 2 times a day |
4 ounces vanilla yogurt
|
4 ounces vanilla yogurt
|
4 ounces vanilla yogurt
|
4 ounces vanilla yogurt
|
4 ounces vanilla yogurt |
4 ounces vanilla yogurt
|
4 ounces vanilla yogurt
|
| 2 times a day |
4 ounces jell-o |
4 ounces jell-o |
4 ounces jell-o |
4 ounces jell-o |
4 ounces jell-o |
4 ounces jell-o |
4 ounces jell-o |
SUCCESSFUL RECIPE LINKS FROM LAST WEEK
These are recipes that have been waiting in cue to post, I’m definitely NOT back to cooking yet.
HEALTH & BEAUTY TIPS
HOMEMAKING/COOKING TIP
ON MY MIND / THINGS THAT ARE MAKING ME HAPPY
You know the old Yiddish proverb, Man Plans, God Laughs? If not, you should learn it just to keep yourself sane.

So, as many of you know I have been suffering from some health issues the past few years, especially this last year. To give you a quick background when I was 24 I was diagnosed with Systemic Lupus and not doing well. Several months into the disease I went to my rhuematlogist, held out my hand with 32 pills in it and said “I can’t live this way”. She agreed and we moved into treating the disease and it side affects like Fibromyalgia with diet or better said, lack of diet. I immediately gave up ALL steroids, preservatives, splendas, aspartames, diet food of any kind, non GMO food, canned “food”, boxed “food”fast food as a whole and started perimeter shopping and scratch cooking with “REAL” foods. My life immediately improved.
Fast forward many years to 2011 and my oncologist claiming this change in food prep and eating for all those years saved my life when she was able to lift out a twice torsioned (wrapped around the ovary 2 times) volleyball sized ovarian tumor from my body intact and I have been NED (no evidence of disease) for almost 7 years since. She decided it was because the cancer had nothing else to feed on in my body except itself. I knew I was extremely blessed when after 6 more months of testing everything and everywhere to make sure it was the only tumor, that they found none.
Fast forward another year and I’m having problems with the hiatal hernia that my cancer doctor found, but left alone. Enter a new gastroenterologist who was able to fix the hiatal hernia and shredded esophogaus with a Nissen Fundoplication (2012). This didn’t alter what I ate except in the beginning 2 months, but did alter how much and how often I ate. I also gave up 90% of bread – just filled me up too fast.
Fast forward 9 months (2013) and the mesh from the Nissen Fundoplication failed requiring a revision surgery and another period of liquid food adjustment.
Fast forward to 2016 and the E.Coli bacterial infection that landed me in the hospital with a concussion because I lost consciousness and fell after becoming violently ill. For the next 13 months I was tested by neurology and cardiology for my symptoms before they finally handed me off to gastroenterology which had a HUGE wait time so my wonderful primary doctor got tired of waiting and began doing logical testing on her own. She was the one who found the hiatal hernia (again) and referred me to the surgeon. His testing was further delayed another 6 weeks past their normal backlog by Hurricane Harvey. I love my surgeon and his immediate staff as well as my hospital nurses Ericah and Lexi. Other than that the hospital will be getting a not so favorable review from me. The recovery nurse should NEVER have contact with human beings and the respiratory therapist is negligent with he lack of follow through and the nurse’s aides need to be trained in patient care and helping.
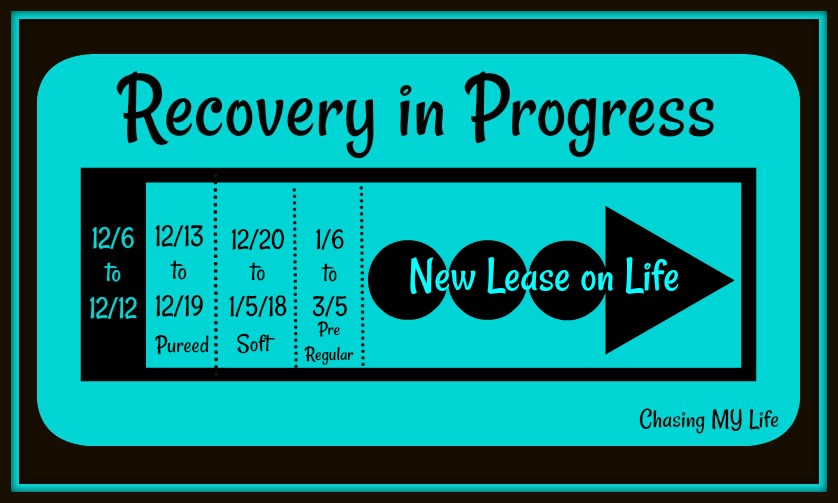
We went into last Wednesday believing he was going to be able to fix the fix on the revision surgery. Unfortunately this is where the Yiddish proverb enters. I had planned food and EVERYTHING on the fix of the fix, but he was unable to correct the issue and had to make a drastic decision to do a bypass. This is a HUGE DRASTIC LIFE CHANGE for anybody, but for me there is very little information written on it for someone who isn’t doing it for weight loss. I mean EVERYTHING written about the subject is for people who need to lose significant amounts of weight. The diet is strict and I can live with that, but the recovery time has now doubled! Once recovery time is over I can live with the longterm lifetime diet and special vitamins as it is high protein, lowfat and REALLY healthy which is right up my alley anyway.
So here we are on day 5 of 90-120 days of nothingness except keeping a food and medicine journal. I cannot tell you how much ALL of your thoughts and prayers have meant to me and are seeing seen me through this ordeal. There is 1 good thing. I did want to lose about 15 pounds and now that is going to be a given. 😀
FAVORITE PHOTO FROM THE CAMERA
I was able to get most of my elf on the shelf photos taken before surgery and definitely have a few favorites. 😀 


INSPIRATION

Be sure to link up with Sandra at Diary of a Stay at Home Mom for Happy homemaker Monday, Terri at Darling Downs Diaries and with Laura at I’m an Organizing Junkie for Menu Plan Monday.


 PEANUT BUTTER FUDGE DROPS


 TATER TOT GRILLED CHEESE & BACON WAFFLE SANDWICH
 Because of my surgery this year I was in a hurry to get things done beforehand and did a lot of gift cards, but NEXT year I’m going back to some simple rustic and fun ideas.