Loaded Baked Potato Salad

Min here, from The Bad Girl’s Kitchen.  Long time no see!  I was lured over here yesterday by Melynda’s Apricot Pie, if you must know.  Then I just had to come back over and share my new creation with you!!

This recipe came about when I received an email listing “summer salads.”  There was a link to a recipe someone had called “Loaded Baked Potato Salad,” which I thought sounded great…but when I read through the recipe, it was really a casserole…?! 

What do I mean by “casserole?”  It was a potato dish that was assembled and then BAKED in a 9×13 pan.  Sort of reminiscent of my Twice Baked Potato Casserole, actually.  Totally not a “salad” at all, (salad in my mind means “cold”), and certainly not a dish I would think about serving in the heat of summer.

I set out to create a true potato salad.

First, I used my grill to bake the potatoes.  I just clean them, rub them with olive oil, then grill on the top rack over medium-ish heat for about one hour, turning over halfway through.  You want them baked but not too soft, keep in mind your grill may cook differently than mine.  Remove potatoes from grill and let cool before chopping, of course. I found that using a serrated knife helps the potatoes hold together better, while keeping the skin pieces intact.

Once salad ingredients are prepped, it’s important not to mix it until you’ve added everything, because the potatoes are a bit fragile.  You want to gently fold the ingredients together.  I used a mixture of sour cream and real mayonnaise because that’s what I prefer.  The real mayo adds a bit of flavor you wouldn’t get with sour cream alone.  You need to put this salad together ahead of time, and I’d recommend chilling it in the refrigerator for at least an hour or so if you have time.

I have to tell you, this is an amazing potato salad!  Make it for your next barbecue, and everyone will be impressed!  I think the baked potatoes add so much to the flavor compared to a traditional potato salad made with boiled potatoes, that I may actually try to bake all my potatoes for salads from now on.

My family and I loved this potato salad; in fact my oldest son H-Bomb even asked for seconds although he’s not a huge potato fan.  It’s my new favorite, and I’m going to make more today!

Loaded Baked Potato Salad 
Serves 6 to 8 

6 baked potatoes, skin on
1/2 pound bacon, chopped and cooked until crisp, then drained and cooled on paper towels
3 – 4 scallions, chopped
1 cup shredded sharp cheddar cheese
1/2 cup sour cream
1/2 cup mayonnaise
Salt and pepper to taste

Reserve a few pieces bacon, some green onions and cheese to use as garnish. 

Use a serrated knife to gently chop potatoes, leaving skin on.  I cut each potato in quarters lengthwise, before chopping in pieces.  Add to large mixing bowl.

Add bacon, onions and cheese; do not mix. Season with salt and pepper. Set aside.

In a small bowl, mix sour cream and mayo.  Add to potato mixture and mix gently with a rubber spatula.  Taste and adjust salt and pepper, if needed.  Refrigerate until ready to serve.

Before serving, garnish with reserved cheese, bacon and green onions.

Don’t forget to visit me at The Bad Girl’s Kitchen for more fabulous recipes!

I also host the fun monthly food blog event, Taste & Create!  Please join us!

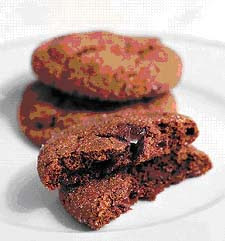
Try a New Recipe: Chewy Chocolate Gingerbread Cookies

Try as I may, I just can’t think about December recipes without coming back to cookies. Holiday cookies are the best, and these cookies are our family’s all-time favorites. A classic Martha Stewart recipe, but worth Every Single Masochistic Step. Truthfully, they take some time but it’s not that bad, and you can divide it up and make them in stages if you need to.
Fresh ginger, molasses and high quality chocolate make these cookies spectacular. Please don’t even consider skipping the fresh ginger, or you’ll be sorry.

Chewy Chocolate Gingerbread Cookies
Makes 2 dozen

7
ounces best-quality semisweet chocolate
1 1/2
cups plus 1 tablespoon all-purpose flour
1 1/4
teaspoons ground ginger
1
teaspoon ground cinnamon
1/4
teaspoon ground cloves
1/4
teaspoon ground nutmeg
1
tablespoon cocoa powder
8
tablespoons (1 stick) unsalted butter
1
tablespoon freshly grated ginger
1/2
cup dark-brown sugar, packed
1/2
cup unsulfured molasses
1
teaspoon baking soda
1/4
cup granulated sugar

1. Line two baking sheets with parchment. Chop chocolate into 1/4-inch chunks; set aside. In a medium bowl, sift together flour, ground ginger, cinnamon, cloves, nutmeg, and cocoa.


2. In the bowl of an electric mixer, fitted with the paddle attachment, beat butter and grated ginger until whitened, about 4 minutes. Add brown sugar; beat until combined. Add molasses; beat until combined.


3. In a small bowl, dissolve baking soda in 1 1/2 teaspoons boiling water. Beat half of flour mixture into butter mixture. Beat in baking-soda mixture, then remaining half of flour mixture. Mix in chocolate; turn out onto a piece of plastic wrap. Pat dough out to about 1 inch thick; seal with wrap; refrigerate until firm, 2 hours or more.

4. Heat oven to 325°. Roll dough into 1 1/2- inch balls; place 2 inches apart on baking sheets. Refrigerate 20 minutes. Roll in granulated sugar. Bake until the surfaces crack slightly, 10 to 12 minutes. Let cool 5 minutes; transfer to a wire rack to cool completely.

Don’t forget to visit me at The Bad Girl’s Kitchen for more fabulous recipes!

Try a New Recipe: Sourdough Starter + Bread

If you’ve ever wanted to try making sourdough, now is the perfect time to get “started!” OuR KrAzY KiTcHeN is holding the 3rd Annual Need to Knead Bread Roundup, and if you “start” now, you can have some fabulous sourdough bread to enter in the roundup!
This recipe came from one of my Taste & Create partners last year: Grace of A Southern Grace. (If you’d like to sign up and participate in November, go here by Nov. 8!)

As I was looking around Grace’s blog last year, I kept seeing all the fabulous things Grace does with her precious Ebenezer, her sourdough starter.

And I thought:

Exactly what kind of cowgirl doesn’t have a jar of sourdough starter?

Can I actually claim to be a cowgirl, having never made a loaf of bread from my own starter?

Does Grace have a recipe for sourdough starter?

Will this sourdough starter really, truly be hard to kill, as Grace alleges?
Please let it be hard to kill, and easy to maintain.

What should I name it??

And I made a list for Number One and sent him off to the store.

Sourdough Starter
1 cup warm water
1/2 cup sugar
1 package (2-1/4 teaspoons) dry yeast
3 tablespoons instant potato flakes

To make starter:
Mix water, sugar, yeast, and potato flakes. Let ferment on counter for two days. Then feed with starter feeder and continue with the instructions found in the bread recipe and/or links below.

Starter Feeder
Mix together:
½ c sugar
3 T potato flakes
1 c warm water

Add to jar of starter, (I mixed mine a little with a wooden spoon) and let sit on the counter for around 8 hours.

Grace says: Eb lives in the fridge until feeding time, which can be anywhere from 3 to 14 days after his last meal. (I’ve actually gone longer than two weeks without feeding him and he still did fine.) Upon feeding, he sits on the counter for about 8 hours, and then he’s ready to go.

After sourdough has been on the counter for 8 hours, proceed with any number of sourdough recipes. (Click this link to see all the things I’ve made with sourdough starter!)

The sourdough starter went off without a hitch. It sat and fermented and bubbled and stewed on the counter. I added the starter feeder, and it bubbled away some more. I decided to name it Virgil, which means “growing.”

When it was time, I decided to go ahead with the most basic recipe, Sourdough Bread. I followed Grace’s recipe to the letter. 12 hours later, the dough had risen, but certainly wasn’t overflowing out of my bowl like Grace’s was out of her trifle bowl. Perhaps my bowl was bigger, or something?

I decided I’d make just two loaves instead of three loaves like Grace made. I left the loaves in the oven for 8 hours, just like Grace recommends.
My bread turned out lovely! Perfectly risen, (see above!) golden brown on the outside. The very middle was just a bit doughy, so next time I will preheat the oven to 350 before I start the timer! I think that will take care of that little problem. But, this bread is delicious and easy, and I started baking more of my own bread! I also tried some other sourdough recipes, and I even got my neighbor started with some starter of her very own!
I am sold and converted. Now I’m a real, live cowgirl with real, live sourdough starter in the fridge. Howdy, Virgil. Thanks for coming into my life! I know we’ll make some beautiful things together.
Grace’s Sourdough Bread
1/2 cup oil
1 cup sourdough starter
1 teaspoon salt
1 1/2 cups warm water
1/2 cup sugar
5 cups bread flour
1 cup whole wheat flour
3 tablespoons wheat germ

Combine all ingredients in a large non-metal bowl. Stir everything together, adding more bread flour as necessary to create dough that’s no longer sticky. Transfer the dough into a second non-metal greased bowl.

Roll it around so the entire ball becomes glorious, set it in a warm place, cover it with sprayed aluminum foil…and watch it grow for about 12 hours.

After 12 hours, punch down the dough once, right in its middle. Turn it out of the bowl onto a floured surface and knead it a few times.

(Although Grace divided her dough into three, I only felt like I had enough for two loaves this time).

Divide the dough into two or three even hunks, and knead each a bit more. Place the dough into greased loaf pans.

Place the pans in the oven, cover with sprayed foil, and leave to rise again for around 8 hours.

Grace says: Just FYI, the pans are put into the oven to rise so they don’t have to be moved later and risk collapsing.

After the second rise, remove the foil and bake the dough at 350 degrees for about 25 minutes. Preheat the oven before you start the timer!
Don’t forget to visit me at The Bad Girl’s Kitchen for more fabulous recipes!

Try a New Recipe: Min’s Pork Chile Verde

For a while, we had a Schwan’s delivery guy who said he used to be chef. He said he was “Irish-Mexican” and that his dream job would be cooking on a ranch like ours. He was large, round, friendly and nice, and we talked quite a bit about food. He shared the ingredients for his “secret” Green Chile, and I wrote them down. I didn’t write down the technique, amounts, or anything else, so the first time I made this, I winged it. For a last-minute dinner for 14 hungry cowboys. Everyone loved it!

This is a nice, filling stew, perfect for a fall day.
Just so you know, here are all the notes I started with:
Green Chile
chicken stock
roasted green chiles
chicken bouillon
cumin
mexican oregano
pork sirloins or chicken
cornstarch to thicken (don’t if freezing)
pureed tomatoes
And that’s all I got. He said that green chile is “peasant food” or something to that effect, and that he used to make and serve it in a restaurant where he cooked. He also said something about feeling okay to share the “recipe” with me because I live in the middle of nowhere, basically “who are you going to tell?” Ahem.
But, you know, I made this up as I went along, and I also added more ingredients, and completely improvised the method. So it’s not really like I divulged any big secrets here. I don’t think, anyway, given the end result.
I pulled a 5-pound package of pork loin ribs out of the freezer, but didn’t realize that they were not boneless, but that’s all I had. That’s okay, since I was cutting the meat up anyway, I just had an extra step of removing all the bones. Incidentally, the slab of meat wouldn’t fit into our microwave for defrosting, so I did it a different way: I stuck it into the biggest frying pan I have (it didn’t all fit, some was sticking over the edge), put a cup of water in the pan and perched the lid on top of the meat. I turned it on medium to sort of “steam-thaw” it until I could get the ribs apart and cut them into bite-size pieces. It worked pretty well, I just tried not to cook the meat very much in the process. It would be much easier with advance notice (instead of, “Do you think you could make dinner for us tonight? There are 14 of us”) and having meat that was thawed.
Yesterday, I used boneless country pork ribs that I had already thawed, so I didn’t have any pork “broth.” I just used all chicken broth instead.
And although this started out to be a somewhat “authentic” Chile Verde, it ended up being something quite different. I embraced the “peasant food” label and ran with it, boiling and straining the pork rib bones for broth, adding ingredients that we had in the pantry to extend the recipe when I didn’t think it looked like enough to feed 14.
It was a bit too spicy for the kids…If you’re concerned about it being too spicy, just leave out the can of jalapeños and reduce the cumin.

Don’t forget, this recipe serves 14 with some leftover. You can half the amounts of everything if you wish, although it’s sooooo good, I don’t know why you would. Also, I always always forget to add the tomatoes at the end. I’m going to go ahead and call them “optional.” =)

Min’s Pork Chile Verde Stew
serves about 14
Butter
Olive oil
5 pounds boneless pork ribs
1 cup flour
1 1/2 yellow onions, diced (about 2 cups)
2 carrots, peeled and cut in 1/4-inch dice
4 cans chicken broth (2 cans if using pork “broth”)
7 cubes chicken bouillon
4 4-ounce cans fire-roasted diced green chiles
1 4-ounce can fire-roasted diced jalapeños
6 to 8 red potatoes, washed and cut in 1/4-inch dice
1 can garbanzo beans
1 can whole kernel corn
1 tablespoon cumin (or to taste)
2 teaspoons Mexican oregano, crushed
1 can diced tomatoes (optional)
Kosher salt and freshly ground pepper to taste
Pour flour into a large ziploc bag. Cut pork into 1/2-inch pieces, add to ziploc bag, seal and shake to coat. Starting with two tablespoon each, add butter and olive oil to a large soup pot over medium heat. Remove pork from flour with a slotted spoon, and fry in butter and oil until golden brown and cooked through, stirring occasionally. Remove cooked pork to a plate, and repeat until all pork is cooked and on a plate, using more butter and oil as necessary in equal amounts.
Add diced onions to the pan, along with an additional tablespoon each of butter and olive oil, if necessary. Saute over medium-low heat until onions are translucent. Add carrots, stirring in and cooking for a few minutes. Add chicken and pork broth, and chicken bouillon cubes. Return pork to the pot.
Add everything else except tomatoes, salt and pepper, and stir well. Reduce heat to low, and simmer until potatoes are tender. Stir in tomatoes and warm through. Taste and adjust for spices, add salt and pepper if needed.
Serve with tortillas or crusty bread on the side and plenty of Corona.
Don’t forget to visit me at The Bad Girl’s Kitchen for more fabulous recipes!

Save Room for Dessert: S’mores Bars

Save Room for dessert new badge 
Hi there, Min from The Bad Girl’s Kitchen and Try A New Recipe filling in here today, with a DESSERT that everyone who has ever camped simply must try!
This recipe comes from Rebecca of Cooking With My Kid, who’s actually a friend of a friend of mine, and who is on a mission to make 365 recipes in 365 days, with her kid. Although I like cooking with my kids, I still think it’s an ambitious project.
When she posted this recipe, I knew I had to make these right away. Just Had To. After all, I’d bought all the ingredients for s’mores recently, but before we could make them someone ate all the Hershey’s bars. Someone else snuck half a bag of marshmallows. And who knows who ate most of the graham crackers. It’s just the way it works around here I guess.
Note: when opening a jar of marshmallow fluff at altitude, just for a “taste,” be prepared to immediately make your recipe because it will just keep expanding and you won’t be able to “taste” that much without making yourself sick. Just trust me on this.
I didn’t do the shopping yesterday, and to be honest my entire grocery list was this:
1 large jar marshmallow fluff
2 king-size Hershey’s Special Dark bars
1 box graham crackers
=)
I took Rebecca’s advice and planned to use dark chocolate from the start. So Number One brought home 4 bars of Hershey’s Special Dark, in two sizes. I’m guessing that the 4.25 ounce bar is the “king size,” but I didn’t come to that realization until I already had the “giant size” bars unwrapped and discovered they wouldn’t fit as neatly as Rebecca’s had in the pan. Oh well, we’ve got some extra dark chocolate to eat!
Now that I’m thinking about it, I can’t say I recall ever eating marshmallow fluff. I know that seems like blasphemy for a Midwestern girl like myself to admit, but I just don’t remember it in my life. Of course I’ve seen the jars around, and of course when someone took that little taste, it tasted like heaven, but it didn’t ring any bells. I didn’t remember the stickiness, or anything. I do love it though, so I think that makes up for my possibly faulty memory.


The verdict: These are very good, but dare I say it, with dark chocolate, I think you need to use MORE fluff. There, I said it. It really needs more fluff!! Next time, I will try it with milk chocolate, which is probably the more classic flavor, and maybe just a little extra fluff.

Let me know which chocolate YOU would use, and how you like them!

S’More Bars
Prep Time:15 minutes
Cooking Time: 30 to 35 minutes
Makes 16 squares
1 stick of butter, room temperature
1/4 cup brown sugar
1/2 cup sugar
1 large egg
1 teaspoon vanilla
1-1/3 cups all-purpose flour
3/4 cup graham cracker crumbs (~7 full-sized graham cracker sheets, processed until fine)
1 teaspoon baking powder
1/4 teaspoon salt
2 king-sized dark chocolate bars (*note: I believe “king-size” is 4.25 ounces. “giant-size” is too big, but will work if you use a little more than one bar. I know because we used “giant-size.”)
1-1/2 cups marshmallow creme/fluff
Preheat the oven to 350 degrees. Grease an 8-inch square baking pan. (I used butter). Use an electric mixer to cream together butter and sugars until light and fluffy. Beat in egg and vanilla. Set aside.
Meanwhile,whisk together flour, graham cracker crumbs, baking powder and salt. Slowly add flour mixture to the creamed butter mixture until combined. Divide dough in half and press half of dough into an even layer on the bottom of the prepared pan.
Place chocolate bars over dough. 2 king-sized Hershey’s bars should fit perfectly side by side.
Spread chocolate with marshmallow creme or fluff. Place remaining dough in a single layer on top of the fluff (most easily achieved by flattening the dough into small shingles and laying them together). Bake for 30 to 35 minutes, until lightly browned. Be sure to cool completely before cutting into 16 squares.
Don’t forget to visit me at The Bad Girl’s Kitchen for more fabulous recipes!

Try a New Recipe: French Dressing

Don’t forget to visit me at The Bad Girl’s Kitchen for more fabulous recipes!

This is a recipe from Julia’s Mastering the Art of French Cooking, which I made recently for my book club. I just downloaded the picture from my new camera, so I thought I’d post it over here–you saw it here first!

The vinaigrette is super simple and simply delicious! Honestly, you won’t believe how easy it is. Try it and see. I served Salad Composée avec sauce vinaigrette. [Mixed Salad with Vinaigrette]

I used red wine vinegar and the “optional” mustard and left out the herbs on accident! No need to “correct” anything at all. I stored this in the refrigerator overnight, pulled it out early to let the oil come back to room temperature, and shook it up right before I tossed the salad. Quick and easy.


Sauce Vinaigrette

[French Dressing]
For about 1/2 cup

For: salads and simple marinades
Salad dressings are always best when freshly made; if they stand around for several days they tend to acquire a rancid taste.

1/2 to 2 tablespoons good wine vinegar or a mixture of vinegar and lemon juice
1/8 teaspoon salt
Optional: 1/4 teaspoon dry mustard
6 tablespoons salad oil or olive oil
Big pinch of pepper

Optional: 1 to 2 tablespoons minced green herbs, such as parsley, chives, tarragon, basil; or pinch of dried herbs

EITHER beat the vinegar or lemon juice in a bowl with the salt and optional mustard until the salt is dissolved, then beat in the oil by droplets, and season with pepper, OR place all ingredients in a screw-top jar and shake vigorously for 30 seconds to blend thoroughly.

(guess which method I chose?)

Stir in the optional herbs and correct seasoning just before dressing the salad.

Cowboy Cookies

Don’t forget to visit me at The Bad Girl’s Kitchen for more fabulous recipes!
A couple years ago, I was looking for a good new cookie recipe, when this one appeared in my mailbox in an issue of Martha Stewart Living magazine. As luck would have it, they have coconut in them, and are appropriately-named for serving on a ranch, or anywhere. Delicious!

Cowboy Cookies
Makes about 5 dozen

The origin and original ingredients of this popular cookie may be unclear, but there’s no doubt it’ll spur a stampede. This version relies on oats, coconut, pecans, and chocolate for just the right chewiness and gooeyness.

Vegetable oil cooking spray
2 cups all-purpose flour
1 teaspoon baking soda
1 teaspoon salt
1/2 teaspoon baking powder
2 sticks (8 ounces) unsalted butter, softened
3/4 cup granulated sugar
3/4 cup light-brown sugar
2 large eggs
1 teaspoon pure vanilla extract
1 1/2 cups old-fashioned oats
6 ounces semisweet chocolate, cut into 1/4-inch chunks (1 cup)~I used 1 heaping cup chocolate chips
3 ounces (3/4 cup) pecan halves
1/2 cup shredded unsweetened coconut

1. Preheat oven to 350 degrees F. Coat baking sheets with cooking spray, line with parchment, and spray parchment. Sift flour, baking soda, salt and baking powder into a medium bowl.

2 Beat butter and sugars with a mixer on medium-high until pale and creamy, about 3 minutes. Reduce speed to medium. Add eggs, 1 at a time, beating well after each addition. Beat in vanilla.

3. Reduce speed to low, and slowly add flour mixture, beating until just incorporated. Beat in oats, chocolate, pecans and coconut until combined. (Dough can be refrigerated for up to 3 days).

4. Using a 1 1/2-inch ice cream scoop or a small spoon, drop dough onto baking sheets, spacing 3 inches apart.

5. Bake until edges of cookies begin to brown, 11 to 13 minutes. Transfer baking sheets to wire rack, and let cool for 5 minutes. Transfer cookies to racks. Let cool. (Cookies can be stored up to 3 days)