Orange zesty ICE CREAM! and you don’t need an ice cream maker


From Adam and Eve to Jesse James (the biker guy who cheated on Sandra Bullock, not the gun slinger), the human race has craved what it can not or should not have.  Me, I am in a tropical paradise.  Rum drinks are pouring every night, and life is pretty darn good…


Except…


I can’t get ice cream.  Surprisingly enough, ice cream is not sold as a dessert here.  Probably just too hot.  It is an effort to get to a store, and even more of an effort to get home from a store.  I do have a couple of those thermal carry bags, but they would not work for ice cream.  Some days it can take an hour or more to get home with my groceries.  It’s just not an option.


The funny thing is that I really am not an ice cream eater.  I may have a dish a couple times a year, but certainly not every day, week or month.


But ever since I got to the island, I have been craving ice cream.  Wouldn’t that be a fine treat for dessert… Cool and sweet… Just a perfect thing after a hot trip to the beach.  But, getting anything but ice cream soup home from a store was nearly impossible.  Getting ice cream while out to dinner was unlikely, and I did not have an ice cream maker.


But I did have an Internet connection and my favorite bloggers… Sure enough, first Mary from One Perfect Bite tweaked my interest, and then the partnership from High/Low Food/Drink posted a Myers Lemon recipe for Lemon ice cream, no maker needed!


You can read their post by clicking HERE.  


So, armed with their recipes, I was off and running.  I prefer Orange, so i adapted their recipe to make an orange ice cream…


And I do miss my zester that I left at home.  Even more after I sliced off a piece of my thumb while zesting my orange.  Feel free to insert your own “blood oranges” joke here.  But, I did eventually get some blood free zest, as well as the juice from two oranges.

I combined the juice of 2 oranges
zest from one orange
2 cups heavy cream (bought on special, less than $3 marked down from $5)
and just a bit of salt


and 1 cup of superfine sugar.


Now, that last bit was going to be a little hard.  I could not find superfine sugar.  So, again, thanks to a fellow blogger, I got the advice to put that cup of “regular” sugar in a mini food processor.  It worked just fine.


OK, here’s what I did…


I used my blender.  I put everything in except the cream and blended away.  I slowly added the cream while the blades were spinning at their lowest speed.  When I got about half the cream in, everything was well blended.  I poured the goop into a Tupperware bowl and added the final bit of cream.


It takes about three hours in the freezer for the cream to set up.  But it really takes over night for it to really firm up.

One last hint… I put a couple of bowls in the freezer at the same time.  We did have our ice cream on our deck, overlooking the ocean.  Everything stayed frozen.  You know how it gets sometimes with homemade ice cream, when it starts to melt too fast… The over night freeze, combined with the frozen bowl made for ice cream and not ice cream soup clear down to the last spoonful!


And my my my, was it just as good as I had hoped!


So, there you have it, my paradise got just a little better this week!


And as always, 

Who knew it was that easy!Dave here from MY YEAR ON THE GRILLAs always, I was SO surprised to learn that I CAN COOK THAT!!!

Give me a little taste of home, and stop by the comment section. Let me know you won’t forget me while I am gone!

Fully Loaded Potato Muffins

My favorite comfort food is potato. When I was a little girl and didn’t feel well, my mother would make me mashed potatoes and carrots. This was the ultimate in comfort food because it was associated with recuperation and feeling good. This is better than chicken soup and we all know that chicken soup is the ultimate or so they say.
Since, I was eating alone, I took two medium potatoes and baked them through in a 375 degree oven, after a thorough cleaning.
To my surprise, at the end of an hour, they were cooked through but the skin on one had a gaping hole in the skin. This is one dish that the skin is a must.
I was going to make one stuffed potato and just mash up the rest when I spotted a muffin tin. Change of plans. I was now making Fully Loaded Potato Muffins. These were delicious. The potato was filled with goodies and I even used Baco Bits since I don’t eat bacon. The end result were these adorable muffins that tasted like something the angels made. Are angels into spices?
Stuffed Potato Muffins
Ingredients:
2 baking potatoes
2 ounces sharp cheddar cheese
2 ounces sour cream
1/2 onion, chopped
1 teaspoon butter
1 teaspoon salt
1/2 teaspoon black pepper
1 teaspoon Worcestershire sauce (without fish)
1/4 cup Baco Bits
Method:
Clean and bake potatoes at 350 degrees for 1 hour.
Cut potatoes in half and remove the potato from the skins.
Put potatoes aside.
Preheat your oven to 375 degrees.
Chop onion and saute with 1 tablespoon butter until golden brown.
Grate the cheese and add 3/4 cup of it to the cold potato along with the sour cream.
Add onions and Baco Bits to the potato, with the salt, pepper & Worcestershire sauce.
Spoon the potato filling into the muffin tins.
Sprinkle over the remaining cheese, giving each potato skin a light covering, and cook for 20-30 minutes until golden.

For Passover recipes, please go to Comfy Cook and My Sweet and Savory.

Peanut Butter Strawberry Pancakes aka Peanut Butter & Jelly Pancakes

The following recipes were inspired by a recent impulse purchase by hubby of Strawberry Peanut Butter M&M’s which were actually pretty good. I figured with Strawberry season is on the way, it would be a good time to try these out.

Peanut Butter Feather Pancakes
1 cup flour
2 tablespoons sugar
2 tablespoons baking powder (this is what makes them feathery)
1/2 teaspoon salt
1 large egg
1/3 cup JIF Peanut Butter
1 cup milk
1 tablespoon butter, melted
  • In a large mixing bowl, sift together the flour, sugar, baking powder and salt.
  • In a small bowl, beat egg with Jif until blended. Stir in milk and melted butter.
  • Add all at once to the dry ingredients, beating until blended. Add more milk to thin batter if necessary.
  • Bake on a hot, lightly greased griddle until bubbles break on the surface. Turn and brown the other side.

Maple Syrup
1 cup white sugar
1 cup light corn syrup
1 cup dark brown sugar, packed
scant 1 cup water
1 teaspoon PURE vanilla extract
2 tablespoons maple extract

  • Combine all ingredients in a medium saucepan.
  • Bring to a slow boil.
  • Simmer gently 5 minutes.
  • Remove from heat and cool 5 minutes.
  • Store in refrigerator.

Peanut Butter Pancakes
1¼ cups flour
2 tablespoons sugar
2½ teaspoons baking powder
½ teaspoon salt
1¼ cups milk
1 egg
¼ cup peanut butter
3 tablespoons butter, melted

  • Combine flour, sugar, baking powder and salt.
  • Beat milk with egg.
  • Add peanut butter and butter until smooth.
  • Add to dry ingredients and beat just until well moistened. Add more milk to thin batter if necessary.
  • Lightly butter hot griddle.
  • Spoon by ¼ cupfuls onto griddle.
  • Cook until golden brown on both sides.

Peanut Butter Strawberry Pancakes
aka Peanut Butter & Jelly Pancakes


1¼ cups Flour
1 tablespoon baking powder
1/4 teaspoon salt
1/2 cup JIF Creamy Peanut Butter
2 tablespoon sugar
2 large eggs
1¼ cups milk
1 teaspoon vanilla
1/4 cup Strawberry Jam

  • Combine flour, baking powder and salt in large bowl.
  • In separate bowl, whisk together peanut butter, sugar, eggs, milk, and vanilla.
  • Stir wet mixture into dry ingredients, stirring until just combined.
  • Heat non-stick skillet over medium heat; brush with oil. Swirl half of jam into pancake batter.
  • Pour about ¼ cup of batter for each pancake into skillet.
  • Cook for 1½ to 2½ minutes or until underside is golden and bubbles break out on top. Turn and cook for 1 to 2 minutes or until underside is golden.
  • Repeat with remaining batter, spooning remaining jam into batter, and brushing skillet with more oil as necessary.

Simple Saturday – Garlic Rolls

Welcome to Simple Saturday!

Basic Dinner Roll Recipe

In bread maker (or you can do it the “old” way 😉
3 1/2 cups flour
2 teaspoons yeast
3 tablespoons oil
3 tablespoons sugar
1 teaspoon salt
1 1/3 cups water

Set bread maker on dough setting and press start. Grease 9×13 pan. When bread maker is done shape rolls, cover with a cloth and let rest (rolls should double in size). Bake 350 degrees for about 20-25 min.

Have leftovers? Stick them in the freezer and take them out on pasta night for Garlic Rolls.

Garlic Rolls

After defrosting, liberally brush with olive oil, sprinkle with lots of finely minced garlic, oregano, and finely grated Parmesan cheese bake until warm and crisp. Serve with pasta and salad – Yum!

Be sure to visit me over at Seaside Simplicity for more simple delicious recipes.

Have a great weekend!

How to make a Frozen Tropical Cocktail Like a Pro – Ala Year on the Grill


Greetings all…
Dave here from MY YEAR ON THE GRILL. Hope you are all enjoying the warming trends coming with spring.  Were I at home (Kansas), with temps in 70’s and spring and summer on their way, i would be planning my first outdoor party.  Still may be a little cool for a frozen drink, but now is the time to sharpen those skills for a real outdoor BBQ… Complete with a frozen Pina Colada, Margaretta or even these…

 Frozen Girl Scout Cookie…
They taste like a Chocolate Thin Mint Cookie,
really they do!


I have been making fun new drinks while I am spending my time in exile in the US Virgin Isles.  I also discovered an odd thing.  I like them frozen, like a milkshake.  My wife prefers hers straight up, over ice.  That is even odder when you consider the extra ice in a frozen drink waters down that alcohol, so hers is a stronger drink.  So, nightly, I have been breaking out the Rum bottles, and making different drinks.  I thought a little post on the basics of how to mix a drink (including frozen drinks) would be in order…
First, Any and all drinks can be made “frozen”.  Just add a cup of ice per drink and mix in a blender.
But, I am ahead of myself… let’s start with the straight up drink…
A straight up drink (or “neat”) is served room temperature.  Just assemble the drink, stir and serve.  Generally, Scotches and whiskey shots are served like this.  Very classy, very potent.


No tropical drink I know of is served straight up.  Most are served chilled, on ice or frozen.  So, here’s how do do that…

 have everything handy, assemble your ingredients, same as with a recipe.  It is even more important, as you are dealing with ice in a warm climate… work fast.For a GIRL SCOUT COOKIE, you need …A blender for frozen drinks, or a mixer for chilled and rocks drinksice
Creme de menthe
Creme de Cacao
Light Rum
Half and Half


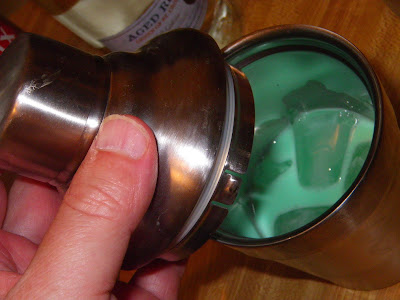
The formula for the drink is easy, 1 ounce of each of the 4 liquids, put 3 large ice cubes or 1/2 cup crushed ice into a cocktail shaker (shown).  add the drink mix, top the shaker (be sure to put the cap over the strainer before you do the next step…)


And Shake, Shake, Shake…Warning, don’t do this with a carbonated ingredient (like rum and cokes).  Those type drinks get a stir stick.


Pour into a chilled glass and your “chilled” GIRL SCOUT COOKIE is ready to serve.  The built in strainer in the cocktail shakers will strain the drink over the ice for one last chilling, without any ice ending up in the drink (and deluding it).
If you would like to add 3-4 ice cubes, a “chilled” GIRL SCOUT COOKIE now becomes a GIRL SCOUT COOKIE “on the rocks”.


To make a “Frozen” GIRL SCOUT COOKIE”, put the liquid ingredients into a blender (Any blender made in the last 5 years should have an “Ice Crusher” setting, if yours doesn’t, time for an upgrade… I just bought a new one for $25).  On top of the liquid, add 1 cup of ice…


And blend away until you reach a smoothie or milkshake consistency.  You may need to add a little extra ice, or a little extra liquids.  It is best to add extra of the non alcoholic mixer if you need to add liquid (in this case, the milk).


And here they are… Jackie got her’s on ice, I got mine frozen and we enjoyed a recap of our day on our deck over looking the ocean.
If you would like, go ahead and check my sister website, A KANSAS FOODIE IN THE VIRGIN ISLANDS, where I have posted a dozen different recipes for drinks that can be served up, on ice or frozen.  Drinks like Pina Coladas, Banana boats, Frozen Mudslides and  my wife’s current favorite, A DIRTY ARNIE…
All of these drinks are incredibly easy and will be a star at your next back yard party (or for a welcome home to your husband… just because it is Thursday and you want to recap your day on your own piece of paradise).
Really… Think about it… greet your husband with a Dirty Arnie and who knows how the conversation will turn out.
See you next week
Dave

RED VELVET CUPCAKES

It seems to me that whatever blog, you visit, you will find red velvet cakes or cupcakes. There must be a reason for this and there is one. They are good and they are attractive. I made the executive decision that this blog must have one, also. Watch, someone is going to tell me, there is already one but all I know, if there is, I have not seen it.

I used The Sweet Melissa Baking Book for my recipe. This is a great book to have, almost as good as Dorie’s. She has lots of recipes and gives lots of tips to make our baking better.

I knew, there was no way, my family was going to eat this cake, the way it was supposed to be eaten, with frosting. Remember, the frostless gang….my guys. Some of the married ones might eat it but then they will look at the red and want to know what mistake I made.

As a result, I made plain red velvet cupcakes and gave them to my class. I made 8 cupcakes, 1/3 of the recipe and we cut them up to share. Even, I got a piece. Actually, it was very good. I would have liked the frosting and so would have the boys. They are lucky, I didn’t make them gluten free.

This was an easy recipe. The only challenge, I think, was how to get it to the right red. Mine look brownish red although my photos came out real red. Go figure. I have one that looks like the true color.

For the Cake Ingredients:
3 3/4 cups all-purpose flour
3 tbsp best-quality unsweetened Dutch-process cocoa powder
2 tsp ground cinnamon
1 1/2 tsp baking soda
1 tsp salt
1 1/2 cups buttermilk
1 1/2 tsp vanilla extract
2 1/4 cups sugar
1 1/2 cups vegetable oil
3 large eggs
1 1/2 tsp red wine vinegar
2 tsp red food colouring

For the Classic Cream Cheese Filling and Frosting:
12 ounces cream cheese, softened
3 cups icing (confectioner’s) sugar
3 sticks unsalted butter, softened
2 tsp vanilla extract

Method:

Before you start position a rack in the center of your oven. Preheat the oven to 350F. Line cupcake tins.

Cake

In a medium bowl, whisk together the flour, cocoa, cinnamon, baking soda and salt.

In a small bowl, whisk together the Rice Milk and vinegar and vanilla.

In the bowl of a mixer fitted with a whip attachment, cream the sugar and oil.

Add the eggs and beat well.

Add the vinegar and food colouring and mix to combine.
Add the flour mixture to the batter in three batches, alternating with the buttermilk mixture. Mix well after each addition. Scrape down the sides of the bowl. Beat well for 10 more seconds.
Divide the batter evenly between the cupcake tins. Bake for 25 – 30 mins or until a wooden skewer inserted into the center comes out clean. Remove to a wire rack to cool for 20 minutes before turning out onto a wire rack to cool .

Please stop by and chat at Comfy Cook and Sweet and Savory. Have a wonderful week.

CHEESECAKE APPLE CRISP


Hi, Tamy here filling in for Save Room for Desserts.
Don’t forget to add your link on the sidebar!
CHEESECAKE APPLE CRISP
CRISP
2-3 large Granny Smith apples (4 Cups chopped)
1/2 cup brown sugar
1 tablespoon flour
1/2 cup milk
1/4 cup apple juice
TOPPING
2/3 cup flour
1/2 cup old fashioned oatmeal
1/4 cup sugar
2 teaspoons cinnamon
1/2 cup butter, melted
1 small box cheesecake flavored instant pudding
  • Preheat oven to 350°.
  • In a large mixing bowl combine all CRISP ingredients and mix well. Pour into an un-greased stoneware pan.
  • In a mixing bowl combine the topping ingredients and mix until crumbly.
  • Sprinkle topping over apple mixture.
  • Bake 45-60 minutes or until apples are tender and topping is crisp and golden.
  • Serve warm with a scoop of French vanilla ice cream.

Simple Saturday – Hasselback Potatoes

Welcome to Simple Saturday!

Today I have a fun simple side for you …

Hasselback Potatoes

Scrub baking potatoes

Stick metal skewers through the bottoms lengthwise
(so you won’t accidentally cut all the way through the potato)

Cut thin slices all the way along the potatoes

Rub with olive oil

Slather tops with butter, minced garlic, and parsley
(I don’t think the original version had garlic – I’m Italian, everything has garlic!)

Bake just as you would a baked potato

Wouldn’t these look pretty next to a nice steak and some greens?
Eat and enjoy!

Visit me over at Seaside Simplicity for more simple recipes.

Have a great weekend!

Piña Colada Dip – A taste of the Caribbean ala Year on the Grill

OK, you thought of it when you read the title, may as well go ahead and click the play button and hum along while you read the post…

I love food.  I love recipes and I love bloggers that put it out there everyday.  I am not the kind of person that writes about a recipe that fails, I will usually find something positive about that recipe that I can talk about with out bringing up negative aspects.  I am just a positive fun loving guy.

So, having said all that, when I do come across a recipe that will change my life… Well, my eating life anyway… I am often at a loss for words for how to convey how much a recipe DOES succeed at every level.  This is one of those recipes that is so simple, yet so perfect in every way…

Low calories
Very healthy
But best of all, incredibly tasty!

First, credit is due COOKING TIP OF THE DAY where I saw this recipe earlier in the week.  I happened to have had everything I needed handy and a variety of fresh vegetables suitable for Linda’s dip.  If you check original post of the recipe (HERE), you will read that Linda recommended this for fruit (pineapple, bananas, apples, etc.).  This would make a GREAT dessert.  But I used it as a substitute for vegetables.  Either way, I can not hype this treat too much…

here’s what I did…

1 low fat Vanilla Yogurt
2 TBS shaved Coconut (toasted)
1 TSP Flavored Rum (Pineapple, Coconut, Black Cherry, Banana or in this case… Mango)
Raw vegetables cut for dipping… Carrots, Celery, Bell peppers, Mushrooms… Whatever happens to be in your fridge).

Toast the coconut by placing a thin layer of coconut on a sheet of parchment paper.  I put this under the broiler for just 3-5 minutes.  Keep an eye on it, fine line between toasted and burnt.

Mix 1/2 the coconut with the rum and yogurt, add the remaining coconut on the top to look pretty.

Dip and serve and you will lick the bottom of the bowl.

I have eaten pretty good on the island since I have arrived.  My cooking, as well as two or three restaurants a week… No exaggeration, this is the best thing I have eaten on the island.

In fact, next night I made almost the same thing…


Except I made the dip with Black Cherry Rum… Yum!


And as an aside, I came across a store that sells those rotisserie cooked chickens.  You’ve seen them, most larger stores seem to have them these days, certainly Wal-mart, Sam’s Club, etc. sell them.  I just sliced a few hunks of meat and served that with the veggies and dip.  A wonderful lower cal dish (I know, i could have taken the skin off, but it tastes sooooo good!).

I actually have two asides… First, imagine this dip with a peppery hot spicy chicken wing.  heat and sweet, a great combination.

And second, even here on the island where everything is expensive, the whole COOKED and very tasty chickens are only $6 and a raw uncooked chicken is $9… Does anyone have a reason???


Don’t be afraid of the rum, there is only 1 teaspoon… Just enough to add a bit of za za zing.

Thanks Linda, GREAT recipe idea.


I have been on island now for nearly three weeks, and all is going very smooth.  I am updating three blogs now with my adventures.  One is a scrapbook type with almost no wording, and just a bunch of photos from my day.  Yesterday I went snorkeling out my back door (beach is only 30 yards away).  Come see my photos I took of all the pretty fishies… 

FISH EVERYWHERE! Snorkeling out my back yard

I also have a blog that is featuring more Caribbean food ideas.  Right now I am trying to greet my hard working wife at the door at the end of her hard day with different frozen drinks, so I have done several posts on them lately.  As well as restaurant reviews and exotic ingredients…

A Kansas Foodie in the Virgin Islands


And as always, 

Who knew it was that easy!
Dave here from MY YEAR ON THE GRILLAs always, I was SO surprised to learn that I CAN COOK THAT!!!

Give me a little taste of home, and stop by the comment section. Let me know you won’t forget me while I am gone!


Oh, and one more update and question before I leave you all for a week –


Just in case you all think i am turning into a rummy since I landed, I have started (and kept up with) a 90 minute a day walk/explore the island, 10,000 aerobic steps a day diet (no change in food intake, but the theory is that if you walk 10,000 steps a day, you will lose weight).  I do not have a scale, but all the clothes I brought are fitting better.

But I do wonder, Does this Ass make my my Donkey look fat???  This was taken after I walked 3 miles ALL UPHILL to the highest lookout spot on the island.  the sweat stains were not photoshopped in.

See you all in a week!

Chocolate Obsession Spotlights Tanya

Tanya, as February’s star made this delicious but what appears to me, to be a bit labor intensive, but fun, to make dish.  Who could turn down chocolate and strawberries.  To find out how to make this gem, check out Tanya’s blog.

Please, come on over to Sweet and Savory and link your favorite chocolate recipe up at Chocolate Obsession.  We will spotlight another foodie, for March.

The winner for February who will be in the spotlight, tomorrow, under Cooking with Chaya, is Tanya of A LA GRAHAM with her fabulous ………….

CHOCOLATE BOWLS WITH CHAMBORD WHIPPED CREAM & BERRIES

Meatloaf with a BIGGER Kick, & Avocado Stufffed Cheddar Jalapenos

MEATLOAF WITH A BIGGER* KICK
2 pounds hamburger
2 Jaapenos, chopped fine
1 bunch green onions, sliced thin
3 cloves minced garlic
1 jumbo egg
1/4 cup chili sauce
1 tablespoon Better than Bouillon Beef Base
1 Tablespoon creamy horseradish
1 sleeve Townhouse crackers, crushed
1 teaspoon sea salt
1/2 teaspoon white pepper
  • Mix all ingredients together thoroughly
  • Use a tall loaf pan
  • Bake 45 minutes at 350 degrees or until edges are browned and crisp
  • Immediately pour off excess grease
  • Enjoy

*You can see my original Meatloaf with a KICK recipe here.

AVOCADO STUFFED CHEDDAR JALAPENOS
12 large Jalapenos
2 ripe avocados
1/3 cup sour cream
salt and pepper to taste
12 slices aged cheddar

  • Preheat oven to 350 degrees.
  • With gloved hands clean and seed the Jalapenos
  • Mash avocados.
  • Mix avocados, sour cream, salt and pepper until well blended.
  • Fill each Jalapeno.
  • Bake 30 minutes.
  • Top with Cheddar and bake 5 minutes more.


TIP: The chemical capsaicin, the component that makes peppers and chiles hot, is a tricky one. Drinking water does not relieve the burn. Capsaicin bonds with fat, so cream, whole milk, yogurt, and other creamy things are your best antidote. If you’re cutting chiles you can prevent irritation by coating your skin with oil before you start working with the chiles, or wearing gloves for chopping.

Cooking The Italian Way – Risotto

You want to know how to make a room full of southern Italians (Sicilians no less!) become. Completely. Quiet.

We’re talking pin-dropping silence here. Tension so thick you could cut it. With a scalpel. (Oh, anatomy lab. It all comes back to you now, doesn’t it…)

I don’t know if you’ve ever met a Sicilian before. But we’re not exactly known for our indoor voices. Imagine a construction crew. Blasting TNT. Outside your window. That’s the volume that my father speaks at. In normal conversation.

So this is no easy feat.

Unless of course. You know the magic word.

Risotto.
Risotto is a northern Italian dish you see. And southern Italians? Don’t get along very well with northern Italians. So when you tell your Sicilian family that you’re making risotto for dinner. It doesn’t always go over so well.

There may be yelling and screaming. But most likely. There will be silence. Because they are so mad that words just don’t suffice (that’s the irony of this whole being loud thing. They are loud when they’re happy. Loud when they’re angry. And silent when they’re livid.)

So then you sit them down. And explain to them that we live in a modern world. A world in which everyone should live in peace and harmony, with no animosity towards anyone else.

They may look at you skeptically. They may be seething with rage. There will probably be sighing. And head shaking. (What did we DO to raise a daughter like this?)

But they love you. And so they sigh. And begrudgingly agree to eat the risotto. That you have stood over the stove cooking for the past thirty minutes. Stirring. And stirring. And stirring. (Why hello carpal tunnel syndrome, how nice to meet you!)

So you sit down to eat. And what ensues? Is more silence. Because they are eating. And eating. And eating. And eating.

Whoever said that food heals all wounds. (Yes I totally took creative license with that idiom. Time is nice. But food is better.) Definitely knew what they were talking about it.
So here are two of my favorite risotto recipes. You can make them with arborio rice. Which is the traditional way to do it. I usually use orzo because it’s less expensive and more readily available. The directions are the same either way and the end product is equally as delicious!

Orzotto with Leeks and Sun-dried Tomatoes
Serves 4, adapted from Williams-Sonoma Risotto

8 cups broth
2 tbsp olive oil
3 leeks, white parts only
1 yellow bell pepper, seeded and diced
1 lb orzo
1 cup dry white wine
1/2 cup sun-dried tomatoes, julienned
2 tbsp butter

Bring the broth to a simmer. Heat the oil.

Saute the leeks and the pepper until softened (season with salt!), about 4 minutes. Transfer to a bowl.

Add the orzo to the pan and saute for 1-2 minutes, stirring constantly. Add the wine. Cook on medium heat until the wine is almost evaporated, stirring constantly. Add in the simmering stock a ladleful at a time, each time waiting until it is almost all evaporated to add the next ladle.

Stir. Constantly.

When the orzo is tender, stir in the leek/pepper mixture and the sun-dried tomatoes. Cook to heat through. Remove from the heat and stir in the butter. Season to taste with salt and pepper.

Orzotto with Spinach
Serves 6, adapted from Williams-Sonoma Risotto

7 cups broth, lightly simmering
1 tbsp olive oil
1 onion, chopped into small pieces
1 lb spinach, chopped
3 cups orzo (or arborio rice)
1 cup dry white wine
2 tbsp butter
3 tbsp parmesan cheese
salt and pepper, to taste

1. Heat 1 tbsp of olive oil. Add the onion and saute for 4 minutes. Add the spinach, reduce heat to low, cover and cook for 4 minutes. Using a slotted spoon, transfer the spinach to a bowl. Leave as many of the onions as you can.

2. Add the orzo to the pan and saute for 3 minutes. Add the wine and stir until absorbed. Add the stock one ladleful at a time, constantly stirring and only adding the next ladleful once the previous one is almost evaporated. Do this until the orzo is cooked. Then stir in the spinach, butter, and parmesan cheese. Add salt and pepper to taste.

Happy eating! And feel free to check out more Italian recipes on my blog.