Salisbury Steak is an oldie, but goodie classic dinner in our household. But, it’s also a blank and adaptable canvas for updating flavor profiles.
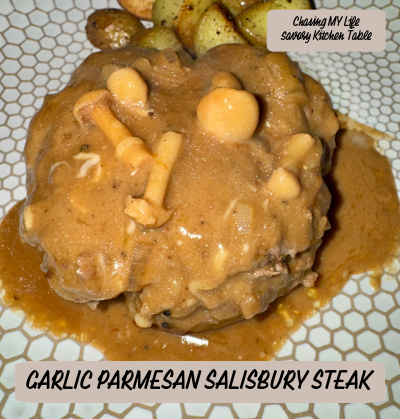
GARLIC PARMESAN SALISBURY STEAK
HERBED GARLIC BUTTER
½ cup of fresh chopped herbs (thyme, sage and/or parsley)
2 tablespoons salted butter at room temperature
1-2 garlic cloves, FINELY minced
FRESH salt and black pepper, to taste
- In a small bowl, combine the herbs, butter and garlic, and FRESH ground sea salt and black pepper, to taste.
- Refrigerate until ready to plate.
SALISBURY STEAK
1 pound QUALITY ground beef
½ cup Panko breadcrumbs
2 tablespoons Ketchup
1 LARGE egg
1 teaspoon garlic powder
1 teaspoon onion powder
FRESH ground Pink Himalayan salt and black pepper, to taste
3 tablespoons salted butter
8 ounces Beech mushrooms, trimmed and separat3ed
1 Shallot, FINELY diced
2 tablespoons WONDRA flour
1 cup dry white wine (Pinot Grigio or Sauvignon)
2 cups homemade beef broth
⅓ cup heavy cream
⅓ cup FRESHLY grated Parmesan cheese
2 teaspoons Dijon mustard, optional
Mashed potatoes with herb garlic butter
CRUSTY bread for sopping
- Combine the ground beef, Panko crumbs, ketchup, garlic powder, onion powder in a large bowl and season to taste with salt and pepper.
- With your hands, gently mix to incorporate all ingredients.
- Divide the mixture into 4 equal sized balls, and pat each into a ¾ inch thick oval-shaped patty.
- Melt 1 tablespoon of the butter in a large skillet over medium-high heat.
- Add the patties and cook 2-3 minutes on each side until browned. Transfer the patties to a plate.
- Melt another tablespoon butter in the same skillet and deglaze over medium-high heat.
- Add the mushrooms and shallots, cooking and stirring often, until the shallots are softened and the
mushrooms caramelized. - Stir in the flour and remaining butter, cooking 1 minute until completely incorporated.
- Whisk in the wine and cook 3-4 minutes until it is reduced by at least half.
- Add the broth and cook another 5-6 minutes until it is again reduced by at least half.
- Add the cream, Parmesan, and mustard (if using), whisking a minute or so until incorporated.
- Reduce the heat to medium-low.
- Return the patties back into the skillet along with any collected juices.
- Spoon the sauce and mushrooms over the steaks.
- Cook until the sauce thickens around the patties to your desired thickness.
- Plate the steaks over mashed potatoes, spooning more gravy over the top.
- Serve with crusty bread to soak up the sauce.