APRICOT PINEAPPLE MONKEY BREAD

APRICOT PINEAPPLE MONKEY BREAD*
BREAD
1 cup scalded milk
1/2 cup shortening
1/2 cup sugar
1teaspoon salt
1/2 cup golden raisins
1/4 cup rum
1/2 cup minced walnuts
2 packages dry yeast
1/2 cup warm water
2 Jumbo eggs, beaten
4 1/2 – 5 cups flour
TOPPING
20 ounce can crushed pineapple, drained well
4 tablespoons butter
1/2 cup light brown sugar, super firmly packed
1/2 cup apricot pineapple preserves**
1/2 teaspoon almond extract
1/2+ teaspoon cinnamon
1/2 cup golden raisins*
1/4 cup rum*

  • Soften the yeast in the warm water.
  • Stir together the sugar and cinnamon and set aside.
  • Soak the raisins in the rum until needed. Drain before adding to the bread.
  • Combine the milk, shortening, sugar and salt. Cool to lukewarm.
  • Add yeast to milk mixture and then the eggs, the raisins and nuts.
  • Add the flour. Mix to a soft dough.
  • Knead on a lightly floured surface until smooth and elastic. Place in a greased bowl. Turn over once, cover with a cheesecloth and let rise until double in size.
  • Punch down and let stand ten minutes.
  • Prepare the topping while the dough is standing.
  • Melt the butter in a saucepan.
  • Add the preserves, brown sugar, cinnamon and almond extract. Cook until smooth and fairly thin.
  • Add the pineapple (and raisins if you’re using refrigerator rolls) and heat through.
  • Roll into many small balls about the size of golf balls.
  • Grease a Bundt cake pan. (I like to use my pineapple upside down cake pan.
  • Arrange a layer of the balls haphazardly in the cake pan.
  • Dribble about half the topping loosely over them.
  • Arrange the other half of the dough balls.
  • Pour remaining sauce over top.
  • Allow to rise until double in size (about 1 1/4-1 1/2 hours)
  • Bake at 350 degrees for 35-45 minutes.
  • Enjoy

*You can cheat and use 3 cans of refrigerator biscuits instead if you’re in a hurry. If you still want the raisins you can add them to the topping instead.
**You can use pretty much any flavor you want – I also use raspberry, peach and blackberry depending on my mood. A lot of times I combine the peach and blackberry half and half.

BREAD – And YOU can make That Loaf ala Year on the Grill

Greetings! Here’s another YOU Can Cook That post when it should be I can Cook that. BTW, hi again, Dave here from MY YEAR ON THE GRILL. The resident cook in training. Today, I am addressing only one blogger out there (but I suspect there are other bloggers who have not baked a loaf of bread on their own). So this post is directed at Lea Ann of MANGOS CHILI and Z. However it is dedicated to all those “want to be” bread bakers out there.

Now, on my own site, I joke that I am a master baker. Truth is, I have about a dozen loafs of bread under my belt, several trays of rolls and I regularly make hamburger buns, but I am far from a master baker. But, as I have said before, whenever I tackle a project, I do a great deal of research. So what I lack in actual experience, I make up for in book learnin’. I think I can help Lea Ann with her bread baking issues.

Her first issue is that her loafs were chunk hard. In her words, a brick.

You see, she recently was gifted a Kitchenaid mixer. WHOO WHOO! what a great gift! HOWEVER, it has a flaw. The flaw is that Lea Ann believed it’s hype. While it is great for mixing, and with the “dough hook”, it advertises itself as doing the kneading for you; in my opinion, I am going to guess that the kitchenaid over kneaded the dough. Too much kneading will cause the bread to be too hard. So, one suggestion, let the dough mix in the kitchenaid, but do the kneading by hand.

Next, she suggests that the dough does not rise.

OK, a couple of solutions. First, are you premixing the yeast in water. Just a little so that it is dissolved does the trick. And, if you are (as you should), be sure that the water is only luke warm. Just a shade above skin temperature, but not uncomfortably warm. Pee warm if you will (but don’t ask me how I know how warm pee is). If the water is too warm, the yeast will die and nothing will rise. Book says about 105 degrees, but no more than 110.

But yeast dough does rise best in a warm area. I keep the heat turned down in the house while my wife is away at her inconvenient day job. So, I need to find the warmest spot in the house to set my dough in while it is rising. Especially on cold days, I like to preheat my oven while my bread rises, and I set the rising dough on top of the stove. With the dough covered, this is by far the warmest spot, and I always get a great rise out of the dough. OR, you can just let the dough rise longer. Dough will rise in a refrigerator if you leave it long enough. Just because the recipe says to let it rise an hour does not mean it will hurt to let it rise three hours.

Another suggestion for Lea Ann is to do a second rise. That is, to do the initial rise, take the dough and hit it hard with a fist. the dough will partially collapse again. then, form the dough into the final product (a dome, a loaf or rope… or whatever). Place the dough on the baking surface, and return to that warm spot and allow to rise again. This second rise will be the one that adds bubbles and tenderness inside the loaf (making it soft).

And finally, to get a more crisp crust, that seals in moisture, take a cup of ice and dump that into the bottom of your stove as the bread is baking (at the beginning of the bake only). The steam will help to seal the crust faster and keep the moisture inside the loaf.

OK, as I promised Lea Ann, I have a wonderful no fail recipe for bread. When hunting for a “standard” bread recipe, I asked for a bit of advice from my favorite blog buddy, Mary from ONE PERFECT BITE. I was a bit surprised when she explained that she does not have a recipe of her own, but uses one from another blogger. Surprised until I found the site of said blogger. These are the famous Moomie’s Buns (I dream of having someone name buns after me one day, but I digress). If you google “Moomie Buns”, you will find about 212,000 links. I initially blogged this on my own site when I made Hamburger buns. Now that I am posting here, you can count at least 212,002. Click HERE to get to my post on hamburger buns.


So, Here’s my Moomie recipe…
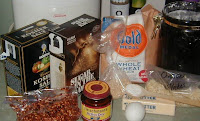
� 1 c water
� 2 tbsp butter or margarine

� 1 egg

� 3 1/4 c. flour

� 1/4 c. sugar

� 1 tsp salt

� 3 tsp instant yeast

� Place all ingredients in your bread machine. Select dough. Allow to run cycle.

Now, I have heard that Lea Ann does not have a bread machine. when I learned that, I had already made my loafs for this post. But, it is easy to do what a bread machine does on the “dough cycle”. Just add all the ingredients together in you kitchenaid bowl. Mix until it just forms a ball. Do not over mix.

Then, knead the dough into a ball shape, coat with a bit of oil and allow to rise for at least an hour, until it has doubled in size.

Punch the ball and allow it to collapse a bit (this is all a bread machine does on “dough cycle”).

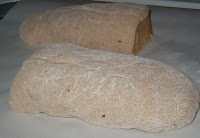
� Dump out onto lightly floured surface. form into bread shape, or cut and form into bun shape. Place on greased cookie sheets or your bun pans, cover; rise about 30 to 40 minutes. Bake in preheated 375 degree oven for 12 to 15 minutes til golden. Cool on wire racks.
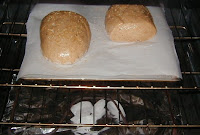
I cut them into two loaf size, a little on the flat size, I was going to make Cajun Po’Boy sandwiches, so wanted that size.

OK, in the spirit of the original recipe, i made a few additions…

I added…

1 teaspoon of Garlic Powder
1 teaspoon of onion powder
and for an extra kick,
1/2 teaspoon of red pepper flakes!

This recipe is wonderfully adaptable. Add fresh herbs, a little cheese or what have you, and it should work fine. I never make the same loaf twice.

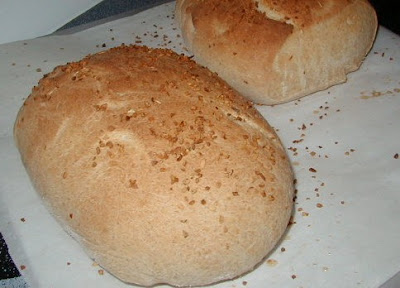
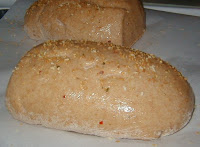
I also brushed the bread with some melted butter prior to baking and sprinkled some onion and garlic flakes on top of the loafs.

I bake bread on a cookie sheet, on parchment paper. Works great for me.

I wanted to include a picture of the ice cubes in the bottom of my oven as the bread was first going into the preheated oven.

It sounds so odd, but it does work to have some steam in the oven.

Lea Ann… You can do this, this recipe, this process has never failed me. There is something primal in making your own bread, knowing what you want to do with it and shaping it accordingly. Once you have some success, you will go crazy as a baker. ALMOST as satisfying as cooking over live fire… but just almost.


And look what I CAN COOK…

Shrimp Po’Boys, and plantain fries…

Come take a look at my site today for the Plantain recipe. and I will post the Po’Boy recipe tomorrow on my site…

See you all next Thursday!

Dave here from MY YEAR ON THE GRILL.

And if anyone else has any suggestions for Lea Ann, drop her a comment here!

Pina Colada Bread Pudding ala My Year on the Grill

Hello foodies! Pina Colada Bread Pudding… It just sounds rich and decadent doesn’t it!

Oh, BTW, Dave here from MY YEAR ON THE GRILL. The resident cook in training that you may recognize from OUR KRAZY KITCHEN. Today is an exciting day for me, and Tamy has agreed to let me do a guest spot on her blog in honor of my special day. You see, the suburbs of Kansas City is hip and happening in a far out way, last night, my neighborhood celebrated “Mardi Gras in the Cul de Sac”! Counting drinks, 13 menu items, to feed 10 people… Laissez les bons temps rouler indeed! I got to spend the day cooking, have fun with my friends, and my proposal to take part in the 24,24,24 FOODBUZZ challenge was accepted. I want to thank Tamy for letting me make an extra post to her readers to tell you all about an amazing CAJUN inspired dessert, perfect for your Mardi Gras party, or if the gods are in alignment, perfect for your Superbowl party featuring the New Orleans SAINTS (as I write this, the Saints are one game away from a birth in the big game)!

I have been in love with all things Cajun, and the food of New Orleans for a very long time. This year, my wife and I vacationed in New Orleans, and we took full advantage of an amazing business there…

THE NEW ORLEANS SCHOOL OF COOKING is the best bargain in town. For three hours, you learn the history of the city, you get fed lunch and you learn to cook a complete three course Cajun/Creole meal. We were in town for 5 days, and we took three classes, each day learning different menus. Every one’s favorite was bread pudding.

At the school, we were given a basic bread pudding recipe. We were also given some suggestions about what you could add to make it your own…

Here’s what I did.

First, assemble your ingredients…

This took just a bit of advance planning. Stale bread works best for bread pudding. the more moisture in the bread, the less it is able to absorb the liquid ingredients. The more the bread absorbs the liquid, the more custard like your pudding will be. So, 4 days ago, I baked a loaf of french bread, just so I could leave it out to get stale. You can read about my bread baking experience by clicking HERE.

The ingredients you need are…

  • 1 loaf stale french bread, shredded (6-8 cups)
  • 4 cups buttermilk
  • 2 cups sugar
  • 1 stick (8 TBS) butter
  • 4 eggs
  • 2 TSP vanilla
  • 1 cup shredded coconut
  • 1 can crushed pineapple, drained
  • 1 cup whole pecans
  • 1 cup white chocolate chips

Combine all the ingredients in a greased 9X12 casserole dish. Mixture should be very moist, but not soupy.

Bake at 350 degree oven for @1 hour 15 minutes until top is golden brown. Serve warm with whiskey sauce.

WHISKEY SAUCE
(can be made “virgin” by leaving out the whiskey)


Ingredients:

  • 8 TBS butter (one stick
  • 1 1/2 cup powdered sugar
  • 2 egg yolks
  • 1/2 cup bourbon

Cream butter and sugar over medium heat til all the butter is absorbed. Remove from heat and blend in egg yolk. Add bourbon to your taste, stirring constantly. The sauce will thicken as it cools.

Pour this over the bread pudding and serve everything warm.

If you should be lucky enough to have any leftovers, pop a slice into the microwave for about 30 seconds and it is even better the next day!


We also served a Cream Cheese King Cake for the party, but that’s a story for another posting.

The cake was just as good as it sounds. Sweet, filled with custard and different textures, from the crusty bread on the top, the soft custard bread inside and the crunchy pecans, with hints of pineapple, coconut and white chocolate in every bite. And the whiskey sauce doesn’t hurt either!

So, thanks Tamy for letting me hangout with your friends today. Start planning your Superbowl party or Mardi Gras event today. This Pudding Cake will be welcome at either!

BTW, if you would like to learn more about the NO School of Cooking, you can read my blog post about the school by clicking HERE.

Come take a look at my site today. I will have plenty to post about all the different foods… Everything that worked great (and maybe a couple that I need to revisit later). And see you all Thursday over at OUR KRAZY KITCHEN!

Dave here from MY YEAR ON THE GRILL. ..

aprons 3

2nd Annual Bread Round Up

It’s FINALLY time? Are You Ready? Here are a few recipes to whet your appetite & inspire you. Click on the badge for more details. All regular posts will appear directly below this round up for the next 2 weeks.

When participating, please use common blog etiquette and courtesy by linking your participating bread recipes back to Joy of Desserts and 3 Sides of Crazy, and visiting the other participants.

TIPS for GREAT Bread Making

  • Always keep flours in airtight, moisture proof containers.
  • Once cooled, always store breads in airtight bags in a cool dry place.
  • When freezing bread, always cool first and do NOT frost or decorate. Wrap them first in airtight plastic and then foil. Store no more than 3 months.
  • To warm breads, wrap bread in foil. Place in 350 degree oven for 15-20 minutes.
  • Dark flours such as rye ore whole wheat have less strength and should be mixed with bread flour for better results.
  • Always cool breads fully before slicing. For best results use a serrated knife or electric knife for even slices.
  • Kneading is a very important part of the bread making process. Kneading develops the protein structure which in turn produces higher volumes.
  • Flavor and texture improve by allowing the dough to double in the size. Be patient.
  • Allowing the dough to “REST” for 15 minutes also helps to achieve the desired volume.
  • The true test for doneness is when the loaf sounds hollow!
  • Remove from pans immediately and cool on wire racks to prevent them from becoming soggy.
ADOBE BREAD A Native American bread made by the pueblo-dwelling Indians of the Southwest and baked in the adobe ovens common to their dwellings. The bread’s made from unbleached flour, salt, yeast, water, lard or shortening and sometimes sugar and/or eggs. A hot fire is started in the adobe oven and allowed to burn out. The ashes are immediately removed and the bread is then baked. This crusty bread of the Pueblo Indians is still baked today in beehive shaped ovens. The round loaves are often decorated with symbols for special occasions.
2 cups whole wheat flour, medium grind
1/4 cup fine white sugar
1 tablespoon instant yeast
1/4 cup vegetable shortening or vegetable oil
2 cups warm water, 100-110 degrees
3 – 4 cups unbleached bread flour (preferred) or all-purpose flour
2 teaspoons salt (fine sea salt preferred)

MIXER METHOD:

  • In a large mixing bowl, place whole wheat flour, sugar, dough enhancer if using, yeast and shortening; use the paddle attachment to mix on low speed until well-combined.
  • Add warm water and beat for 1 minute or so.
  • Stir in 3 cups of bread flour and mix on low speed until the dough forms a soft ball.
  • Change to the dough hook and knead on medium speed about 5 minutes, adding only enough additional bread flour to make a manageable dough. The dough should have pulled away from the sides of the bowl but can still stick to the bottom of the bowl.
  • Turn the dough out onto a floured board let it rest 10 minutes, covered with a towel.
  • Knead the dough an additional 4-5 minutes or until the dough is soft and pliable, tacky but not sticky.
  • Place in lightly greased bowl, cover with plastic wrap and let rise at room temperature (72 deg.F.) 45-60 minutes or until doubled in bulk.
  • Spray a large baking sheet with PURE and set aside. Gently deflate the dough and turn out onto a lightly floured board.
  • Divide in half and let rest 5 minutes.
  • Shape each half into a round, stretching the dough across the top and tucking under; place the rounds on opposite wnsa of the cookie sheet.
  • Cover and let rise in a warm place 40-50 minutes or until almost doubled.
  • Meanwhile, preheat oven to 375 F. Using a lame or sharp knnife, make 1/2 inch deep slashes across each loaf (in lattice design if desired).
  • Sprinkle each loaf lightly with bread flour. Bake 35-40 minutes until loaves are deep, golden brown and register 200 degrees on an instant thermometer.
  • Remove from the pan and cool completely on a wire rack before slicing. Yields 2 loaves
MANUAL METHOD:
Follow the above instructions, kneading the dough by hand about 10-12 minutes.

NOTE~this is best made using a stand mixer!

APPLESAUCE RAISIN BREAD
2 cups applesauce
2 JUMBO eggs, beaten
1 cup fine sugar
1/2 cup butter, melted
4 cups flour

4 teaspoons baking powder
1 teaspoon salt
1 teaspoon baking soda
2 teaspoon cinnamon
2 teaspoon nutmeg
1 cup golden raisins
1/4 cup golden rum
1 cup minced walnuts
  • In a large bowl, beat together the applesauce, eggs, sugar and melted butter.
  • In a smaller bowl, sift together the dry ingredients.
  • Stir the dry ingredients into the applesauce mixture and mix only until smooth.
  • Add the raisins and nuts.
  • Pour into 2 greased 9x5x3-inch loaf pans and bake in a 350 degree oven for 50 minutes or until a wooden toothpick inserted into centers comes out clean.
BUTTER HORN ROLLS
1 cup scalded milk, cooled

1 package yeast, dissolved in 1/8 cup warm water
1/2 cup unsalted butter, softened

1/2 cup sugar
1 teaspoon salt

3 eggs, beaten
4 1/2 cups flour
  • Add yeast mixture to cooled scalded milk.
  • Combine butter, sugar and salt with electric mixer on low.
  • Add milk and yeast to butter mixture.
  • Add beaten eggs.
  • Add half of flour and increase speed to medium. Beat well for two minutes.
  • Stir in remaining flour by hand to form a very soft dough.
  • Let rise till double – about 3 hours.
  • Divide into 3 equal parts. Roll each portion on lightly floured board to 9 -10 inch circle.
  • Brush with butter.
  • Cut each circle into 12 wedges (like a pizza).
  • Roll from wide end (similar to a crescent roll) and place on cookie sheet.
  • Let rise in a warm place for an hour before baking.
  • Bake at 400 for 10 minutes.
  • Makes 3 dozen
BUTTERMILK CORNBREAD
1 cup yellow cornmeal

1/3 cup all-purpose flour
1/4 teaspoon baking soda
1 teaspoon baking powder
1 teaspoon salt
1 egg, beaten
1 cup buttermilk
  • Sift together dry ingredients.
  • Add egg and buttermilk, mixing well.
  • Pour into greased, heated 8-inch or 9-inch iron skillet.
  • Bake at 400° for 20 minutes, or until lightly browned.
CHOCOLATE WALNUT BREAD CAKE
CAKE

2 cups flour

1/2 cup sugar
Pinch of salt

1 teaspoon cinnamon
2 tablespoons butter, softened
2/3 ounce fresh yeast
1/3 cup milk

1/2 cup heavy cream
1 egg

FILLING
1 cup + heavy cream
12 squares Baker’s semi-sweet chocolate, finely chopped
1/3 cup walnuts, minced
6 tablespoons butter, melted & cooled
  • Sift the flour into a large mixing bowl.
  • Add the sugar, cinnamon, salt, butter, yeast, milk, cream and egg. Using the hook attachment blend for 5 minutes – this can be done manually if you prefer. After 5 minutes the dough will be ready, so flour your hands to avoid sticking.
  • Knead and allow to rise.
  • On a floured surface, knead the dough and transfer to a bowl.
  • Cover the bowl with a four sack towel and allow to rise for 2 hours in a warm place.
  • In a saucepan heat the cream over medium heat bringing it to a slow boil. Remove from heat.
  • Pour the hot cream over the chopped chocolate and mix together.
  • Add the butter and whip with the spoon.
  • Stir in walnuts and allow to cool.
  • Press down on the dough and transfer to a floured surface. With a rolling pin, flatten the dough into a round about half an inch thick.
  • Pour the chocolate sauce over the dough and spread evenly with the rubber spatula.
  • Using a large knife, cut the dough into thick slices approximately 2 1/2 inches wide.
  • Roll slices cinnamon roll style.
  • Transfer the slices to a spring form pan with the edges very slightly touching.
  • Allow to sit for 15 minutes before baking.
  • Preheat the oven 350 degrees.
  • Brush the top of the cake with butter and bake 15-20 minutes.
  • Remove the cake from the oven, brush once more with butter and sprinkle with powdered sugar.
HONEY NUT BRAN MUFFINS
1/2 cup honey

1 1/2 cups flour
1/2 teaspoon baking soda
1/2 teaspoon salt
1 1/2 cups bran
2 tablespoons butter, melted

1 1/4 cups buttermilk

1 teaspoon maple extract
1 teaspoon vanilla extract
1 tablespoon molasses
1 teaspoon pumpkin pie spice
1 egg, beaten
1/4 cup walnuts, finely chopped
  • Sift together flour, soda and salt. Combine with the bran.
  • Add remaining ingredients, mixing just until well blended.
  • Pour batter into greased and lightly floured muffin pans and bake at 425° for 25-30 minutes or until done in center.
ORANGE OATMEAL MUFFINS
1 cup flour
1 tablespoon baking powder
1/2 teaspoon salt
1 cup quick-cooking oats
1/4 cup sugar + 2 tablespoons sugar

1 JUMBO egg, beaten
1 tablespoon grated orange rind
1/2 cup fresh orange juice with high pulp
1/4 cup 2% milk
2 tablespoons vegetable oil
1/2 teaspoon grated orange rind
PURE
  • Combine the flour, baking powder, salt, oats, and 1/4 cup sugar in a large bowl. Make a well in center of the flour mixture.
  • Stir together egg, 1 tablespoon grated orange rind, orange juice, milk and oil.
  • Add to flour mixture, stirring just until moistened.
  • Spray muffin tins with PURE or line with papers.
  • Spoon batter into muffin pans , filling three-fourths full.
  • Stir together 2 tablespoons sugar, orange rind, and ground cinnamon until blended.
  • Sprinkle evenly over tops of muffins.
  • Bake at 400 for 15 minutes or until muffins are lightly browned.
  • Remove muffins from pans immediately, and cool on a wire rack.
PARMESAN CHEESE BREAD
3 1/4 cups unbleached flour
1 tablespoon active dry yeast
2 teaspoons sea salt
1 1/3 cup warm water
1/2 cup freshly grated Asiago Parmesan Cheese
extra-extra virgin olive oil
  • Sift together the four, yeast and salt.
  • Stir in the water until dough forms.
  • Sprinkle with 1/2 the cheese.
  • Transfer to a well floured surface.
  • Knead until soft, elastic and no longer sticky (about 10 minutes). Add flour as necessary to reduce stickiness.
  • Knead the dough until it remains rounded and doesn’t flatten out when left to sit for a few minutes.
  • Arrange into a round.
  • Brush the surface with olive oil.
  • Cover loosely with a tea towel and let rise in a warm place until double in size (about 2 hours).
  • Preheat oven to 425 degrees.
  • Brush a 9 inch round pan with olive oil.
  • Put remaining cheese on a plate.
  • Punch down the dough and knead a few more times with fresh flour.
  • Divide dough into 12 pieces.
  • Roll each piece into a ball.
  • Roll each ball in the cheese and then place in pan with the edges touching. 9 balls around the outside, 3 balls in the center.
  • Cover with a flour sack towel and allow to rise again.
  • Cut a small slash in the top of each ball.
  • Sprinkle with more Parmesan cheese.
  • Bake for 10 minutes and the reduce oven temperature to 375 degrees and continue to bake until golden and crispy, about 20-30 minutes more.
  • Serve hot or transfer to a wire rack and cool.
POLENTA BREAD

Polenta is made with ground yellow or white cornmeal and was originally made with Chestnut meal in ancient times. As it is known today, polenta derives from earlier forms of grain mush (known as puls or pulmentum in Latin or more commonly as gruel or porridge) commonly eaten in Roman times and after.

3 cups unbleached bread flour
1/2 cup finely ground polenta
2 teaspoons quick rise yeast
1 teaspoon sea salt
1 1/3 cups warm water
1 tablespoon extra-extra virgin olive oil
1 Jumbo egg, beaten
  • In a large bowl sift together the flour, polenta, yeast and salt.
  • Stir in the water and olive oil until dough forms.
  • Transfer to a well floured surface.
  • Knead until soft, elastic and no longer sticky (about 10 minutes). Add flour as necessary to reduce stickiness.
  • Knead the dough until it remains rounded and doesn’t flatten out when left to sit for a few minutes.
  • Arrange into a round.
  • Cover loosely with a tea towel and let rise in a warm place until double in size (about an hour).
  • Preheat oven to 425 degrees.
  • When dough has risen, use a VERY sharp knife and slash the center of the loaf.
  • Brush the surface with the beaten egg.
  • Sprinkle cornmeal on the baking sheet and then transfer the loaf on top.
  • Bake for 15 minutes and the reduce oven temperature to 375 degrees and continue to bake until golden and crispy, about 30-35 minutes more.
  • Transfer to a wire rack and cool.
SOURDOUGH STARTER & BREAD
The novel thing about sourdough baking is that it requires that you keep something alive in your fridge. Think of your starter as a pet that needs to be fed. Sourdough “starter” is a batter of flour and water, filled with living yeast and bacteria. The yeast and bacteria form a stable symbiotic relationship, and as long as you keep the starter fed can live for centuries, a thriving colony of microorganisms. To make sourdough bread, you blend the starter with some flour and make dough. The yeast propogates, and leavens your bread. This is how you make your starter:

  • Select a container that your starter will live in. A wide-mouthed glass jar is best. A small crock with a loose lid is also great. You can also use a rubbermaid or tupperware container. Metallic containers are a bad idea; some of them are reactive and can ruin your starter (for the same reason, avoid using metal utensils to stir your starter).
  • Blend a cup of warm water and a cup of plain unbleached flour, and pour it into the jar. That’s the whole recipe! If you want, you can add a little commercial yeast to a starter to “boost” it. Note that starter made with commercial yeast often produces a bread with less distinctive sour flavor than the real thing.
  • Every 24 Hours, Feed the Starter. You should keep the starter in a warm place; 70-80 degrees Farenheit is perfect. This allows the yeast already present in the flour (and in the air) to grow rapidly. Temperatures hotter than 100 degrees or so will kill it.
  • The way you feed the starter is to (1) throw away half of it and then (2) add a half-cup of flour and a half-cup of water. Do this every 24 hours. Within three or four days (it can take longer, a week or more, and it can happen more quickly) you should start getting lots of bubbles throughought, and a pleasant sour or beery smell. The starter may start to puff up, too. This is good. Here’s the gist: When your starter develops a bubbly froth, it is done.
  • Refrigerate the Starter. Keep the starter in your fridge, with a lid on it. Allow a little breathing space in the lid. Once the starter is chilled, it needs to be fed only once a week. Realistically, you can get away with less; it’s important to remember that your starter is a colony of life-forms that are almost impossible to kill (except with extreme heat). Even starving them is difficult.
  • Aside from weekly feeding, the only other thing you need to worry about is hooch. Hooch is a layer of watery liquid (often dark) that contains alchohol. It smells a bit like beer, because it is a bit like beer – but don’t drink it! Hooch builds up in your starter, especially in the fridge. Just pour it off or stir it back in. It doesn’t hurt anything. If your starter is looking dry, stir it back in. If your starter is plenty wet, pour it off. Just remember that hooch is nothing to worry about!
  • Several hours before you plan to make your dough (recipe below), you need to make a sponge. A “sponge” is just another word for a bowl of warm, fermented batter. This is how you make your sponge.
  • Take your starter out of the fridge. Pour it into a large glass or plastic bowl. Meanwhile, wash the jar and dry it.
  • Add a cup of warm water and a cup of flour to the bowl. Stir well, and set it in a warm place for several hours. This is called “proofing,” another word for fermenting.
  • Watch for Froth and Sniff. When your sponge is bubbly and has a white froth, and it smells a little sour, it is ready. The longer you let the sponge sit, the more sour flavor you will get. The proofing-time varies. Some starters can proof up to frothiness in an hour or two. Some take 6-8 hours, or even longer. Just experiment and see how long yours takes. If you’re going to bake in the morning, set your sponge out to proof overnight.

Of course, there are a lot of recipes for sourdough bread. There are also recipes for sourdough rolls, sourdough pancakes, sourdough pretzels, sourdough bagels…

You should have some leftover sponge and that is your starter for next time: Put it into the jar, and give it a fresh feed of a half-cup each of flour and warm water. Keep it in the fridge as above.

BASIC SOURDOUGH RECIPE
2 Cups of sponge (proofed starter)
3 Cups of unbleached flour
2 tablespoons softened butter
4 teaspoons of sugar
2 teaspoons of salt

  • To the sponge, add the sugar, salt, and softened butter instead, or no oil at all). Mix well, then knead in the flour a half-cup at a time. Knead in enough flour to make a good, flexible bread dough. You can do this with an electric mixer, a bread machine on “dough cycle,” or a food processor. You can also do it with a big bowl and your bare hands. Keep in mind that flour amounts are approximate; flour varies in absorbency, and your sponge can vary in wetness. Use your judgement; treat it like ordinary white or french bread dough. Trust your hands and eyes more than the recipe, always.
  • Let the dough rise in a warm place, in a bowl covered loosely with a flour sack towel . Note that sourdough rises more slowly than most yeast bread. Let the dough double in bulk. When a finger poked into the top of the dough creates a pit that doesn’t spring back), you’ve got a risen dough.
  • Punch the dough down and knead it a little more. Make a loaf and place it on a baking sheet (lightly greased or sprinkled with cornmeal). Slit the top if you like, and cover the loaf with a paper towel and place it in a warm place to rise again, until doubled in bulk.
  • Place the pan with the loaf in your oven, and then turn your oven to 350 degrees and bake the bread for 30-45 minutes. Do not preheat the oven. The loaf is done when the crust is brown and the bottom sounds hollow when thumped with a wooden spoon. Turn the loaf out onto a cooling rack or a towel and let it cool for an hour before slicing.

SOURDOUGH TOMATO CHEESE BREAD
1 1/2 cups sourdough starter
1 cup warm water (110 degrees F)
1 (.25 ounce) package active dry yeast
1 cup warm tomato juice
2 teaspoons white sugar
1 teaspoon salt
7 cups all-purpose flour
2 cups grated Sargento sharp cheddar cheese

  • Dissolve yeast in 1 cup warm water, set aside.
  • In large bowl; mix starter and tomato juice. Add yeast mixture, salt, sugar and stir well.
  • Add 1 cup of flour at a time and beat well to develop the gluten.
  • Add cheese just until well blended.
  • When a stiff dough forms, turn out onto a floured surface and knead until smooth and elastic, adding the last 1 cup of flour as you go.
  • Turn into greased bowl and lightly grease top, cover with towel and place in draft free area for 2 hours. Will double in bulk.
  • Punch down and divide dough in two, form into rounds and place each on a baking sheet that has been sprinkled generously with cornmeal.
  • Let rise 1/2 hour, rub top lightly with flour and slash with sharp knife. Bake at 350 degrees F for 45-60 minutes or until bottoms are lightly browned.
  • For a soft crust, cool under a clean flour sack dishtowel. For a harder European type crust, cool without.

♥♥final blog signature. ♥♥

Spoon Rolls: What Did You Bake Today?

When I need a super easy roll that takes no kneading and no thought, I turn to this recipe.
The recipe comes from the 2nd Pillsbury Bake Off in the 1950s. It won a whopping $4000. It’s still a winner to me.
Spoon Rolls:
1 Tbls yeast
1/4 cup warm water
3 Tbls sugar
4 Tbls butter
1 tsp salt
2/3 cup milk, scalded (see instructions below for my cheat)
1/2 cup cold water
1 egg, slightly beaten
4 cups flour
Dissolve yeast in warm water. Put the butter, milk, salt and sugar in a pyrex bowl and microwave 2 or so minutes or until the butter melts and the milk boils rapidly…watch it, it may spill all over your microwave. Cool the milk mixture by adding the cold water. Let sit a bit longer….you don’t want to kill your yeast. Place flour in a large bowl. Add the yeast/water and the milk mixture. Stir until well blended. Cover and let rise in a warm place until double in bulk…about 1 hour. Punch down the dough and spoon into greased muffin tins (this makes 18). Cover and let rise about 45 minutes. Bake 400 degrees for 15-20 minutes.
Dump out onto a wire wrack to cool….or serve immediately. These rolls have a great chewy texture.
What did you bake today?

Ready … Set … Start your ovens

Joy at Joy of Desserts and I are hosting our 2nd Annual Need to Knead Bread Roundup. Are you ready? This year Joy will be using MckLinky so you can post your favorite bread recipes between November 1st-15th to link in for the roundup over at her place.

~ We are looking for all sorts of breads: quick breads, savory breads, sweet ones, yeast breads, no-knead breads, 5-minute breads, vintage or gluten-free breads, etc, etc, etc!

~ Help us promote this bread roundup by putting the above banner in your sidebars and posting about the 2nd Annual Need to Kneed Roundup on your own blogs.

~ Come back November 1-15, 2009 to link all your bread recipes to MckLinky.

~ When participating, please use common blog etiquette and courtesy by linking your participating bread recipes back to Joy of Desserts and 3 Sides of Crazy, and visiting the other participants.

~ Have fun blog hopping through the bread recipes, make new friends, find new family-favorite recipes, comment, enjoy the process of community-building.

Freezer Biscuits: What Did You Bake Today?

Just so that all of you feel comfortable posting things you haven’t really baked today, I am posting something that I am baking next week. These biscuits are amazingly light and tender and SO convenient. You make them up in bulk, freeze them and then use only the amount you need. I think you can buy something similar to this in the freezer section, but this is much cheaper and my middle name (this week) is Cheap.

Freezer Biscuits:
5 cups flour
1/4 cup sugar
1 tsp baking soda
2 tsp salt
3 tsp baking powder
1 cup Crisco
2 cups milk
Combine first 5 ingredients. Cut Crisco into the flour mixture using a pastry blender or fork (or a food processor).  Combine buttermilk and flour mixture, stirring slowly until well combined. Dump onto a well floured counter and knead for 2 minutes or until dough is not sticky and feels elastic. Roll out to 1/2 – 1/4 inch thick. Cut out circles with a floured glass or biscuit cutter. Place on a cookie sheet and into the freezer. When frozen, place into a ziplock bag.

To use, let rise in greased pan with biscuits touching each other. Dot each biscuit with butter and bake 425 degrees until tops are golden brown (about 10-12 minutes)

What Did You Bake Today?

Blueberry Muffins ~ What Did You Bake Today?

I love vintage cookbooks. Not just because they are cute and old, but because the recipes of yesteryear used less sugar and processed foods. Today’s recipe comes from The New England Cookbook published in 1956 by the Culinary Arts Institute of Chicago.Blueberry Muffins:

1/4 cup melted butter
2 cups flour
1/4 cup sugar
1 tsp baking powder
1/2 tsp salt
1 egg , beaten
1 cup milk
1/2 cup fresh or thawed blueberries

Combine dry ingredients in a large mixing bowlCombine milk and eggs in another, then blend in melted butter. At this point, the recipe says to make a well in the dry ingredients, add the wet and stir for no more than 25 strokes. I counted and frankly, I just couldn’t do in in 25. I stirred for more like 30 strokes. Anyway, after it is moist, lumpy and mostly incorporated, fold in the blueberries.Scoop into 12 greased muffin tins. Bake 425 degrees for 15 to 20 minutes or until golden.
What Did You Bake Today?

Homemaker Mondays and Making a Happy Home Monday ~ Holiday Bread

Homemaker Mondays is hosted by Robyn at 11th Heaven’s Homemaking Haven
Making a Happy Home Monday is hosted by LL at As for me and my house…
HOLIDAY BREAD

3 1/4 cups all purpose flour
1 cup whole wheat flour
2 teaspoons sea salt
1/2 teaspoon orange peel
1 teaspoon cinnamon
1/2 teaspoon instant yeast
1 3/4 cups cool water
3/4 cups golden raisins
1/4 cup orange juice
1/8 cup salted sunflower seeds
1/2 cup minced walnuts

  • In a small bowl pour orange juice over the raisins. Let set 1/2 hour. Pour off remaining juice before using fruit.
  • In a LARGE mix together the flours, salt, yeast and water in a large bowl. Stir until you need to use your hands to form a sticky dough.
  • When the dough is smooth and uniform work in the fruit and nuts.
  • Cover the bowl with press-n-seal and let rest at room temperature for at least 8 hours or better yet over night. Dough will bubble and rise quite a bit.
  • Turn dough out onto a lightly floured surface and form into desired shapes to fit lightly greased covered stoneware bakers. I make 2 loaf pan sizes. Place in pan smooth side up.
  • Let rise another 2 hours or until your thumb print remains when you poke the dough.
  • Just before placing in oven slice across the tops several times to allow the steam to escape.
  • Place bread in cold oven and set temperature to 450 degrees.
  • Bake 45 minutes, uncover and bake another 5-10 minutes until golden brown and 205 degrees internal temperature.
  • Cool on rack before slicing.

final blog signature.

The Need to Knead Bread Recipe Round Up Day is FINALLY here!!

It’s here – FINALLY!


Don’t forget to sign Mr. Linky and put your recipe in parenthesis.
Visit everyone you can for scrumptious recipes for the upcoming holiday season.
Joy at Joy of Desserts is co-hosting this with me so be sure and check out her recipes too.

final blog signature.
My recipe is for my favorite ‘toast’ bread.

OAT SUNFLOWER BREAD or SESAME OAT BREAD

3/4 cup old fashioned oats (DO NOT USE INSTANT)
1 1/4 cups very hot water, but not boiling
1/4 cup warm water
1 tablespoon yeast
1/2 cup honey
1/4 cup canola oil
1 tablespoon salt
2 cups whole wheat flour
3+ cups bread flour
1/2 cup toasted sunflower seeds or toasted sesame seeds

  • Using your mixer with dough hook combine the oats and hot water. Allow to stand until soft, 5 or so minutes.
  • While these are cooling whisk together the warm water and yeast.
  • Add the honey, oil and salt to the oats until well blended.
  • Add the yeast and blend together.
  • Add the wheat flour until well blended.
  • Add 2 1/2 cups of the wheat flour and blend well.
  • Add last 1/2 cup as needed until dough forms a smooth mass.
  • Add sunflower seeds until just mixed.
  • Place dough in a an oiled bowl and cover with a light cloth and allow to rise 2 hours or until double in size in a warm spot of your kitchen away from drafts.
  • Punch the dough down and fold dough into itself.
  • Place dough onto a lightly floured work surface . Lightly sprinkle flour over dough.
  • Knead dough until all the air is worked out and you have a nice smooth mass.
  • Split into two loaves.
  • Cover them for 10 minutes.
  • Form loaves into rectangles by folding dough into itself and eliminating excess air.
  • You can either free form these or use 9×5 loaf pans. Seam side down place loaves into pans. Recover with towel.
  • Set aside and let rise another hour until dough rises above the edge of the pan.
  • Preheat oven to 350 degrees.
  • Make diagonal cut across the top of each loaf (these allow the steam to escape).
  • Bake on the center shelf in the center for 45 minutes or until golden.
  • Cool completely on a wire rack.
  • Enjoy!

Here are a few of my other bread recipes to entice you.


WooHoo the long awaited Bread Round-Up is FINALLY here!!

I’ve been collecting recipes for all my life it seems. When I decided to do this bread round up I scoured my files for every recipe that had been handed down from family or given to me by a co-worker or one that has become one of our family favorites. Ironically I found 4 different recipes for Buttermilk Biscuits. The recipes stem from really easy to more involved and are all slightly different in taste and texture.

BUTTERMILK BISCUITS (most similar to the Colonel’s)
1/2 cup butter, softened
2 1/2 tablespoons sugar
1 egg, beaten
3/4 cup buttermilk
1/4 cup club soda
1 teaspoon salt
5 cups Bisquick baking mix

  • Preheat oven to 450 degrees
  • Combine all the ingredients
  • Lightly flour your hands
  • Knead the dough by hand until smooth
  • Pat the dough flat to 3/4 inches
  • Cut out biscuits
  • Place on cookie sheet about 2 inches apart
  • Bake for 10-12 minutes or until golden brown
  • Makes about 18 biscuits

BUTTERMILK BISCUITS with MAPLE BUTTER (a little lighter and sweeter with the maple butter)
BISCUITS
1 1/2 cup flour
1 cup cake flour
2 teaspoons baking powder
1/4 teaspoon baking soda
1/2 teaspoon apple pie spice
1/2 teaspoon salt
3 tablespoons butter, softened
2 tablespoons Crisco
1 cup + 2 tablespoons buttermilk
1 egg
BUTTER
1 tablespoon maple syrup
1/4 cup butter, softened
2 tablespoons brown sugar

  • Preheat oven to 450 degrees.
  • Spray an 8 inch cake pan with PURE.
  • Sift together the 1 cup of the flour, cake flour, salt, baking powder and soda.
  • With a pastry blender cut in butter and Crisco until mixture is coarse and crumbly
  • Stir in buttermilk.
  • In a mixing bowl add the remaining 1/2 cup flour.
  • Drop the dough 1/4 cup at a time into the flour.
  • Shape into balls.
  • Arrange all the balls in the pan.
  • Beat egg with water. Brush tops of dough.
  • Bake 15-18 minutes or until golden brown.
  • To make this ahead of time do all steps except the buttermilk, cover and refrigerate until needed.
  • Stir syrup into butter.
  • Transfer to wax paper.
  • Top with another sheet of wax paper.
  • Press into a 1/4 inch thickness and freeze for 10 minutes.
  • Using a rolling pin roll smooth.
  • Remove top sheet of wax paper and sprinkle with brown sugar.
  • Using small cutouts, cut butter into desired shapes.
  • These can be made ahead of time and frozen.

BUTTERMILK SPOON BREAD (more like a souffle – light and fluffy)
7 large eggs
1/2 cup whipping cream
4 cups water
1 1/2 cups buttermilk
1/2 cup butter, diced
1 1/2 teaspoons salt
1/2 teaspoon pepper
2 cups yellow cornmeal

  • Preheat oven to 350 degrees.
  • Spray 9×13 baking dish with PURE.
  • In a large bowl whisk the eggs and whipping cream together until smooth. Set aside.
  • In a large sauce pan bring the buttermilk, water, salt, pepper and butter to a boil.
  • Gradually whisk in corn meal.
  • Reduce heat and and simmer until thick and smooth, stirring frequently.
  • Remove from heat and gradually whisk the cornmeal mixture into the egg mixture.
  • Transfer the batter to the baking dish.
  • Bake uncovered 30 minutes or until top is golden brown.
  • Let stand 10 minutes before serving.
  • Serve warm.
What makes biscuits rise?
Baking Powder and Baking Soda are both leaveners and when activated creat carbon dioxide which produces the rise. Baking Soda aka sodium bicarbonate has been commonly used for 200 years and works by simple chemistry. It’s reaction is immediate, but does not continue once the biscuits are in the oven. Ironically Baking Powder is the main ingredient in Baking Soda, but baking powder also includes an acid or two. Double acting baking powder is the perfect one for biscuits because it has the immediate acting acid as well as the heat activated acid. In order to use baking powder alone you have to use way too much and it dries out the dough. So finding the perfect combination of baking powder and baking soda is the key to tall and fluffy biscuits.

PERFECT TALL & FLUFFY BUTTERMILK BISCUITS
2 cups flour + 1 cup flour
1 tablespoon double acting baking powder
1 tablespoon sugar
1 teaspoon salt
1/2 teaspoon baking soda
4 tablespoons butter, diced
2 tablespoons butter, melted
1 1/3 cups low-fat buttermilk

  • Preheat oven to 500 degrees.
  • Spray a 9 inch cake pan with PURE.
  • In a food processor pulse dry ingredients several times to combine.
  • Add butter pieces scattered over dry ingredients and pulse until crumbly.
  • Transfer to a medium bowl.
  • Stir in buttermilk. (Dough will be wet and lumpy).
  • Spray a 1/4 cup measure with PURE.
  • In a mixing bowl add the remaining 1 cup flour.
  • Drop the dough 1/4 cup at a time into the flour.
  • Shape into 12 balls. Shaking off excess flour.
  • Arrange balls (9 around the perimeter and 3 in the center) in the pan.
  • Brush tops of dough with melted butter.
  • Bake 5 minutes.
  • Reduce oven temperature to 450 degrees.
  • Bake another 15 minutes.
  • Cool 2 minutes.
  • Invert biscuits into a clean towel, turn right side up breakaing them apart and cool another 5 minutes.

final blog signature.