Menu Plan Monday

MONDAY ~ Chicken Chili & Salad
TUESDAY ~ Seafood Salad & Parmesan rolls
WEDNESDAY ~ grilled Bourbon & Brown Sugar marinaded steaks & Salad
THURSDAY ~ grilled Mahi Mahi in Lemon Sauce & rice pilaf
FRIDAY ~ Sweet & Sour Meatballs & Rice Chutney
SATURDAY ~ Spinach Salad & Sunflower Rolls
SUNDAY ~ ABC Pork Roast and rice pilaf

I do the memes: Menu Plan Monday hosted by Laura at I’m an Organizing Junkie, Favorite Ingredient Friday hosted by Kathryn at Overwhelmed with Joy, Freezer Food Friday hosted by MJ at mjpuzzlemom, Scrumptious Sunday hosted by Meredith at Mercedes Rocks and Slow Cooking Thursday hosted by Sandra at Diary of a Stay at Home Mom. Doing them all make great additions to help keeping me on track and finding so new recipes!

Kitchen Update & Counter Substitutions

Did I mention we’ve been working like dogs around here?

We installed the last cabinet in the kitchen and I got the first coat of stain on it. All of the cabinets from home depot are now ready for the second coat and then the sealer. It also looks like they’re going to match the ones we bought from the dealer going out of business. As a temporary means we installed sheets of MDX as counter tops. I had painted them white and we have been doing pretty well with them, but what I really want is soapstone counters and those are going to cost, so we have to save up! In the meantime I made a trip to Family Dollar and purchased 2 packs of self stick tiles. We cut them to fit and voila instant counter top. I took the pictures from 2 different angles to show how versatile this color is going to be. I mixed paint to paint the edges of the plywood brown to match, but just ran out of steam to get it done.


Meatloaf with a Kick – Great new perspective & Yummy too!

2 pounds hamburger
4 ounces Gorgonzola Cheese Crumbles
1 bunch green onions, sliced thin
2 teaspoons minced garlic (jar)
1 jumbo egg
1/4 cup chili sauce
1 tablespoon Better than Bouillon Beef Base
1 Tablespoon creamy horseradish
1 sleeve Townhouse crackers, crushed
1 teaspoon sea salt
1/2 teaspoon white pepper
  • Mix all ingredients together thoroughly
  • Use a tall loaf pan
  • Bake 45 minutes at 350 degrees or until edges are browned and crisp
  • Immediately pour off excess grease
  • Enjoy


Spare Bedroom – Guest Ready – Finally!

We have been working like dogs for the past 2 days. Mom is coming to visit soon. She hasn’t been here since we first moved in a year and a half ago and were in the midst of the “Great Mold Tear Out”. So we have been working hard to make things nicer for this visit. Yesterday morning the spare bedroom was a ‘staging’ area for the upstairs bathroom. I won’t even show you a picture it was that bad! It had the old claw foot tub in the middle of it and all the various parts for the new vanity, sink, toilet, wall cabinets and their various contents. It also had exercise equipment, quilting boxes, various paperwork and books as well as linens covering the bed. Anyway, it too will need another coat of paint, (I ran out of that too) and about a million trim boards, but it looks pretty presentable. I still have a couple of photos to get printed and hang, but not bad for a days work. And yes, that’s Holly Hobbie on the bed – my original from the 70’s.

Friends around the World

I found this over at Thomas Web Links and thought it would be fun to play along.

::Start Copy Here::

Rules:

1. Copy from ::Start Copy Here:: through ::End Copy Here::.
2. Add your blog to the list. Feel free to add all your other blogs. Just make sure to post this to each of the blog you added in the list.
3. Tag other online friends you know.You don’t need to be tag in order to join. If you want to join just post this one in your blog.
4. Let me know your blog’s name and url by leaving me a comment HERE. I will add you to the master list.That way, everyone is happy and can meet new friends too!
5. Come back once in a while to get the master list! Let’s see how this makes our Technorati and PR goes up! :D
6. Do Not Remove This
Scrap page made by Yen using alphas and tapes from Kate H., flowers from Ida, paper by Catrine.

::End Copy Here::

I TAG:
Barbara
, Kathryn,
Sharon, Misty, Penelope, Meredith


Scrumptious Sunday ~ Patio Coolers


hosted by Meredith at Mercedes Rocks

PATIO COOLERS ~ alcoholic and tea totaler versions

1 small can Minute Maid limeade concentrate
1 small can Minute Maid Orange juice concentrate
1 cup pina colada mixer
32 ounces pineapple juice
1 cup peach Schnapps (optional)**
1 cup Captain Morgan Rum (optional)

  • Mix together well.
  • Pour over crushed ice.*
  • Garnish with a pineapple or orange slice.
*When I’m making it for a large group, I prepare it as a double or triple batch in advance and freeze as a slush. You can then serve it in a punch bowl and garnish with a small carton of rainbow sherbet, a bottle of ginger ale, sliced fruit and maraschino cherries.

**If making the tea totaler version substitute peach nectar for the schnapps.

Photo Hunt – Shoes


My favorite kick arounds!

About the PhotoHunt: A theme is given for each Saturday. Post a photo that best represents the theme. New and old photos welcome but must be from your personal collection and not photos obtained from the web. Play along once a week by posting your photo on your site.

Tunnel Light has been turned ON!!

The light at the end of the tunnel was officially switched ON today with the installation of the sink and toilet in the upstairs bathroom. Woohoo, running water and no worries about tripping down the stairs in the middle of the night! Still need to install the shower, floor, linen closet and a million trim boards (especially around the window to hide that very red duct tape!), but who cares now?

Favorite Ingredients Friday ~ Apple Bread

Favorite Ingredient Friday
hosted by Overwhelmed with Joy
even Memorial Day needs a great dessert!
APPLE BREAD

1 cup vegetable oil
2 jumbo eggs
1 3/4 cups sugar
1 teaspoon vanilla
2 cups flour + 2 tablespoons
1/2 teaspoon salt
2 teaspoons cinnamon
1 teaspoon baking soda
4 cups diced apple pieces
1/2 cup golden raisins
1/4 cup orange juice
1 cup walnuts

  • Preheat oven to 350 degrees.
  • In a small bowl pour the orange juice over the raisins and set aside to soak.
  • Cream together the oil, eggs and sugar.
  • Add the vanilla and blend smooth.
  • Sift together the dry ingredients.
  • Gradually add the dry ingredients to the cream mixture and blend until smooth.
  • Drain raisins.
  • Fold in the apples, raisins and nuts.
  • Pour into prepared loaf* pan.
  • Bake 35-40 minutes.
  • Cool 15 minutes and then frost OR glaze.

*Thanks to a great tip from sis-in-law I sometimes make this in the mini loaf pans or a Texas muffin pan and freeze many to save for snacks.

CREAM CHEESE FROSTING

2 cups powdered sugar
8 ounces cream cheese
3 tablespoons butter
1/2 teaspoon vanilla
pinch salt

  • Blend all together until smooth.
GLAZE

1/4 cup butter
1/4 cup milk
pinch of cinnamon
1 1/2 cups powdered sugar

  • Heat butter and milk together in microwave until butter is melted.
  • Blend in cinnamon and powdered sugar until smooth and the consistency of maple syrup.

I do the memes: Menu Plan Monday hosted by Laura at I’m an Organizing Junkie, Favorite Ingredient Friday hosted by Kathryn at Overwhelmed with Joy, Freezer Food Friday hosted by MJ at mjpuzzlemom, Scrumptious Sunday hosted by Meredith at Mercedes Rocks and Slow Cooking Thursday hosted by Sandra at Diary of a Stay at Home Mom. Doing them all make great additions to help keeping me on track and finding so new recipes!

The previously OH NO… More Mold upstairs bathroom update! AKA The Light Will soon be turned on in the Tunnel!

Part of this update post is copied from my original post, Oh No More Mold which required destruction of the upstairs bathroom also. I’m happy to say that it is almost all handled now. I’m including the original pictures as well as the updates so you can easily see the progress. The new plumbing has been done (but not without casualties) by hubby and buddies and we will actually be able to use the bathroom again (don’t panic, we’ve been trudging downstairs in the interim – a real pain in the butt in the middle of the night).

So we’ve had a productive and disappointing time of it. I tried to show the pictures in order so you can see the changes throughout.


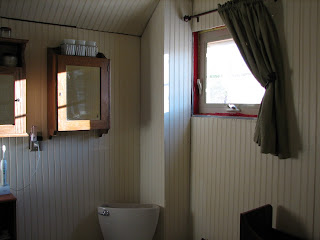
We needed to expose the old plumbing that the previous owners had built this funky facade around it (out of old masonite board) so we could get the plumber in for an estimate to convert this fantastic old 6 foot claw foot tub into a shower and tub combo. We’ve also had to change out the old vanity sink due to more mold so we chose an old fashioned sink that looks a little more like it belongs and camouflages the new plumbing. We were able to put the new plumbing under the floor (where it belongs). As you can see, they had built a really funky facade around the tub too. I can’t figure out why either ~ it’s in near perfect condition. I painted the tub with Rustoleum Copper colored hammer paint as well as the drain vent pipe that has to stay. I don’t have the parts yet, but will also paint the shower enclosure bars the same color. I had 2 choices for the shower enclosure, either get the FUNKY too small conversion kit at Home Depot for $65 or spend $500 for the one from the restoration company so I chose option #3 – build my own for about the price of the FUNKY one. So the drawings are done and I’ll get the parts so look for that completion picture in the future. Okay, scratch that, we’ve decided to eliminate the old fashioned tub and opt for a more efficient and conventional shower that will also allow room for a linen closet and better storage. Anyone want to buy a turn of the century claw foot tub in excellent condition?

They also painted the wood floor a funky rust color and then had a cheap carpet remnant on top of that. We weren’t going to do anything but paint the floor for now, but found some serious molded rotted wood as we began the plumbing. We looked at doing ceramic tile and then actually settled on a Laura Ashley ‘exotic’ (their word for the thicker solid pieces) floating plank floor for 2 reasons. 1) The Laura Ashley floor is self contained, and 2) the backing foam is already mounted to the back of each board, it was on sale, it was about $1.25 less a square foot than doing the tile.


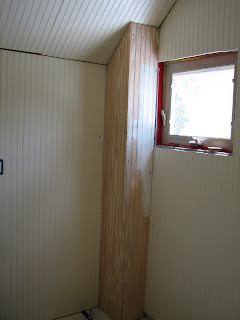
Productive in that we got to this point, disappointing that we found more mold all along the way so there was more old lathe and plaster to be torn down, and exciting that we can begin to visualize this room done. I tried to bleach it and use KILZ first on the mold, but it always seems to work the hard way and we had to tear out most of the back and one side wall. So after getting to the tear down point that we were comfortable with no more mold, we added 3/4 inch foam insulation board and then white washed bead board on top of that to create the turn of the century feel we were looking for to go with the claw foot tub. We’re building a new and better enclosure around the vent pipe.

We’ve also done the ceiling like an old tin ceiling. We priced the real stuff and the plastic replica and then decided on the fiberboard by Armstrong that now painted looks like it was original to the house. I sealed each seam with caulking, painted with BEHR kitchen and bath paint and then did a clear coat sprayed sealer (It is a bathroom and we wanted to protect against steam). We also added a powerful exhaust fan.
So all we need to do is finish the floor, shower, a decorative shower curtain and about a million trim boards and we’ll be all done., But at least we’ll have a sink and toilet upstairs at the end of the day which means the light will soon be turned on in the
tunnel.