Dad’s Crockpot Roast

A  roast is a treat for us.  We rarely have one but then we have cut down on meat, tremendously.  This was a Costco Kosher cut which was extremely reasonable in price.  I love Costco.  My husband made th is one and I was not around.  He deserve several pats on the back for a most delicious main dish that everyone loved.
Crockpot Roast Beef

Ingredients:

2 onions sliced
1/2 pound button mushrooms
1 cup vegetable soup (organic)
1 tablespoon maple syrup
2 teaspoons onion powder
1 teaspoon garlic powder
salt
black pepper
You could use onion soup mix in place of the spices.

10 fingerling potatoes, added after beef is taken out of crockpot

Method:

After sprinkling seasoning all over the meat, sear it, in a separate pan, on the stove.

Place in crockpot.

Add mushrooms and onions.

Add the vegetable soup mixed with maple syrup, pouring it over the meat.

Cook on low for 8 hours.  It stayed overnight and I am not sure but it was between six to eight hours.

Turn it up to high for another hour.

Turn into a roasting dish.  Add fingerling potatoes, as many as you need for your table.  I figure two to three potatoes per person.  Do not peel.  Dave, Tamy and Martha are cheering now. 

In liquid from crock pot, place potatoes around roast. 

Place in oven at 350 degrees and cook fo 40 minutes.

For additional recipes go to Sweet and Savory and Comfy Cook

Asian Influenced Pork Loin Wellington – an original recipe

Hi everybody… It’s the resident cook in training again, as Dave from MY YEAR ON THE GRILL amazes you all (but mostly myself) as I post again that I CAN COOK THAT !!!

I am hoping that you have been paying attention over the last two weeks. It all seems a natural progression to me…

In week one of my postings, I used store bought puff pastry to see what happens when I follow a recipe for PUFF PASTRY WITH A BLUE CHEESE FILLING. I made a few mistakes, but I gained a bit of knowledge about how puff pastry works, what it does and I pondered what the advantages of using it were. In all humility, I was pretty amazed at the results, and you can read about them by clicking HERE.

It sounds silly to say, but I amazed myself the next week when I made the exact same dish. Two big differences, The recipe came from Julia Child (It was my first, she was very gentle). But the main difference was that I made my own puff pastry. It was a natural progression for my learning curve to go from store bought to home made. Once again, if you will forgive my braggadocio, I was even more amazed at the results, and you can read about them by clicking HERE.

So, to me, the next logical progression to my puff pastry journey would be to create an original recipe, and justify my ingredients for you “real” cooks to critique.

It is always a dangerous thing to claim any recipe as original. I have never seen this combination of ingredients, combined with this cooking method. So, while it is possible (and actually, considering the number of ingredients, probable that somewhere in the world another cook assembled these ingredients and possibly published them, I am raising my virtual right hand and swearing on a stack of Julia Child cookbooks that to me, this is an original recipe. Since it is my original recipe, I get to name it. If I were writing a boring cookbook, I would indeed name this, Asian Influenced Pork Loin Wellington”. But, I am not, so I get to have a little fun with the name… And so, in honor of my favorite Asian American Poker Playing Actress, I give you…

Jennifer Tilly’s
PORK WELLINGTON!

The name is very logical and makes sense to me…

My two hobbies are poker and cooking. The recipe calls for a couple of main ingredients that are hidden by a beautiful protective shell. Jennifer Tilly also has a couple of almost always hidden assets that she uses to her advantage at the poker table. And finally, the recipe, like Jennifer is much better than you think. Jennifer is one of only a hand full of players (and the only actor) who has won not only a World Series of Poker Bracelet, but also is a World Poker Tour championship. The honor of having a recipe named for her is fitting and well earned.

At this point in the recipe and my postings, I always include a photo of the ingredients (Mise en Place). Unfortunately, The photo did not turn out, so live with this…

Here’s what I needed to make my recipe…

1 – 3 pound Pork Loin (one of the hidden ingredients)
1/2 gallon water for brining
1/2 cup of kosher Salt for brining
1/2 cup of Honey for brining

1/2 pound of Spinach (the other hidden ingredient)
1/2 cup finely chopped Pecans
10 cloves of Garlic (minced)
1 Tbs Ginger Molasses (if you can not find ginger molasses, combine 1 Tbs of molasses with 1/2 teaspoon ground ginger… If you do not have molasses, feel free to use honey and ginger. I hate buying ingredients that are rarely used for such a small amount. But once you have ginger molasses, you will use it up, it is that good… but I digress)
1/4 cup Peanut Sauce
2 TBS Chinese 5 Spice
1 Egg for an egg wash

OK… Here’s what I did and why. If any of you real cooks have a comment or critique, I would love to hear it. Before working on this, I did quite a bit of research, and read several recipes. I think I got it right (it tasted and looked as I wanted). But if I lucked into something, and it worked, but for a wrong reason… let me know. I really was making it all up as i went along.

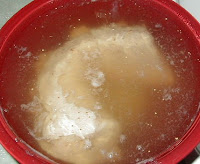
First, Brine your meat. Brining is that little secret that chefs never tell you. It makes pork more succulent and flavorful. Modern pork producers have evolved the pig into a very lean product. If you have ever over cooked a pork chop to the hockey puck stage, you know that there is not much margin for error between cooked and dried out. Brining will increase that margin drastically, while at the same time add flavor.Brining is VERY easy.

Take 1 cup of the water, and get it boiling. Add the honey and salt and stir till dissolved. Add the cold water and remove from heat. Place the pork in a non reactive container, and add the water. If need be, add more water til the pork is completely covered. Place the whole container in the refrigerator for at least 3 hours, but no more than 12. Rinse the pork twice before proceeding to the next step. Pat dry with paper towels.

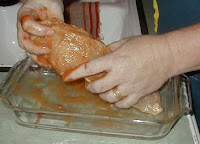
Next, get your hands dirty. You are adding a wet rub to the pork. The key word… it’s a RUB, not a drizzle. Take the peanut sauce. And rub all over the loin. Next, apply the 5 spice to the loin. Again, rub well, till it is all mixed in with the wet rub.

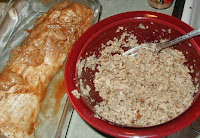
Next, we combine the pecans, garlic and ginger molasses… Mix well to form a paste. Spread this all over the loin. Keep caking it on as it falls off. Again… USE YOUR HANDS, get dirty. Set this aside, and let it absorb into the meat.

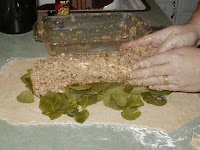
And now it’s time to assemble… While the paste is marinating into the wet rub and the wet rub is spicing the pork, lay out your puffed pastry. roll it out until it is wide enough and long enough to roll around the pork loin. Lay out the raw but washed spinach, and then lay the pork loin on top of the spinach. Push the spinach all up under the loin as much as you can. When you roll up the pastry, you do not want any of the spinach on the top (which will be the bottom when you cook).

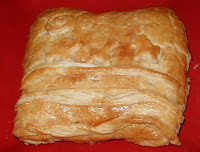
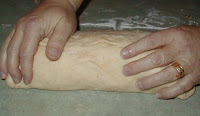
Roll the pastry up over the loin and seal as best you can. Everything nice and tight, with a double layer of the pastry on the bottom (actually the top, til you turn it over… make sense???) so that it can soak up the juices and still retain it’s shape and integrity.

Take your egg wash and help keep everything sealed up by painting the egg over the seal. And now, it is time to flip it over, so the smooth side with all the spinach is now on top, and the side with the edges is on the bottom.

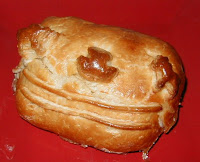
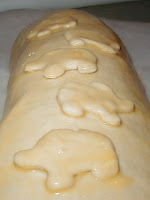
It is now time to decorate. When you rollout the pastry, there are always little bits that stick out. I take a pizza cutter and trim the edges square. I used these to cut out shapes. These are supposed to be elephants from a tiny Noah’s Ark cookie cutter set. When i serve these, I am going to serve a one inch slice, so the elephants were placed so that i can cut the loin and each slice will have an elephant. Paint the entire surface of the pastry with the egg wash, then place the decorations down. When you have them where you want them, add another layer of egg wash over the decorations. Take a knife and put a few holes in the pastry to allow steam to escape. If you don’t, your pastry will split.

I bake this on a sheet of parchment paper at 350 degrees for 55 minutes. Actually, I used an instant read meat thermometer, inserted into the niddle to measure the internal temp/ It was 140 degrees… perfect.

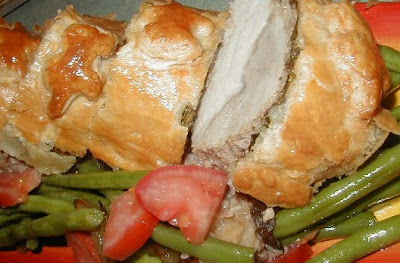
I removed from the oven, and put a piece of tin foil over the top, sealed as best I could and worked on a side dish. I made some HARICOT VERT (Green Beans) – Restaurant Quality Vegetable. to serve with them. Those only take 5 minutes, so I made them while the meat was resting. Also, while the meat was cooking, I made a batch of garlic mashed potatoes. when all was ready, I made a presentation plate to take to the table, with the beans on teh bottom and slices of the wellington on top…

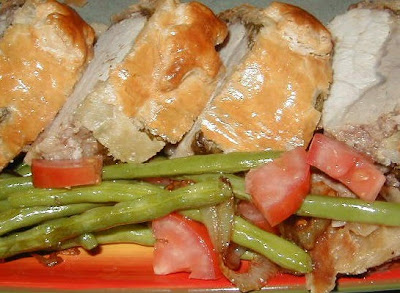
It was a HUGE hit. The pork was fork tender, even at the 1 inch thickness. Each bite that contained a bit of the pastry also contained some of the now steamed and cooked spinach! The spinach was flavored with the Asian influenced rub and paste, as was the pork. The crunch of the nuts added a delicious texture, and the peanut sauce/Chinese 5 spice wet rub flavored perfectly. I worked hard on the prep for this recipe. I thought about each ingredient and what it would add to the dish. In the end, it was just as good as I had hoped. Jennifer Tilly should be very proud.

So, all that’s left is to explain what the pastry shell does… First, it makes a dynamite presentation. Very pretty. But as important, it improves the taste of the pork. It forms a shell around the meat so that as the wet rub and the moisture in the paste heats and starts to stem, it acts as a mini pressure cooker to force the aromatic flavors into the meat. Almost every bit of the moisture from the pork and the rub/paste is retained and improves the texture of the pork. Moist, tender and delicious; full of flavors… What pork should be!

And with this post, I am ending my puff pastry recipes for a bit… Kind of, I do have a recipe for a Salmon wellington on my “REAL” site, MY YEAR ON THE GRILL, which you can see by clicking HERE.

Come back next Thursday to see what I amaze myself with next!

Sweet and Spicy Salmon

I usually make salmon on Fridays and this past Friday, was no different. I want to make a new recipe each week and this is a new recipe but it didn’t end up they way I had planned.

It was supposed to be grilled. I baked it. It was to have chili sauce. I used chili powder. Otherwise, I stayed true to this recipe from All Recipes.
We love salmon and it could be plain but the additions, each week, are a surprise and it has become fun to see what salmon comes out of the kitchen, this Friday.

If you have any good salmon recipes, please link them up. If you don’t, link whatever recipe you would like. We love new recipes.

Sweet and Spicy Salmon

Ingredients:

2 pieces of salmon

1/4 cup soy sauce
1/4 teaspoon chili powder
1/4 teaspoon ginger
1/4 teaspoon garlic powder
1 tablespoon lime juice
1 tablespoon brown sugar
3 scallions, chopped
Preheat oven to 350 degrees.
Place salmon in a baking pan to fit.
In medium size bowl, mix soy sauce, chili powder, ginger and garlic.
Pour sauce over salmon.
Sprinkle chopped scallions over salmon.
Bake at 350 degrees for 30 minutes.
Serve, spooning juice over salmon.
I added about a quarter of inch of water to the bottom of the pan to avoid it drying out and burning.

Chicken Bundles – What Did You Bake Today?

I did an inventory of the outside fridge and found two rolls of Pillsbury Crescent sheets. I feel ashamed to be using these store bought puffy pastries after Dave’s amazing post about homemade puffed pastries, but I am too frugal not to use what I have…next time, Dave, they will be homemade all the way….just wait.
I digress…Anyway, to use them up, I decided to make the old stand-by, Chicken Bundles. I also ended up creating something new that I will share below.
Chicken Bundles:
3 cups cooked chicken
1 8 ounce package cream cheese
1 small jar pimentos
1/4 cup chopped green onions
2 packages crescent rolls or sheets

Mix chicken with cream cheese, pimentos and green onions. Spread out the cresent sheets. If you are using the rolls, pinch them together to form one giant rectangle. Cut each big rectangle into 4 pieces. Place about 1/3 cup of chicken mixture onto one half of each piece. Fold the other half of the crescent piece over the chicken mixture. Using a fork, seal the edges. Bake 400 degrees 15 minutes.
If, like me, you happen to have a lot of chicken mixture left over and you realize that you need more dinner to feed your crew, get out a box of chicken flavored Stove Top and make it up really quick….Place the chicken mixture on the bottom of a microwave safe bowl and top with the Stove Top. Heat for 5 minutes in the microwave and Voila! you have a new and surprisingly delicious main dish.
Don’t forget about the Oatmeal challenge….link up your recipes using Oatmeal on January 29th.
What Did You Bake Today?

Sausage Pasta Casserole ~ Cooking with Chaya

My husband said, this was interesting which meant to me, he did not like it, but then I watched him take three servings. He liked it. The truth is it is an interesting recipe because it is not a combination I have ever used and you, very likely, have not used, either. It worked though, it worked very well, blending flavors.

This has some of my favorite food, sausage, pasta, Brussels sprouts, and tomatoes. For me, it had to be good and it was. If you make this, you can substitute in every area. You could use chopped meat or meat balls instead of the sausage. You could use another vegetable in place of the sprouts, (green beans, broccoli, cauliflower or even spinach. I would leave the pasta and tomatoes in place but choose any pasta you want.

Sausage-Pasta Casserole (two servings)

Ingredients:
2 large sausages, cut into about 8 pieces each
1/2 pound pasta of choice – I used penne (gluten free)
10 ounces Brussels sprouts
1 medium onion, sliced
6 tomatoes, bigger than cherry tomatoes, smaller than a full size one, in eighths
1 red pepper, sliced
4 tablespoons crushed tomatoes (canned)
Spray cooking oil
Method:
Put up water to boil and while browning, cook the pasta according to directions.
Microwave or boil Brussels sprouts.
Spray a large skillet with cooking oil and fry sausages in it until they are lightly browned.
Remove sausage. Do not clean skillet.

Fry red pepper and onion until slightly browned.

Add fresh tomatoes.

Add pasta and Brussels sprouts.

Add crushed tomatoes. If you need more crushed tomatoes, add what is necessary. There is also juice from the fresh tomatoes for the sauce.
Add salt and pepper to taste.
Mix all ingredients gently together. I put these in a casserole and heated them in the oven for twenty minutes on 300 degrees.

Parsley Herb Noodles OR Linguini & Clams ~ Cooking with Chaya at OuR KrAzY kItChEn

PARSLEY HERB NOODLES / LINGUINI & CLAMS
1/2 cup butter
1/4 cup olive oil
1 pound linguini, cooked and drained well, reserving pasta water as needed
4-6 cloves minced garlic
(2) 7 1/2 ounce cans minced clams, drained well, but retaining 8 ounces of the juice
1 cup white wine
1 shallot, minced

1 bunch green onions, sliced
1/2 cup minced fresh parsley
3/4 cup shredded Parmesan

salt & pepper to taste

  • Heat butter and oil together.
  • Add shallot, green onions and garlic cooking until golden and fragrant.
  • Add clam juice and white wine and simmer uncovered 10 minutes.
  • Add clams, parsley, salt and pepper, to taste and most of the Parmesan cheese,  heating until cheese is melted.
  • Toss with the linguini.
  • Serve with fresh grated Parmesan Cheese.

ORIGINALLY POSTED 12-21-2009 for my FIL’s birthday

Baked Smoked Turkey in a Slow Cooker: What Did You Bake Today?

I realize that I am completely pushing the limits of the whole “bake” thing with this post.  Hopefully, you will have it in your hearts to hear me out.  This is a new technique I learned reading Cheater BBQ by Mindy Merrill and R.B. Quinn.  The premise being that slow cookers can act as mini ovens on occasion.  By wrapping meat tightly in foil, it doesn’t end up like the typical crockpot stew but stays firm as though it were cooked in the oven.
 
Now, here’s the bad news.  This is the only picture I took of the turkey breast.  Yep!  You have to use your imagination and trust me a Lot!
Smoked Turkey Breast (based on the Cheater BBQ Hobo Crock Turkey Breast)
One thawed turkey breast
4 Tbls butter, melted
1/4 cup liquid smoke
2 tsp garlic powder
1 tsp salt
1/2 tsp pepper
1 tsp paprika
Line the crockpot with foil large enough to completely encase the turkey breast.  Place the turkey in the middle of it.  Combine the spices and rub them all over the meat, including in the cavity.  Combine the butter and liquid smoke and pour it all over everything.  Wrap the foil over the turkey, sealing snuggly.  Cook on low 6-8 hours or until internal temperature reaches 160 degrees F.  I cooked mine for the originally prescribed 10 hours and had a very dry bird.   Serve with your favorite BBQ sauce.
We only ate half of the meat.  With the leftovers, I borrowed another recipe from the Cheater BBQ cookbook…..and I really baked it in the oven.
Cornbread Turkey Bean Casserole:
3 cups chopped leftover smoked turkey
1/2 large onion, chopped
2 Tbls olive oil
2 cans Texas Ranch style beans (ranch brand)
1 can hickory bbq beans (bush’s brand)
1 cup cornmeal
1 cup flour
1 heaping tsp baking powder
1/2 tsp salt
1 cup milk
1 cup shredded cheddar cheese
1 small can green chilies
Saute the onion in the oil until soft.  Combine the meat, beans and onion and pour into the bottom of a greased casserole dish.  Combine the cornmeal, flour, baking powder and salt in a mixing bowl.  Stir in the milk until moistened.  Add the cheese and chilies.  Spread the mixture over the beans.  Bake uncovered 350 degrees for 45-50 minutes or until cornbread is done.  (Note: if, like me, you take it out of the oven a bit too soon and find that there is a thin layer of not done cornbread between the beans and the baked cornbread…microwave it for 3 minutes.)
 What Did You Bake Today?
 

Garlic Sauce Chicken ~ Dieter’s Delight

Garlic Sauce Chicken

OK, you have to be a garlic lover to like this one, but I promise it rocks!

6 skinless boneless chicken breasts
3 tablespoons rice vinegar
1 1/2 cups fat free chicken broth
1 cup whole peeled garlic
  • Preheat oven to 400 degrees.
  • Brown chicken in a nonstick skillet.
  • Remove chicken and add rice vinegar and chicken broth to pan. Cook over high heat for 2 minutes.
  • Put the garlic cloves into a 11 x 13 baking dish. Place the chicken on top and pour sauce on chicken.
  • Bake for 30 minutes.
  • Mash the garlic into the sauce and pour over chicken.
Serves 6
Calories – 171
Fat – 3 grams

This one is so simple and does not taste like diet food!

What’s feeding your diet this week?


Guess Who’s Coming To Dinner – Joanne of Eats Well With Others

So I have to admit. I’m a little nervous. This is my first time.

Cue awkward silence.

AS A GUEST BLOGGER!

But have no fear, I will try to make the experience as pleasurable and painless as possible. I am Joanne from Eats Well With Others, a first year MD/PhD student from NYC who spends most of her time avoiding studying by either (a) running or (b) cooking. These may seem like two antithetical things but they are actually one vicious cycle. I run so that I can eat what I want. And then I cook so that I can eat to fuel the running. I also like taking long walks on the beach and watching sunsets. And am just looking for someone who will make me laugh. Just thought I’d throw that in there in case this paragraph didn’t sound enough like a singles ad.

So let’s see, what do I cook? When people used to ask me this I always used to say, “Well, I can do just about anything with a sweet potato.” Which used to be very true and still is to some extent (sweet potatoes are one of my favorite vegetables), except that they have kind of been usurped by winter squash. And pasta. When you train for a marathon, you need to eat a lot of pasta. So that is by far what has been dominating my blog for the past five months. In general, though, I cook mostly vegetarian dishes, not necessarily by choice but mainly because I am a med student on a budget and it is cheaper this way. I use a TON of vegetables in my cooking and I truly believe that no meal is complete without them. I have also recently started baking. Which is infinitely more of a challenge than cooking is. But the end products are usually equally tasty.

Anyway, that’s enough about me. Let’s get on to our feature presentation!

Whenever I go home to visit my parents and siblings, I am the one who does the cooking. Mainly because if I don’t take the reins, we end up eating Chinese take-out at 10PM. And no one wants that. Except, of course, for my brother who is a stereotypical 20-year-old boy and could happily live off of Tex-Mex and General Tso’s Chicken for the rest of his life. Until his metabolism catches up with him. But that is another grievance for another day.

This dish is one of the few successes that I have had when cooking for my family. They are very picky eaters and so every dish I make is scrutinized heavily for spice content (my dad hates almost all herbs and spices. He can handle basil in small quantities. It is a situation. We are working on it) as well as for veggie content.

Two things that they do like, however, are chicken and potatoes. I’ll take what I can get.

Thus, I present you with grilled Hoisin chicken breasts, accompanied by a side of maple mustard glazed potatoes and string beans. I hope they are as celebrated in your kitchen as they were in mine.

Thank you to the ladies of the Krazy Kitchen for gracing me with the opportunity to share these with you all! Enjoy!

Grilled Hoisin Chicken Breasts
Serves 4

1/2 cup hoisin sauce
4 cloves garlic
1/4 tsp cayenne pepper
1/2 tsp sesame oil
1 tbsp soy sauce
1 tbsp rice vinegar
1 1/2 lb chicken breasts

1. Whisk together all of the ingredients except for the chicken in a small bowl. Heat up your grill.

2. Arrange chicken on a platter and brush lightly with the hoisin sauce mixture. Turn to the other side and coat as well. Place the chicken on the grill and cook, occasionally brushing with sauce and turning every 5 minutes, until chicken is cooked through.

Maple Mustard Glazed Potatoes and String Beans
Serves 6, adapted from Vegan With A Vengeance

2 lb red potatoes, scrubbed and diced
1 lb string beans
1 yellow onion, diced
2 cloves garlic
3 tbsp soy sauce
1/4 cup maple syrup
3 tbsp dijon mustard
1 tbsp olive oil

1. Preheat your oven to 400.

2. Arrange the vegetables in a 9×13 casserole dish. In a mixing bowl, stir together all of the other ingredients. Pour over the vegetables and mix until everything is coated. Cover with foil and place in the oven. Bake for 25 minutes. Remove from the oven and toss everything. Turn down the oven to 350 and cook, uncovered, for another 25 minutes. Remove from the oven, toss again, and cook for another 25 minutes or until potatoes are cooked through.

Oven Barbecued Chicken ~ Simply Delicious Sunday

OVEN BARBECUED CHICKEN

2-3 pounds boneless chicken breasts
olive oil to coat pan well
3 tablespoons butter
1 small onion, chopped
1 cup ketchup
1/3 cup roasted garlic rice vinegar
4 tablespoons brown sugar
1 tablespoon Worcestershire sauce
1/2 teaspoon sea salt
1/2 teaspoon white pepper

  • Heat oil in a large skillet
  • Brown chicken on all sides
  • Transfer chicken to 9×13 olive oiled baking dish
  • In a saucepan melt the butter and saute the onion
  • Stir in the remaining the ingredients and simmer uncovered for 15 minutes
  • Pour the sauce mixture over the chicken
  • Bake at 350 degrees for 1 hour
  • Baste periodically
  • We like to use the excess sauce over a serving of rice and serve this with home made Potato Salad

Previously posted at 3 Sides of Crazy May 2008

Stuffed Italian Chicken Breasts ~ Simply Delicious Sunday

STUFFED ITALIAN CHICKEN BREASTS
4 skinless, boneless chicken breast halves
1 teaspoon dried Italian seasoning
grated Parmesan cheese
1 bunch green onions, sliced
2 teaspoons minced garlic, jar
1/3 cup chopped mushrooms
1/2 cup roasted red bell peppers*
shredded mozzarella cheese
grated Parmesan cheese
salt and pepper to taste
olive oil
PURE

  • Preheat oven to 350 degrees.
  • Spray baking dish with PURE.
  • In a large skillet melt butter.
  • Add onions and garlic. Saute until translucent and fragrant. Add mushrooms and cook until tender.
  • Slice each chicken breast almost in half lengthwise, making sure they are attached on one side. Opened and laid flat, the chicken breast should resemble a butterfly.
  • Place between two sheets of wax paper, and pound flat, about 1/4 inch.
  • Combine Parmesan cheese with Italian seasoning, and sprinkle over chicken breasts.
  • At one end of each breast, place 2-3 strips of roasted pepper.
  • Add 1/4 cup of onion mixture to each chicken breast.
  • Top with some shredded Mozzarella cheese.
  • Roll each breast up, starting on the side with the peppers and cheese and secure with a silicone band.
  • Place in prepared baking dish.
  • Season chicken rolls with salt and pepper to taste, and drizzle with olive oil.
  • Bake in preheated oven for 15 minutes.
  • Set oven to broil, and continue cooking for 5 to 10 minutes.
  • Remove from oven.
  • Remove bands and ENJOY!

*I like to make these fresh, but jarred peppers are fine as long as they are drained well.

Sorry guys no pictures, the camera was still packed.
3420344618_9e5495bf19_m

Savory Pot Roast & Roasted Veggies

Super Savory Pot Roast & Veggies

I love Pot Roast. I adapted grams old recipe to my family and their likes.

3-4 pound Pot Roast
2 medium Onions
1 bag baby carrots
3 Tablespoons Olive Oil
3 large Yukon potatoes~scrubbed clean, but not peeled
Kosher Salt
White & Black Pepper
3 t. minced garlic
1 teaspoon dried chives
1 teaspoon thyme
1 teaspoon Pampered Chef Rosemary mix
Beef bullion
Red Wine (2 cups) OR White Wine (2 cups)

  • Pre-heat the oven to 350 degrees.
  • The meat you use is important. My favorite roast is the chuck roast because it has wonderful marbling throughout the meat, and when cooked right (prep, cover, cook ~ don’t fiddle with it while it’s in the oven) any chuck roast winds up being tender and melt-in-your-mouth delicious. Be aware that the tougher the piece of meat is, the longer it needs to cook so that the connective tissue will soften and break down. You truly can’t rush a pot roast, you’ll be disappointed if you try as it will be dry or lack flavor. BE PATIENT. You want the meat to basically fall apart. You SHOULD NOT need a knife to cut it.
  • Bring the piece of meat to room temperature.
  • GENEROUSLY sprinkle the first side of meat with the Kosher Salt and Pepper mix.
  • Heat enough olive oil in the bottom of a fry pan to make a thick coating. Heat to a medium-high heat.
  • Cut the onions tip to root, cut off root and stem, peel and lay flat into hot oil.
  • Brown both sides well. Remove to side.
  • Add the baby carrots and do the same. I normally cut each carrot just in half. Brown carrots-you’re trying more for color here than cooking. They will have plenty of time to cook in the oven. I also like to add my garlic (I use the bottled minced garlic from the produce section) and spices at this point. By this time I have put them all into a mortar and pestle to revive their scents and aromas. When carrots are finished, remove them to the same plate as the onions.
  • If necessary add more olive oil to the pan and add the roast seasoned side down. While it’s browning season the other side really well Brown both sides and all edges really well.

Now, for the oven I like to use my grandma’s old Magnalite dutch oven which cooks really even! And see those little hobnail bumps on the bottom side of the lid? Those are better known as drip catchers. They collect the steam from the juices and redistributes it all right back down on the roast as it cooks. These help keep the meat moist and juicy.

  • After the roast is browned, place it in the dutch oven and spread vegetables all around it.
  • While fry pan is still hot, add white or red wine and the beef bullion to deglaze the pan ~ make sure you scrape up all the stuck little bits from the bottom. Cook long enough to mix well and then pour over the roast. The liquid should come up at least half way on the sides of the roast and vegetable mixture. For this recipe we added the white wine to the recipe and drank the red. The red wine, Harrod wine, is from our nephew’s vineyard so we don’t waste it cooking, but enjoy every last drop.
  • Put the lid on the dutch oven, put it in the oven, don’t open the door for AT LEAST 3 hours! Today’s roast was 2.39 pounds and I roasted it for 3 1/2 hours. Go relax or at least get the dishes you’ve dirtied so far done up. At 3 hours, I prep the potatoes for boiling. I prefer not to cook mine with the roast ~ I prefer a bit of substance instead of the mush they become with the roast. I do a basic mashed with heavy cream, salt, pepper, and butter (hey you gotta splurge a little sometimes!)

We get 2 meals out of these proportions. Now to us eating starts with the eyes ~ so make it pretty. I love my polish pottery, all of it is unique one-of-a-kind creations and decorates a table and your meal so easily!

Previously posted at 3 Sides of Crazy

Don’t forget the party starts next week!
Halloween Fall Round Up

WHEN: Sunday, October 18th ~ Saturday, October 31st, 2009
WHERE: OuR KrAzY kItChEn
RSVP: MR. LINKY

We’re having a party here at the OuR KrAzY kItChEn and you’re invited. Bring your favorite recipe, decorating idea, pictures, anecdotes and let’s have some fun together.

  • Do you have a special popcorn ball recipe?
  • What is your favorite fall recipe?
  • Do you have a favorite apple recipe?
  • Do you have special way to carve pumpkins?
  • How about a party punch that’s perfect for Halloween?
  • What is your idea of a best costume?

We’ll post Mr. Linky on October 18th and leave him in place through Halloween. Write your post piece and come link it up. We’ll all have some time to blog hop and see each other and try recipes.