


Author: QuiltLady
SATURDAY COFFEE ~ BLOG 365.189

PORK CHOPS & POTATOES ~ BLOG 365.188
The original recipe called for using the slow cooker which is great, but NOT always necessary so I converted this to an oven recipe.

PORK CHOPS & POTATOES
6 bone in pork chops (6-8 ounces each)
1 tablespoon avocado oil
1 tablespoon butter
24-30 ounce package frozen shredded hash browns, thawed
1 1/2 cups grated sharp cheddar cheese
1 can Campbell’s cream of celery soup
1/2 cup milk
1/2 cup FULL fat sour cream
FRESH ground sea salt and black pepper, to taste
1 can French fried onions
- Preheat oven to 350°.
- In a LARGE skillet heat oil and butter over medium heat until melted.
- Generously season pork chops on both sides with FRESH ground sea salt and black pepper.
- Sear pork chops quickly on both sides. Set aside.
- In a large bowl whisk together the soup.
- Stir in 1 cup of the cheese and half of the onions.
- Fold the hash browns into the soup mixture.
- Arrange potato mixture in the bottom of a large baking dish.
- Nestle browned pork chops into potato mixture.
- Cover and bake 45 minutes.
- Uncover and top with remaining cheese and onions.
- Bake another 15 minutes until pork is cooked through and cheese is melted.
NOTE:
- To convert to a CROCK-POT recipe you don’t need to thaw the hash browns first, just break them up into smaller pieces.
- Also be sure to spray CROCK-POT well with non-stick spray.
- Prepare the same as for the oven by layering the potatoes under the pork chops and saving the remaining cheese and onions for the last 15 minutes.
- Slow cook on low 5-6 hours.
CRISPY GREENISH SALAD ~ BLOG 365.187
The original recipe called for leaving the peels on the cucumber and apple making this a monochromatically ALL green salad, but we found the peels too bitter. We also usually skip the lettuce and avocado if we’re not making this for a LARGE group because we have leftovers and the lettuce and avocado do NOT hold well.
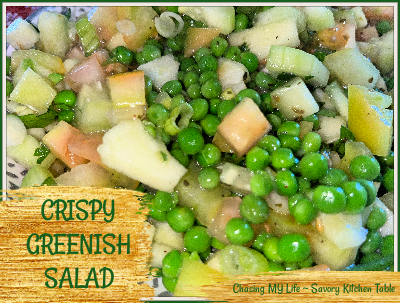
CRISPY GREENISH SALAD
1 head butter lettuce (optional)
1 avocado (optional)
1 green apple, cored, peeled and chopped small
1 bunch green onions, sliced
Juice of 1 lemon
1 medium cucumber, peeled and diced
2 green tomatoes, diced
2 cups frozen petite peas, thawed and drained WELL (see note)
- Toss apple pieces in the lemon juice to prevent browning.
- In a large bowl toss all the ingredients together including the lemon juice in the apples.
DRESSING
1/4 cup avocado oil
Juice of 1 LARGE lime
FRESH ground sea salt and black pepper, to taste
1 teaspoon Italian seasoning
- Whisk together and drizzle over salad.
- Toss well and chill before serving.
NOTE: Many recipes say you can use the peas frozen, but we find they leave behind too much moisture.
WORDLESS WEDNESDAY ~ BLOG 365.186

DOUBLE BANANA CAKE ~ BLOG 365.185

I hope you’re having a WONDERFULLY relaxing and happy 4th of July – Stay safe and don’t forget to hydrate! It’s HOT out there.
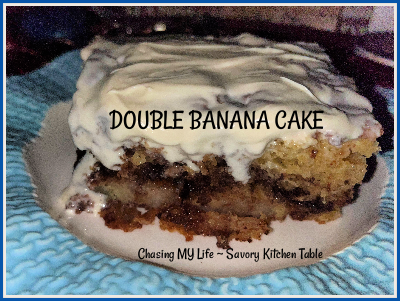
DOUBLE BANANA CAKE
18 ounce banana cake mix plus any ingredients to prepare it according to package directions
3/4 cup chopped walnuts
1 banana, THINLY sliced
4 tablespoons NUTELLA hazelnut spread
- Preheat oven to 350°.
- Spray 9 inch deep baking dish.
- Prepare cake mix according to package directions.
- Fold in nuts.
- Spread batter in prepared pan.
- Dot batter with NUTELLA.
- Using a knife swirl the Nutella into the cake mix.
- Layer banana slices in a single layer on top.
- With your fingers or the back of a spoon press banana slices down into the cake batter.
- Bake 25-30 minutes or until tester comes out of center clean.
- Cool in pan 15 minutes.
- Frost as desired.
HAPPY HOMEMAKER MONDAY & MENUS week 27 of 2023 ~ BLOG 365.184

Be sure to join us for Happy Homemaker Monday and link up with our host, Sandra at Diary of a Stay at Home Mom


It has been warm, but ABSOLUTELY beautiful with a decent ocean breeze. The next few days are supposed to near triple digit, but nothing unbearable compared to the rest of the country!

Toddler squeeze (apple carrot pineapple) and coffee 😀

|
THIS WEEK’S TO DO LIST, PROJECTS & APPOINTMENTS
|
|

|
WHAT’S ON THE DVR/TV
|
|
 ,
,
I’ve been working so much that I’ve been tired enough I haven’t been getting any reading done at night. I’m hoping to pick up with #6 A Vineyard Vow from the series I’ve been reading.


|
MONDAY 7/3
|
TUESDAY 7/4
|
WEDNESDAY 7/5
|
THURSDAY 7/6
|
FRIDAY 7/7
|
SATURDAY 7/8
|
SUNDAY 7/9
|
|
|
DINNER
|
MARSALA PORK CHOPS & 3 CHEESE SOUFFLES
|
CARNE ASADA, GREEN CHILI DIP & CHIPS
|
ORANGE GLAZED MEATBALLS & RICE DRESSING
|
CHOPPED ITALIAN STEAKS & CAULIFLOWER AU GRATIN
|
YOYO YOU’RE ON YOUR OWN
|
SOUTHWEST CHICKEN SALAD
|
RED BEANS & RICE WITH CHICKEN & SALAD |
|
DESSERT
|
|
GRANS APPLE CAKE
|
|


SILENT SUNDAY ~ BLOG 365.183

SATURDAY COFFEE THOUGHTS ~ BLOG 365.182

MID YEAR UPDATE QUARTERLY LIST UPDATE ~ BLOG 365.181
It’s MID-YEAR update time. Can you believe we’re half way through the year already? This year seems to be pedaling by faster and faster!
When I took one of those silly Facebook games last December it said my word was RESILIENCE, but I liked PROGRESS better. So decided both words for RESILIENT PROGRESS were better! Then I saw a meme that spoke to me and decided to add BALANCE! I truly believe all three words work hand in hand to make life easier and happier.

Update to MY list for 2023 is:
- Do a Happy Homemaker Monday post each and every week and link up with Sandra over at Diary Of A Stay At Home Mom. This keeps me more on track and organized about my home life. Doing Happy Homemaker Monday so extensively helps keep me on track as it summarizes the past week and lays out a fairly concise plan for this week.DONE TO DATE
- I have also decided the join Sandra over at Diary Of A Stay At Home Mom for her Blog 365 challenge. A blog post every single day of 2023! Sometimes the post might be a full one but other times it might simply be a picture. I may not always get the logo in, but I will get the post done! DONE TO DATE except 5 back posts I’m working on to get up to date.
- Do a devotional every day. I seriously need to get better in this category. When time falls short and there is so much to do, personal time AND pampering time always take a back seat 🙁
- Follow a nightly skincare regime. DONE TO DATE (pretty well)
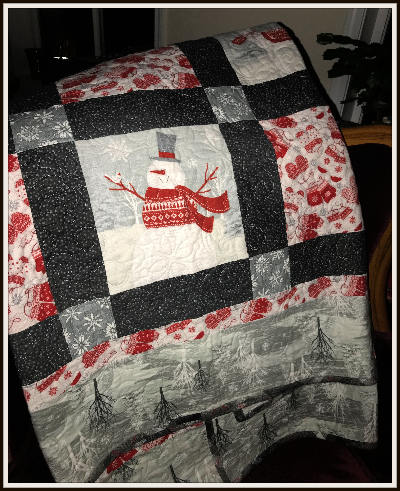
- Complete 4 quilts – at least 1 for each quarter. This year is starting off right with these 2 Christmas beauties being bound. I have several others that are 90% done, but need bindings and I’m hoping to get to them soon.

- Make a better effort to reach out and connect with friends and family more regularly. Pretty good, but could still be better!
- Learn YOGA or Pilates or both! I can’t seem to find the time to do these, but will keep working on it.
- Take at least a 2 mile walk daily. While I USUALLY get this done in just my daily routine, it is something I need to be more conscious of accomplishing.
- Continue to downsize and declutter EVERYTHING. DONE TO DATE and the garage sale was a GREAT success despite the weather (sun, rain, wind, snow and that was just the first hour). The BIG & HEAVY items are sold and gone which was the most important thing to me. As we continue to go antiquing I have added more questions to my thought process about whether I really need and/or will use something before I buy it. I have a couple boxes of old toys that I’m meeting with my antiques guy to sell.
- Clean out photo files that date back 13 years! I’m working on it, but it’s really hard. This is a serious work in progress that will ALWAYS take ALL year, EVERY YEAR, mainly because I keep taking pictures 😀
- Create Shutterfly photo albums for 2022, 2021, 2019, 2018, 2017 and 2016. These have been in the works for awhile, but I’m going to get them done this year.
- Do more drawing and painting – at least one per every other month. NOT so good this year as it has been filled with working on the estate sales with a friend as well as our own garage sale through the horribly long and cold/wet winter. The remainder of our garage sale items were donated to the Eagles for their yard sale (enough to cover my good deed category).
- Focus on rewriting more recipes to work for only 2 people with NO leftovers. This is a work in progress, but doing REALLY well so far. It has been seriously complicated by the increase in grocery prices 🙁 A friend loaned me her mom and grandma’s recipe boxes which was fun for some new recipes. It also helped with the “clutter” since I only photoed those recipes I REALLY wanted to make – so I only “rented” them.
- Volunteer at least once a month for a community project. Since I’ve gotten more involved in the Eagles this is a category I SERIOUSLY accomplish regularly and enough for the both of us. 😀
- Do a date weekend once a month – exploring a new place we’ve never been before. In February we were going to take a Valentine’s couples painting class that didn’t happen but in March we went for a special romantic dinner to TRUE KITCHEN for hubby’s birthday and it was fantastic. In January we were going to go to the beach antique shopping and a special dinner out at Waterfront Depot, an old train depot on the bay, but weather has been so bad and medical appointments didn’t line up so we will postpone this until later this year. In April we finally made it to the coast and did some antiquing also. Tomorrow night we going to dinner and see a local oldies band.
- Clean out old files and recycle or destroy old papers. This is still an ongoing work in progress, but I’ve made seriously good progress in 2022 and so far through 2023 and will finish through next winter.
- Eat at least 1 piece of fruit daily. Good so far.
- I’m all about leading a positive life and carrying the Christmas spirit year round. There is no better way to do that than to do at least 1 random act of kindness every time I leave the house.

- Read 36 books. Hoping for double this year over last year! 36 was a realistic goal and I actually reached 59 which makes me REALLY happy! Here’s a list of the books I have in queue – a baker’s dozen+ to get this year started. When I’ve actually read them I’ll change their number to red. 1) A Fire Sparkling by Juliane Maclean 2) The Honey Bus by Meredith May 3) When It Falls Apart by Catherine Bybee 4) The Brighter the Light by Mary Ellen Taylor 5) The Lost Girls of Willowbrook by Ellen Marie Wiseman 6) The Woman with Two Shadows by Sarah James 7) The Silent Woman by Minka Kent 8) Waking Kate by Sarah Addison Allen 9) Real Bad Things by Kelly J. Ford 10) The Last Summer at Chelsea Beach by Pam Jenoff 11) The D’Angelos by Catherine Bybee 12) Brewed Book #1 in the Cozy Coffee Shop series by Heather Sage 13) Cauldrons Call by Kristen Proby 14) The Resistance Girl by Mandy Robotham 15) Someone to Hold Wild Widows #2 by Marie Force. 16) State of Shock, First Family #4 by Marie Force 17) Summer Magic #1 The Thorne Witches by T.M. Crom 18) Clue Crewe by Jana De Leon 19) Cauldron’s Call by Kristen Proby 20) Find Her by Chris Patchell 21) The Sunrise Cove Inn (Vineyard series #1) by Katie Winters 22) Firefly Nights (Vineyard series #2) by Kate Winters 23) On The Market (Texas BBQ Brothers #1) by Audrey Wick 24) We Begin at the End by Chris Whitaker 25) A New Choice (The new Beginnings Series #1) by Michelle MacQueen 26) The Copperfield House (A Nantucket Sunset series #1) by Katie Winters 27) Firefly Nights, #2 Vineyard series by Katie Winters 28) August Sunsets, #3 Vineyard series by Katie Winters 29) Under the Maui Sky #1 Maui Island by Kellie Coates Gilbert 30) Fortune Teller #25 Miss Fortune series by Jana DeLeon 31) State of Denial #5 First Family series by Marie Force 32) The Heart Match by Phillipa Nefri Clark 33) The Menu Match by Phillipa Nefri Clark 34) The Christmas Match by Phillipa Nefri Clark 35) Justice, A Rocky Mountain Thriller by Ann Voss Peterson 36) The Alice Network by Kate Quinn 37) Girl One Murder ~ FBI Suspense Thriller #1 by Maya Gray 38) Lost & Found ~ A Clean Small Town Romance #1 by Lucinda Race 39) A Vineyard Thanksgiving #4 Vineyard series by Katie Winters 40) A Vineyard White Christmas #5 by Kate Winters 41) A Vineyard Vow #6 by Katie Winters 42) A Vineyard Lullaby #7 by Katie Winters
- I’ve added a “SEASONAL” list too. I started with fall that you can see here. And a simple winter list is here. I’ll work on a spring list if it ever happens 😀 – never got around to the spring list and it turned into the summer list which is primarily figuring out and solving the irrigation and water u=issues around here.
- Finish indexing the recipes on my Food blog, Savory Kitchen Table. This is a serious work in progress and hold over from 2022 that WILL take ALL year.
- Finish indexing the recipes on my Life blog, Chasing MY Life. When I merged my old blogspot blogs into this single blog it duplicated many things and added an “ALL” category that I am having to eliminate one by one so it’s taking a LONG time. This is a serious work in progress and roll over from 2022 that WILL take ALL year into the next also.
PAN SEARED CHICKEN with LEMON LIME SAUCE ~ BLOG 365.180
This is a modified recipe reminiscent of RAO’S famous lemon chicken. Everyone cleaned their plates and went in for seconds.

PAN SEARED CHICKEN with LEMON LIME SAUCE serves 4
4 chicken breast steaks, 1/4 inch thick
FRESH ground sea salt and black pepper
1/3 cup flour
2 tablespoons butter
1 tablespoon avocado oil
- Melt butter and oil in large skillet over medium heat.
- Add shallots and stir 30 seconds.
- Generously season chicken breasts with FRESH ground sea salt and black pepper.
- Dredge chicken breasts in flour, shaking off excess.
- Add chicken breasts to hot butter. Sear each side 3-4 minutes until cooked through.
- Serve over noodles, rice or mashed potatoes and drizzle sauce over top.
SAUCE
1 cup FRESH lemon juice
1 cup key lime juice
1/2 cup avocado oil
1/2 cup HOMEMADE chicken broth
1 tablespoon red wine vinegar
2 tablespoons sugar
2-3 cloves garlic, FINELY minced
FRESH ground sea salt and black pepper
1 tablespoon cornstarch
- Whisk together the lemon juice, key lime juice, avocado oil, red wine vinegar, sugar, garlic, FRESH ground sea salt and black pepper in a large saucepan.
- Simmer 5-10 minutes until sugar is dissolved and heated through.
- Put the cornstarch in a small bowl and ladle out about a 1/2 cup of lemon juice mixture to whisk into the cornstarch.
- Add cornstarch mixture to the saucepan, whisking until combined. Simmer 5-10 minutes until desired thickness.