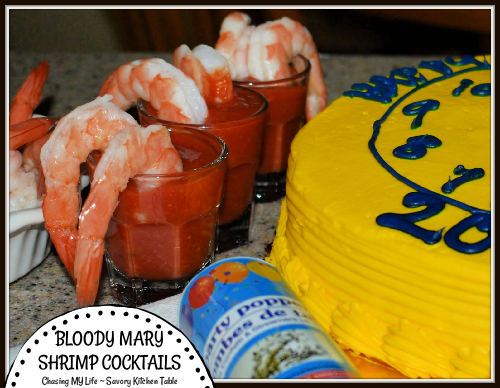
BLOODY MARY SHRIMP COCKTAIL

BLOODY MARY SHRIMP COCKTAIL adapted from Ree @ Pioneer Woman
1 cup jalapeno ketchup
1 teaspoon prepared horseradish 
1 teaspoon Worcestershire sauce 
1/2 teaspoon Bragg’s liquid aminos 
1/2 tablespoon vodka 
1/2 lemon, zested and juiced 
FRESH ground sea salt & black pepper 
16 peeled, de-veined and cooked extra-large shrimp (about 1 pound), tails on
1/2 celery stalk, finely diced, plus 16 small celery stalks with leaves, for garnish (optional)

  • Mix together the ketchup, horseradish, Worcestershire sauce, liquid aminos, vodka lemon zest and lemon juice.
  • Season with salt and pepper.
  • Transfer the sauce to 16 shot glasses, then top each with a shrimp and a sprinkle of diced celery.
  • Place a celery stalk with leaves into each glass.

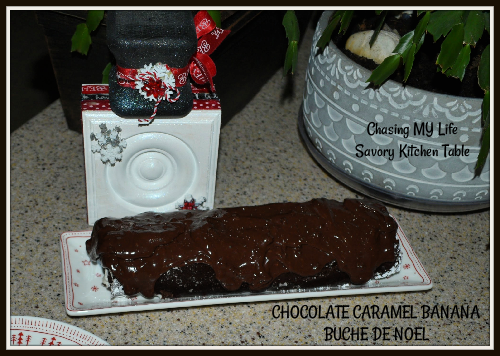
CHOCOLATE CARAMEL BANANA BUCHE DE NOEL

I went super simple on this, but you can get as carried away with decorations as you want. This cake is great, FULL of flavor even without the ganache! I also made half of the recipe for just the 2 of us so it was more of a twig or branch than a log, but didn’t impact the flavor 🙂

CHOCOLATE CARAMEL BANANA BUCHE DE NOEL

CAKE
1 cup cake flour
1/4 cup cocoa
1/2 teaspoon baking soda
1/2 teaspoon salt
1/4 teaspoon baking powder
2 eggs
3/4 cup sugar, divided
1/2 cup mashed ripe banana (about 1 medium)
1 teaspoon PURE vanilla extract
3 egg whites
1 tablespoon confectioners’ sugar

  • Preheat oven to 375°.
  • Spray a 15-in. x 10-in. x 1-in. baking pan with non stick cooking spray; line with parchment paper and spray the top of the parchment paper with non stick cooking spray; set aside.
  • Sift together the flour, cocoa, baking soda, salt and baking powder. Set aside.
  • In a large mixing bowl, beat eggs for 5 minutes; add 1/2 cup sugar, banana and vanilla.
  • In a small mixing bowl, beat egg whites on medium speed until soft peaks form.
  • To the egg whites gradually beat in remaining sugar, a tablespoon at a time, on high until stiff peaks form.
  • Add flour mixture to banana mixture; mix gently until combined.
  • Fold in egg white mixture.
  • Spread into the prepared pan.
  • Bake for 10-12 minutes or until cake springs back when lightly touched.
  • Cool 5 minutes; run a knife around the edges to loosen.
  • Turn cake onto a kitchen towel dusted with confectioners sugar.
  • Gently peel off parchment paper.
  • Roll up cake in towel jelly-roll style, starting with a short side.
  • Cool completely on a wire rack.
  • Once the roll is cooled, unroll the cake.
  • Because the cake has cooled in a rolled position it will easily re-roll.

VANILLA BEAN FILLING

2 cups heavy whipping cream, chilled
⅔ cup (80 grams) confectioners’ sugar
1 vanilla bean, split lengthwise, seeds scraped and reserved

  • In the bowl of a stand mixer fitted with the whisk attachment, beat cream, confectioners’ sugar, and vanilla bean seeds at medium-high speed until stiff peaks form, 2 to 3 minutes.
  • Unroll cake and evenly spread the filling.
  • Roll back up.

TOPPING ~ WHIPPED GANACHE FROSTING Makes about 2 cups

4 (4-ounce) bars (460 grams) high-quality dark (60% to 65%) chocolate, chopped
2 cups heavy whipping cream

  • Place chocolate in a medium heatproof bowl.
  • In a small saucepan, bring cream JUST to a simmer below a boil over medium-high heat.
  • Pour cream over chocolate; cover and let stand for 5 minutes.
  • Whisk together chocolate and cream until smooth.
  • Let stand until ganache reaches room temperature, 45 minutes to 2 hours. (If necessary, refrigerate for 15 minutes.)
  • Transfer ganache to the bowl of a stand mixer fitted with the whisk attachment.
  • Beat at medium-high speed until a spreadable consistency is reached, 5 to 8 minutes.
  • Spread or drizzle on the cake.

OVERNIGHT BREAKFAST CASSEROLE

Our family has been making some version of this casserole, each their OWN way, and each called Overnight Breakfast Casserole, for as long as I can remember. Each and every one of those casseroles was excellent on their own merit, but the real plus is that it’s a MAKE AHEAD (anywhere from 3 hours to overnight) casserole and take the stress off of the holiday morning. Just pop it in the oven while you’re watching the kids open their stockings and gifts or if you have guests you don’t have to spend time in the kitchen and away from your togetherness time. Be sure and take the casserole out of the refrigerator at least a half an hour before you put it in the oven so it can come to room temperature.

The other beauty of this recipe is that the innards are up to you – either what you prefer or what you have on hand. It is just a basic strata with eggs, bread chunks and add ins of a protein, veggies and cheese. It is also a GREAT way to use up stale bread. You can use whatever bread you prefer, but we love sourdough ourselves. Some people also prefer to cut the crust off, but we are definitely crust on people.

We also tend to always use the same add-ins where as my niece changes it up EVERY time she makes it, but they always have a protein, veggies and cheese(s). Seasonings are another area that can change this up, but we tend to stay pretty traditional with FRESH ground sea salt and black pepper. Occasionally I’ll use tri-color pepper for a hint more heat.

My normal proteins are diced ham and crumbled bacon, but I have been known to use rotisserie chicken also. My traditional veggies are diced red peppers, sliced green onions and thinly sliced mushrooms. Sharp cheddar is our cheese of choice, but we also like shredded Gruyere and/or pepper Jack.

Oh and did I mention that it makes a wonderful leftover dish for a quick lunch over a holiday weekend.
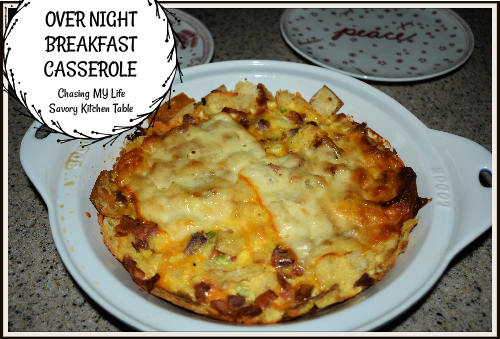
OVERNIGHT BREAKFAST CASSEROLE serves 10-12
PREP TIME: 20 minutes
BAKE TIME: 50-60 minutes

12 slices sandwich size bread, flavor of choice, cubed
3/4 cup diced ham steak
8 slices bacon, cooked and crumbled
3 green onions, THINLY sliced
1/2 red pepper, FINELY diced
4 cups grated cheese, flavor of choice
6 LARGE eggs
3 cups WHOLE milk
FRESH ground sea salt and black pepper
1/2 teaspoon Coleman’s mustard (optional)

  • Preheat the oven to 300°.
  • Cube bread and place on a baking sheet.
  • Add baking sheet to oven for 15 minutes, just long enough to dry out the bread cubes, but not toast them.
  • Whisk together the eggs, milk and seasonings.
  • Spray 9×13 baking dish with non-stick spray.
  • Layer the bread cubes evenly into the bottom.
  • Even top the bread cubes with half of the proteins, veggies and cheese.
  • Layer again ending with cheese.
  • Pour the egg mixture over top.
  • Cover and refrigerate at least 3 hours, but preferably overnight.

NEXT MORNING:

  • Remove baking dish from refrigerator to bring to room temperature.
  • Preheat oven to 350°.
  • Remove plastic wrap and cover with foil.
  • Bake 50-60 minutes or until center is set when you test with a knife and it comes out clean. If you’re using a deep baking dish or baking multiple pans, you will need to increase the baking time by another 15 minutes.
  • Return to oven for 5 minutes.
  • Serve immediately.

BEAR CLAWS OR PAWS ~ See’s Candy COPY CAT

BEAR CLAWS OR PAWS ~ See’s Candy COPY CAT – 12 servings

30 KRAFT caramels (238 grams) or 1 (11 ounce) bag KRAFT Caramel Bits
3 tablespoons heavy whipping cream
1 tablespoon butter
1 teaspoon PURE vanilla
1/2 teaspoon sea salt
1 cup peanuts, salted roasted or honey roasted
12 ounces vanilla almond bark for polar or milk chocolate for regular
COARSE sea salt (optional)
holiday sprinkles (optional)

  • Line a large cookie sheet with Silpat mats or parchment paper and grease it with butter or spray with non stick cooking spray. Set aside.

  • Melt caramels with butter and cream in the microwave in 30 second increments, stirring, and repeating until completely smooth.

  • Fold in vanilla, salt and peanuts. Let it sit in the bowl to cool for about 15 minutes, stirring every few minutes.

  • Spoon onto the mats with a small cookie scoop into mounds. Chill in refrigerator for an hour or until set.

  • Place almond bark in a bowl and melt in the microwave on low in 30 second increments and stir until melted and smooth.
  • Dip each caramel cluster in the chocolate to coat.
  • Holding it over the bowl, tap on the edge to let any excess chocolate drip back down.
  • Place cluster back on the parchment lined pan and repeat with remaining clusters.

  • Put the pan back in the refrigerator for an hour or until chocolate is set.
  • Remove from parchment.
  • Store in a cool place.


CHICKEN TORTILLA SOUP

CHICKEN TORTILLA SOUP serves 6

1 medium onion, finely chopped
1 can (10 oz) diced tomatoes with green chiles, undrained
1 can (10 oz) mild enchilada sauce
1 can (4.5 oz) chopped green chiles
4 cups chicken broth
1 can white shopper corn
4 cloves garlic, minced
1 teaspoon chili powder
1 1/2 teaspoons ground cumin
1/4 cup chopped FRESH cilantro
1/2 teaspoon salt
3 cups diced rotisserie chicken
4 soft corn tortillas (5 to 6 inch), cut into 1-inch strips
chopped onions for garnish
sour cream dollop for garnish
drizzle of hot sauce for garnish
chopped cilantro for garnish

  • Add everything except chicken to a large sauté pan or soup kettle.
  • Cover, cooking over medium heat and bring to a SLOW boil.
  • Lower heat to low and simmer 30 minutes.
  • Add chicken, stirring to blend.
  • Serve immediately with toppings.

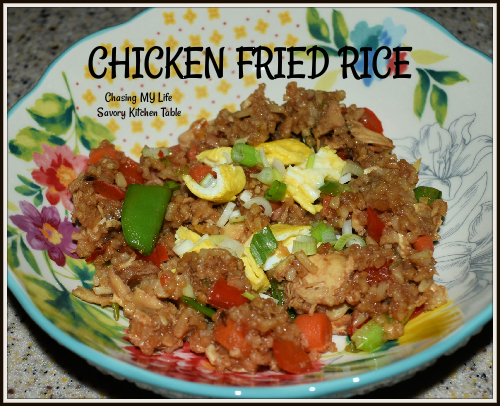
CHICKEN FRIED RICE

CHICKEN FRIED RICE
1 tablespoon avocado oil
3 eggs, beaten
1/4 cup Bragg’s liquid aminos or soy sauce
2 tablespoons sweet chili sauce
FRESH ground black pepper
1 red pepper, diced
1 LARGE carrot, diced
1/2 cup frozen corn kernels
1 cup snap peas, trimmed
1 bunch green onions, sliced on the diagonal – reserve a few for garnish
4 cups cooked rice, chilled
2 cups chopped rotisserie chicken

  • In a large skillet heat half of the oil over medium-high heat.
  • Add eggs and swirl to coat pan bottom.
  • Cook 1-2 minutes until set.
  • Transfer egg to cutting board.
  • Cool slightly.
  • Roll up like a jelly roll and thinly slice crosswise. Set aside, keeping warm.
  • In a small bowl whisk together the liquid aminos and chili sauce. Set aside.
  • Add remaining oil to skillet and heat over medium heat.
  • Add peppers, onions, corn and peas, cooking 4-5 minutes.
  • Add rice, chicken pieces and reserved sauce mixture, cooking 4-5 minutes until heated through.
  • Toss with reserved scallions and egg pieces.
  • Serve immediately with additional soy sauce if desired.

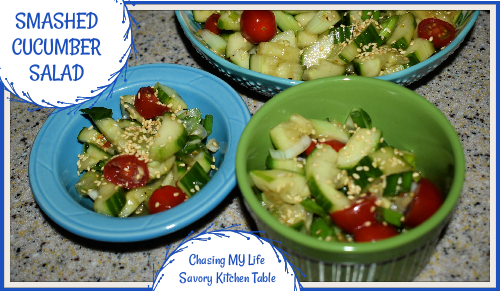
SMASHED CUCUMBER SALAD

SMASHED CUCUMBER SALAD adapted from Molly Yeh

Evidently smashing cucumbers is quite common in Asia. Oddly it provides a deliciously rustic presentation and releases the excess moisture.

2 LARGE English cucumbers
2 LARGE green onions, sliced thin
FRESH ground sea salt and tri-color pepper
2 tablespoons Bragg’s liquid aminos
2-3 tablespoons apple cider vinegar
1 1/2 teaspoons toasted sesame oil
2 teaspoons sugar
1/2 teaspoon crushed red chile flakes
Toasted sesame seeds and fresh cilantro, for garnish

  • Peel strips down each cucumber and cut off ends.
  • Place the cucumbers in a resealable plastic bag.
  • Seal and use the palm of your hand to lightly smash the cucumbers.
  • Take the cucumbers out of the bag and cut into 1-inch chunks.
  • Add to a bowl and season to taste with FRESH ground sea salt and black pepper.
  • Toss to coat.
  • Combine the liquid aminos, vinegar, sesame oil, sugar and chile flakes in a medium bowl.
  • Whisk well to dissolve the sugar. 
  • Add the cucumber chunks and green onions, toss to coat.
  • Garnish with the toasted sesame seeds and cilantro.

NOTE: The recipe does NOT call for tomatoes, but I had a few that I threw in for color 😀

HOT HONEY LIME BUTTER CHICKEN

Hidden in a stack of my magazine tear outs, I found this delectable recipe for a chicken recipe that is as sweet as it is spicy and is an eye catching appetizing dish. I made just a very few changes to appeal to my liking.

HOT HONEY LIME BUTTER CHICKEN
4 chicken leg quarters
1/4 cup honey
1/4 cup Frank’s Original hot sauce
2 + 2 + 2 tablespoons butter
2-3 cloves garlic, minced
FRESH ground sea salt and black pepper
1 teaspoon cumin
1 tablespoon avocado oil
Zest and Juice of 2 limes, separated (see notes)
2 green onions, sliced thin

  • Preheat oven 425°.
  • Stir together cumin, salt and pepper to make a dry rub.
  • Pat chicken pieces dry.
  • Rub chicken all over with the dry rub.
  • Melt 2 tablespoons butter and avocado oil together in a large skillet over medium-high heat.
  • Add chicken, skin side down and sear 4-5 minutes per side until golden on both sides.
  • Transfer chicken to baking sheet or baking dish, skin side up.
  • Wipe skillet clean.
  • Add 2 tablespoons of butter.
  • When melted add honey, hot sauce and garlic, cooking a few minutes until well blended.
  • Pour honey mixture evenly over chicken.
  • Place baking dish in pre-heated oven for 20 minutes, or until chicken pieces register 175°.
  • Turn off oven and let chicken rest 5 minutes
  • Transfer chicken to platter and keep warm.
  • Add 2 tablespoons of butter to skillet to melt.
  • Whisk lime juice into drippings and transfer back to skillet with butter, cooking until slightly thickened.
  • Spoon sauce over chicken and garnish with scallions and lime zest.

NOTES: Oranges or lemons work just as well as limes and have a subtle change in the flavor profile.

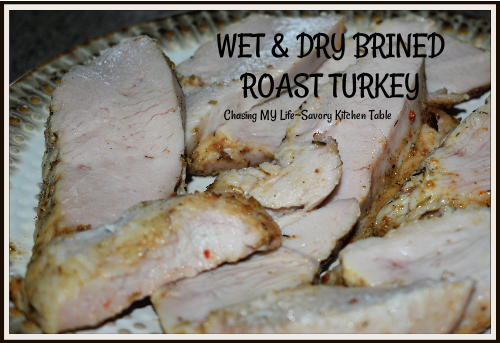
WET & DRY BRINED ROAST TURKEY

Preparing turkey breasts instead of the whole turkey is a sure fire way to make sure everyone has the white meat they desire. It is also EASIER – no carcass or bones to mess with. AND it looks more elegant when served. No wait time while someone has to carve it is a real plus too! PLUS you still get enough drippings to make a GREAT gravy with.

I use one 3 pound breast per two people. This gives you enough for the BIG day as well as leftovers for sandwiches. I also use both a WET BRINE and a DRY BRINE.

For Thanksgiving I take the turkey out of the freezer on Monday and move it to the refrigerator. It will thaw in less than 24 hours generally. Then on Tuesday I submerge it into the wet brine. On Thursday I drain off the wet brine an hour before I want to roast it and bring it to room temperature.

WET BRINE
3 cups WHOLE milk
1/2 cup apple cider vinegar
1/4 cup sea salt

  • Whisk together until salt is dissolved.
  • Place turkey breast in large ziplock bag.
  • Place bag in baking dish or large bowl.
  • Pour brine in bag and seal tight.
  • Refrigerate 24-48 hours.

DRY BRINE
1 teaspoon onion powder
1 teaspoon garlic powder
1 teaspoon sugar
1/2 teaspoon dried tarragon
1/2 teaspoon red pepper flakes
1/2 teaspoon orange peel

  • Drain wet brine for turkey breast and pat dry.
  • Combine ingredients in mortar and finely grind.
  • One hour before you plan to start roasting, rub turkey breast on both sides, lightly cover with cheesecloth and allow to come to room temperature.

3 pound half breast
2 carrots, washed and sliced (optional)
2 stalks celery, washed and sliced (optional)
1 SMALL onion, diced (optional)
2 tablespoons unsalted butter
1 tablespoon COARSE Kosher salt
FRESH ground black pepper

  • Preheat oven to 450°. This will start the browning process.
  • Adjust oven shelf to low position.
  • Add any veggies you might be using to the bottom of the roasting pan. If using veggies I add a couple tablespoons of butter to the bottom so they don’t burn. Also if using veggies you can place the breast directly on top eliminating the roasting rack and another thing to wash!
  • Top with roasting rack.
  • Transfer DRAINED brined breast to a roasting rack.
  • Brush turkey with melted butter. Loosen the skin and brush a little butter under there also. Make sure skin is covering as much meat as possible. This helps keep your turkey moist.
  • Season with Kosher salt and FRESH ground black pepper.
  • Move pan to oven.
  • Reduce heat to 350° when you place turkey breast in the oven. This will slow down the cooking to keep the meat juicy. With no bones the turkey breast will cook much more quickly.
  • Roast 1 hour or until internal temperature reaches 165°. Check every 15 minutes – NOT to baste, but to make sure your skin is no browning too fast. If it is, lightly cover with foil for the remainder of the roasting time.
  • Remove turkey to carving board, cover with foil and rest 15-20 minutes while you prepare the gravy from the drippings.
  • Prepare gravy.
  • Carve turkey.

NOTE: Leftovers can be stored in an airtight container 5 days or frozen up to 2 months. LOL like any leftovers will last that long! I see serious turkey sandwiches ALL weekend long!

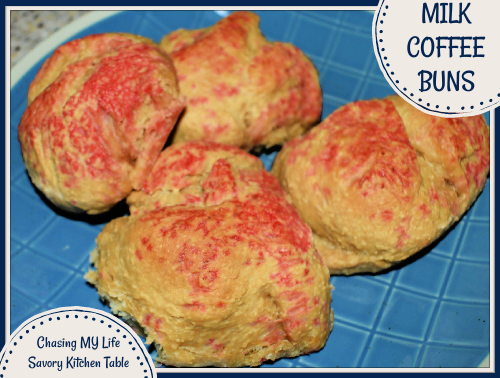
MILK COFFEE BUNS

I found this recipe for these incredible buns over at TrickNTreat.

The dough is topped with a milk wash and sanding sugar forms the perfect crust. The instant coffee adds a wonderful flavor and the aroma while baking is mouth watering. You can use colored sanding sugars like I did here for different holidays and add a touch of whimsy.

Eat them warm from the oven while they are soft with that sugary crunch. These are going to become a Sunday morning brunch favorite.

MILK COFFEE BUNS yield 10 buns

2  cups all purpose flour
2  teaspoons instant yeast
3  tablespoons  butter
2  tablespoons  sugar
½ teaspoon salt
¾ cup  milk
2 teaspoons QUALITY instant coffee
2  tablespoons  milk and sugar for topping

  • In a saucepan, scald the milk.
  • Add in instant coffee, butter and sugar.
  • Cool until lukewarm.
  • Place the flour and instant yeast in a mixing bowl.
  • Gradually add the milk mixture and salt, forms into soft  pliable dough.
  • Knead by hand for 10 minutes until smooth.
  • Transfer into greased and covered bowl and let rise until double for 1-1 1/2 hours.
  • Punch dough down, divide into 8-10 balls.
  • Shape into smooth balls and place onto baking sheet.
  • Brush tops with milk.
  • Sprinkle with sugar.
  • Re-cover with a flour sack towel and let sit in a warm place for 45 minutes.
  • Preheat oven to 350°.
  • Bake 15-20 minutes until golden brown.
  • Transfer onto cooling rack.

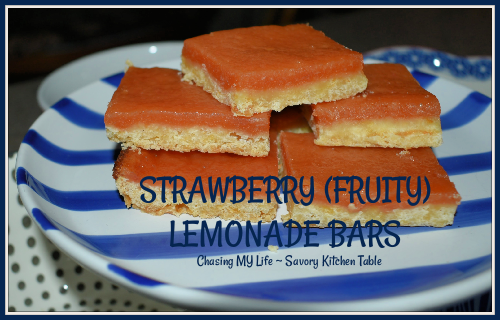
STRAWBERRY (FRUITY) LEMONADE BARS

I found the original recipe in an old cookbook that called for FRESH strawberries only – never frozen, but I wanted to make them in December when fruit, even FRESH can have virtually no flavor.  So, I have adapted it to use FREEZE DRIED fruit powder, Which opens up all sorts of possibilities for future flavors.  So far we’ve used strawberry and raspberry – so YUMMY! A shortbread crust topped with a fruit custard are the perfect combo for this sweet and tart bite. I’m anxious to try this recipe as a cherry limeade.

STRAWBERRY (FRUITY) LEMONADE BARS

CRUST
1 1/4 cups AP flour, sifted
1/2 cup sugar
1/2 teaspoon sea salt
1 tablespoon FRESH lemon zest
10 tablespoons unsalted butter, COLD AND CUBED (see notes)
1 LARGE egg yolk

  • Preheat oven 350°.
  • Combine the flour, sugar, sea salt and lemon zest quickly in the food processor.
  • Add COLD, CUBED butter, pulsing until mixtures is coarse crumbs. (see notes)
  • Add the egg yolk, pulsing until incorporated.
  • Transfer dough to a 9×9 lightly greased baking dish.
  • Press dough down evenly.
  • Bake 18-20 minutes until lightly browned.
  • Set aside to cool while you prepare the filling. DON’T TURN OFF THE OVEN.

FILLING
12 tablespoons unsalted butter
1 cup sugar
5 LARGE egg yolks
1/4 cup FREEZE DRIED strawberry powder
1 tablespoon FRESH lemon zest
Juice of 4 lemons (1/2 cup)
1/4 cup cornstarch

  • In a medium saucepan, melt the butter over a low heat.
  • Remove the pan from the heat and stir in sugar until dissolved.
  • Let cool slightly.
  • Mix in egg yolks.
  • In a food processor combine the lemon juice, lemon zest and strawberry powder.
  • Add the cornstarch, pulsing to incorporate.
  • Add the strawberry mixture to the butter mixture and cook over medium heat, stirring continuously, 8-10 minutes until you reach a custard consistency that coats the back of a spoon.
  • Pour strawberry mixture evenly over the cooled crust.
  • Bake 10 minutes, until filling is set.
  • Cool on wire rack 20 minutes.
  • Transfer to refrigerator for 3-4 hours to chill.
  • Cut and dust with powdered sugar if desired.
  • Store in an airtight container in the fridge.

NOTES: If you don’t have a food processor, you can make this recipe easily by grating your butter with a cheese grater to make it easier to cut into the flour with a pastry cutter by hand.

BLOGMAS 2020 ~ DAY 14 ~ NEIGHBOR PLATES & GIFTS / DELIVERY DRIVERS

I have a station set up just outside the front door in the alcove for delivery drivers with a nice variety of drinks and snacks for them to choose from.  They all seem to enjoy it and our regular drivers have come to know it will always be there. I normally do this, but tried for a bit nicer variety this year so they realize just how much they have become essential in this day and age.

I usually do a large plate of goodies for my neighbors and regular delivery people. But, this year with smaller gatherings and everyone having been home so much and already snacking too much probably, I’m changing it up to make it easier on me, more cost effective for me and more fun too since I’m sans my munchkin baking crew this year because of social distancing.

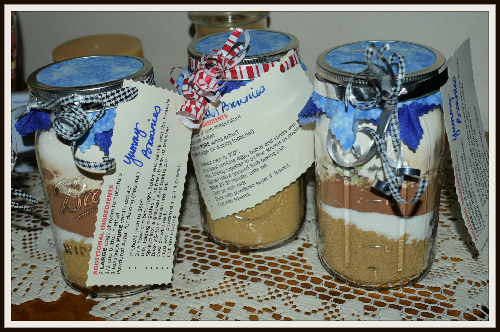
So, I’m doing gift jars for brownie mixes that can be used whenever they want instead of a plate of goodies that may go bad before they eat them all.

PEANUT BUTTER* BROWNIE MIX
1 cup packed brown sugar
1/2 cup sugar
1/3 cup baking cocoa
1 cup peanut butter chips*
1 cup all purpose flour
1/2 teaspoon baking powder
1/4 teaspoon sea salt
1/2 cup semi-sweet chocolate chips
1/2 cup FINELY chopped walnuts

  • In a quart size mason jar, layer the ingredients in the order listed, packing down well between each layer. This is an important step s these ingredients literally fill the jar!
  • Cover tightly. Store in a cool, DRY place up to 6 months.

Include a cute little square of Christmas fabric, some ribbon and tag with the following instructions:
ADDITIONAL INGREDIENTS
2 LARGE eggs at room temperature
1/2 cup butter, melted
1 teaspoon PURE vanilla extract
Powdered sugar for dusting (optional)

  • Preheat oven to 350°.
  • In a bowl combine eggs, butter and vanilla with the brownie mix, folding together in as few strokes as possible.
  • Spread into a greased 8×8 baking pan.
  • Bake 25-30 minutes until set.
  • Cool on wire rack.
  • Dust with powdered sugar if desired.
  • Cut into squares.

NOTE: It is easy to change up this flavor by just changing the flavor of chips you use. I’m posting my peanut butter recipe, but you’ll notice the picture is of the jars I made with mint chocolate chips.  This batch of 12 had a variety of peanut butter chips, butterscotch chips, caramel chips and mint chocolate chips, LOL 😀 NOT all together  of course!