So long, thank you and a Save Room for Dessert award for YOU

I am so thankful for all the wonderful and creative cooks and bloggers who have participated at Save Room for Dessert since its beginning when my blog friend Tamy started this blog and invited me to host this weekly dessert meme.

All great things must come to an end, so it’s time to say so long, but it is not really good-bye because we are all just a click away on this great super highway of friendly blogs. As I wrote for my Joy of Desserts sidebar, “the road is never long between bloggy friends.”

Gerri of Heart N Soul Cooking, one of the regulars here at Our Krazy Kitchen and at Joy of Desserts, too, has awarded me the Kreative Blogger Award, and I see it fitting to award it back to all of you as a party favor and thank-you for having fun with me while we all Saved Room for Dessert.

You are all creative cooks and bloggers, and your participation and comments are what make any blog successful, so I thank you from the bottom of my heart for every recipe and tip you have shared with me and all of us.

There will still be lots to do and read at Our Krazy Kitchen, so keep on participating here. And since most of the Save Room for Dessert regulars are also regulars and followers at my Joy of Desserts blog, you know that I have lots there too, with giveaways, recipe roundups, Vintage Recipe Thursday, etc. I’ll continue to post there, and I have great new things planned at Joy of Desserts for all of YOU.

I went back in the Save Room for Dessert Archives and below are the creative foodie bloggers who have participated. Most on them were regulars — THANK YOU!!


Joy of Desserts
http://joyofdesserts.blogspot.com

Melissa @ Frugal Creativity

Martha @ The Daily Grind

Terry @ At Home with Terry and Dennis

Chaya @ Comfy Cook

Kristen @ Frugal Antics of a Harried Housewife

Emily @ Marvelous Recipes

Liz @ Hoosier Mama

Chaya @ Sweet and Savory

Jules @ The Persimmon Perch

Sara @ Cooking with Sara

Vickie @ 2babb

Mickey @ Monster Mama

Snowhite @ Finding Joy in my Kitchen

Heather @ Girlie Chef

Lisette @ Fancy Frugalista

Martha @ Menagerie

Reeni @ Cinnamon Spice and Everything Nice

Angie @ Annie’s Home

Jennifer @ For Such a Time as This

David @ A Year on the Grill

Cook @ The Desperate Cook

Katie @ Food Stuffs

Karen @ Muffin Fixation

Marcia @ Frugal Homekeeping

Anshika @ Cooking Pleasures

Fishie @ The Fishie’s Kitchen

Pat @ Butter Yum

Pamm @ Leftovers On Purpose

Tami @ Around the Table with Tami

Simply Me @ The Local Cook

Jen @ My Petite Chefs

Sweetie @ Vanilla Strawberry Spring Fields

Tara @ Feels Like Home

Carol @ Easy to be Gluten Free

Shaunta @ Live Once, Juicy

Chris @ An Instant Out of Time

Pattie @ Bramasole … to Yearn for the Sun

Velva @ Tomatoes on the Vine

Joanne @ Eats Well With Others

Tamy @ 3 Sides of Crazy

The Kreativ Blogger Award rules.

1. Post the award.

2. Thank and mention the person who gave you the award.

3. Pass the award on to seven blogger’s who you think embody the spirit of the Kreativ Blogger Award.

4. Name seven things about yourself that others don’t know.

5. Don’t forget to notify the your seven Kreativ Bloggers about their AWARD and post a link to their blog.

Easy Chocolate Torte

This is one of the easiest elegant desserts I have ever made. It screams chocolate in every bite – perfect for Valentine’s Day. It is straight from Taste of Home. It uses all convenience foods which is normally not what I do, but instead of getting any better, my harried-ness is out of control right now. You certainly could use a homemade brownie recipe and then whip real cream with powdered sugar and vanilla for the topping.

1 package fudge brownie mix (13-inch x 9-inch pan size)
1 cup (6 ounces) semisweet chocolate chips, melted
1/2 stick butter, softened
2 cups whipped topping
1 teaspoon chocolate sprinkles

Directions

Prepare brownie mix according to package directions for fudge-like brownies. Spread batter in a greased and floured 9-in. round or springform pan.

Bake at 350° for 35-40 minutes or until center springs back when lightly touched. Cool for 10 minutes. Invert or release onto a serving plate; cool completely.

In a bowl, stir the melted chocolate and butter until smooth. Spread over brownie layer; refrigerate for 30 minutes. Just before serving, top with whipped topping. Decorate with sprinkles. Yield: 9-12 servings.

ROMANCE Part 2 – CHOCOLATE – Ala Year on the Grill

OK ladies, I gave you my advice on how to really make a meal your man would love for romantic occasions (like Valentines day) a couple weeks ago. I was dead serious that what men really want would be MOINK BALLS. Beef Meatballs, wrapped in bacon says lovin‘ to that man of yours. Click HERE to get to that post. But, you all being women, I really don’t expect you to do the logical thing and give your men what they want. Instead, you are going to try to foo foo the day up and make us men folk pretend to enjoy things like this…

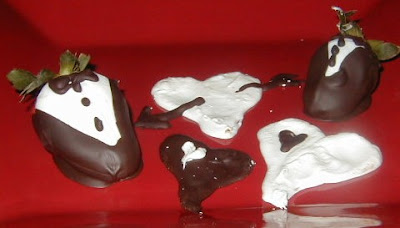
Chocolate Covered Strawberries dressed in Tuxedos… Accented with Chocolate Hearts!

Sigh, ok, I’ll bow to the conventional wisdom (but as an experiment, put 6 Moink balls in front of your man, and 6 Chocolate covered strawberries next to the moink balls and see which plate ends up empty… But i digress)… As I was saying, I bow to conventional wisdom and will give you all a lesson in the easiest thing you will ever see me make.

It looked SO EASY, I was sure that even though I have never made anything with melted chocolate before, I CAN COOK THAT!

Credit where credit is due, I saw these on Regis and Kelly this week. It was just as easy as they made it sound. the only ingredients and supplies you need is some…

Dark Chocolate bark
White Chocolate bark
Strawberries
Parchment paper
double boiler and water
Pastry bag for decorating (or just a ziplock bag with a corner cut out)
and a spoon…

First, set up a double boiler. This was my first time melting chocolate in a double boiler, but it worked just like it was supposed to.

Get some water boiling, put a bowl in the water. I put a couple spoons around the edge so the bowl never touches the bottom of the pan, nor the sides.

Watch it carefully, stir occasionally and in about 10 minutes, you have melted chocolate. Do the white first…

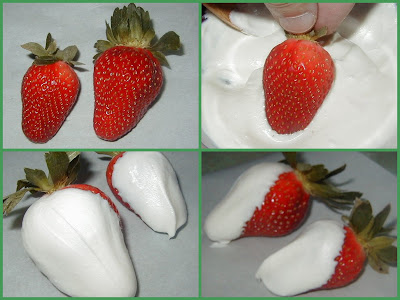
Just like it looks, you are making the shirt front only, so you only need to dip the front in the chocolate. Allow it to cool.

Meanwhile, it is time to make a few chocolate hearts… With that rustic homemade look that you will pay big bucks for in a candy shop…

This is easier if you use your wife’s pastry bags. Or, if you don’t have a wife with pastry bags, put the still warm melted chocolate in a plastic bag and cut just a tiny hole in one of the corners.

Make two dots, about the size of quarters, use about 2/3rds of the amount of a Hershey’s kiss in each dot. Space them about 1/2 inch apart. use the flat side of a spoon to spread the dots out so they touch and then swirl down to form the heart. Allow to cool and viola.

I made several, til I was out of white chocolate. So, now it’s time to do the same melty thing with the dark.

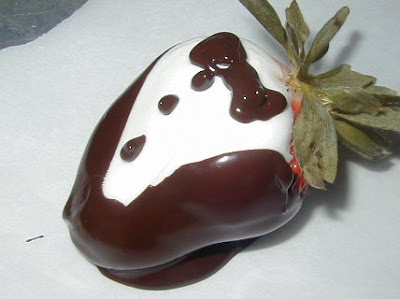
I am sorry I did not take more photos of the process of the dark chocolate to get the tux look on the strawberries. But, just dip from the side, being careful to leave the white “V” shape of the front of the shirt showing.

Then use another pastry bag (or a very tiny hole in a plastic bag) and draw a little bow tie and a couple dots for buttons. Guys would still rather have Moink Balls, but women folk go weak in the knees over this kind of stuff.

Here’s the plate I gave my wife for an early Valentine’s Day gift. Her knees were so weak, she could hardly climb the stairs to thank me in the only way better than Moink balls… But I digress…

Here’s something really important…

A lot of this post should be dedicated to a wonderful blogger, katherine from SMOKEY MOUNTAIN CAFE. Just this week, Katherine had an opportunity to go to New York City, meet regis and Kelly, take cake decorating classes from a celebrity baker and have her cake entered in a charity contest to raise money for Ovarian Cancer Research Fund. Do me a favor (and yourself), and visit Katherine’s site for details on her trip. Also, take just a second and follow the link she gives to “vote” for her cake. With each vote, the good folks at Electrolux will donate a dollar to the fund. A great cause and a fun read. Click HERE to get to Smokey mountain Cafe and the post on her day of cake decorating!

Ok ladies. You are now armed with the recipe for romantic loving, Moink Balls, and for these silly little trifles. Let your conscience be your guide as to what you think your man would REALLY like for Valentine’s Day.

See you all next Thursday!

Dave here from MY YEAR ON THE GRILL.

And BTW, I do wish there was an “I was trying to be funny, please don’t be insulted” Font.

You say zabaglione, I say sabayon: Don’t call the whole thing off, Save Room for Dessert

Do you remember the song? Louis Armstrong and Fred Astaire both sang this romantic tune over the decades, and this dessert from the Joy of Desserts archives would be pretty to celebrate St. Valentine’s Day no matter how you pronounce it.

Whether you call this dessert zabaglione like the Italians, or sabayon like the French, it is the same classic dessert made with egg yolks and a sweet dessert wine. It only takes about 15 minutes to make and can be prettied up by serving in a glass with berries.

Italian Zabaglione or French Sabayon
Prep time: 15 minutes
Makes 4 servings
2 packages (6 ounces each) raspberries
4 large egg yolks
1/3 cup granulated sugar
1/2 cup dry Marsala or other dessert wine

Divide berries between four 8-ounce dessert dishes or stemmed glasses.
Fill the bottom of a double boiler (or a saucepan with a metal bowl fitted snugly on top) with 1-2 inches of water or just below bowl. Bring water to a simmer.
Beat egg yolks and sugar in top of double boiler or bowl with an electric mixer or wire whisk until fluffy and light in color, about 5 minutes. Maintain water at a low simmer while beating.
Add Marsala, 1 tablespoon at a time, continuously beating until mixture forms very soft peaks, about 8 minutes.
Pour zabaglione mixture over berries and serve immediately.

Nutrition Per Serving: 238 calories, 4.79g total fat, 1.64g saturated fat, 3.39g protein, 37.47g carbohydrate, 209.78mg cholesterol, 2.04g fiber, 192mg sodium
Recipe and nutrition values from Driscoll’s, California Certified Organic Farmers (CCOF)

Healthy tips:
* Substitute blackberries, blueberries or about 3 cups sliced, hulled strawberries
* Try a mixed berry zabaglione with some of all the above berries
* 1 cup of strawberries provides an amazing 93% of your day’s supply of Vitamin C
* 1 cup of raspberries and blackberries each provide 50% of your day’s supply of Vitamin C
* Blueberries have one of the highest antioxident values at 5,486 ORAC Value (Oxygen Radical Absorbance Capacity) per cup

Happy St. Valentine’s Day,

Joy of Desserts

The new Inlinkz system is located HERE for the SUPERBOWL PARTY and this week for you to add your links and HERE for last week. We look forward to your recipes. Remember we’re looking for that special recipe to feature at the end of February.

APRICOT RUM RAISINS

APRICOT RUM RAISINS

1 cup butter
1 cup milk
1 1/2 cups warm water
1 cup sugar
2 teaspoon salt
1/2 teaspoon cinnamon
2 tablespoons yeast
4 eggs, beaten
7 1/2 cups flour
  • In a saucepan melt butter.
  • Add milk and water whisking until smooth consistency and JUST boiling.
  • Cool 5-10 minutes so you don’t kill the yeast.
  • Add the sugar, salt and yeast to form a sponge like blob.
  • Add the eggs until uniform consisitency.
  • In a mixer with a dough hook attached, combine flour and yeast mixture.
  • Knead well. Put in refrigerator for at least several hours, but overnight is better.
  • Preheat oven to 375 degrees.
  • Roll a ball of dough the size of a golf ball into a rope and coil into a circle. Make sure the center is thinner than the outer edges to hold the filling in. Sometimes I prefer squares, but you just have to work with your dough after you have it coiled.
  • Fill with a heaping tablespoon of filling per danish (recipe below).
  • Let rise an hour in a warm place.
  • Bake 15 minutes.
  • Frost with Cream Cheese Frosting. If you prefer a drizzle thin out this frosting with a couple extra tablespoons of milk until desired consistency.
Cream cheese apricot raisin filling
1 bag large dried apricots, chopped
1/2 cup golden raisins, chopped

1/4 cup golden rum

  • Soak apricots and raisins in rum for an hour or overnight.
  • Drain off rum.
  • Set aside.
8oz pkg cream cheese
1 egg
1/2 cup powdered sugar
1/2 tablespoons grated orange peel
  • Blend cream cheese, egg, powdered sugar and orange peel together until smooth.
  • Fold in apricots and raisins into the cream cheese mixture. Or my favorite is to fill them as 2 separate fillings with the cream cheese first and the apricot in the center of that.

BANANA PINEAPPLE RAISIN NUT BREAD OR CAKE & PINEAPPLE MOJITOS

BANANA RAISIN NUT BREAD OR CAKE
1 cup packed brown sugar
1 cup butter, 1/2 soft & 1/2 melted
2 jumbo eggs
1 tablespoon cinnamon
1/2 cup golden raisins, currants or craisins
1/2 cup crushed walnuts
2 large, RIPE bananas
1 small can pineapple, well drained BUT RESERVED
1/2 cup sugar
2 cups flour
1 teaspoon baking powder
1/2 teaspoon baking soda

  • Combine the melted butter, brown sugar and bananas in a sauce pan.
  • Cook until smooth and then add pineapple, nuts and raisins.
  • Stir until well coated & set aside to cool.
  • Cream softened butter, sugar and eggs until fluffy.
  • Sift together flour, baking powder, baking soda and cinnamon.
  • Add this to the creamed mixture gradually until well blended.
  • Add cooled banana mixture.
  • Pour into greased and floured pan(s)*
  • Bake at 350 degrees for 45+ minutes.

*This recipe will make 2 large loaves or 1 cake. If making bread, skip the frosting.


FROSTING
8 ounces cream cheese, softened
1/4 cup butter, softened
juice of 1 small lemon
1 teaspoons pure vanilla extract
1 1/2 cups powdered sugar

  • In a medium bowl beat cream cheese and butter until smooth.
  • Add lemon juice and vanilla. Beat until blended.
  • Add powdered sugar gradually until well blended and smooth.
  • Refrigerate 1 hour to set icing before serving.

PINEAPPLE MOJITOS
reserved pineapple juice
jigger rum
jigger mojito mix

  • Mix and enjoy!

ORANGE BANANA NUT BREAD or LEMON BANANA NUT BREAD


ORANGE BANANA NUT BREAD or LEMON BANANA NUT BREAD
2 cups flour
1/2 cup sugar
1 teaspoon baking powder
1 teaspoon baking soda
1 teaspoon pumpkin pie spice
1 cup golden raisins
1/2 cup crushed walnuts
1/3 cup shredded coconut
2 medium or 3 small RIPE bananas
2 eggs
6 oz. can unsweetened orange juice concentrate*
1 tablespoon butter, melted

  • Sift together the dry ingredients.
  • In a large mixing bowl blend together the orange juice concentrate, bananas and eggs.
  • Blend in nuts, coconut and raisins.
  • Add flour mixture until well mixed.
  • Pour into greased loaf pan.
  • Bake 45 minutes at 350 degrees.
  • Immediately top with melted butter.

*I use a large can as the small cans are getting hard to find, but using a large serrated knife, cut it in half and then make juice out of the other half. This recipe is also good if you substitute lemonade for the orange juice.

Plain Ol’ Cheesecake

For the crust:
1 3/4 cups ginger snap/vanilla wafer crumbs
3 tablespoons sugar
Pinch of salt
1/2 stick (4 tablespoons) unsalted butter, melted

For the cheesecake:
2 pounds (four 8-ounce boxes) cream cheese, softened
1 1/3 cups maple sugar
1/2 teaspoon salt
1/2 teaspoons pure vanilla extract
2 teaspoons blackberry extract
1 teaspoon lemon juice
4 large eggs, at room temperature
1 1/3 cups sour cream or heavy cream, or a combination of the two

To make the crust:

  • Butter a 9-inch springform pan—choose one that has high sides. Mine is square.
  • Stir the crumbs, sugar and salt together in a medium bowl. Pour over the melted butter and stir until all of the dry ingredients are uniformly moist.
  • Turn the ingredients into the buttered springform pan and use your fingers to pat an even layer of crumbs along the bottom of the pan and about halfway up the sides. Don’t worry if the sides are not perfectly even or if the crumbs reach above or below the midway mark on the sides.
  • Center a rack in the oven, preheat the oven to 350°F and place the springform on a baking sheet. Bake for 10 minutes.
  • Set the crust aside to cool on a rack while you make the cheesecake.
  • Reduce the oven temperature to 325°F.
To make the cheesecake:
  • Working in a stand mixer, preferably fitted with a paddle attachment, or with a hand mixer in a large bowl, beat the cream cheese at medium speed until it is soft and truly creamy, about 5 minutes.
  • With the mixer running, add the sugar and salt and continue to beat another 4 minutes or so, until the cream cheese is light. Beat in the vanilla and blackberry extract.
  • Add the eggs one by one, beating for a full minute after each addition. Reduce the mixer speed to low and stir in the sour cream and/or heavy cream.
  • Give the batter a few stirs with a rubber spatula, just to make sure that nothing has been left unmixed at the bottom of the bowl, and scrape the batter into the springform pan.
  • Bake the cheesecake for 1 hour and 30 minutes, at which point the top will be browned (and perhaps cracked) and may have risen just a little above the rim of the pan. Turn off the oven’s heat and open the door a crack.
  • Allow the cheesecake to sit for another hour.
  • After 1 hour, carefully remove from the oven and leet the cheesecake come to room temperature on a cooling rack.
  • Run a knife around the edge of the pan to loosen sides.
  • When the cake is cool, cover the top lightly and chill the cake for at least 6-8 hours, although overnight would be better.
Serving:
  • Remove springform sides. The easiest way to cut cheesecake is to use a long, thin knife that has been run under hot water and lightly wiped. Keep warming the knife as you cut slices of the cake.
Storing:
  • Wrapped well, the cake will keep for up to 1 week in the refrigerator or for up to 2 months in the freezer. It’s best to defrost the still-wrapped cheesecake overnight in the refrigerator.

CARAMEL, MOCHA HOT FUDGE AND MILKY WAY FUDGE SAUCES

CARAMEL SAUCE
1/2 cup heavy cream
4 tablespoons butter, softened
2 tablespoons light corn syrup
3/4 cup sugar
2+ tablespoons water

  • Combine the cream and butter in a small saucepan and bring to a simmer, stirring frequently to prevent scorching. Remove from the heat.
  • In a medium saucepan cook the corn syrup over a medium heat until bubbly. Fold in 1/4 cup of the sugar and continue to cook until the edges begin to turn a light amber color. Add in 1/4 cup sugar more and repeat until all the sugar is blended in. Continue cooking until amber color darkens stirring constantly.
  • Remove from the heat and carefully fold in the cream mixture.
  • Cook over medium heat stirring frequently until caramel is bubbling.
  • Serve warm.
  • Makes 1 1/2 cups. Refrigerate for up to 2 weeks.
  • Microwave20-30 seconds to soften refrigerated caramel before serving.

MOCHA HOT FUDGE SAUCE
1/3 cup warm water
1/4 cup light corn syrup
scant 1/3 cup unsweetened cocoa powder
2 tablespoons sugar
4 oz. bittersweet chocolate, melted & cooled
3 tablespoons strong brewed coffee
2 tablespoons golden rum

  • In a medium saucepan blend together the water, corn syrup dissolving the sugar and cocoa into it until smooth.
  • Bring to a low boil.
  • Remove from heat and whisk in the chocolate until smooth.
  • Gradually add the coffee and rum until desired flavor and consistency is reached.
  • Serve warm.
  • Makes 1 1/2 cups. Refrigerate for up to 2 weeks.
  • Microwave20-30 seconds to soften refrigerated caramel before serving.

MILKY WAY FUDGE TOPPING
12 ounces Milky Way candy bars, cut into chunks
6 ounces semi-sweet chocolate
1 cup milk

  • In a double boiler combine candy bars, chocolate and milk.
  • Cook and stir constantly until melted and well blended and smooth.
  • Store in a airtight jar in the refrigerator.

ROCKY ROAD BLACK FOREST BROWNIES


ROCKY ROAD MEETS THE BLACK FOREST BROWNIES
1 1/2 sticks butter, softened
2 squares Baker’s semi-sweet chocolate
3/4 cup marshmallow cream
2 teaspoons PURE vanilla
1-2 teaspoons cherry extract
1 1/4 cup sugar
3 JUMBO eggs
1/2 cup walnuts, chopped
1/2 cup milk chocolate chips, chopped
1/3 cup chopped maraschino cherries
1/2 cup all purpose flour
1/4 cup cake flour
1/2 teaspoon baking powder
1/2 teaspoon salt

  • Preheat oven to 350 degrees.
  • Grease (really well) a 9×9 baking pan. I like to use my stoneware for nice even baking.
  • Melt butter and chopped unsweetened chocolate in a double boiler until smooth and consistent. Set aside to cool.
  • Sift together the flours, baking powder and salt. Set aside.
  • Toss chocolate chip pieces and walnuts with a bit of the flour mixture and set aside.
  • In a large mixing bowl beat the eggs and vanilla until smooth and consistent.
  • Add cooled chocolate mixture into the eggs and blend well.
  • By hand stir in the flour mixture just until well blended – DO NOT over mix!
  • Fold in the chocolate pieces, cherry pieces and walnuts just until well blended.
  • Warm the marshmallow cream for 15-20 seconds in the microwave (just enough to make it spreadable) and spread it over the chocolate batter in the mixing bowl.
  • With a knife gently and slightly swirl it lightly into the chocolate batter. If you swirl too much it will just become part of the batter instead of clumps of marshmallow.
  • Gently pour the batter into the prepared ban and bake 40-45 minutes or until edges pull away from the sides of the pan.
  • Cool the cake in the pan until completely cooled.

OREO CHEESECAKE BALLS – YUM YUM GOOD!

OREO CHEESECAKE BALLS – YUM YUM GOOD!
1 regular package Oreos
12 ounces cream cheese, room temperature
Almond Bark
Candy Decorations

  • Crush Oreos in food processors
  • With hand mixer, mix together the Oreo crumbs and cream cheese
  • Roll into small balls.
  • Put balls into freezer for 5 minutes.
  • Melt Almond bark in small batches.
  • Coat each ball in almond bark.
  • Immediately decorate.
  • Let harden.

BANANA NUT MUFFINS or BANANA BLUEBERRY NUT MUFFINS


BANANA NUT MUFFINS or BANANA BLUEBERRY NUT MUFFINS
1 cup packed golden brown sugar
2 sticks of butter, softened
2 jumbo eggs
2 teaspoons cinnamon
2 VERY ripe bananas*
1 3/4 cups flour
1 teaspoon baking powder
1/2 teaspoon baking soda
1/2 cup sugar
1/2 cup golden raisins
1/2 cup crushed walnuts

  • Preheat oven to 350 degrees.
  • In a medium saucepan melt one stick of butter.
  • Puree bananas.
  • Add brown sugar, raisins and pureed banana. Stir until well blended and remove from heat.
  • In a large mixing bowl cream together 1 stick of butter, eggs and sugar.
  • Sift together the flour, baking soda and baking powder.
  • Gradually add flour mixture into creamed mixture until well blended.
  • Add in the brown sugar mixture until smooth and consistent.
  • If making the Banana Blueberry version, fold in the blueberries last.
  • Fill muffin tins 2/3 full.
  • Bake for 12-15 minutes.

*to make Banana Blueberry Nut use one less banana and add 1+ cup blueberries.