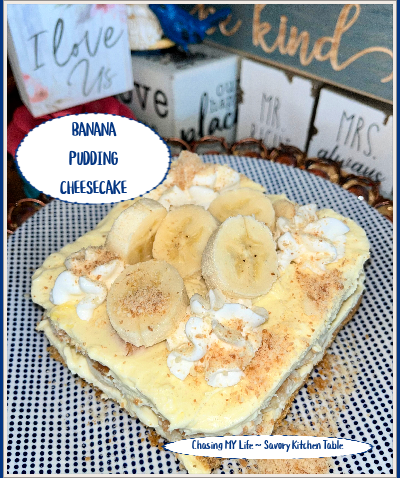
ORANGE RASPBERRY BUTTER CAKE

ORANGE RASPBERRY BUTTER CAKE Yield 2 9inch layers, 12-16 serving(s)
1 cup butter, softened
1 1/2 cups sugar
3 LARGE eggs
3 LARGE egg yolks
1 tablespoon PURE vanilla
3 1/4 cups cake flour
1 1/2 teaspoons baking powder
1/4 teaspoon salt
1 cup WHOLE milk
1/4 cup orange liqueur (raspberry liqueur or rum also work well)

  • Preheat oven to 350°.
  • Butter and flour two 9-inch round cake pans.
  • In mixer bowl, on medium-high speed, beat butter and sugar 4-5 minutes until fluffy.
  • Add eggs, then yolks, one a time, beating well after each, scraping sides of bowl occasionally.
  • Beat in vanilla.
  • In another bowl, sift together flour, baking powder and salt.
  • Mix in about a third of flour mixture into butter mixture.
  • Stir in half the milk and liqueur, just until blended.
  • Stir in another third of flour mixture,.
  • Add the remaining milk and liqueur and then the rest of the flour mixture.
  • Spread batter equally into the cake pans.
  • Bake 25-30 minutes until toothpick inserted in the center comes out clean.
  • Cool on racks in pans for 10 minutes, then invert cakes onto racks and remove pans.
  • Cool completely before frosting.

NOTE: This cake is good with or without frosting or glaze.

ZEBRA CAKE

While this recipe didn’t turn out exactly as planned, the flavor was amazing so we will be trying again for a better stripe and a better picture. 😀

ZEBRA CAKE

VANILLA LAYER
2 ¾ cups cake flour
2 cups granulated sugar
1 tablespoon baking powder
1 teaspoon salt
6 tablespoons unsalted butter softened to room temperature
⅔ cup avocado oil
¾ cup whole milk, room temperature
½ cup sour cream
1 tablespoon clear vanilla extract
6 LARGE or EXTRA LARGE egg whites, room temperature

  • In a stand mixer sift together flour, sugar, baking powder, and salt until thoroughly combined.
  • Turn your mixer to low speed and add butter, one tablespoon at a time, not adding the next tablespoon until the first is completely incorporated. When you’re finished, the mixture should resemble coarse sandy crumbs.
  • Add oil and stir until combined.
  • In a measuring cup, whisk together milk, sour cream, and vanilla extract and stir into batter until thoroughly incorporated.
  • In a separate clean, dry, chilled and grease-free bowl use clean beaters to beat egg whites to stiff peaks.
  • Use a spatula to gently fold egg whites into batter – DO NOT OVER MIX, but make sure there are no lumps of egg white remaining either.
  • Portion 3 cups of batter into a separate bowl. You’ll be left with 5 cups in the first bowl that will be used to make into the chocolate batter.

CHOCOLATE LAYER
scant ¼ cup dark cocoa powder
2 tablespoons boiling water
2 tablespoons sour cream
2 tablespoons granulated sugar

  • In a large measuring cup, stir together hot water and cocoa powder – it will be thick!
  • Add sour cream and sugar, whisking until well combined.
  • Stir into the smaller bowl of batter and use a spatula to carefully stir together until completely combined

BAKING ASSEMBLY

  • Preheat your oven to 350°.
  • Prepare two 8 inch round cake pans AT LEAST 2” deep by lining each of the bottoms with a round of parchment paper and generously spraying the sides with baking spray.
  • Dollop approximately ⅓ cup of white batter into the center of each of your prepared cake pans.
  • Using a clean scoop, scoop just shy of ⅓ cup of chocolate batter and drop that directly onto the center of the white batter.
  • Repeat, alternating batter flavors, until you have used all of the batter.
  • Take a reasonable amount of care so that your white batter doesn’t touch another ring of white batter nor does a ring of chocolate overlap with any of the other chocolate batter, this will keep your stripes looking like stripes and not like marbled swirls.
  • Carefully transfer pans to oven and bake for 35-40 minutes or until a toothpick inserted in the center comes out clean or with moist crumbs.
  • Allow to cool in pans for 15 minutes then run a knife around the edges of the cake to loosen from the sides (if needed) and carefully invert onto a cooling rack to cool completely.
  • If needed, carefully level the cakes with a sharp serrated knife once completely cooled.
  • Decorate.

NOTES:

  • THIRD STRIPE If you would like a 3rd color stripe make a half batch of the vanilla cake and add food coloring accordingly. You’ll also need to use 9 inch pans. If making it a red strip I use a half portion of my red velvet cake recipe.
  • CAKE FLOUR I recommend cake flour for two reasons with this cake: 1) it has a lighter texture and when you use all-purpose flour the cake ends up a bit heavier and tends to sink in on itself a little bit. 2) it produces a finer crumb, which makes the stripes even bolder and more defined.
  • VANILLA EXTRACT you may substitute regular vanilla extract, but clear extract helps to keep the cake batter pure white.
  • COCOA POWDER I use “special dark” cocoa powder because it makes the zebra stripes darker and closer to black, but you may substitute natural cocoa powder.

RED VELVET CAKE
2 1/2 cups all purpose flour
1 1/2 cups sugar
1 teaspoon baking soda
1 teaspoon fine sea salt
1 teaspoon QUALITY cocoa powder
1 1/2 cups avocado oil
1 cup buttermilk, room temperature
2 LARGE eggs, at room temperature
2 tablespoons QUALITY red food coloring
1 teaspoon white distilled vinegar
1 teaspoon PURE vanilla extract

  • Preheat the oven to 350°.
  • Lightly oil and flour three 9 by 1 1/2-inch round cake pans.
  • In a large bowl, sift together the flour, sugar, baking soda, salt, and cocoa powder.
  • In another large bowl, whisk together the oil, buttermilk, eggs, food coloring, vinegar, and vanilla.
  • Using a standing mixer, mix the dry ingredients into the wet ingredients until just combined and a smooth batter is formed.
  • Divide the cake batter evenly among the prepared cake pans.
  • Place the pans in the oven evenly spaced apart.
  • Bake, rotating the pans halfway through the cooking, until the cake pulls away from the side of the pans, and a toothpick inserted in the center of the cakes comes out clean, about 30 minutes.
  • Remove the cakes from the oven and run a knife around the edges to loosen them from the sides of the pans.
  • Invert the cakes onto a plate and then re-invert them onto a cooling rack, rounded-sides up. Let cool completely.

FINAL ASSEMBLY

  • Place 1st layer, rounded-side down, in the middle of a rotating cake stand.
  • Using a palette knife or offset spatula spread 1/4 to 1/2 inch layer of the frosting over the top of the cake.
  • Carefully set second layer on top, rounded-side down, and repeat.

SWISS MERINGUE BUTTERCREAM (not as sweet as an American buttercream)
Yield: 5 cups

Swiss Meringue Buttercream is not as sweet as American buttercream which makes it PURE perfection in my book because it’s the ideal balance of sweet AND creamy, without being as sugary as American buttercream, but still as thick and pipe-able.

6 LARGE FRESH egg whites (approximately 230g)
2 cups (400g) granulated sugar
1 and 1/2 cups (3 sticks; 350g) unsalted butter, cut into tablespoon sized pieces and softened but still cool *see note*
2 teaspoons PURE vanilla extract
1/8 teaspoon salt

  • Separate the eggs one at a time into a small bowl before placing them in a heat proof bowl.
  • Whisk sugar into the egg whites, then set the bowl over a saucepan filled with just two inches of simmering water over medium heat. Do not let the bottom of the egg whites bowl touch the water.
  • Whisk the egg whites and sugar together 4-5 minutes until sugar is COMPLETELY dissolved and the mixture has thinned out. (The mixture will be thick and tacky at first and then thin out and be frothy white on top.) To test that it’s ready, use your finger. Lightly and quickly dip your finger into the mixture (BE CAREFUL it will be very hot) and rub the mixture between your thumb and finger. You shouldn’t feel any sugar granules. OR use an instant read thermometer – the temperature should read 160°F (71°C).
  • Transfer mixture to the bowl of a stand mixer fitted with a whisk attachment while it’s still warm.
  • Beat on medium high speed 10-15 minutes until stiff glossy peaks form and the meringue is no longer warm to the touch. This will take a few minutes more on particularly humid days. MOISTURE IN THE MAKES A DIFFERENCE. If it’s still not reaching stiff peaks, stop the mixer, place the uncovered bowl in the refrigerator for 10 minutes, then return to the mixer and continue beating until stiff peaks form and the mixture has cooled to room temperature. You can put it in the refrigerator for a couple minutes if needed. If it’s too warm, the butter will melt instead of blend.
  • Switch to the paddle attachment.
  • On medium-high speed, add the butter 1 tablespoon at a time. Wait for the butter to fully mix in before adding the next tablespoon.
  • Add the vanilla, salt and flavor if using beating 30 seconds until completely incorporated. It should be thick, creamy and silky smooth.

NOTES

TROUBLESHOOTING TOO THICK  If the meringue has separated, curdled, or is too thick at any point after you mix in all of the butter, place the mixture in your heat-proof bowl back over a pot of 2 inches of simmering water – DO NOT STIR. Let the edges of the meringue warm up 1-2 minutes and become liquid while the center of the meringue is still be solid. Remove from heat and return to the mixer. Beat meringue on low speed for 30 seconds, then switch to medium-high speed and beat until smooth, about 2 minutes.

TROUBLESHOOTING TOO THIN If the meringue becomes too thin after you add the butter, place the entire bowl in the refrigerator for no more than 20 minutes at a time (any longer will make the butter solid) to cool down. Return it to the mixer and beat on medium-high speed until thickened.  If it’s still soupy, place back in the refrigerator again before re-whipping again.

EGG WHITES For best success use FRESH eggs. FUN FACT – eggs separate much easier when they’re cold. Be sure and separate the egg whites one at a time into a small bowl and then place the egg white into a large heat-proof mixing bowl, double boiler or the metal mixing bowl from your stand mixer before separating the next. This way, if a yolk breaks in one of them, you don’t waste the whole batch.

BUTTER This buttercream will become liquid-y (too thin) if the butter is too warm. Make sure you’re using butter that is slightly cooler than proper room temperature butter. Remove butter from the refrigerator and set it out for just 30-40 minutes before you need to add it to the meringue.

FLAVORS adding flavors can be tricky. Substituting extracts for the vanilla is one of the most fool proof ways.  Or even a teaspoon of espresso powder or frozen fruit powder. Taste, then add a touch more if desired. For potent extracts, like peppermint or almond use just 1/2 teaspoon. For chocolate, beat 8 ounces of PURE (like Baker’s OR Ghiradelli) melted and slightly cooled chocolate of choice into the buttercream at the same time you add the vanilla and salt.

COLORS If you are coloring use gel food coloring so it does not add any liquid.

HALVING OR DOUBLING If you halve the recipe the time to reach stiff peaks and cook time will be less. I DO NOT recommend doubling this recipe. If you need a double recipe make it in separate batches so you don’t overcrowd the bowls.

OR

CREAM CHEESE FROSTING
16 ounces cream cheese, softened
1/2 cup butter, softened
juice of 1 LARGE lemon
2 teaspoons PURE vanilla extract
3-4 cups powdered sugar

  • In a medium bowl beat cream cheese and butter until smooth.
  • Add lemon juice and vanilla. Beat until blended.
  • Add powdered sugar gradually until well blended and smooth and you reach desired consistency.
  • Ice first layer and then add 2nd cake top and ice again including sides of cake.
  • Refrigerate 1 hour to set icing before serving.

CHERRY CHEESECAKE BITES

These super simple and oh-so-scrumptious ‘cupcakes’ are quick and easy, but look and taste like they took you all day!! You can make the glaze as thick or thin as you like to change your look. I was trying for a new Easter recipe and I was looking for a new version of a hot cross bun 😀

Yields 24-26 cupcakes

CHERRY CHEESECAKE BITES adapted from REAL HOUSE MOMS

CRUST
1 1/2 cups ginger snap FINELY ground crumbs
4 tablespoons unsalted butter, melted
3 tablespoons sugar
1/4 teaspoon QUALITY ground cinnamon

  • Preheat oven to 325°.
  • Line two regular sized muffin tins with cupcake liners.
  • In a small bowl, mix together cookie crumbs, melted butter, sugar and cinnamon.
  • Pour 1 tablespoon of graham cracker mixture into the bottom of each cupcake liner.
  • Using a juice glass, press crumbs into an even packed layer.
  • Bake for 5 minutes.
  • Remove from oven and let rest while you make the filling.

FILLING
32 ounces cream cheese, room temperature
1 1/2 cups sugar
4 LARGE eggs, room temperature
1 teaspoon PURE vanilla extract
1/4 teaspoon salt

  • Beat cream cheese until fluffy.
  • Gradually add in sugar and mix until smooth.
  • Add eggs, one at a time.
  • Add vanilla and salt, mixing to combine.
  • Pour 3 1/2 tablespoons of the cheesecake filling into each cupcake liner.
  • Tap muffin tins on the counter to bring the bubbles up to the top and pop them with a toothpick.
  • Bake cheesecakes for 22 minutes.
  • Remove from oven and allow to cool for 5 minutes.
  • Transfer to a wire rack to cool to room temperature.


TOPPING
8 ounces SMUCKERS tart cherry jam (or jam/preserves of choice)

1 cup powdered sugar
2-4 tablespoons heavy cream
1 teaspoon PURE vanilla extract

  • Place 2 teaspoons of jam on top of each cheesecake where a little dip forms.
  • In a mixing bowl, whisk together powdered sugar, heavy cream, and vanilla until smooth. Vanilla glaze will be a little on the thick side, but should still drizzle off a spoon. Add more heavy cream as needed to reach your desired consistency.
  • Drizzle over cheesecake tops.

  • Chill for 2 to 4 hours.
  • Remove from liners and enjoy!


EPIPHANY – KING CAKE for MARDI GRAS

Mardi Gras 2022 falls on Tuesday, March 1st this year and is also known as Fat Tuesday, the last day of the Carnival season as it always falls the day before Ash Wednesday, the first day of Lent. Fat Tuesday is EXACTLY what it sounds like – time to party and EAT! 
Carnival runs from Epiphany, the 12th night, January 6 through March 1, 2022 so I thought this would be a good time to re-run this recipe for Mardis Gras King Cake.  I threw in some history for you also since King Cake isn’t just for Mardi Gras though that is what it is most famous for these days.
I often make this cake without the Mardi Gras colors, but using traditional Christmas colors.

A king cake (sometimes rendered as kingcake, kings’ cake, king’s cake, or three kings cake) is a type of cake associated with the festival of Epiphany in the Christmas season in a number of countries, and in other places with Mardi Gras and Carnival.

The “king cake” takes its name from the biblical three kings. Catholic tradition states that their journey to Bethlehem took twelve days (the Twelve Days of Christmas), and that they arrived to honor the Christ Child on Epiphany. The season for king cake extends from the end of the Twelve Days of Christmas (Twelfth Night and Epiphany Day), through to Mardi Gras day. Some organizations or groups of friends may have “king cake parties” every week through the Carnival season.

Related culinary traditions are the tortell of Catalonia, the gâteau des Rois in Provence or the galette des Rois in the northern half of France, and the Greek and Cypriot vasilopita. The galette des Rois is made with puff pastry and frangipane (while the gâteau des Rois is made with brioche and candied fruits). A little bean was traditionally hidden in it, a custom taken from the Saturnalia in the Roman Empire: the one who stumbled upon the bean was called “king of the feast.” In the galette des Rois, since 1870 the beans have been replaced first by porcelain and, now by plastic figurines; while the gâteau des Rois Also known as “Rosca de Reyes” in Mexico.

In the southern United States, the tradition was brought to the area by colonists from France and Spain and it is associated with Carnival, which is celebrated in the Gulf Coast region, centered on New Orleans, but ranging from the Florida Panhandle to East Texas. King cake parties in New Orleans are documented back to the eighteenth century. The king cake of the New Orleans Mardi Gras tradition comes in a number of styles. The most simple, said to be the most traditional, is a ring of twisted bread similar to that used in brioche topped with icing or sugar, usually colored purple, green, and gold (the traditional Carnival colors) with food coloring. Cajun king cakes are traditionally deep-fat-fried as a doughnut would be, and there are many variants, some with a filling, the most common being cream cheese and praline. It has become customary in the New Orleans culture that whoever finds the trinket must provide the next king cake or host the next Mardi Gras party.

Some say that French settlers brought the custom to Louisiana in the 18th century where it remained associated with the Epiphany until the 19th century when it became a more elaborate Mardi Gras custom. In New Orleans, the first cake of the season is served on January 6. A small ceramic figurine of a baby is hidden inside the cake, by tradition. However now, the tradition is giving way to the baby being supplied and the customer placing the baby were ever they wish in the cake. Whoever finds the baby is allowed to choose a mock court and host the next King Cake party the following week (weekly cake parties were held until Mardi Gras).

The classic king cake is oval-shaped, like the pattern of a racetrack. The dough is basic coffee-cake dough, sometimes laced with cinnamon, sometimes just plain. The dough is rolled out into a long tubular shape (not unlike a thin po-boy), then shaped into an oval. The ends are twisted together to complete the shape  (HINT: if you want to find the piece with the baby, look for the twist in the oval where the two ends of the dough meet. That’s where the baby is usually inserted.) The baby hidden in the cake speaks to the fact that the three Kings had a difficult time finding the Christ Child and of the fine gifts they brought.

The cake is then baked, and decorated when it comes out. The classic decoration is simple granulated sugar, colored purple, green, and gold for the colors of Carnival. King cakes have gotten more and more fancy over the years, so now bakeries offer iced versions where there’s classic white coffee cake glaze on the cake before it’s decorated, and even king cakes filled with apple, cherry, cream cheese, or other kinds of coffee-cake fillings.

King cakes are available at bakeries all over South Louisiana, but only after January 6 through Mardi Gras Day.

Mardi Gras is French for “Fat Tuesday” referring to the practice of the last night of eating richer, fatty foods before the ritual fasting of the Lenten season, which starts on Ash Wednesday. Popular practices also include wearing masks and costumes, overturning most social conventions, dancing, sports competitions, parades and such. Similar expressions to Mardi Gras appear in other European languages sharing the Christian tradition. In English, the day is called Shrove Tuesday, associated with the religious requirement for confession before Lent begins.

This is my version of this yummy yeast bread/cake.

MARDI GRAS KING CAKE (makes 2 cakes)

PASTRY
1 cup milk
1/4 cup butter
2 (.25 ounce) packages active dry yeast
2/3 cup warm water
1/2 cup white sugar
2 large eggs
1 1/2 teaspoons salt
1/2 teaspoon freshly grated nutmeg
1/2 teaspoon cinnamon
5 1/2 cups all-purpose flour

FILLING
1 cup packed brown sugar
1 tablespoon ground cinnamon
2/3 cup chopped walnuts or pecans
1/2 cup all-purpose flour
1/2 cup golden raisins
1/2 cup melted butter

FROSTING/GLAZE
1 cup confectioners’ sugar
1 tablespoon water

  • Scald milk, remove from heat and stir in 1/4 cup of the butter.  Allow mixture to cool to room temperature.
  • In a large bowl, dissolve yeast in the warm water with 1 tablespoon of the white sugar. Let stand until creamy, about 10 minutes.
  • When yeast mixture is bubbly, add the cooled milk mixture.
  • Whisk in the eggs.
  • Stir in the remaining white sugar, salt and nutmeg.
  • Beat the flour into the milk/egg mixture 1 cup at a time. When the dough has pulled together, turn it out onto a lightly floured surface and knead until smooth and elastic, about 8 to 10 minutes.
  • Lightly oil a large bowl, place the dough in the bowl and turn to coat with oil.
  • Cover with a damp cloth or plastic wrap and let rise in a warm place until doubled in volume, about 2 hours.
  • When risen, punch down and divide dough in half.
  • Preheat oven to 375°.
  • Grease 2 cookie sheets or line with SILPATS or parchment paper.
  • In a large mixing bowl combine the brown sugar, ground cinnamon, chopped pecans, 1/2 cup flour and 1/2 cup raisins.
  • Pour 1/2 cup melted butter over the cinnamon mixture and mix until crumbly.
  • Roll dough halves out into large rectangles (approximately 10×16 inches).
  • Sprinkle the filling evenly over the dough and roll up each half tightly like a jelly roll, beginning at the wide side.
  • Bring the ends of each roll together to form 2 oval shaped rings.
  • Place each ring on a prepared cookie sheet.
  • With sharp knife make cuts 1/3 of the way through the rings at 1 inch intervals. Let rise in a warm spot until doubled in size, about 45 minutes.
  • Bake in preheated oven for 30 minutes.
  • Push the doll into the bottom of the cake.
  • Decorate with beads.
  • Frost while warm with the glaze.

MELT IN YOUR MOUTH BANANA BREAD

I’ve been making this moist and flavorful banana bread, or at least my version of it since college. I found the original recipe in the Village Voice and adapted it to my liking 😀 It’s been in our family cookbook and a friend uses it for her family holidays and when making boxes to send to the troops overseas. I gave her a copy of the family cookbook and she loved it. When she posted that on Facebook, it melted my heart to see her copy of the recipe all banana bread splattered and well used!

MELT IN YOUR MOUTH BANANA BREAD or SNACK CAKE
1 cup packed brown sugar
1 cup butter, DIVIDED
2 JUMBO eggs
2 tablespoons cinnamon
1/2 cup golden raisins, currants or craisins
1/4 cup coconut flavored rum

1/2 cup crushed walnuts
2 LARGE, RIPE bananas
1/2 cup sugar
2 cups all purpose flour
1 teaspoon baking powder
1/2 teaspoon baking soda

  • Place the raisins in a small bowl and cover with rum. Set aside to soak for 10 minutes and then drain WELL.
  • Combine 1 stick of the butter, brown sugar and bananas in a sauce pan cooking until smooth and sugar is dissolved.
  • Add nuts and raisins.
  • Stir until well coated & set aside to cool.
  • Cream softened butter, sugar and eggs until fluffy.
  • Sift together flour, baking powder, baking soda and cinnamon.
  • Add this to the creamed mixture gradually until well blended.
  • Add cooled banana mixture.
  • Pour into greased and floured pan(s)*
  • Bake at 350° for 45+ minutes.

*NOTE:* This recipe will make 2 large loaves or 1 snack cake or 18 muffins…

FROSTING (optional) – use this if you want to turn it into a snack cake.
8 ounces cream cheese, softened
1/4 cup butter, softened
juice of 1 SMALL lemon
1 teaspoons PURE vanilla extract
1 1/2 cups powdered sugar

  • In a medium bowl beat cream cheese and butter until smooth.
  • Add lemon juice and vanilla. Beat until blended.
  • Add powdered sugar gradually until well blended and smooth.
  • Refrigerate 1 hour to set icing before serving.

GRAN’S APPLE CAKE

Today would have been my dad’s birthday. In his honor I bake a cake each year. This year I chose this yummy apple cake because this is the perfect season for a spiced apple and sweet glazed simple apple cake that fits like your favorite sweater or boots. It also makes the perfect dessert for any fall gathering, church supper or just plain old comfort food for brunch that is sure to bring a smile to everyone’s face. A little spicy and a little sweet, but seriously comforting each and every bite.

GRAN’S APPLE CAKE

CAKE
3 cups all-purpose flour
1 teaspoon baking soda
1 teaspoon kosher salt
2 1/2 teaspoons apple pie spice
1 1/2 cups avocado oil
2 cups sugar
3 LARGE eggs, room temperature
2 teaspoons PURE vanilla extract
1 teaspoon FRESH lemon juice
3 medium apples, peeled and thinly sliced
1 cup chopped toasted walnuts
1/2 cup shredded coconut, (optional)
1 cup golden raisins
1/4 cup rum

  • Preheat oven to 300°.
  • In a small bowl pour rum over raisin and set aside.
  • Spray bottom of a 10 inch spring form pan with non-stick cooking spray. I like my square shaped spring form pan.
  • Whisk together flour, baking soda, salt and apple pie spice. Set aside.
  • In a large bowl, beat oil, sugar and eggs until pale and slightly thick, about 2 minutes.
  • Beat in vanilla and lemon juice.
  • Add dry ingredients; stirring just until moistened.
  • Drain raisins well.
  • Fold in apples, raisins, walnuts and coconut if using (batter will be thick).
  • Transfer to prepared pan.
  • Bake until a toothpick inserted in center comes out clean, 55- 60 minutes.
  • Cool cake in pan on rack.

GLAZE
1 cup powdered sugar
2 tablespoons FRESH lemon juice

  • Whisk together the powdered sugar and lemon juice until well blended and smooth.
  • Drizzle over cake.
  • ENJOY!

NOTE: Japanese pears or crisp red pears work really nice in this cake also.

STRAWBERRY CAKE

I needed a birthday cake for a friend’s birthday yesterday. SHHHH!!!! it’s a secret for later today. Not a BIG party or anything, but just a little surprise. She manages a sports bar and we’ve arranged for a dozen or so friends to pop in for a little get together. In case you hadn’t guessed, her favorite fruit is strawberry which makes for a very pretty cake.

I found this adorable little pedestal for part of her present. It’ll work for her small personal cake or for a soap holder or ???? whatever she chooses. We ate this cake. What? It had to be taste tested. I baked her a fresh one as well as the same recipe as a sheet cake for easy cutting with the group.

STRAWBERRY CAKE
1-2 cups sugar
1 small package (3 ounce) strawberry gelatin
1 cup butter, softened
3 JUMBO eggs
2 ¾ cup cake flour
2 ½ teaspoons baking powder
1 cup WHOLE milk
1 tablespoon PURE vanilla extract
½ cup strawberry puree (use FRESH-preferably or unsweetened frozen strawberries that have been thawed and drained of excess moisture)

  • Preheat oven to 350°.
  • Spray three 9 inch round cake pans with baking spray. (I got creative with this one because it was for a birthday present fitting on a specific size pedestal)
  • In a large mixing bowl, cream together the butter, sugar and dry strawberry gelatin until light and fluffy.
  • Beat in eggs one at a time, mixing well after each egg.
  • Add puree and vanilla, blending well.
  • Combine flour and baking powder.
  • Add the flour and milk alternately to the batter beginning with flour and ending with flour.
  • Pour into prepared pans.
  • Bounce pans to remove air bubbles.
  • Bake for 20 minutes or until a toothpick inserted into the center of the cake comes out clean. DO NOT OVER BAKE!!
  • Cook pans on a wire cooling rack for 8-10 minutes.
  • Turn cake out onto a cooling rack and allow to cool completely before icing.

STRAWBERRY ICING
½ cup butter, softened
¼ cup strawberry puree
3 1/4-3 1/2 cups powdered sugar

  • Using an electric mixer, cream all ingredients together until smooth. 
  • Frost, cover and chill until serving.

NOTE: Change the flavor by changing the gelatin and fruit. Peach and cherry work really well.

PLAIN ‘ol PUMPKIN PIE SPICED DUMP CAKE

Is it pie? Is it Cake? Is it creamy? Is it crunchy? Who cares – it’s delicious! 😀

PUMPKIN PIE DUMP CAKE – a pumpkin pie and a spice cake all rolled into one!

15 ounce can pumpkin puree (NOT pumpkin pie mix)
12 ounce can evaporated milk
3 LARGE eggs
1 cup sugar
1 teaspoon QUALITY ground cinnamon
1/2 teaspoon nutmeg
1 box spice cake mix
1/2 cup sweetened coconut
1/2 pecan pieces
3/4 (1) cup unsalted butter, melted
Whipped cream
FRESH grated nutmeg
FRESH grated cinnamon

  • Preheat oven to 350°.
  • Spray a 9×13 baking dish with nonstick cooking spray.
  • In a medium bowl, combine pumpkin puree, evaporated milk, eggs, sugar and cinnamon until well-combined. It will be very liquidy.
  • Pour this pumpkin mixture into the baking dish.
  • Sprinkle dry cake mix evenly on top of pumpkin mixture.
  • Sprinkle coconut pieces and pecans all around the top.
  • Drizzle melted butter over the top.
  • Bake for 1 hour. 
It might still be just a bit jiggly in the middle when done, but it will continue to set up as it cools.
  • 
Let it cool for AT LEAST 30 minutes before slicing and serving.
  • Top with FRESH whipped cream and a sprinkling of FRESH grated nutmeg and cinnamon.

BLACK FOREST DUMP CAKE

There’s an original version of this cake from the 1980’s, but there are ever so many possibilities to build on the flavors and make your own version! BLACK FOREST is one of my ALL time favorite versions. The other is the CARAMEL APPLE PECAN. 😀 That recipe will be coming up soon. 😀

BLACK FOREST DUMP CAKE
1 LARGE can crushed pineapple, drained, but save the juice!
21 ounce can COMSTOCK country cherry pie filling
1 box MOIST devil’s food cake mix
1/2 cup sweetened coconut
1/3-1/2 cup crushed pecans
1/2 cup butter, melted

  • Preheat oven to 350°.
  • Lightly spray 9×13 cake pan with non-stick spray.
  • Pour crushed pineapple into pan.
  • Pour cherry pie filling into pan. You can stir to mix them up a bit, but it is not necessary. Let your OCD decide 😀
  • Evenly sprinkle dry cake mix over the pineapple cherry mixture and press down lightly.
  • Whisk together the pineapple juice and the melted butter.
  • Pour butter mixture over dry cake mix evenly making sure to cover all the dry cake mix.
  • Sprinkle with coconut and pecans.
  • Bake 35-40 minutes.
  • Cool slightly.
  • Top with whipped cream if desired

NOTE: If you still have dry cake mix showing, use a sheet of wax paper over the top of the cake and lightly press coconut and pecans into cake mix and butter. You can use a fork instead of the wax paper, but it takes a bit longer and then you have to lick the fork at the end. 😀

P3 #2 PUMPKIN PINEAPPLE PECAN DUMP CAKE

P3 #2 PUMPKIN PINEAPPLE PECAN DUMP CAKE

I found the basic recipe somewhere, but it just seemed soooooo plain that I had to rework it and embellish it to bring out the best of the season.  The pineapple adds a sweet, yet tangy bite. The nuts add a bit of crunch that this dessert really needed and the FRESH grated nutmeg on top adds a fresh, rich aroma and a woody, bittersweet flavor with a hint of clove.

P3 PUMPKIN PINEAPPLE PECAN DUMP CAKE gets its name because you literally just dump the ingredients in, bake and voile you have a cake with NO real mixing, just a little whisking having been done! It is a pumpkin pie and a spice cake all in one yummy bite!

15 ounce can pumpkin puree (NOT pumpkin pie mix)
12 ounce can evaporated milk
1 LARGE can crushed pineapple, DRAINED REALLY, REALLY WELL
3 LARGE eggs, 1 WHOLE and 2 yolks
1 cup sugar
1 1/2 teaspoons QUALITY ground cinnamon
1 box moist spice cake mix
scant 1 cup unsalted butter, melted
1/2 – 3/4 cup crushed walnuts or pecans (optional)

  • Preheat oven to 350°.
  • Spray a 9×13 baking dish with nonstick cooking spray.
  • In a medium bowl, whisk together the pumpkin puree, evaporated milk, eggs, sugar, drained pineapple, nutmeg and cinnamon until well-combined. It will be very thin, don’t worry!
  • Pour into the baking dish.
  • Sprinkle dry cake mix evenly on top of pumpkin mixture.
  • Drizzle melted butter evenly over the top.Use a fork to gently press down any exposed cake mix so that the butter completely covers the dry mix.
  • Sprinkle with nuts if using.
  • Bake 55-60 minutes. It might still be a bit jiggly in the middle but as long as the edges are set it will continue to set up as it cools.
  • Let it cool for at least 30 minutes before slicing and serving. Chill if not serving immediately after the 30 minutes. Let come to room temperature before serving.
  • Serve with a dollop of whipped cream and sprinkle of nutmeg.

CRUST LESS APPLE PIE ~ FAITH & FOOD FRIDAY #11

I’m still featuring my Mary & Martha GRACE meal prayer box on Faith and Food Friday, hosted by Sandra at Diary of a Stay at Home Mom.

THIS WEEK’S PRAYER: Fo.r life and love, for rest and food, we thank you Lord, for You are good. We praise  Your name for all You do, for daily help and blessings too. Amen

CRUST LESS APPLE PIE slightly adapted from Ree Drummond

SPICES
2 tablespoons QUALITY ground cinnamon
1 teaspoon FRESH ground nutmeg
1/2 teaspoon ground allspice
1/4-1/2 teaspoon ground cardamom (optional, but delicious)

  • Whisk together the cinnamon, nutmeg, allspice and cardamom in a small bowl.

APPLES
3 LARGE Honeycrisp apples, peeled, halved vertically and cored (Granny Smith work well too)
4 tablespoons salted butter, melted
2 HEAPING tablespoons brown sugar
1 orange, zested and juiced (about 3 tablespoons juice and 2 teaspoons zest)
1/2 cup quick-cooking oats
1/4 cup chopped walnut pieces
1/3 cup currants or golden raisins
Pinch kosher salt
QUALITY Honey, for serving
“Vanilla” ice cream, for serving (see notes)

  • Preheat the oven to 400°.
  • Place the apple halves core-side down on a flat surface. Before slicing, place chopsticks or wooden spoons on either side of them to make sure you don’t cut all the way through.
  • Slice almost all the way to the bottom of each apple half at 1/4-inch intervals, then place them on a sheet pan.
  • Whisk together 2 tablespoons of the butter, 2 tablespoons of the brown sugar, 2 teaspoons of the apple pie spice and the orange juice in a mixing cup.
  • Drizzle over the apples, making sure they are well coated and the drizzle goes into the slits.
  • Bake until they are just starting to get tender, about 15-20 minutes.


  • Meanwhile, mix together the oats, walnuts, salt, remaining melted butter, remaining brown sugar, orange zest, raisins or currants and remaining apple pie spice.
  • Sprinkle the oat mixture over the apples, making sure to get some between the slices without breaking the apples.
  • Bake until the topping is slightly crisp and golden, another 10-15 minutes.
  • Drizzle with honey and serve with ice cream.

NOTES: A local ice cream company makes an absolutely WONDERFUL lemon bar ice cream that is just completely decadent and absolutely perfect for this dish. We actually had this on July 18th (third Sunday in July), National Ice Cream Day!

PINEAPPLE UPSIDE DOWN CAKE with PINK PEPPERCORN CARAMEL

PINEAPPLE UPSIDE DOWN CAKE with PINK PEPPERCORN CARAMEL adapted from Alex Guarnaschelli

CAKE
8 tablespoons unsalted butter, softened
1 large pineapple, skinned, cored and cut into eight or nine 3/4-inch-thick slices  OR 1 LARGE can of pineapple slices or crushed works too
3/4 cup dark brown sugar 
1/2 cup WHOLE buttermilk  (do NOT use light or reduced fat)
1 teaspoon PURE vanilla extract
2 LARGE eggs, lightly beaten 
1 cup all-purpose flour 
3/4 cup granulated sugar 
1 teaspoon kosher salt 
3/4 teaspoon baking powder 
1/4 teaspoon baking soda
Maraschino cherries 

  • Preheat the oven to 350°.
  • Heat a cast iron 9-inch skillet over medium heat and melt 2 tablespoons butter.
  • Add the slices of pineapple in a single layer and sprinkle the brown sugar over the fruit.
  • Add a maraschino cherry in the center of each pineapple ring.
  • Cook until the pineapple browns slightly, 2 to 3 minutes. Flip the pineapple slices. Turn off the heat and keep warm.
  • Whisk together the buttermilk, vanilla, eggs and the remaining 6 tablespoons butter in a medium bowl until smooth.
  • Use a rubber spatula to stir in the flour, granulated sugar, salt, baking powder and baking soda until completely smooth. (The batter will be fairly stiff)
  • Pour the batter over the pineapple.
  • Transfer the skillet to the center of the oven and bake until a toothpick inserted in the center of the cake emerges clean, 40 to 45 minutes.
  • Cool for about 10 minutes before carefully inverting onto a serving platter. Cooling any longer may make cake stick. If you cool too much, quickly heat the bottom of the skillet before inverting.

CARAMEL
1 cup granulated sugar
2 tablespoons light corn syrup 
Juice from 1 LARGE lime 
1/4 cup COLD water
2 teaspoons (pink) peppercorns 

  • Combine the granulated sugar, corn syrup, lime juice and 1/4 cup cold water in a medium stainless saucepan.
  • Stir in the pink peppercorns and bring to a gentle simmer, cooking until the sugar is dissolved, and then cooking 10 minutes more.
  • Pour through sieve to remove large pepper pieces.
  • Set aside to cool slightly.
  • After cake is inverted pour the caramel over the cake.