 MAGIC COOKIE BUTTER BARS
Years ago one of my VERY favorite treats were Eagle Brand 7 Layer bars A.K.A. as Magic Cookie Bars with sweetened condensed milk, BUT, they were so heavy and calorie packed. This recipe is a WONDERFUL substitute for that recipe and the bars are still moist and tender AND they taste amazingly similar – kind of like a loaded Blondie that strives to be overindulgent! This recipe also makes smaller portion which is great for just 2 people
BARS
1/2 cup unsalted butter, melted
1 large egg
1 cup packed brown sugar
2 teaspoons PURE vanilla extract
2 teaspoons QUALITY cinnamon (I use Red Ape)
Heaping 1/3 cup smooth Cookie Butter
3/4 cup all-purpose flour
pinch salt
1/4 cup golden raisins
1/4 cup milk chocolate chips
1/4 cup roasted coconut pieces
- Preheat oven to 350°.
- Line an 8-by-8-inch pan with aluminum foil, spray with non-stick cooking spray and set aside.
- Melt 1/2 cup butter and allow to cool slightly.
- Add the egg, brown sugar, vanilla and cinnamon, whisking until smooth.
- Add the heaping Cookie Butter, and stir to blend.
- Add the flour and salt, stirring until just combined DO NOT OVER MIX!!!! – these are like brownies and overtaxing will make them tough.
- Pour batter into prepared pan, smoothing the top lightly with a spatula.
- Sprinkle evenly with the chocolate chips, raisins and coconut.
- Set pan aside while you prepare the streusel.
STREUSEL
1/4 cup unsalted butter, softened
1/2 cup whole rolled old-fashioned oats DO NOT USE quick or instant oats
1/4 cup packed brown sugar
2 tablespoons granulated sugar
2 tablespoons all-purpose flour
1-2 teaspoonS cinnamon, to taste
2 tablespoons Cookie Butter, melted for final drizzle after baking
2 tablespoons milk chocolate chips
- Using the same bowl you made the batter in add all the streusel ingredients except the 2 tablespoons cookie butter and work the mixture with a spoon, a pastry cutter, or your hands until small pebbles form.
- Sprinkle streusel evenly over top.
- Bake for about 30-40 minutes, or until center is set and not jiggly; and the edges are set and have pulled away slightly from sides of pan. Test with a toothpick. If it comes out mostly clean, you’re good to go. EVERY oven is different so start checking these at the 30 minute mark.
- After pulling pan from the oven, heat 2 tablespoons of Cookie Butter and 2 tablespoons milk chocolate chips in the microwave to melt, about 15 seconds.
- Immediately and evenly drizzle Chocolate Cookie Butter over the top of bars.
- Allow pan to cool for at least 30 minutes cutting.
- Lift out foil and place on cutting board.
- Slice and serve.
- Store bars in an airtight container for up to 1 week at room temperature, or up to 3 months in the freezer.
ORIGINAL MAGIC COOKIE BARS
“This bar cookie is an old fashioned favorite. Chocolate chips, nuts and coconut are set in a caramelized layer on top of a graham cracker crust.” – Eagle brand
1/2 cup butter or margarine, melted
1 1/2 cups graham cracker crumbs OR ginger snap cookie crumbs
1 (14 ounce) can EAGLE BRAND® Sweetened Condensed Milk
2 cups semisweet chocolate chips
1/2 cup golden raisins
1 1/3 cups flaked coconut
1 cup chopped nuts
- Heat oven to 350° (325° for glass dish).
- Coat 13×9-inch baking pan with no-stick cooking spray.
- Combine graham cracker crumbs and butter. Press into bottom of prepared pan.
- Pour sweetened condensed milk evenly over crumb mixture.
- Layer evenly with chocolate chips, raisins, nuts and coconut. Press down firmly.
- Bake 25 minutes or until lightly browned.
- Cool.
- Cut into bars.
- Store covered at room temperature.
NOTES/VARIATIONS:
- 7-Layer Magic Cookie Bars: Substitute 1 cup (6-ounces) butterscotch flavored chips* for 1 cup semi-sweet chocolate chips and proceed as directed above.
- Peanut butter flavored chips or white chocolate chips may be substituted for butterscotch flavored chips.
- Magic Peanut Cookie Bars: Substitute 2 cups (about 3/4 pound) chocolate-covered peanuts for semi-sweet chocolate chips and chopped nuts.
- Magic Rainbow Cookie Bars: Substitute 2 cups plain candy-coated chocolate candies for semi-sweet chocolate chips.


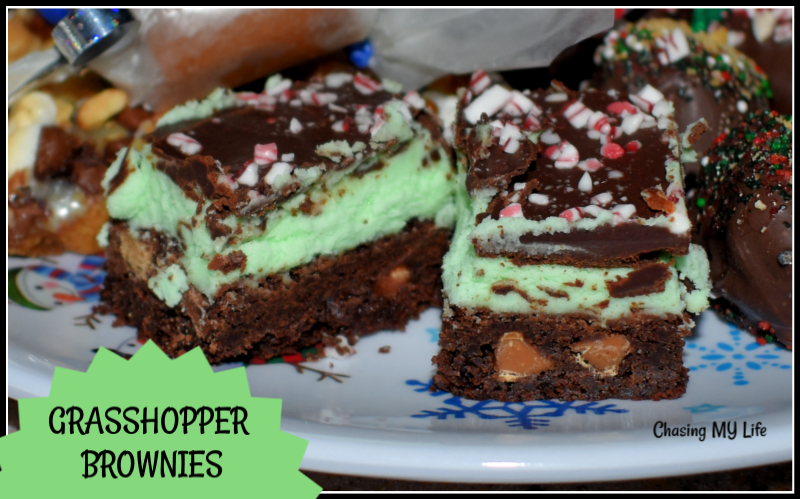 GRASSHOPPER BROWNIES