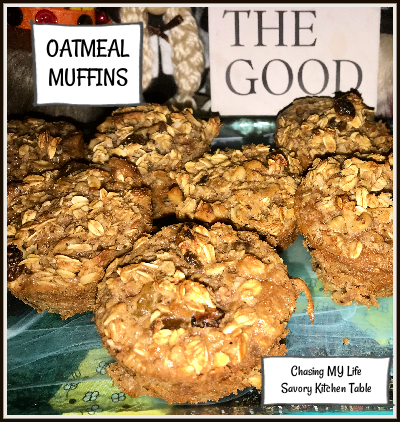
SALSA VERDE CHICKEN – CROCK POT STYLE

SALSA VERDE CHICKEN – CROCK POT STYLE
1-1 1/2 pounds boneless, skinless chicken thighs, tenders or breasts
1 LARGE shallot, halved and sliced
2-3 cloves garlic, minced
1 LARGE can diced green chiles, heat of choice, DRAINED
1 can ORIGINAL Rotel tomatoes DRAINED
1 can green chile verde sauce

FRESH ground sea salt and black pepper
1 tablespoon Kinders or Pampered Chef taco seasoning

TOPPINGS
sliced avocado
sliced limes
sour cream
shredded cheese

  • Pour Green Chile Verde sauce and the Rotel tomatoes into bottom of slow cooker.
  • Season chicken pieces with taco seasoning, FRESH ground sea salt and black pepper.
  • Arrange chicken pieces on top of tomatoes in a single layer if possible.
  • Sprinkle shallot and garlic on top of chicken pieces.
  • Pour chopped green chiles on top.
  • Cook for 6 hours on low or 3 hours on high.
  • Shred chicken into sauce, stirring to blend and coat the chicken pieces well.
  • Serve with warm tortillas and toppings of choice.

NOTES:

  • Depending on which cut of meat you’re using cooking time may vary.
  • For a gluten free version serve in large lettuce leaves.

BLONDE BEEF STEW

BLONDE BEEF STEW

1 pound Stew Beef, cut into bite sized pieces
FRESH ground sea salt and black pepper
¼ cup WONDRA flour for dredging
2 tablespoons butter
2 tablespoons avocado oil
2 leeks, thinly sliced
1 SMALL fennel bulb, medium diced
4 cloves garlic, thinly sliced
½ cup white wine
4 cups chicken stock
1 cup parsnips, diced
1 cup turnips, diced
1 cup celery root, diced
1 cup carrots, diced
1 bunch FRESH thyme

  • Preheat oven to 300°.
  • Preheat butter and 1 tablespoon of oil in a Dutch oven over medium heat.
  • Toss beef in seasoned flour.
  • Sear beef on all sides for 2 minutes per side, or until browned.
  • Remove beef from Dutch oven and set aside.
  • Add remaining oil, fennel, leeks and garlic to Dutch oven and sauté until slightly translucent, approximately 5 minutes.
  • Deglaze with white wine, simmering until reduced by half.
  • Add remaining ingredients and bring to a SLOW simmer.
  • Cover and place in oven for 2 hours or until beef is fork tender.
  • Once stew is finished cooking remove thyme sprigs and discard.

EVERYTHING BAGEL SEASONING

For years I’ve eaten EVERYTHING BAGEL spice from Trader Joes. But now there are no Trader Joes where I live and I need more! I always thought it was called EVERYTHING spice because it had a little of everything in it. I was SOOOOOO wrong. It is SOOOOOOOO simple with only 5 ingredients so why not make your own? And by the way, it’s called EVERYTHING spice because you can use it on everything 😀

The combination of toasted, salty savory flavors blend together so well that it seems like you’re truly getting EVERYTHING, but yet each bite is a slightly different flavor.

EVERYTHING SPICE

1 tablespoon poppy seeds
1 tablespoon toasted sesame seeds
1 tablespoon dried garlic
1 tablespoon dried onion
2 teaspoons coarse salt

  • Grind together.
  • Store in a sealed container.

NOTE: Adjust amounts to your personal preferences.

STUFFED GREEN CHILE CHEESE CHICKEN

As everyone knows bacon is the duct tape of the culinary world or more commonly BACON MAKES EVERYTHING BETTER 😀

This recipe is super simple, yet extremely tasty! PERFECT for any night of the week. It is also grill friendly if you don’t want to heat up the kitchen, but I prefer the oven.

STUFFED GREEN CHILE CHEESE CHICKEN serves 6-8
8 slices bacon
4 LARGE chicken breasts
1 LARGE can WHOLE green chiles, rinsed and sliced open
FRESH ground black pepper
Garlic Salt
4 ounces COLD cream cheese, sliced into 8 pieces
1/2 cup shredded cheddar cheese
1/2 cup BBQ sauce, optional

  • Preheat oven to 375°.
  • Line baking sheet with foil and top with roasting rack LIGHTLY sprayed with non-stick cooking spray.
  • Slice chicken breasts lengthwise so you have 8 thin steaks.
  • Season both sides of chicken steaks with garlic salt and FRESH ground black pepper.
  • Place cream cheese slices on top of chicken steaks.
  • Add a green chile on top of the cream cheese.
  • Sprinkle with cheddar cheese.
  • Roll each piece up TIGHTLY.
  • Wrap each piece with a bacon slice and secure with toothpicks.
  • Arrange chicken bundles in a single layer on roasting rack.
  • Bake 30-35 minutes.
  • Brush with BBQ sauce and bake another 5 minutes or until bacon is crisp and chicken is cooked through.

SUPER EASY SCALLOPED POTATOES or AU GRATIN with CHIVES

For years and years I was taught to make scalloped potatoes with even layers and a sprinkling here and a seasoning there… BUT, here is the easiest recipe for a scalloped, au gratin potato dish. 😀 The shallower the dish equals more golden gooey cheese 😀

SUPER EASY SCALLOPED POTATOES or AU GRATIN with CHIVES & FLAVOR serves 6-8
2 1/2 pounds russet potatoes, washed and sliced 1/4 inch thick
1 bunch green onions, sliced thin
2 cloves garlic, minced
1 teaspoon FRESH thyme
1 1/3 cups heavy cream
1/3 cup WHOLE milk
2 tablespoons WONDRA flour
FRESH ground sea salt and black pepper, to taste
2 cups QUALITY grated Gruyere cheese (I sometimes use Havarti)
1/4 cup FRESH chives, minced for garnish

  • Preheat oven to 400°.
  • Spray a 9×13 inch shallow baking dish with non stick spray.
  • In a large bowl whisk together the heavy cream, milk, flour, salt and pepper until well blended.
  • Fold in the potatoes, green onions, garlic, thyme and most of the chives until well mixed and coated.
  • Fold in 1/2 cup of the cheese.
  • POUR (here’s the easy part) the mixture into your baking dish.
  • Press the mixture down so that the potatoes are submerged in the liquid.
  • Cover with foil and bake 40 minutes.
  • Remove the foil and bake 20 minutes more.
  • Sprinkle with the remaining cheese and bake 5-7 minutes more until golden and bubbling.
  • Top with remaining chives and serve.

SHORT CUT APPLE PIE CUPCAKES

SHORT CUT APPLE PIE CUPCAKES

yields 24 cupcakes PREP 15 minutes COOK 15 minutes TOTAL 30 minutes

A fun and easy apple pie cupcake recipe made with a spicy cinnamon roll dough, spicy apples and a sweet crumble topping. Is there anything better than the sweet smell of an apple pie baking? I think not.

APPLE FILLING
6 tablespoons unsalted butter
6 large Granny Smith apples, peeled, cored and diced in to 1/4-inch cubes
6 tablespoons brown sugar
2 teaspoons QUALITY ground cinnamon (I use red ape)
3/4 teaspoon FRESH ground nutmeg
SCANT 1 teaspoon salt
Juice from LARGE lemon

  • Melt butter in a large skillet over medium-high heat.
  • Add the diced apples and cook 5 minutes or so, tossing occasionally, until they start to soften.
  • Stir in brown sugar, cinnamon, nutmeg and the salt.
  • Cook 5 more minutes, or until tender.
  • Stir in lemon juice.
  • Set aside.

CRUMBLE
6 tablespoons unsalted butter
3/4 cup WONDRA
3/4 cup dark brown sugar
1/4 teaspoon QUALITY cinnamon
1 teaspoon FRESH grated nutmeg

3/4 cup chopped walnuts

  • Add the flour, brown sugar, cinnamon, nutmeg and walnuts to a medium bowl.
  • Grate the butter with a cheese grater over the bowl.
  • With a pastry cutter work the butter in until crumbly.
  • Set aside.

CUPCAKES & ASSEMBLY
3 cans (8 count) refrigerated cinnamon roll dough (store bought or home made is up to you!)

  • Heat oven to 400°.
  • LIGHTLY spray muffin tins with cooking spray.
  • Separate cinnamon roll dough into 24 rolls.
  • Flatten each into 4-inch round then place into each muffin cup so it comes up the sides evenly.
  • Divide the cooled apple filling mixture evenly into muffin cups.
  • Top with the crumble topping.

  • Bake the cupcakes 15 minutes or until bubbly and tops are light brown.
  • Cool in the pan 5 minutes then transfer to a cooking rack.

TOPPING – your choice – store bought or home made is up to you!
Whipped cream
Ice cream
Caramel sauce drizzle

  • Serve the cupcakes with topping of choice.

COCONUT MACAROONS

Soft, chewy and yet crispy and golden. YUM!

COCONUT MACAROONS yields 2 dozen cookies

14 ounces sweetened Baker’s Angel Flake flaked coconut
¾ cup plus 2 tablespoons sweetened condensed milk
1 teaspoon PURE vanilla extract
2 LARGE eggs whites
¼ teaspoon salt
4 ounces QUALITY (GHIRADELLI) semi-sweet chocolate, chopped

  • Preheat the oven to 325°F.
  • Arrange oven racks near the center of the oven.
  • Line two baking sheets with parchment paper or silpats.
  • In a medium bowl, mix together the coconut, sweetened condensed milk and vanilla extract. Set aside.
  • Beat the egg whites and salt until stiff peaks form.
  • Use a large rubber spatula to fold the egg whites into the coconut mixture.
  • Using a mini ice cream scoop or gloved hands sprayed with non-stick cooking spray, form heaping tablespoons of the mixture into mounds on the prepared baking sheets, spacing about 1 inch apart.
  • Bake for 23 to 25 minutes, rotating the pans from top to bottom and front to back, until the tops and edges are ALL golden.
  • Let cool on the pans for a few minutes, then transfer to a wire rack to cool completely.
  • Melt the chocolate in a microwave-safe bowl at medium power, stopping and stirring at 30 second intervals, until just smooth and creamy or melt the chocolate in a double boiler over simmering water.)
  • Dip the bottoms of the macaroons in the chocolate, letting any excess drip back into the bowl, and return to the lined baking sheets. Place the macaroons in the refrigerator for about 10 minutes to allow the chocolate to set.

NOTES:

  • A drop or two of food coloring can make these festive for any special occasion – red for Valentine’s Day, green for St. Patrick’s Day, pink or blue for a baby shower, etc…
  • The cookies keep well in an airtight container at room temperature for about a week or they can be frozen for up to 3 months.
  • If freezing, DO NOT DIP in the chocolate until you thaw them out. Remove the cookies from the freezer and let them come to room temperature before dipping in chocolate or serving.

SWEET & SOUR BRISKET

This is a savory, aromatic, and yet sweet as well as tangy sour slowly cooked (for hours and hours) brisket based on traditional Ashkenazi Jewish recipes. It’s always a crowd pleaser!

Brisket is one of the tougher cuts of meat that many Jewish recipes have tamed into a tasty cut by slow cooking a well marbled cut of meat with a decent fat cap. DO NOT TRIM OFF THE FAT. The fat is necessary to help break down the toughness as it roasts turning it into a piece of meat that easily flakes apart into tender pieces that just melts in your mouth. This cut also tastes even better a day or two after it’s prepared. I searched through many recipes to come up with one of my own that appeased all my picky eaters.

This is traditionally the cut of meat that is pickled and made into Pastrami or Corned Beef brought to the U.S. by immigrants and is a traditional staple for many Jewish families for special holidays and special occasions.

SWEET & SOUR BRISKET
5-7 pound brisket, DO NOT trim fat – especially if it’s grass fed

1/4 cup avocado oil, divided
2 large yellow onions, peeled and sliced
1 1/2 pounds carrots, peeled and sliced
1/2 pound celery, peeled and sliced thin
one 14 ounce can tomatoes – whole, diced, or crushed OR two 8 ounce cans of crushed pineapple – see notes
5-6 peeled whole garlic cloves
1/2 cup brown sugar
1/3 cup Apple Cider vinegar
2 cups beef bone broth
FRESH ground sea salt and black pepper

  • Preheat oven to 300.
  • Rinse the brisket and pat dry.
  • Rub both sides of the meat with FRESH ground sea salt and black pepper.
  • Heat a large skillet over a medium heat.
  • Drizzle 2 tablespoons of avocado oil into the pan.
  • Brown the brisket 5 minutes on each side. Depending on the size of your brisket you it may need to be browned in parts or stages to get the whole thing browned.
  • While the brisket is browning, add the tomatoes, garlic, brown sugar, apple cider vinegar, and 1 ½ cups broth into a blender or food processor. If using the crushed pineapple you can just whisk it all together.
  • Add 2 teaspoons of salt and ¼ teaspoon of black pepper. Pulse till garlic is chopped small and all ingredients are well combined.
  • Remove the browned brisket from the skillet.
  • Drizzle 2 tablespoons more avocado oil in the pan and add the sliced onions, sautéing them over medium high for a few minutes until they begin to soften and shrink in size.
  • Add the carrot and celery slices, sauteing 5-6 minutes until the onions are soft and browning and the vegetables are fragrant.
  • Transfer the vegetables out of the skillet and onto a plate, set aside.
  • Add 1/2 cup beef stock into the skillet and let it heat up.
  • Use a spatula to gently scrape up any brown bits and pan juices that are clinging to the skillet. Turn off heat.
  • Pour half of the tomato mixture into a large roasting pan, ceramic if you have one that large.
  • Place brisket on top of sauce, fat cap facing up.
  • Pour the sauteed vegetables across the top of the brisket, along with the broth and brown bits.
  • Pour the remaining tomato sauce over the top of the vegetables and brisket.
  • Cover the roasting pan tightly with a strong layer of parchment paper followed by a layer of foil. The parchment forms a protective layer between the meat and sauce (which is acidic) and the foil. If you have a ceramic roaster with a glass lid you can skip the parchment and foil step.
  • Place brisket in the oven and roast COMPLETELY undisturbed for 5 to 7 hours. It will take about 1 hour per pound of meat (leaner cuts, especially grass fed may take longer—test for desired doneness). Brisket is ready when it flakes tenderly when pierced with a fork. You can let it cook even longer for a soft, shredded texture if that’s what you prefer. When fully cooked, the brisket will have shrunk considerably in size.
Remove brisket from the pan and let it rest on the cutting board fat-side up for 20-30 minutes.
  • Pour the sauce and vegetables from the roasting pan into a smaller saucepan.
  • Skim fat from the surface of the cooking sauce, then SLOWLY simmer the sauce until hot DO NOT BOIL.
  • 
Cut fat cap off the brisket, then cut the brisket in thin slices against the grain.
  • Serve topped with the warmed sauce and veggies.

This is delicious immediately, but I highly recommend making this recipe a couple days in advance because the brisket just gets so much more flavorful as it sits.

DIRECTIONS FOR MAKING AHEAD

  • When brisket comes out of the oven, open the foil to vent and let the brisket slowly return to room temperature.
  • Switch the brisket and sauce to a ceramic or glass dish (metal from the roasting pan can react with the acid in the sauce, which can cause an off taste if left to sit).
  • Cover with plastic wrap and place in the refrigerator.
  • Let the brisket chill overnight, or up to two days. You can also freeze the brisket if you prefer.
  • 1-2 hours before serving, remove the brisket from the refrigerator and preheat your oven to 350°.
  • The fat in the sauce will have risen to the top, turned white, and solidified. Use a spoon to scoop the fat bits out of the sauce and discard.
  • Take the brisket out of the dish and brush any excess sauce back into the dish.
  • Place brisket on a cutting board, fat-side up.
  • Cut the fat cap off the brisket and then cut the brisket into thin slices against the grain.
  • Return the sliced meat to the dish and spoon sauce over it, making sure to spoon a little sauce between each slice.
  • Cover the dish with a layer of parchment paper, then with foil or better yet a glass lid, and place it in the oven.
  • Let the brisket roast for 45-60 minutes until heated through.

NOTE:

  • It can also be reheated in a slow cooker on high heat for 1 hour.
  • Tomatoes are more savory, pineapple is sweeter, but they both contribute to the sweet & sour name.

CHEESY SNACKS

The perfect chewy and cheesy snack, appetizer or soup crouton dippers!

CHEESY SNACKS
2 cups (8 ounce bag) shredded Parmesan cheese
2 cups (8 ounce bag) shredded Mozzarella cheese
1 LARGE egg
1 teaspoon onion powder
1 teaspoon garlic powder

  • Preheat oven to 350°.
  • In a large mixing bowl whisk together the egg, garlic powder and onion powder until mixed well.
  • Fold in shredded cheeses until well blended.
  • Spread in an even layer on parchment paper.
  • Bake 15-20 minutes. Edges will start to crisp and
  • Cool slightly and cut into pieces.

NOTES:

  • I used a Mozzarella and provolone mix instead of plain Mozzarella and a Parmesan Roman Asiago mix instead of plain Parmesan and it adds just a little extra flavor.
  • Add some minced red onion and minced pepperoni chunks to call it CHEESY PIZZA SNACKS!

JALAPENO POPPER WONTON CUPS

Wonton Cups full of yummy bacon, jalapeños (or green chiles if you’re a wimp), cream cheese, cheddar cheese, and sour cream make the perfect party or game day appetizer!

JALAPENO POPPER WONTON CUPS Yield: 12

12 wonton wrappers, (you’ll find them in the produce section for some weird reason)
4 ounces softened cream cheese
1/2 cup sour cream, plus more for serving
3/4 pound bacon, cooked & crumbled, reserve 2 tablespoons
1 cup shredded cheddar cheese, reserve 2 tablespoons
3-4 jalapeños, seeded and chopped (for more spice, do not remove all the seeds and for wimps substitute green chiles – I used HOT green chiles for a middle of the road)
diced green onion for serving

  • Preheat oven to 350°.
  • Spray muffin pan with non-stick cooking spray.
  • Place one wonton wrapper in each muffin cup; bake 10 minutes or until lightly browned.
  • Remove from oven and cool slightly.
  • In a medium-sized mixing bowl, stir together the cream cheese and sour cream until smooth.
  • Stir in bacon pieces, cheddar cheese, and chopped jalapeños or green chiles.
  • Spoon filling into wonton cups, then sprinkle with reserved bacon and cheese.
  • Return to oven and bake for an additional 8-10 minutes, until wontons are golden brown and the cheese is melted.
  • Serve with a dollop of sour cream and sprinkle of diced green onion.

VARIATIONS ON THIS RECIPE:

  • Bacon can be replaced with ground beef, crumbled sausage or small diced ham
  • Add crumbled blue cheese, Gorgonzola or flavor of choice
  • Substitute a flavored cream cheese for the plain cream cheese
  • Use a Mexican Sour Cream instead of plain
  • Add chopped red peppers
  • Add chopped onions

RUM RAISIN CARROT CAKE with CREAM CHEESE FROSTING

This has been a family favorite for many years and is the first dessert I taught my niece, Amber how to bake with so it has some seriously “sweet” memories 😀

RUM RAISIN CARROT CAKE with CREAM CHEESE FROSTING
CAKE
2 1/2 cups flour
2 teaspoons baking soda
1/4 teaspoon salt
1 tablespoon cinnamon
1 cup packed golden brown sugar
1 cup sugar
1 1/2 cup butter, softened
3 JUMBO eggs
2 teaspoons PURE vanilla extract
1/4 cup golden rum** SEE NOTE
3 cups grated carrots
8 ounce can crushed pineapple, drained well
1 cup golden raisins
1/2 cup chopped walnuts

  • Pour rum over raisins and set aside for at least an hour.
  • Preheat oven to 350°.
  • Grease and flour 2-9 inch cake pans or line cupcake tins.
  • In a large bowl sift together the flour, baking soda, salt, cinnamon and sugars.
  • In another bowl cream together the butter, brown sugar, vanilla and 1 egg.
  • Add additional eggs and beat until well creamed.
  • Add dry ingredients gradually until well blended.
  • Add carrots, pineapple and walnuts until well blended.
  • Drain raisins and fold in last.
  • Pour batter into prepared pans.
  • Bake 1 hour or until toothpick comes out clean.
  • Cool 10 minutes.
  • Invert cakes onto rack and cool completely.

**NOTES:

  • As an option you could soak the raisins in orange juice instead of the rum and then substitute 1 teaspoon maple flavoring for the rum.
  • This recipe also makes scrumptious cupcakes.

FROSTING
16 ounces cream cheese, softened
1/2 cup butter, softened
Juice of 1 LARGE lemon
2 teaspoons PURE vanilla extract
3 cups powdered sugar

  • In a medium bowl beat cream cheese and butter until smooth.
  • Add lemon juice and vanilla, beating.
  • Add powdered sugar gradually until well blended and smooth.
  • Ice first layer and then add 2nd cake top and ice again including sides of cake.
  • Refrigerate 1 hour to set icing before serving.

Save Room for dessert new badgeOriginally posted 7-26-2010 for OURkRazZykitchen a food blog a friend and I hosted 😀
Update posted 7-26-2022

SMOKEY WHISKEY WINGS

SMOKEY WHISKEY WINGS Serves 4

Sweet, savory AND a bit of a kick.

WINGS
2 pounds chicken wing sections
3 tablespoons salt
3 tablespoons sugar
2 quarts cold water
2 tablespoons canola oil
FRESH ground salt and black pepper
2-4 tablespoons cornstarch

  • Combine the 3 tablespoons salt, sugar, and water in a large bowl.
  • Add the wings and set in the fridge for 30 minutes.
  • Remove wings from brine and pat dry.
  • Toss wings in a bowl with the FRESH ground salt and black pepper and cornstarch until coated evenly.
  • Preheat oven to 350°.
  • Arrange wings in a single layer on a foil lined baking sheet.
  • Bake 30-45 minutes until cooked through and crispy.

SAUCE
3 tablespoons butter
1 garlic clove, FINELY minced
½ cup light brown sugar
2 tablespoons water
1/4 cup whiskey
¼ teaspoon ground ginger
1/4 cup Tabasco OR Frank’s Original hot sauce (optional)
FRESH ground sea salt & black pepper
1 teaspoon liquid smoke (flavor of choice)

  • Melt butter in a saucepan.
  • Whisk in the brown sugar, whiskey, hot sauce, liquid smoke, garlic, ginger, salt and pepper.
  • Stir occasionally 10-15 minutes.
  • In a large heatproof bowl, toss together the wings and sauce, coating them well.
  • Serve with celery sticks and blue cheese or ranch dressing.