I’ve been working on this post since last July when I promised to find my slab pie recipes for my nieces. Katie and Lulu I am so sorry this took so long – I sure hope you enjoy them! I hope having all 3 versions together inspires you to make your own.
Today I made “half” pies in the same pan so they almost looked more like a galette, but they tasted perfect! 😀

APPLE CHEDDAR SLAB PIE
Pie Crust dough for a 2 crust pie (homemade or Pillsbury)
3/4 cup + 1/4 cup + 1/4 cup finely shredded sharp cheddar cheese
3 pounds Granny Smith apples, peeled, cored and cut into 1/4 inch slices
1/2 cup sugar
Juice of 1 LARGE lemon
1/8 teaspoon salt
1/2 cup flour
1/2 cup rolled oats
1/2 cup packed brown sugar
4 tablespoons COLD unsalted butter, cubed
1 LARGE egg, beaten
- Preheat oven to 400°.
- Lightly flour your work surface.
- Unroll first pie crust and sprinkle with 1/4 cup finely shredded cheddar cheese. Top with second crust and roll out to a 17×12 inch rectangle.
- Place crust in a 15×10 jelly roll pan. Refrigerate while you prepare the filling.
- In a large mixing bowl toss apple slices with lemon juice, salt, sugar and 1/4 cup of the flour.
- Remove piecrust from refrigerator.
- Spread apple mixture evenly into crust.
- Sprinkle with 1/4 cup cheddar cheese.
- In food processor pulse together the brown sugar, rolled oats, 1/4 cup flour and cold butter until crumbly.
- Sprinkle evenly over pie.
- Fold crust edges over pie like a Galette.
- Brush with egg.
- Bake 35-45 minutes until browned.
- Cool 1 hour.
- Cut into squares and serve with a dollop of vanilla ice cream.
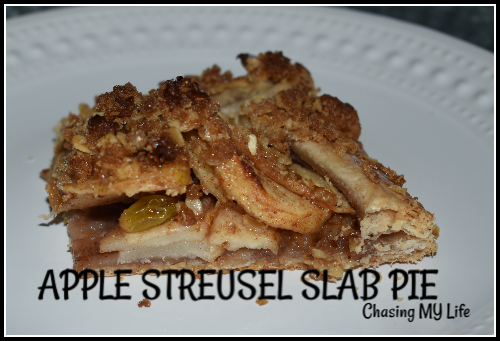
APPLE STREUSEL SLAB PIE
1 1/2 cups brown sugar
1 teaspoon +1 teaspoon QUALITY cinnamon
1/4 teaspoon FRESH ground nutmeg
1/2 teaspoon salt
1 3/4 cups all purpose flour
12 ounces COLD unsalted butter, cubed
1/4 cup + 2/3 cup chopped walnuts
1/2 cup golden raisins
3 pounds Granny Smith apples, peeled, cored and cut into 1/4 inch slices
- Preheat oven to 400°.
- Lightly flour your work surface.
- Unroll first pie crust and sprinkle with 1/4 cup finely chopped walnuts and 1 teaspoon cinnamon.
- Top with second crust and roll out to a 17×12 inch rectangle.
- Place crust in a 15×10 jelly roll pan.
- Refrigerate while you prepare the filling.
- Combine brown sugar, cinnamon, nutmeg and salt.
- Combine 3/4 cup of the sugar mixture with 1 1/2 cups of the flour, the butter and 2/3 cup chopped walnuts cutting in butter until coarse crumbs form. Set aside.
- Combine remaining sugar with apples and 1/4 cup flour.
- Spread apple mixtures over crust evenly.
- Fold crust edges over pie like a Galette.
- Sprinkle with crumb mixture.
- Bake 35-45 minutes until browned and bubbly.
- Cool 1 hour.
- Cut into squares and serve with a dollop of vanilla ice cream.


I did save the BEST for last, at least in my opinion. This pie tastes just like a caramel apple! The beauty though is that there is a thin and flaky crust that houses the juicy apples and crispy crust and is drizzled with a luscious homemade caramel for a melt in your mouth tasty treat.
CARAMEL APPLE SLAB PIE
CRUST
2¼ cups all-purpose flour
¾ teaspoon salt
⅔ cup CRISCO butter-flavored shortening
8 tablespoons cold water
- Spray a 15x10x1 inch jelly roll pan with non stick cooking spray and set aside.
- In a large bowl combine flour and salt. Using a pastry blender cut in the shortening until it resembles coarse crumbs.
- Sprinkle 1 tablespoon of the cold water over the mixture and toss with a fork. Repeat using 1 tablespoon of water at a time until it is moistened and knead the dough into a ball.
- Preheat oven to 375°.
- On a lightly floured surface, roll dough into a 19×13-inch rectangle.
- Wrap it around the rolling pin and unroll it into the prepared baking pan.
- Ease dough into the pan and up the sides, being careful not to stretch it.
- Trim dough to ½ inch beyond edge of pan.
- Fold dough edge over and flute as desired.
APPLES
⅔ cup sugar
⅓ cup all-purpose flour
2 teaspoons QUALITY ground cinnamon
1/2 cup golden raisin, optional
3½ pounds granny smith apples, peeled, cored, and cut into ¼-inch-thick slices (about 10 cups)
- In an extra large bowl combine the sugar, ⅓ cup flour, cinnamon, raisins and apples.
- Toss until coated.
- Spoon the mixture on the dough and spread evenly.
CRUMB TOPPING
1 cup quick-cooking rolled oats
1 cup packed brown sugar
½ cup all-purpose flour
½ cup butter, cold
- In a large bowl, stir together quick-cooking rolled oats, packed brown sugar, and all-purpose flour.
- Using a pastry blender, cut in butter until topping mixture resembles coarse crumbs.
- Sprinkle EVENLY on top of apples.
- Bake for 40-45 minutes or until apples are tender.
- Cool slightly.
NOTES:
- IF you are in a hurry, melting the butter and using a fork to mix it all together works well too.
- IF TOP IS BROWNING TOO QUICKLY, COVER LIGHTLY WITH A PIECE OF FOIL.
CARAMEL
1 cup PACKED brown sugar
4 tablespoons butter
½ cup half-and-half
1 tablespoon PURE Vanilla
Pinch of salt
- Mix all ingredients together until smooth in a medium saucepan over medium-low to medium heat.
- Cook while whisking gently for 5 to 7 minutes, until thicker.
- Turn off heat.
- Serve warm or refrigerate until cold.
- Drizzle on top of apple slab pie.
NOTE: If you don’t use all your streusel topping, it stores perfect in the freezer.


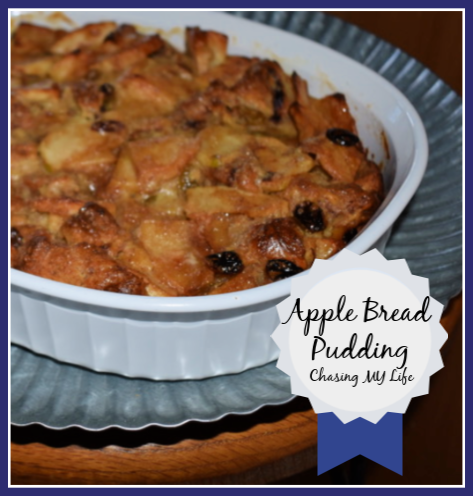 APPLE BREAD PUDDING serves 8-10
 PEANUT BUTTER CHOCOLATE MOUSSE CUPS