Easter is late again this year! Do you ever wonder how the date is decided? Well, let me tell you what I found with a little research.

Unlike Christmas, the date of Easter Sunday changes every year and can fall anytime between March 22nd and April 25th. Why is this you ask?
Because Easter Sunday is decided by complex calculations based on the moon. Early on in Christianity different churches used different methods. This led to disagreements that still exist today in some cultures.

Easter celebrates the death and resurrection of Jesus which according to the Bible happened around the same time as Jewish Passover. Passover typically begins the night of the first FULL moon AFTER the spring equinox (usually March 20th or 21st) EXCEPT in months when it is the SECOND full moon. This most recently occurred in 2016. The FULL moon can vary in each time zone so the Church calculates Easter from the 14th day of the ecclesiastic lunar month which is known as the paschal full moon. Easter is the Sunday that follows the paschal full moon that falls on or after the equinox so can be from 1-7 days later. This year Passover and Easter fall on the same weekend with Passover coinciding with Good Friday.
In 1818 the full moon fell on the equinox, Saturday March 21, so Easter was the next day, March 22. Easter will not be this early again until the year 2285. The earliest recent Easter was March 23 in 2008. In 1943 a full moon fell on March 20, just before the equinox, so the paschal full moon was the next one on April 18 which was a Sunday so Easter was seven days later on April 25. It will not be this late again until 2038. The latest recent Easter was April 23 in the year 2000.
This year Good Friday was April 15th and today is Easter Sunday. You can find a table for upcoming Easter Sundays here.

Here is a fun Easter egg recipe.
Using ordinary materials (vinegar, food coloring and whipping cream) you probably already have on hand to decorate gorgeous Easter eggs is so easy and fun too! You will want to wear gloves so as not to dye your fingers.

TIE-DYE EASTER EGGS
INGREDIENTS
Bowl of Vinegar
Whipped cream
Food coloring
Hard-boiled eggs
- Boils eggs and cool to room temperature.
- In a bowl large enough to hold all the eggs (or work in batches) place the eggs in the bowl and cover with vinegar for 20 minutes. The vinegar allows the dye to adhere to the egg shell better.
- Dry the eggs and set aside.
- In a large baking dish fill it with a thick layer (about 1 inch deep) of the whipping cream.
- Generously dot the cream with various colors of food dye coating most of the surface fairly close together.
- Drag a skewer or chopstick through the cream to create a tie-dye design, kind of like you’re making a marbled cake.
- Place a layer of paper towels on a cookie sheet and set aside.
- Put on gloves to protect your hands from the dye.
- Gently place an egg on the surface of the whipped cream.
- Slowly roll the egg over the surface to coat the shell.
- Place the egg on the cookie sheet and repeat with remaining eggs. DO NOT WIPE ANYTHING OFF!
- Let dry 20 minutes.
- Fill a large bowl with water. The water will remove the excess cream leaving the design on the egg.
- Gently submerge the egg and then GENTLY dry with paper toweling. DO NOT RUB HARD as you might rub off the design.
- Store eggs in refrigerator.
NOTE: This can be done substituting shaving cream for whipped cream, but then they are for decoration only and NOT edible!!
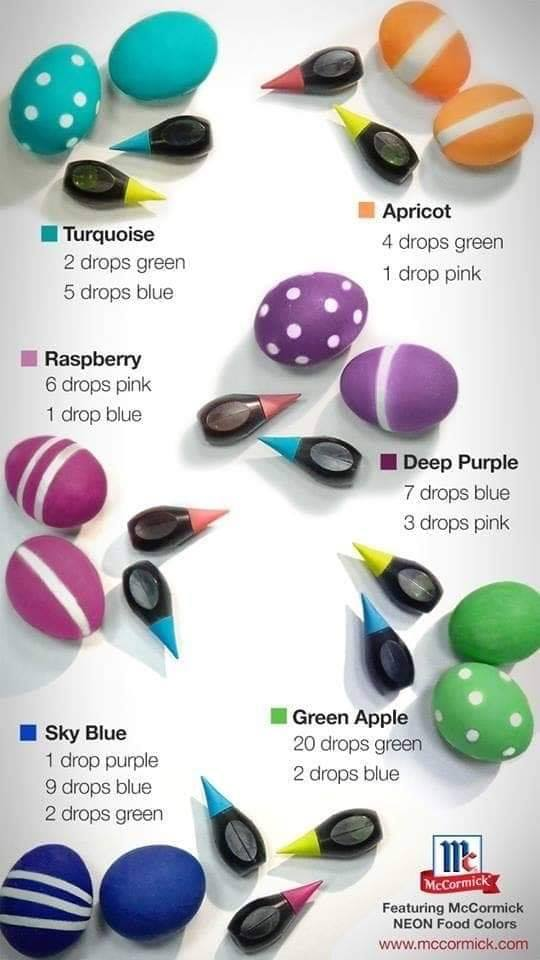
And just for your information here is a great little color chart for other methods.